Comments URL: https://news.ycombinator.com/item?id=27645801
Points: 1
# Comments: 0
When it comes to building a conversion rate and search engine optimized website, speed is crucial.
If you don’t have a fast website, people will bounce faster than you can say “conversions.”
However, speeding up your website is no easy task.
Your problem could be anything from code that’s written poorly to images or large page elements.
You need to fix those issues fast, because Google will ding your website if you don’t.
The faster your site loads, the lower the bounce rate. If your site is fast, you have a better chance of ranking on Google over slow sites that drive high bounce rates.
Thankfully, Google offers the PageSpeed Insights tool to find out what you need to fix.
Unfortunately, they don’t give you the best instructions on getting your score to 100%.
Here’s how to score a perfect 100% on Google’s PageSpeed Insights and why you need to accomplish this feat.
Page speed is a critical factor in ranking your website higher on Google’s search engine results.
If your website isn’t on par with the top 10 organic pages, you won’t rank on the first page.
So focusing on page speed is paramount to having a successful company and a website that converts.
Backlinko recently conducted a study where they analyzed over eleven million search engine results pages (SERPs) on Google.
They wanted to figure out which factors were the most common among sites ranked in the top 10 results.
Surprisingly, they found page speed and ranking don’t seem to be correlated. However, the average load time of a site on the first page is 1.65 seconds, which is decently fast.

However, Google says page speed does matter. There was even an entire update about it.
That connection is backed up and supported by Google’s new PageSpeed industry benchmarks.
They found that as page load times go up, the chance of someone bouncing from your site increases dramatically:
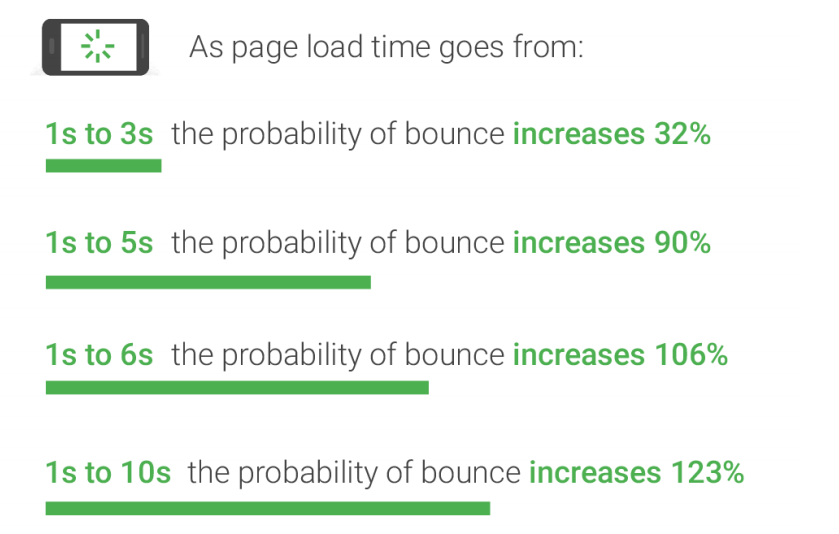
That means that if your page takes 10 seconds to load, the likelihood of someone leaving your site before it even loads increases by more than 120 percent!
But according to a recent study of more than 5 million sites, the average website takes 10.3 seconds to load fully on desktop and 27.3 seconds to load on mobile.
This means almost all of us are missing the mark when it comes to having a fast-performing website.
In another study, BigCommerce found that conversion rates for e-commerce websites average somewhere in the one to two percent range.
Portent found page speed can increase conversion rates drastically.
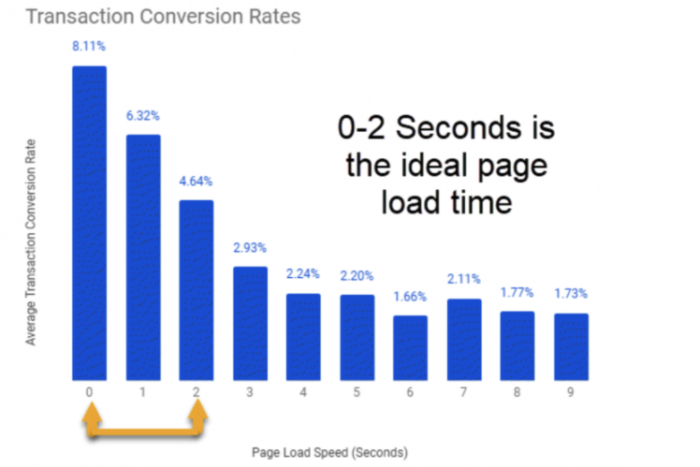
Getting your speed to under two seconds can increase traffic and revenue.
So, what causes a page to load slowly?
The most common causes of slow pages are bulky images and poorly-designed coding.
If you look at any website in the modern era, it’s likely filled to the tipping point with images.
If you aren’t optimizing your images, you could have pages that take up multiple megabytes of space.
Page size and weight are often measured by page weight bytes. Simply put, page weight bytes show the total size of a web page measured in bytes.
Google’s benchmark data shows that the best practice for page size or weight is under 500KB:
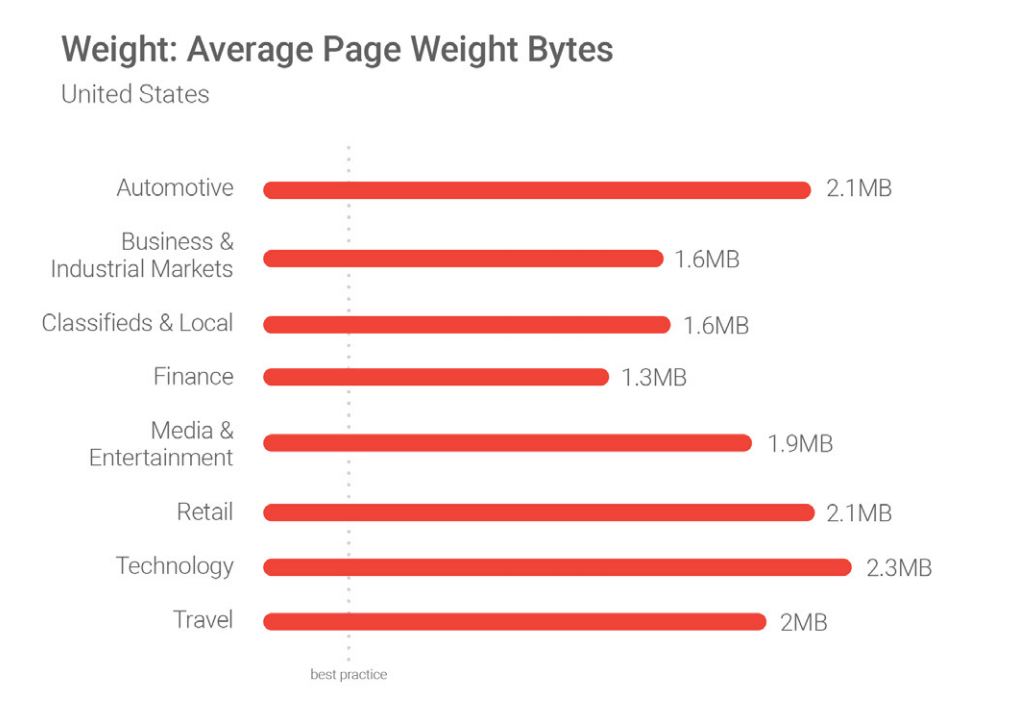
But again, most of us are missing the mark here. We are vastly exceeding the recommended weight.
One of the concepts that stood out to me the most from the Google report comes from this short yet impactful quote:
“No matter what, faster is better and less is more.”
No matter how well your site is doing, there’s a good chance you have serious room for improvement.
Most sites run slowly due to large images that take up too much space.
But that’s not always the case for every website.
You need to know exactly what’s causing your slow site speeds before you can make the necessary changes to score 100% on the PageSpeed Insights tool.
To get started, open up the PageSpeed Insights tool and enter your website URL into the bar:
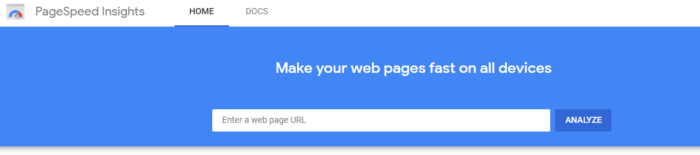
Click “Analyze” to have Google run a quick test on your site.
The finished report will tell you everything you need to know about your site and what might be hindering its performance.
Here’s what my report looks like:
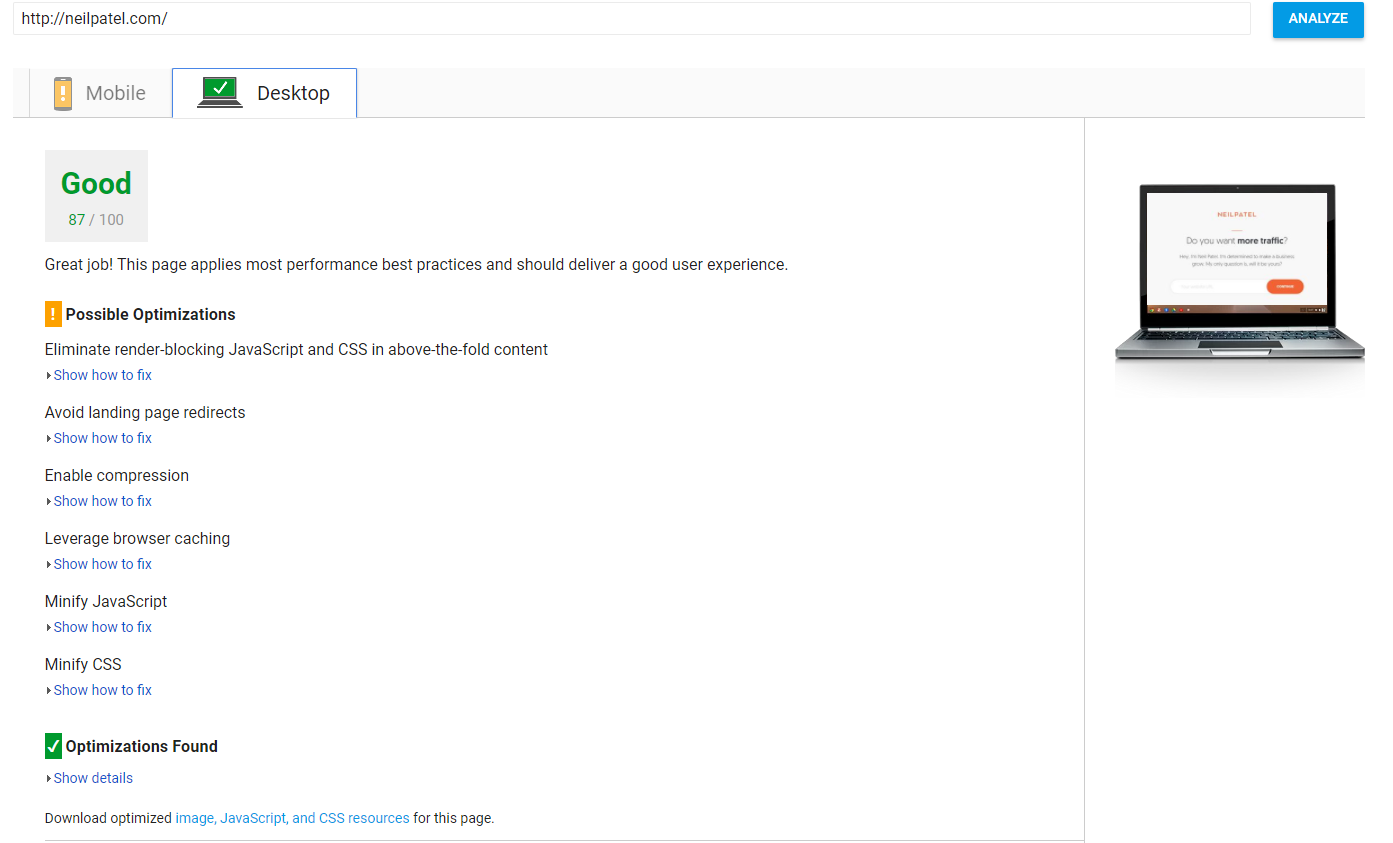
It’s an 87/100.
It’s not great. It’s not terrible either, though.
There’s almost always have room for improvement. My goal here is to get you to 100% by the end of this article as we take this journey in page speed together.
First, let’s look at the items that I have optimized and perfected:
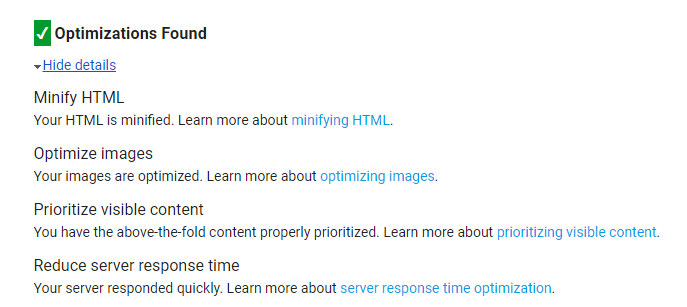
Now, notice how there are only a few items on this list compared to my “Possible Optimizations” list:
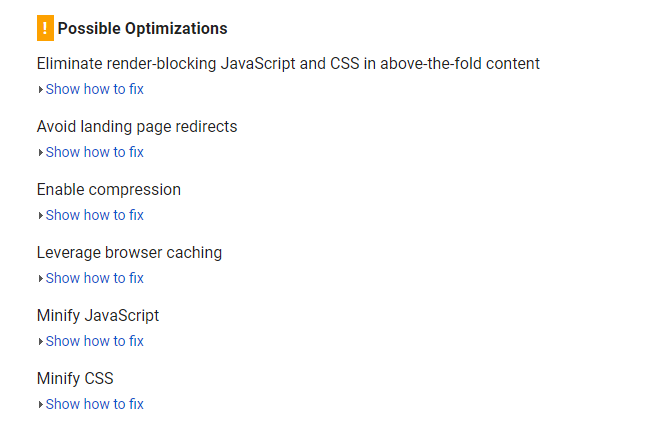
This information tells me that the items on “Possible Optimizations” are a little less impactful than those I have already optimized.
Obviously, you’ll need to take care of every element to hit 100% on the Page Speed Insights tool.
You’ll want to start with the top priority items (more on this later).
Next, we want to test our mobile site separately.
You can use the mobile site tester on the PageSpeed Insights tool, but Google released an updated, more accurate version of this.
Head over to Test My Site to try it. Input your website URL and hit enter:
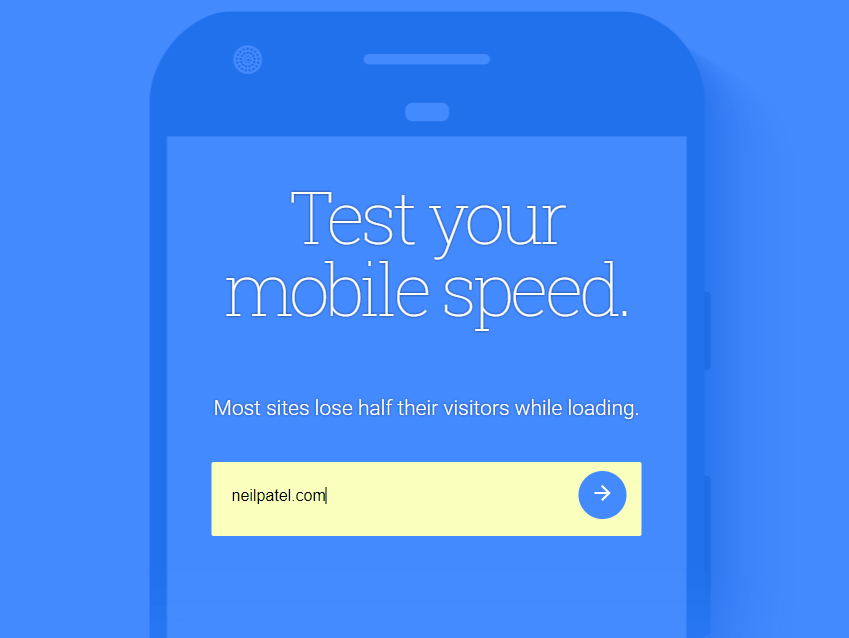
Google will take a few minutes to run this report, but it will give you a detailed look at how your mobile site performs compared to industry standards.
It will even tell you how many visitors you could be losing because of a lower page speed.
Here’s what my data looks like:
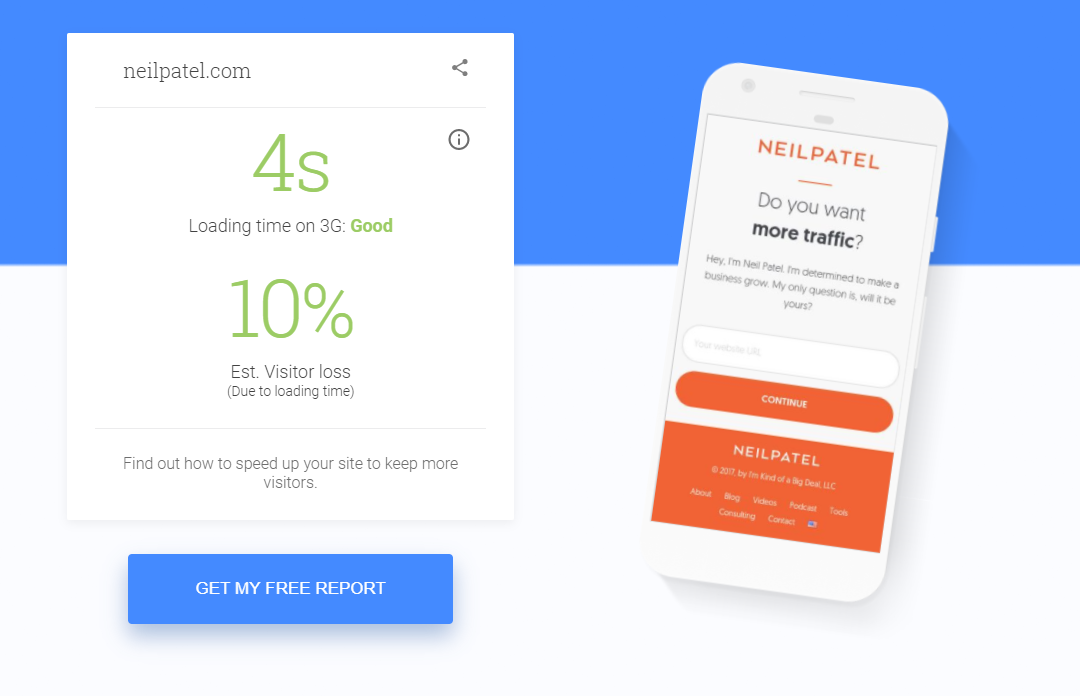
My load time on mobile is four seconds.
Remember: The recommended load time is three seconds or less.
That means that my speed isn’t up to par with industry standards.
Due to that, I am losing up to 10 percent of my visitors simply from poor speed performance!
Here’s what my mobile test looks like when I compare it to the industry standards:
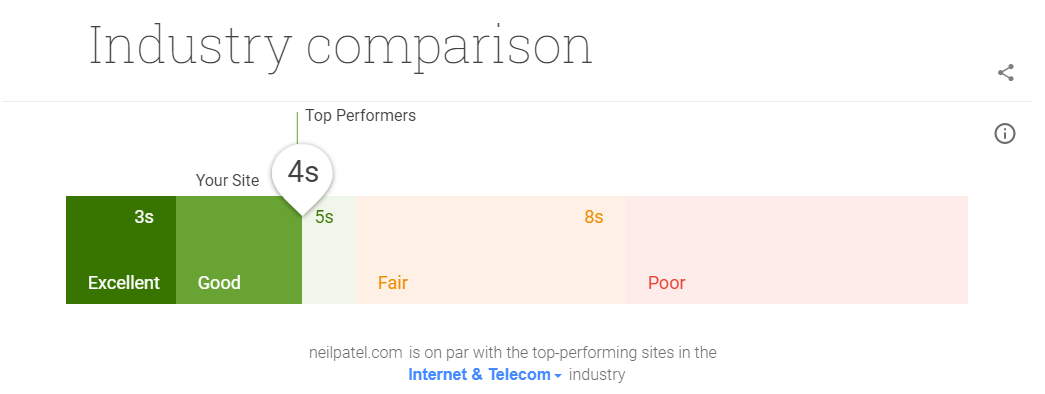
While still in the top-performing section, I am not where I should be if I want to maximize the effectiveness of my website or drive more traffic and conversions.
Scroll down even further and Google will give you an estimate on what your top fixes could do for your website:
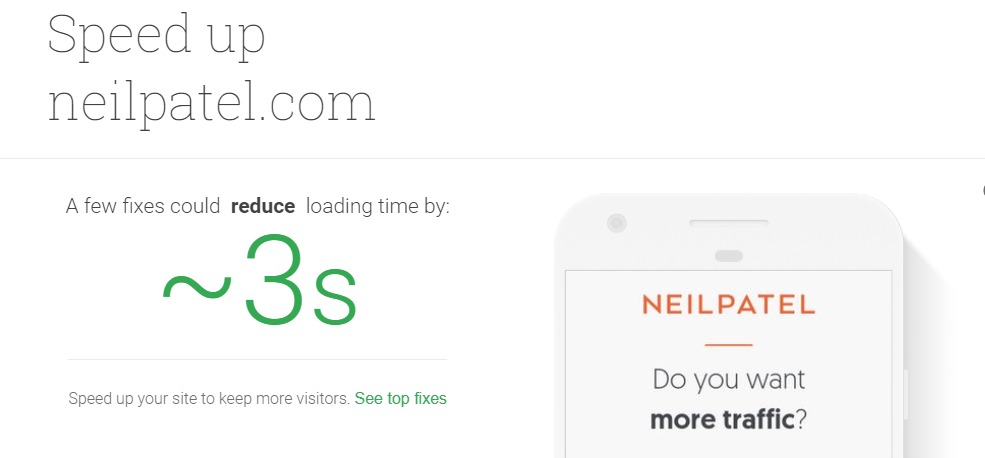
Google says that with a few fixes I could reduce my load times by around three seconds.
That means that I could potentially get my website to load at the one-second mark!
That’s amazing. Trust me, to save 10 percent of your visitors or more, it’s something that you need to do.
Run your website through this mobile site test to get data on what fixes you need for your website.
In this next section, I’ll walk you through fixing the top page speed problems to help you score a 100% on the PageSpeed Insights tool.
Getting a perfect 100% on Google’s PageSpeed Insights tool is no easy task.
It’s not going to happen overnight, either. You’ll have to do some legwork and spend some hours at the grindstone.
But if you want to save traffic, drive more conversions, and bring in more revenue, you need to do it.
It may be tedious and tiresome, but you need those conversions. You can’t be lazy and risk leaving traffic and profit on the table.
Here are the top four ways you can speed up your site and score a perfect 100% with Google.
The biggest cause of slow pages and low scores is large images.
When I fixed this on my own site, I found a huge impact on speed.
One of the top optimization techniques for fixing image size is compression.
You can save an average of 50 percent or more on image size by using simple compression tools.
If you use WordPress, one of the best ways to do this without spending much time is to use a plugin, like WP Smush Image.
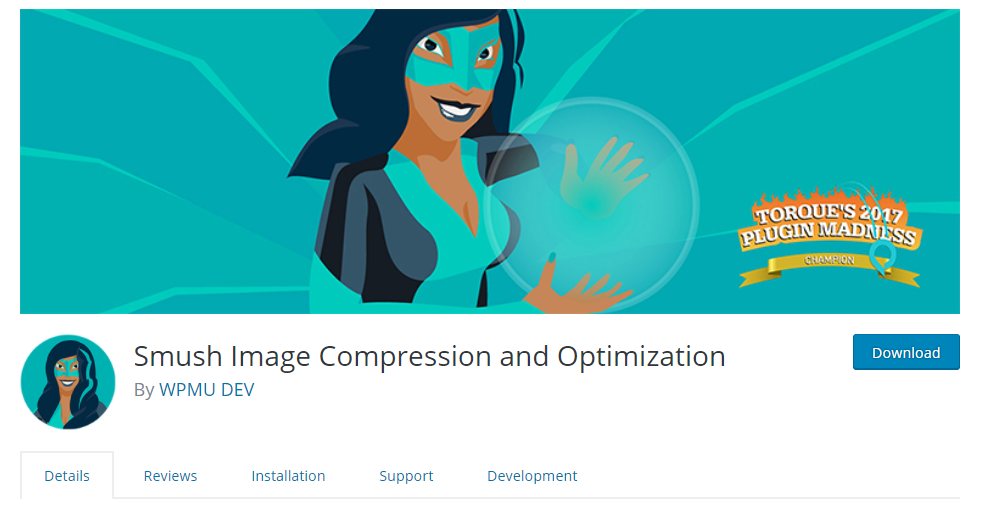
WP Smush has tons of awesome features for free.
You can smush images automatically by adding the plugin. It will scan your media library on WordPress and detect images that it can compress:
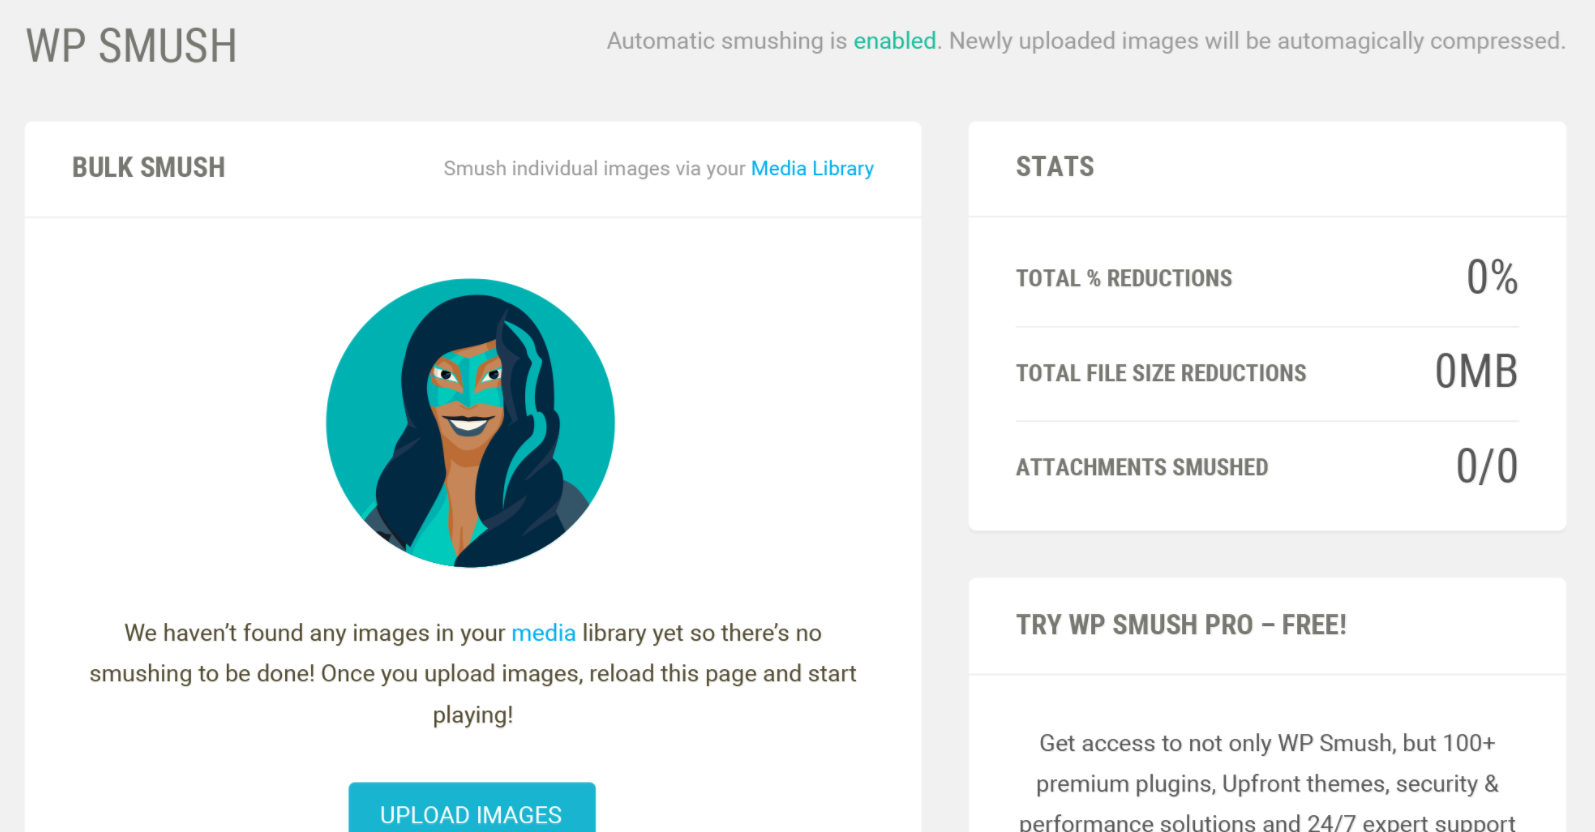
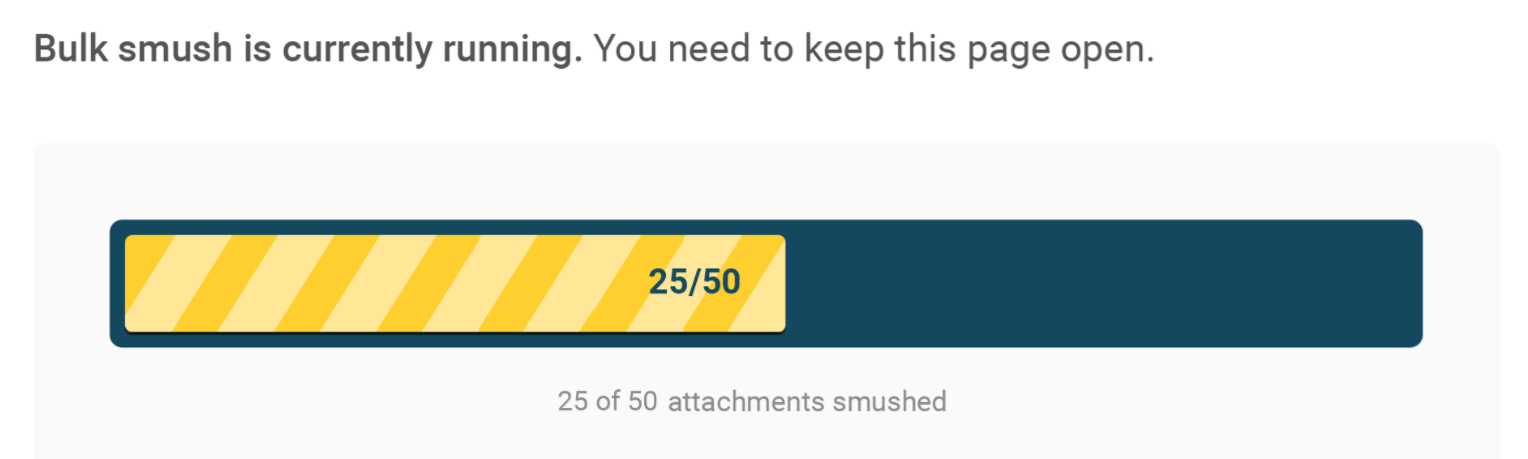
If you want to smush tons of new images for your site in bulk, you can upload them directly into the plugin.
You can smush up to 50 images at a single time, making it one of the fastest tools on the market:
If you head to the settings for this plugin, you can turn on the setting to automatically smush images on upload.

If you enable this setting, you’ll never have to worry about compression again. And if you compress all of the existing images on your site, then you don’t have to worry about it every time you upload.
WP Smush is an excellent, free tool for the everyday WordPress user.
But, if you don’t use WordPress, what do you do?
If you run a Shopify-based store and site, you can use Crush.pics:
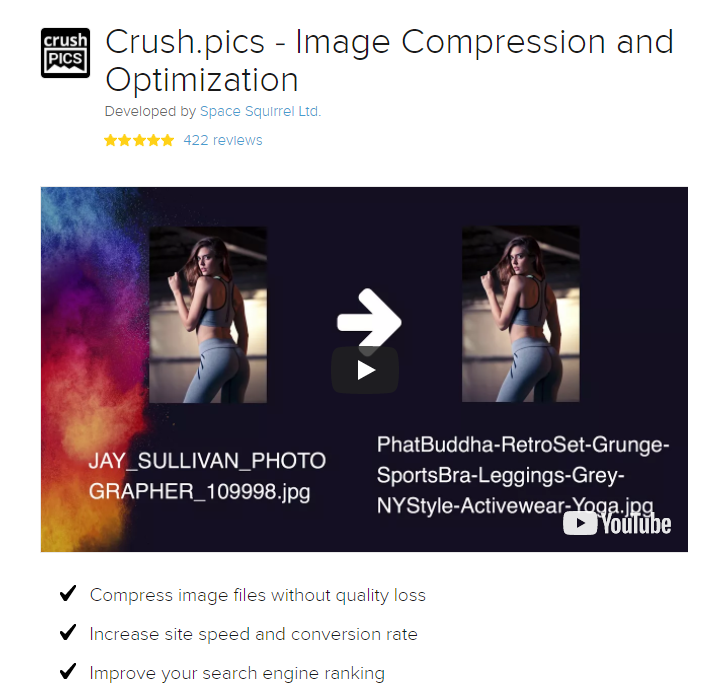
Crush.pics says that you can expect a big jump in PageSpeed Insights scores using their tool:
PageSpeed score before compression: 75/100. PageSpeed score after compression: 87/100
If you aren’t familiar with plugins or don’t like to use them for your site, you can use free tools online like Compress JPEG or Optimizilla.
Both are fast, free tools that allow you to compress up to 20 images in a single upload.
Check out this example image that I compressed to give you an idea of how impactful these programs can be:
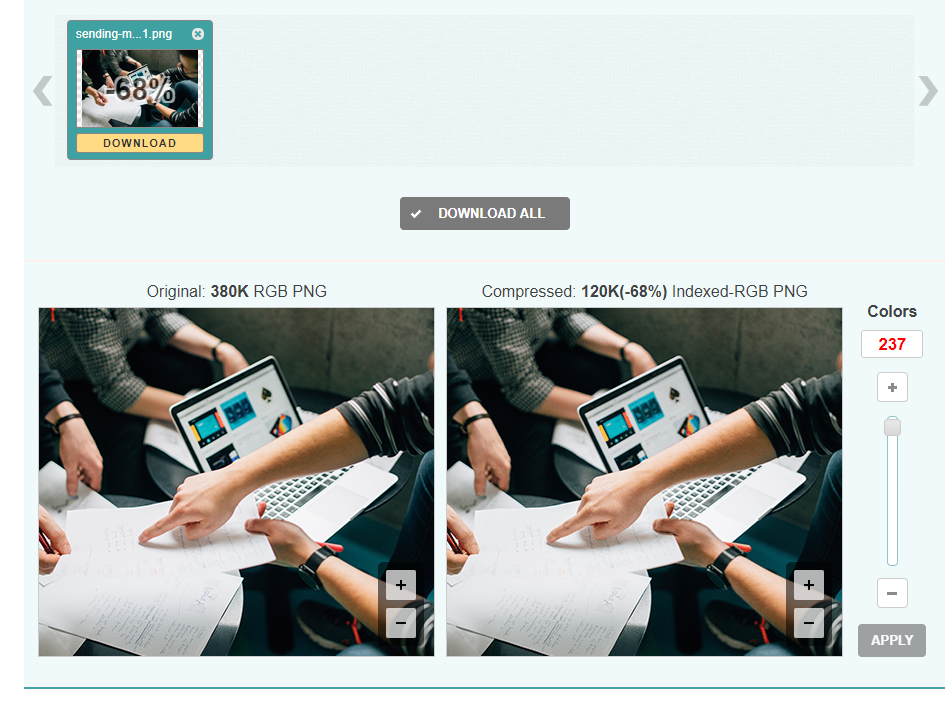
I reduced the file size by 68 percent in just two seconds using Optimizilla. It reduced the size from 380KB to 120KB with almost no quality difference!
You can use all of these tools for free and you should definitely implement them if you can’t use a plugin.
Browser caching works by “remembering” the previously-loaded resources so that it doesn’t have to reload them upon every single visit.
When a website visitor travels to a new page on your site, all of your data, like logos and footers, won’t need to load again.
That will result in a big increase in speed when people land on your site.
How do you implement it? Thankfully, there’s a plugin for it. You don’t need to be a coding expert to do it.
Try using W3 Total Cache for WordPress sites. It’s got over one million active installs and is the most popular caching plugin on the market:
W3 Total Cache claims that it can give you at least a 10x improvement in overall site performance.
On top of that, they claim (and back up) that this plugin will help you achieve higher results on Google’s PageSpeed tools.
The tool also helps you minify HTML (which we will dive into next), JavaScript, and CSS, giving you up to 80 percent bandwidth savings.
Try using W3 Total Cache today to give your website a fast, easy boost in speed even if you don’t have coding experience.
Minimizing the space your HTML coding takes up is another big factor in getting a perfect score from Google.
Minification is the process of removing or fixing unnecessary or duplicated data without impacting how a browser will process the HTML.
It involves fixing code, formatting, removing unused code, and shortening code when possible.
Once again, thanks to the awesome plugin options of WordPress, you don’t need to be a coding genius to fix this.
One of the best tools to do this is HTML Minify.
You can download this plugin for free directly from their site and install it to your WordPress account in seconds.
You can also install it directly from this plugin page.
Once you install the plugin, you only need to take a few steps before you see an instant impact on your site.
Head to the settings tab on your Minify HTML plugin and enable all of the following settings:
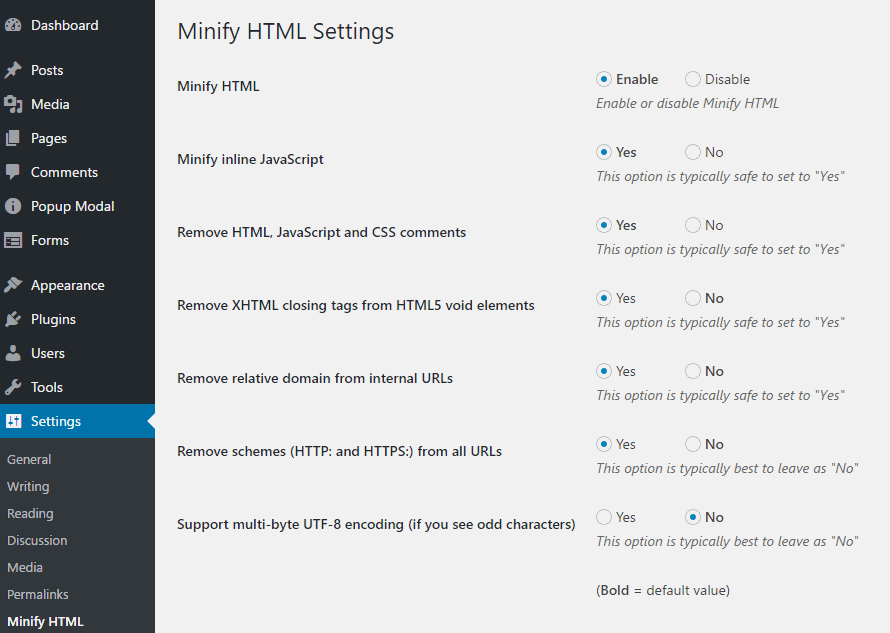
You can effectively kill multiple birds with one stone.
Google’s PageSpeed Insights recommends that you minify HTML, JavaScript, and CSS.
Enable the “Minify HTML” + “Inline JavaScript” settings.
Next, be sure to select yes for “Remove HTML, JavaScript and CSS comments.”
The great thing about this plugin is that it will tell you what the recommended action is under each setting.
Follow these actions if you are unfamiliar with how these settings work.
Minify your coding today and you should see an instant impact on your insights report.
AMP is short for Accelerated Mobile Pages.
It’s a project implemented by Google to help mobile pages load faster.
It works by making an open-source format that strips away tons of unnecessary content, making your mobile pages load nearly instantly.
It gives users a more streamlined experience on mobile without any clunky features that don’t work well on mobile devices.
If you browse the Internet on your mobile phone, you probably have clicked on an AMP-based article.
Here’s what they look like:
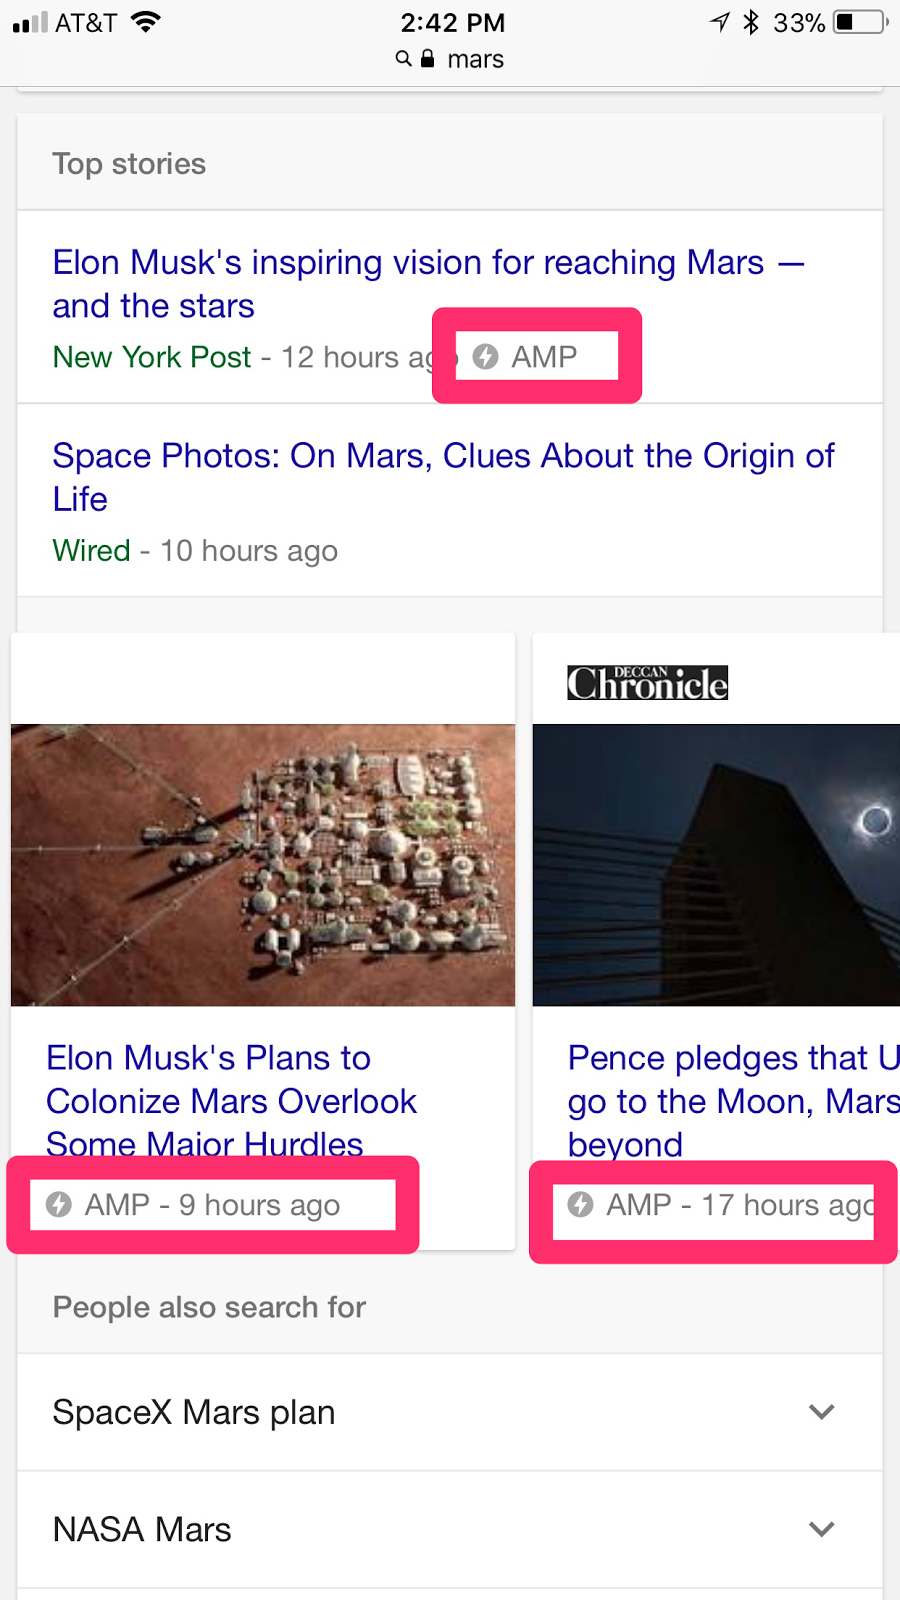
They are often relegated to the “Top Stories” section of Google search results and they load up instantly.
They don’t have much formatting, which helps them load quickly and deliver the content that the mobile user wants to see.
When a searcher on Google clicks one of these AMP articles, they see the content like this:
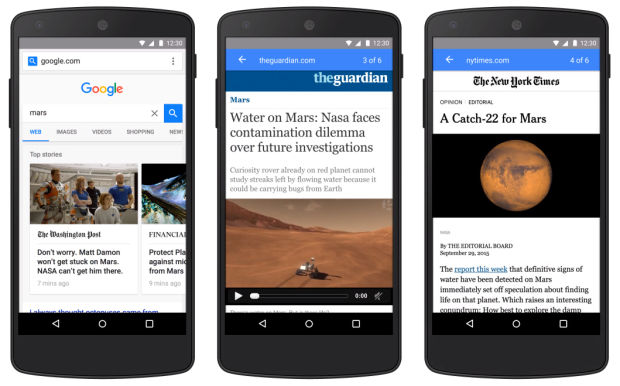
It’s a simplified version of the real website that allows a user to scroll between different stories without leaving the web page and clicking on the next.
This feature streamlines the user experience on mobile.
Gone are the days where you had to wait 10 seconds for a site to load, then click back to the search results page, and wait another 10 seconds for the next site to load.
Here you can access the content of multiple articles without clicking the back button once.
It’s extremely effective at speeding up your site and reducing the likelihood that someone will leave.
Tons of companies are taking advantage of AMP.
The company WIRED started implementing AMP to do a better job of reaching their customers.
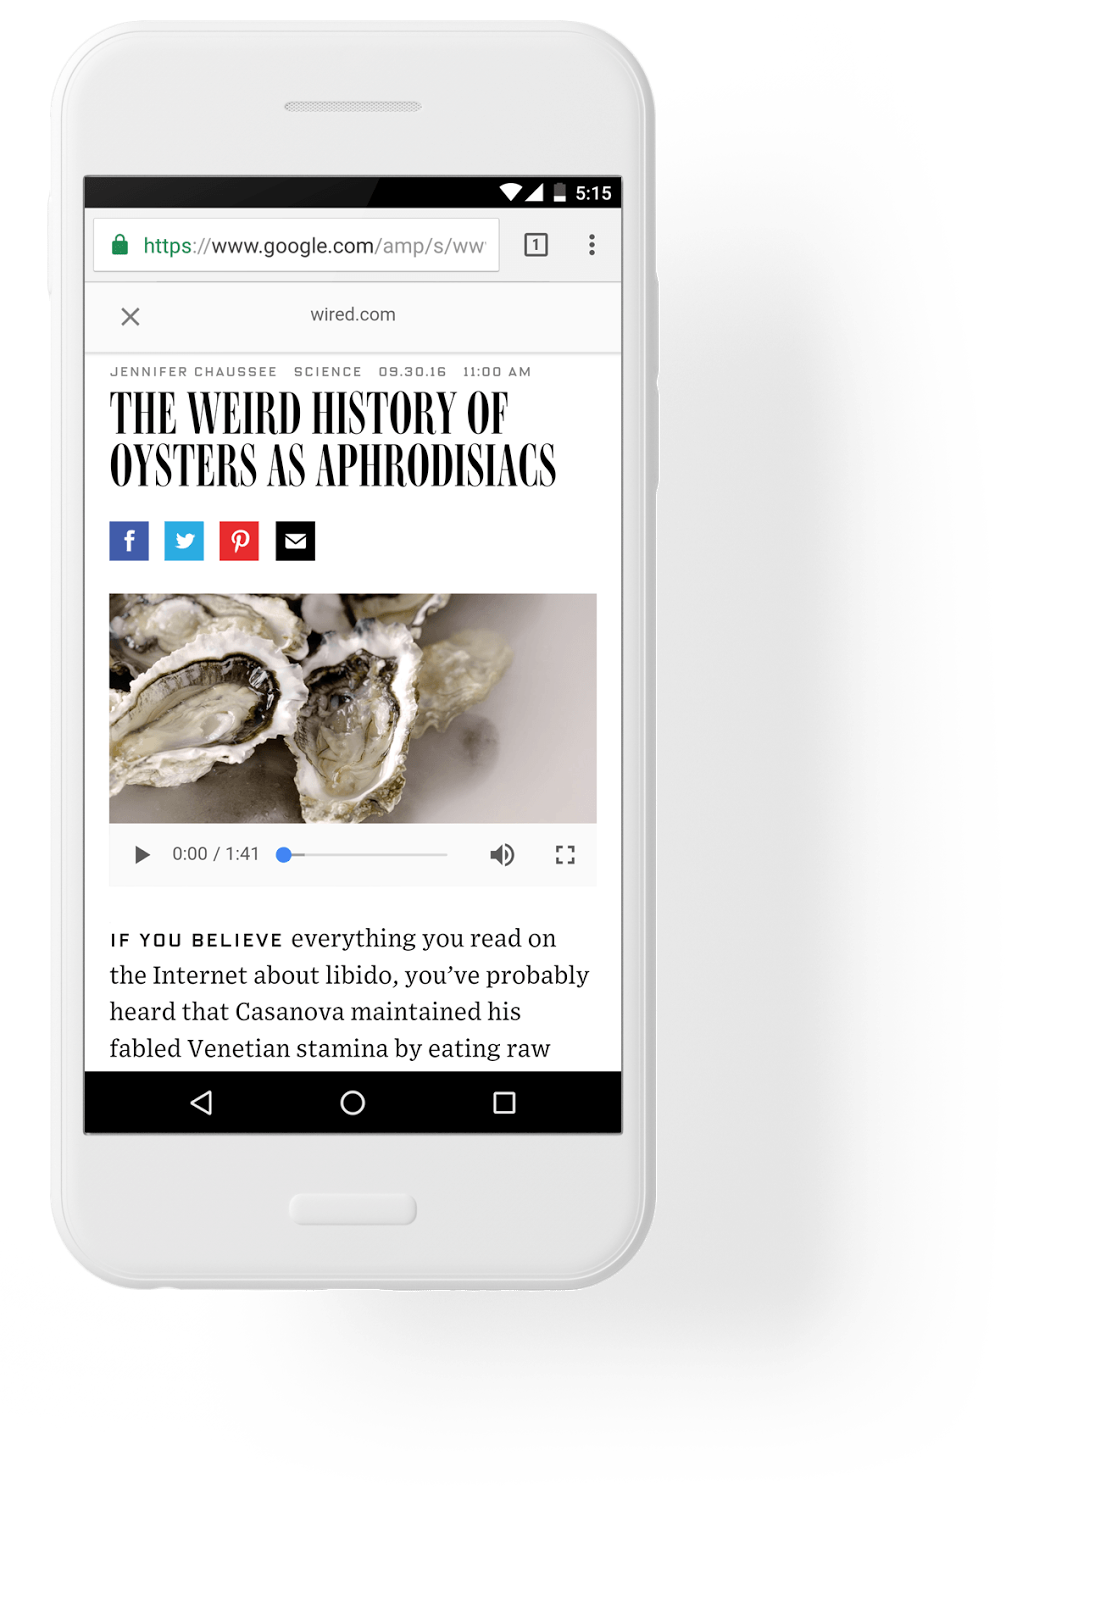
They were finding that their mobile user experience was too slow. Conversions were simply not happening because of the speed issues and visitor retention problems.
Deciding to invest time into AMP made a huge impact for WIRED.
They increased their click-through rate from organic search results by 25 percent.
They found a 63 percent increase in CTRs on ads in AMP stories, too.
They also were able to add AMP stories to over 100k articles on their site.
Gizmodo also hopped on the AMP train and saw huge improvements on their mobile site.
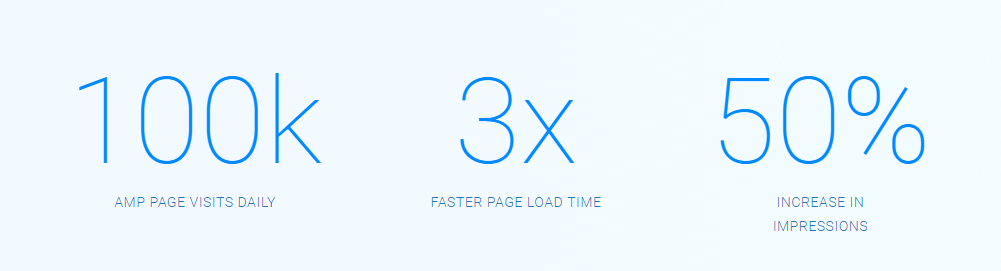
They were getting over 100k AMP page visits every single day with load times that were 3x faster than standard mobile pages.
Conversions increased by 50 percent, too.
It’s safe to say that AMP can significantly increase conversions and mobile speed, giving you a massive opportunity to score higher on Google’s PageSpeed Insights.
If you want to start using AMP on your own site, there are a few ways to do it.
If you’re familiar with HTML, you can follow AMP’s detailed tutorial here.
For those who are less technologically savvy or have no experience in HTML, try using a WordPress plugin.
One of the most popular plugins is AMP for WP.
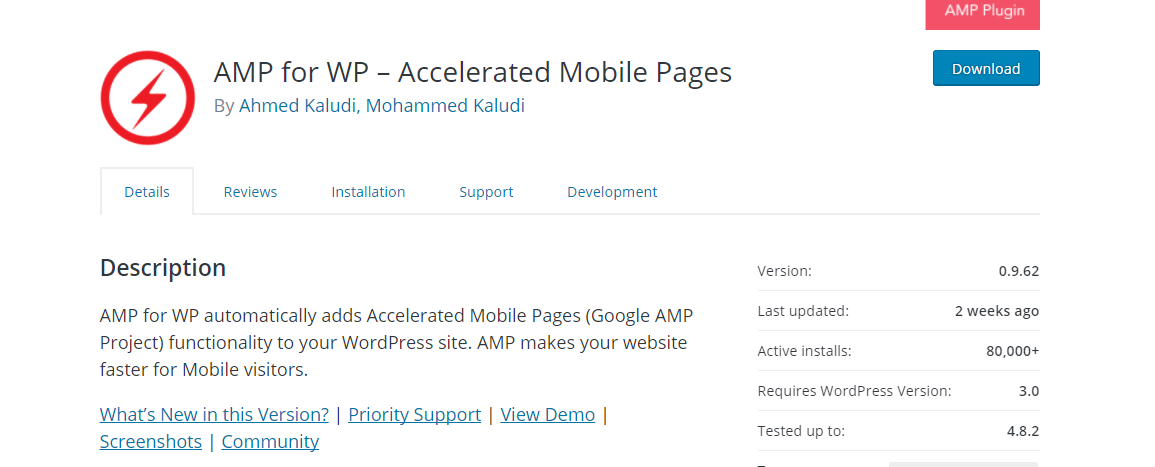
It has over 80,000 active installs and has constant support and updates.
The plugin includes an AMP page builder that you can easily drag and drop page elements on:
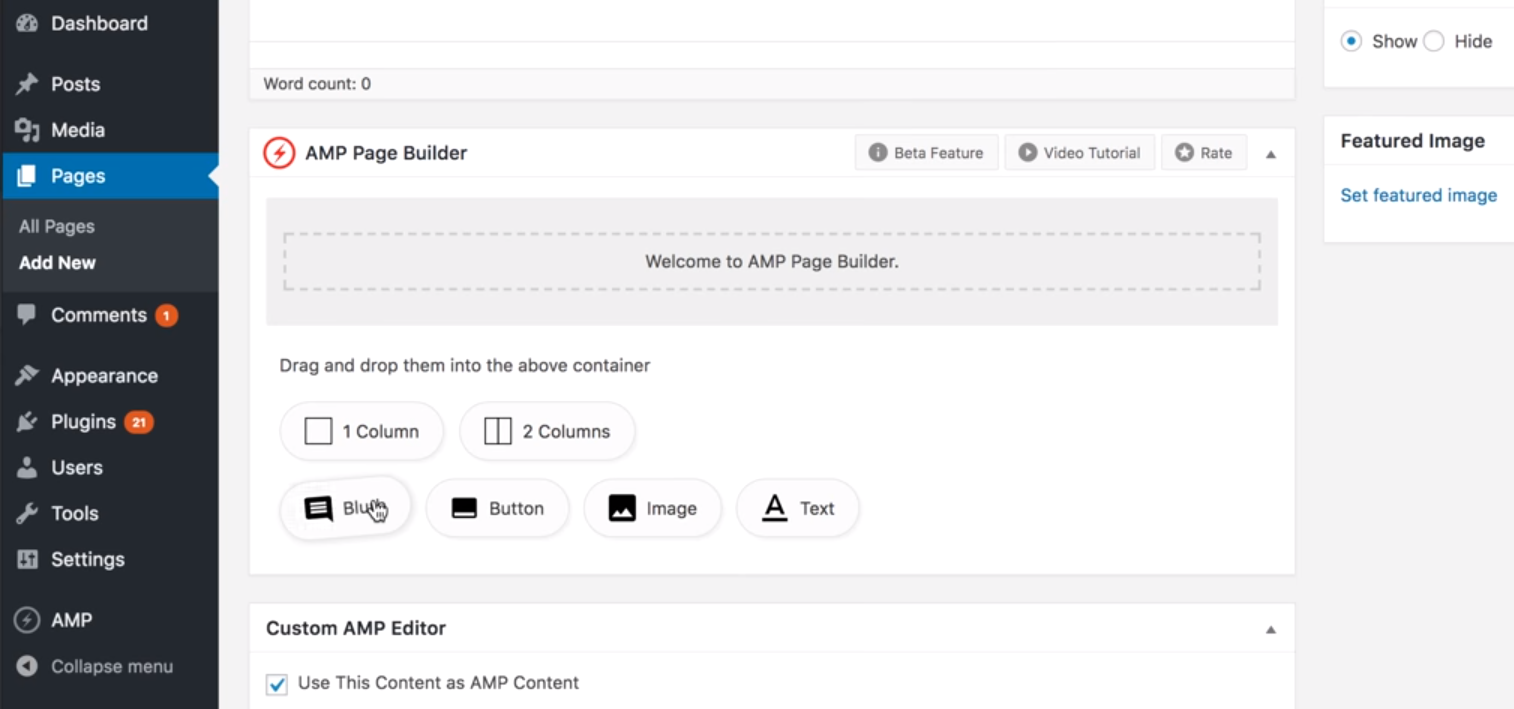
It’s one of the easiest ways to create AMP-friendly content.
All you have to do is download and install the plugin on your WordPress dashboard and activate it.
From there, you can use the page builder on each new post that you upload.
These pages will then create an AMP-friendly version that will show up in mobile search results.
AMP is a proven way to speed up your mobile site and reduce your speed to under one second–and tons of companies are finding success with it.
Google uses page speed as a ranking factor because it affects user experience. It may affect your ability to rank higher in SERPs.
Studies have shown that sites that load faster have a lower bounce rate. This means the user is likely having a better experience.
On average, technology and travel sites load the slowest, where local and classified sites load the fastest.
The best practice for page speed load time is three seconds.
{
“@context”: “https://schema.org”,
“@type”: “FAQPage”,
“mainEntity”: [
{
“@type”: “Question”,
“name”: “Why is page speed important?”,
“acceptedAnswer”: {
“@type”: “Answer”,
“text”: “Google uses page speed as a ranking factor because it affects user experience. It may affect your ability to rank higher in SERPs.”
}
}
, {
“@type”: “Question”,
“name”: “How does bounce rate correlate to page speed?”,
“acceptedAnswer”: {
“@type”: “Answer”,
“text”: “Studies have shown that sites that load faster have a lower bounce rate. This means the user is likely having a better experience.”
}
}
, {
“@type”: “Question”,
“name”: “What industries have the slowest sites?”,
“acceptedAnswer”: {
“@type”: “Answer”,
“text”: “On average, technology and travel sites load the slowest, where local and classified sites load the fastest.”
}
}
, {
“@type”: “Question”,
“name”: “How fast should a site load?”,
“acceptedAnswer”: {
“@type”: “Answer”,
“text”: “The best practice for page speed load time is three seconds.”
}
}
]
}
When you’ve spent countless days, weeks, and months building a new website, you want every image, element, and icon to be top-notch.
However, that often results in a site that is slower than Google recommends.
When it comes to driving conversions on your site, speed will always play a big role.
People don’t want to wait 10 seconds for your site to load when they can click back to Google and select the next result.
Scoring well on the PageSpeed Insights test should be one of your main priorities when trying to perfect and optimize your site.
To get started, you first need to diagnose what issues are plaguing your site.
Is it images, page elements, too much text, bad coding, or all of the above?
Use the Google PageSpeed Insights tool to see where the problem lies, then work through their suggestions. You’ll also want to minify code, compress images, add browser caching, and implement AMP.
These are proven steps that can have a big impact on your PageSpeed Insight score.
Scoring a perfect 100 percent on Google’s PageSpeed Insights can give your website the boost that it needs to succeed.
What are the best ways you have found to increase your site speed?
Learning Equality | Full Stack Engineer | REMOTE (USA) or San Diego | Full-time
We’re a cross-disciplinary team that believes in the transformative power of access to education. We’re a nonprofit, we create open-source software, and our beneficiaries are in underserved communities such as rural schools, community centers, and refugee camps all over the world. We enable completely offline access (via local network, mobile app, and peer-to-peer/sneakernet distribution) to a wealth of free learning resources (things like Khan Academy) and tools to support students and educators.
We are seeking a Full Stack Engineer who identifies strongly with Learning Equality’s mission to bring quality education to under-resourced communities around the world. We use Python/Django on the backend, and Vue.js on the frontend. Apply at: https://grnh.se/5b407e571us
Location: Atlanta GA, USA (but no roots if you know what I mean)
Remote: All but required.
Willing to relocate: Maybe.
Technologies: Modern C++, SQL, HTML/CSS/JavaScript, some C#, currently learning Node.js/TypeScript
Résumé/CV: https://www.dropbox.com/s/owrrfl2n5yzsjnj/resume%20june%2014…
Email: “iris” aat “enesda.com”
I’ve spent the last few years developing a declarative GUI programming language and implementation called “IVD” (https://github.com/IrisChase/IVD), it’s not done yet because life happens. “should be done soon it only needs the last 5%” is the current status.
My experience is all solo projects but I’m ready to get into the industry. At the moment I’m most interested in getting into backend work with Node and TypeScript, but also have an interest in React. I have done full-stack but nothing recent worth putting out in public.
I’m working on a project using TypeScript/Node/Express/SQLite3 which you should totally bring up if you’re interested in contacting me.
🙂

If you’ve got a franchise, then you probably need franchise financing.
Franchises are businesses that trade their name and operating methods to people in exchange for a royalty fee. They offer both the flexibility and independence of being a small business owner, plus the support and infrastructure of a large corporation. They can be the ideal opportunity for anyone interested in becoming an entrepreneur. But they do require a significant capital investment.
You may be tempted to pour your own money into your franchised location. Or you may want to use your own credit cards or take out a second mortgage on your house. You shouldn’t have to do any of these to finance a franchise.
If you need funding to purchase a franchise, your first conversation should be with your prospective franchisor. Many corporations with franchise business models offer tailored financing solutions exclusively designed for their franchisees. These can be either through partnerships with specific lenders or by providing capital directly from the corporation. This is one of the most common ways to finance a franchise and offers many benefits. For example, Gold’s Gym, UPS Store and Meineke all offer financing options to their franchise owners.
One benefit of using franchisor financing is that it can be a one-stop shop for everything you need. Many of these programs don’t just offer financing for the franchise fees. They can also offer financing to purchase equipment and other resources you need to start up the business. If you’re working with a franchisor who offers their own financing program, chances are you won’t need to look much further for funding.
Each franchisor financing agreement will differ. But some offer to take on as much as 75% of the debt burden from the new franchise owner. Agreements might involve deferred payments while the business is starting up. Or they may structure repayment on a sliding scale. Have your independent business attorney or accountant review the terms of your franchise agreement and the financing agreement. Have them help you understand the full terms before you sign. See entrepreneur.com/article/312476.
These are another option for franchise financing. Many business owners consider approaching their bank for funding. But a traditional term loan doesn’t have to come from a bank. Such loans can come from a credit union or an alternative lender. With these loans, the lender offers a lump sum of cash up front, which you then repay, plus interest, in monthly installments over a set period of time.
These kinds of loans are more likely to be available to business owners with good credit. Lenders will be looking at your financial history, as in how well you pay your bills. A better financial history means interest rates and terms will be better, and it can be the difference between being approved or not.
Demolish your funding problems with 27 killer ways to get cash for your business.
The Small Business Administration guarantees a portion of the loans made in its name. This gives lenders an incentive to offer more loans, and at better rates and terms. But keep in mind that qualification standards are strict. New business owners in particular are not likely to qualify.
Often, alternative lenders have less stringent requirements and shorter turnaround times than traditional financing options. They offer a variety of loan options like equipment financing, business lines of credit and term loans.
But this access and convenience may cost you. Alternative loan products tend to be more expensive, offer shorter repayment terms and lower loan amounts, than their more traditional counterparts.
But it may be worth it if you need to supplement your existing financing or you can’t qualify for a bank or SBA loan or need cash quickly to jump on a life-changing opportunity. So don’t dismiss alternative lending out of hand. Here are some alternative lenders to consider.
This lender works exclusively with franchise businesses to help them find the solution that’s right for their needs. Get financing for new units, refinancing, recapitalization, remodels, and acquisitions, etc. You can also access equipment financing loans. Apple Pie works with a variety of different lenders, hence the interest rates and terms you receive on your franchise loan will vary, but it will be largely based on the type of product and your qualifications.
Apple Pie Capital is specifically dedicated to franchise financing. Get 5-10 year payment terms. They have flexible collateral options. There are no prepayment penalty options. See applepiecapital.com/franchise-financing.
This lender works with businesses in a variety of industries, including franchise businesses. With CAN Capital, you can access short-term loans and medium-term loans. Terms for the short-term loans range from 3 to 24 months, and 2 to 4 years for the medium-term loans. CAN Capital charges interest as a factor rate.
To qualify for a franchise loan from CAN Capital, you’ll need at least $4,500 revenue per month, a minimum credit score of 600, and 12 months preferred (although they will consider 3+ months with consistent revenue) in business, for their short-term loan.
Qualifying for a medium-term loan is stricter. For a CAN Capital medium-term loan, you’ll need a 680 personal credit score, 7 years in business, and a preferred $350,000 in annual revenue. See cancapital.com/business-loans.
Demolish your funding problems with 27 killer ways to get cash for your business.
This is one of the easiest and quickest ways to get a short-term loan up to $250,000 or a line of credit up to $100,000. Though OnDeck isn’t specifically geared toward franchise owners, it’s a viable online loan option for any type of small business owner who doesn’t qualify for a bank loan or doesn’t want to wait months to receive loan funds. See ondeck.com.
This lender has numerous franchise partners across the US, including Papa John’s, Pinkberry, Quiznos, etc. Funding Circle offers various loan products through partnered lenders for franchises in different stages of growth. For Funding Circle’s standard term loans and lines of credit, you’ll need to be a franchisee with a business that’s at least two years old and have a credit score of at least 660.
But they also offer merchant cash advances, short-term working capital loans, and invoice financing. These choices have higher rates, but more lenient requirements. For example, for an MCA, you’ll only need six months in business, and a credit score of 500.
Get online SBA loans up to $5 million for commercial real estate purchases, loans up to $350,000 for debt refinancing and business capital, and bank term loans up to $500,000. This lender is only an option for established franchises. You’ll need at least two years in business, positive cash flow, and good personal credit. See smartbizloans.com.
If you have a decent social media presence and a fairly large number of friends or followers, crowdfunding may be feasible. Acquaintances aren’t likely to send you thousands of dollars. But a few bucks here and there can add up. Crowdfunding is also a way to get funding without having to give up a portion of control and ownership.
Demolish your funding problems with 27 killer ways to get cash for your business.
The main difference between the two is angel is investing is actually a sale of some of your ownership and control, whereas loans from friends and family are much like more formal loans from a provider. Your family and friends are under no obligation to charge the kind of interest rates prescribed by the Federal Reserve, so they could potentially charge more. On the other hand, they aren’t obligated to charge interest at all.
Your family and friends are under no obligation to put anything in writing, but you should do so anyway, for the sake of your sanity if nothing else. Having your family and friends loan you money or buy a part of your business will change the dynamic. Can your relationship stand the strain?
Franchises, just like every other form of business, can build and improve their business credit. As long as they are an LLC or corporation it is fine. Note: you need each company you want to build business credit on to have its own EIN number.
But keep in mind, many franchises may require purchases directly from headquarters or suppliers specifically designated by them. This can be anything from uniforms to beef, to architectural plans for erecting a new building or renovating an existing one. It will always pay to check.
Franchises need funding, like every type of business. Check with the franchise itself to see if they have funding. Check the SBA and your bank, and alternative lenders. Consider crowdfunding, angel investing, or loans from your friends and family if other sources are not forthcoming. And be sure to build business credit for your franchise!
The post Franchise Financing appeared first on Credit Suite.

The post Sheldon Stalks the Supreme Court appeared first on WE TEACH MONEY LIFE SELF DEFENSE WITH FINANCIAL GOALS IN MIND.
The post Sheldon Stalks the Supreme Court appeared first on Buy It At A Bargain – Deals And Reviews.

Have you thought about incorporating the AI magic of chatbots with the wide net of a PPC ad campaign? Combining these two strategies can add a boost to your next digital marketing campaign.
To ensure a successful PPC campaign, you have to start with the end in mind. Where do you want people to go once they’ve seen your ad and shown some interest? Do you want to make a sale or provide information?
You also need to consider what they want to learn about you and how you can help them find all the information they want.
That’s where chatbots come in.
Chatbots are a type of artificial intelligence (AI) created to answer customer questions. They’re capable of answering basic or common questions, sending people to pages answering their questions, looking up orders, and more.
You can program your bot to escalate a customer to a real person if needed as well.
Most people think to look for chatbots in the lower right-hand corner of a company’s website. The button may say something like “chat now” or “support,” like the one on Imperfect Foods’ website:

However, you can also set them up on Facebook Messenger and some other social media sites.
Chatbots can become very interactive, depending on the platform and the script. Also, you can check in with them however often you want and follow up with prospects when needed.
Functionalities vary widely, but however you incorporate bots, they can be a powerful, real-time player in your digital marketing strategy, buttressing your PPC campaign with interactivity and deepened brand awareness.
The great thing about adding chatbots to your PPC campaign strategy is the flexibility they bring. No matter your business, sales goals, or individual PPC campaign goals, chatbots can become your right-hand person when you can’t be there for every click-through.
Here are five things they can do to help your customers while freeing you and your team up to focus on the big picture.
We’ve all seen PPC ads, and chances are you’ve clicked on at least one because it intrigued you enough to want to learn more about what was in the content you saw.
Was your curiosity satisfied immediately? Or did you have to dig for the information promised by the ad?
Save your prospective customer the trouble and have a chatbot ready to answer their questions.
When a user clicks the PPC ad, your chatbot can appear on the page and ask if they have any questions. Through a series of scripts, you can help prospective customers learn more about you and find the products or services they need.
Going back to the Imperfect Foods example, if you’re a first-time visitor, it simply tells you to ask it a question.

However, if you’re a returning user, it knows why you probably clicked on the chat function: You forgot your password.

If that’s not knowing what your audience is going to ask, I don’t know what is.
People like to make a connection with real people behind a brand.
A chatbot is, by definition, a bot—not an actual person. However, even when companies tell consumers they’re talking to a bot, something fascinating tends to happen. According to Psychology Today, “When interacting with chatbots, our brain is led to believe that it is chatting with another human being.”
Further, since they are always there, ready to help, people can feel a real personal connection with them. (So, be sure to program your bot’s voice to fit in with your brand story!)
This can improve brand awareness and encourage people to continue that connection by following you on social media or coming back to your website when they need your products or services.
It could also help with immediate sales. Getting emotions involved in your marketing can improve your leads and conversions.
People like feeling supported. When they come to your website and don’t have to poke around to get their questions answered and find the resources they’re looking for, they’re likely to feel better about the experience.
As you create your PPC campaign, the reality is you can’t guess what every person is shopping for. While you should create a targeted landing page or ensure your PPC ads take users to the right place, sometimes miscommunications between customer intent and where they land can occur.
How can you keep users from landing on your page, then immediately bouncing if they don’t see exactly what they need?
A chatbot can showcase your entire inventory or website content from any page your customer lands on.
You can use them to ask users what they’re looking for and direct them to the corresponding page or resource.
PPC ad campaigns only tell you so much about who is clicking. You can gather specific metrics from analytics, but those are often demographic stats from which you would have to deduce motivations or needs.
What is your target market looking for? How can you help meet them where they are?
Why not use a chatbot to actually ask them?
In an on-brand tone, you could have your chatbot pop up with a specific question to start a conversation.
Even if a customer chooses not to buy or comes back later, that chatbot conversation can help you uncover valuable information about your target market.
As the PPC campaign continues, you can look for patterns.
For example, HubSpot uses chatbots on their pages to ask the user what they want to do next. HubSpot employees can review those conversations later to learn about what their viewers are looking for.

Whether your PPC campaign is introducing potential customers to your brand for the first time, debuting a new product or service, or keeping your brand at the forefront of your target market’s mind, chatbot integration can help to improve your brand awareness.
From the first pop-up welcome or introduction message to the answers to questions, chatbots can be designed to show brand personality.
This can be as simple as just using vernacular specific to your brand and how your customers talk. If your brand is casual, perhaps a chat could start with “Howdy!” If your voice is more formal, something like “How may I assist you today?” could be more appropriate.
You can also incorporate any characters or mascots you use in your branding to be the “face” of the chatbot. Generally, people logically know they aren’t talking to a real person and are okay with that. However, it’s much more fun and feels more personal if they get to talk to a character associated with your company, thereby potentially improving their experience with your brand.
Before you can dive into the metrics and measure whether your chatbot PPC campaign is working, you need to define success for yourself. What are you trying to accomplish with this campaign?
Success metrics could include:
When you know what defines success for this campaign, you can look at the right metrics to understand what’s working and what you can improve upon.
With the PPC campaign as a whole, one of the primary data points you can look at is click-throughs.
With chatbots, though, there is an added component: Interaction. The conversations between chatbots and users allow you to answer questions like:
The information you learn from your chatbots in your PPC campaign can help you:
Here are two examples of how Chatfuel shares its chatbot metrics. Users can explore engagement through these dashboards. Most chatbot platforms have similar metric dashboards.

Your chatbot on your PPC campaign’s landing page needs to be obvious, popping up soon after a user clicks your link. To encourage interaction, program your chatbot to welcome the user and ask them a question.
The best chatbot platform for PPC campaigns is one you can seamlessly integrate onto the landing page where people click to. This varies by your needs, but HubSpot’s Chatbot Builder, ManyChat, and Chatfuel may be worth checking out.
Chatbot pricing depends on the provider and features you choose. Many offer free trials or a free basic level, with prices going up after your trial or as you add additional options.
Give your chatbots a personality in line with your brand. Make the bot feel like a real person, even if you’re upfront about being a bot, so the user feels connected to your brand. The bot should introduce itself, ask questions, and provide relevant information to customers as they interact.
Using chatbots in tandem with PPC campaigns can make your prospective customers feel “seen,” help them learn more about your brand, and potentially increase conversions thanks to the help they give.
Setting up a chatbot on the landing page of your PPC campaign can put your brand’s features, options, benefits, and customizations at your customers’ fingertips from the get-go.
The chatbots your PPC campaigns introduce users to can also teach you more about what your customers want. Then, you can use that data to create future digital marketing campaigns specific to their needs.
How are you going to incorporate chatbots into your next PPC campaign?


Marketers create a lot of content. Yes, content is king, but that king is powerless without followers.
So, what’s the first thing that comes to mind when you want to reach a broader audience with your awesome new blog post?
Sharing on social media, of course. The massive audiences of sites like Facebook and Twitter make them some of the best sharing, but do you know how to optimize that outreach potential?
Open graph meta tags were designed to do just that. But what are they, why do they matter, and — most importantly — how do you use them?
Facebook introduced Open Graph in 2010 to promote integration between Facebook and other websites by allowing posts to become rich objects with the same functionality as other Facebook objects.
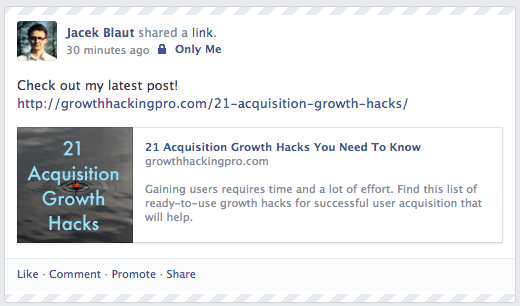
Put simply, it helps optimize Facebook posts by providing more control over how information travels from a third-party website to Facebook when a page is shared (or liked, etc.).
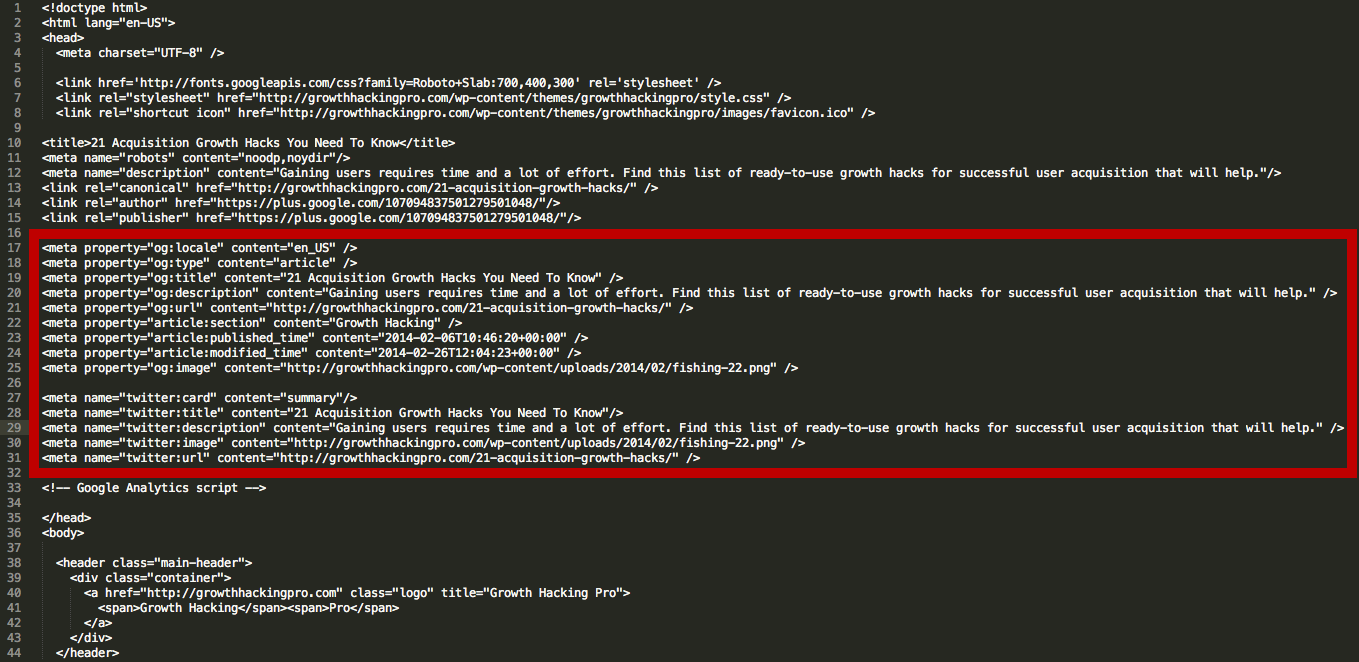
To make this possible, information is sent via Open Graph meta tags in the <head> part of the website’s code.
Now, other social media sites also are taking advantage of social meta tags.
Several other major platforms, including Twitter and LinkedIn, recognize Open Graph tags. Twitter actually has its own meta tags for Twitter Cards, but if Twitter robots cannot find any, Twitter uses Open Graph tags instead.
Social media sites are the major drivers of most of the web’s traffic. Consequently, the ability to harness the power of social meta tags is a vital skill for today’s marketers.
Most importantly: open graph meta tags can have a massive impact on conversions and click-through rates.
Have you ever shared a link on Facebook only to find that the thumbnail was missing, or there was a totally different picture than you expected?
Knowing just a little about Open Graph tags can help you tackle these problems and improve your social media marketing.
Adding Open Graph tags to your website won’t directly affect your on-page SEO, but it will influence the performance of your links on social media, so that means it’s worth looking into. Let’s take a look at the most important meta tags for Facebook and how to optimize them for better sharing.
Facebook has several open graph meta tag types. Let’s cover the different types, then I’ll cover how to use them.
As you might guess, this is how you define your content’s title. It serves a similar purpose as the traditional meta title tag in your code. In fact, if Facebook doesn’t find the og:title tag on your page, it uses the meta title instead.
Keep in mind that the text shown on a Facebook feed is in bold and extremely eye-catching. It must be compelling, just like a good post title.
There is no limit on the number of characters, but it’s best to stay between 60 and 90. If your title is longer than 100 characters, Facebook will truncate it to only 88!
Example:
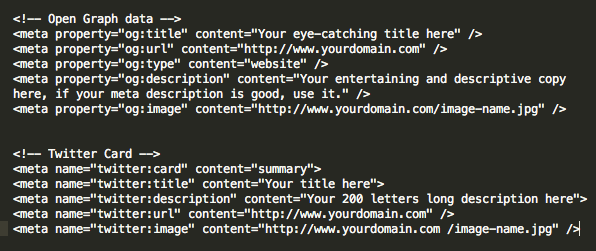
<meta property=”og:title” content=”Your eye-catching title here” />
This is how you set the canonical URL for the page you are sharing. What this means is that you define one page that all your shares will go to. It’s useful if you happen to have more than one URL for the same content (for example, using parameters). Important note: URL provided is not shown on Facebook newsfeed, only domain is visible.
Example:
<meta property=”og:url” content=”http://www.yourdomain.com” />
This is how you describe the kind of object you are sharing: blog post, video, picture, or whatever. The list to choose from is long. Here are some examples:
Web based:
Entertainment:
Place:
People:
Business:
You can see the full list of types here.
This tag is important if your page has a “Like” button and represents a real-life object (like a book or a movie). It determines if your content will appear in a user’s interest section of her profile in the event she “Likes” it.
In most cases, you will use the “website” value, since what you are sharing is a link to a website. In fact, if you don’t define a type, Facebook will read it as “website” by default.
Example:
<meta property=”og:type” content=”website” />
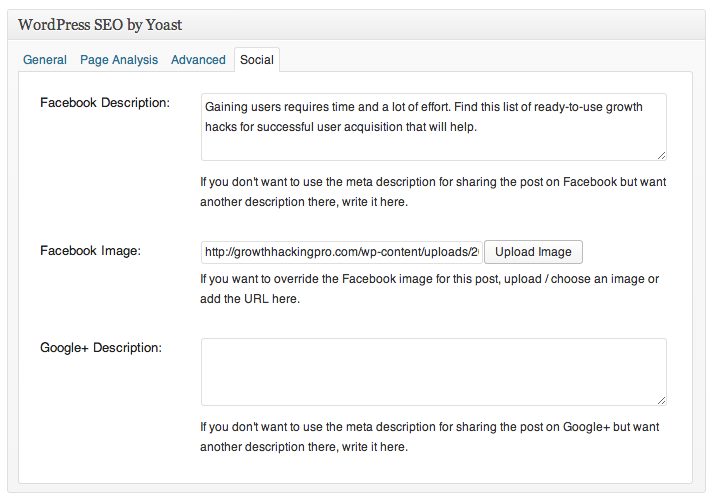
This meta data descriptor is very similar to the meta description tag in HTML. This is where you describe your content, but instead of it showing on a search engine results page, it shows below the link title on Facebook.
Unlike a regular meta description tag, it won’t affect your SEO. (So, don’t spend too much time figuring out how to sneak in keywords.) However, it’s a good idea to make it compelling because you want people to click on it.
You are not limited to a character count, but it’s best to use around 200 letters. In some cases, depending on a link/title/domain, Facebook can display up to 300 characters, but I suggest treating anything above 200 as something extra.
Example:
<meta property=”og:description” content=”Your entertaining and descriptive copy here, if your meta description is good, use it.” />
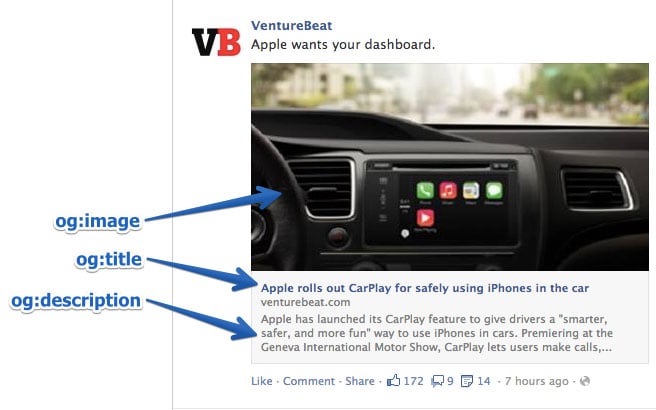
This is the most interesting Open Graph tag for many marketers because a picture always helps content stand out. This is how you ensure that a particular thumbnail will be shown when your page is shared. It can be very helpful for your conversion rates.
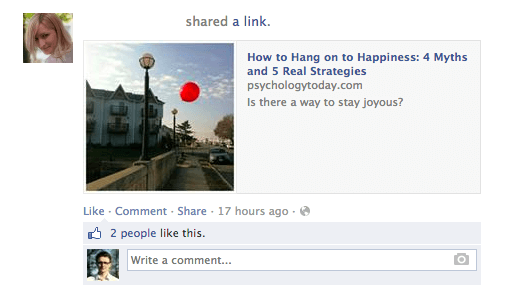
Make sure you set the og:image you choose, otherwise Facebook will show something stupid like an unwanted ad banner scraped from the page, or nothing at all (as below). We definitely don’t want that!

It’s important to remember that if your page is static and you don’t use any sort of content management system (CMS) (like WordPress), you need to change the og:image manually for each of your pages.
If your website is controlled with a CMS and you installed the relevant plugin, the og:image tags are assigned automatically for each page. Look for the list of plugins further down.
The most frequently recommended resolution for an OG image is 1200 pixels x 627 pixels (1.91/1 ratio). At this size, your thumbnail will be big and stand out from the crowd. Just don’t exceed the 5MB size limit.
If you use an image that is smaller than 400 pixels x 209 pixels, it will render as a much smaller thumbnail. It’s nowhere nearly as eye-catching.
Keep in mind that the picture you use as an Open Graph image can be different from what you have on your page.
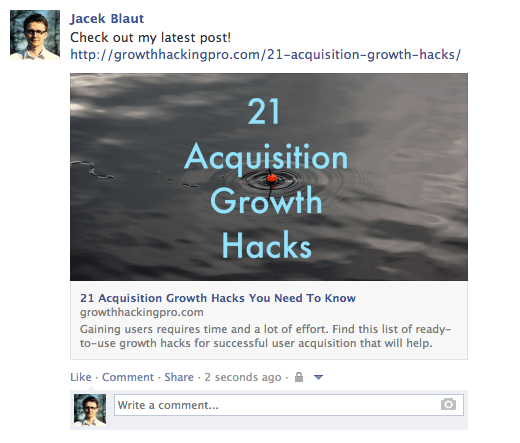
Why wouldn’t you leverage that opportunity to stand out even more?
For example, if your title is good, but the picture you are using is not very exciting (not an infographic or a good-looking person, etc.), consider using an image with a good line or two of copy instead (see example below).
One thing you need to remember if you do this: lace your text, or the most significant part of it, in the middle of the image. This matters because Facebook trims the sides of thumbnails.
Example:
<meta property=”og:image” content=”http://www.yourdomain.com/image-name.jpg” />
The Open Graph tags above are the ones you really need to know (og:description not so much, but it is useful). There are other, more advanced, tags you can use to provide even more in-depth specifications.
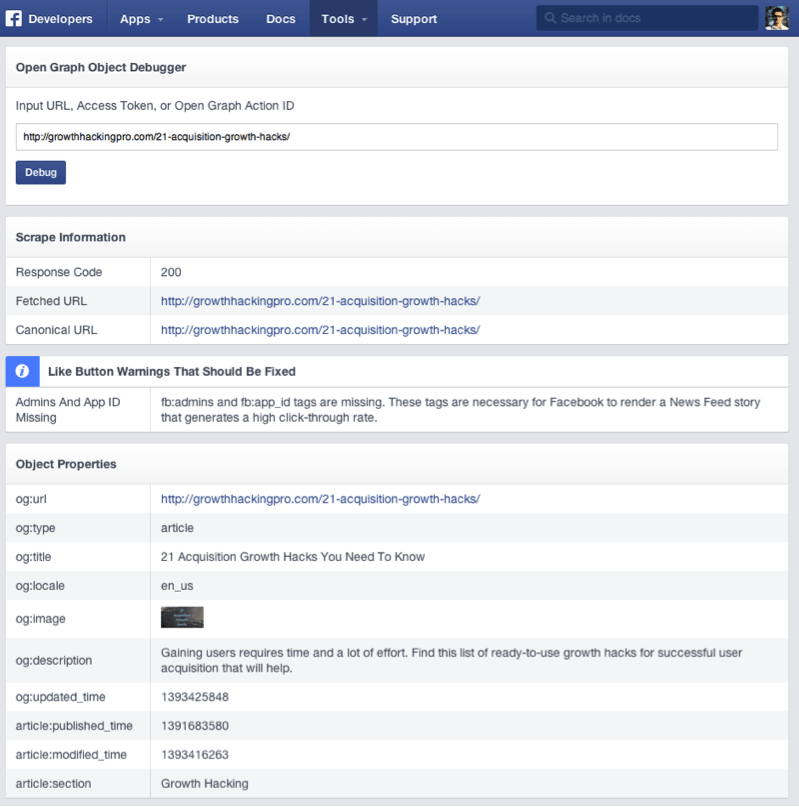
To make life easier, Facebook has created a tool called Sharing Debugger. It has two very helpful functionalities.
First, when you type in the link you want to check, it returns any errors and suggestions for OG tags, if there are any. You also can check what the og:image looks like, what your description is, and so on.
Second, it clears the Facebook cache. Imagine this: you post a link to Facebook, but then you see a mistake in the thumbnail, so you go back to your site and adjust the OG tags, and you post it again on Facebook.
Probably, nothing will happen. The thumbnail will stay the same. This is because of the cache. The Facebook Sharing Debugger will refresh the cache on your links after any adjustments, so remember to use it each time.
Like Facebook’s Open Graph tags, Twitter Cards let you stand out from the crowd of tweets. They allow some additional content to be generated from your 140-character tweet.
This doesn’t show up on people’s feeds automatically, but it adds a little “View summary” button below the tweet.
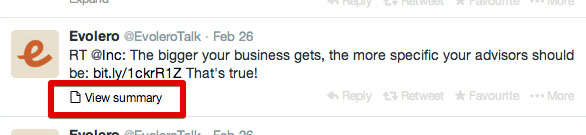
When you click it:
It’s a tempting thing to click and provides a handy summary of the shared page—the Twitter Card. Surprisingly, not many sites take advantage of these tags. This is a big opportunity to make your tweets stand out in crowded Twitter feeds.
The best way to get them is to install one of the WordPress plugins. WordPress SEO by Yoast, mentioned above, does the job. If that’s not an option, ask your web developer and give him the ready-to-implement Twitter Card tags. Here’s how you’ll make them.
This required tag works in a similar way to og:type. It describes the type of content you are sharing. There are 7 options to choose from: summary, photo, video, product, app, gallery, and “large version” summary.
Depending on the type of content you choose, the link at the bottom of your tweet changes. You can get “View summary” for summaries, “View photo” for photos, etc. If this tag is not set, Twitter reads your link as a “Summary” by default.
Example:
<meta name=”twitter:card” content=”summary” />
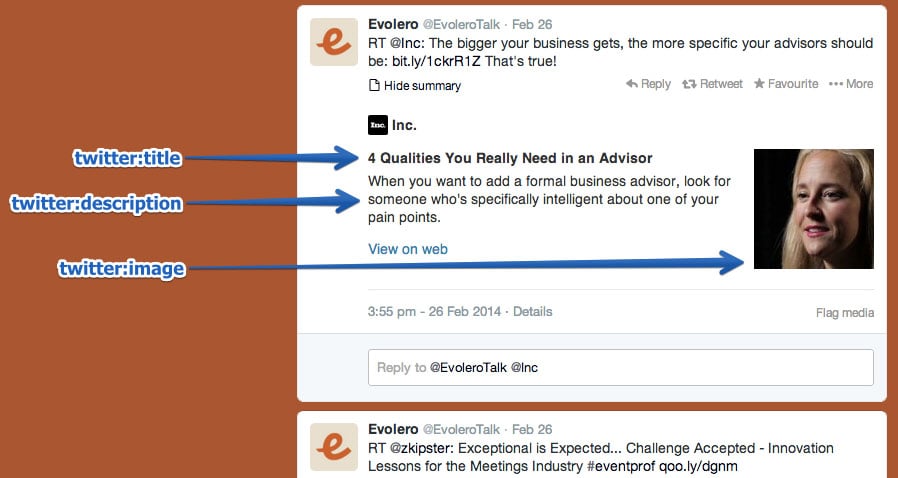
This basically does the same thing as its OG counterpart. You specify the title for your article that will show up in bold. It’s smart to avoid repeating the same text you have in your tweet. Make the most of the space provided and let the two pieces of copy play on each other to reinforce the message. Use up to 70 characters.
Example:
<meta name=”twitter:title” content=”Your title here” />
Use this tag to write a descriptive lead to the page you are sharing. As with Open Graph tags, don’t focus on keywords because they won’t matter for your SEO. Create compelling copy that nicely complements your tweet and the title. Twitter limits this part to 200 characters.
Example:
<meta name=”twitter:description” content=”Your 200-character description here” />
This sets the canonical URL for the content you are sharing. (For more information, review the description for the equivalent Facebook Open Graph tag above.)
Example:
<meta name=”twitter:url” content=”http://www.yourdomain.com” />
Yes, you guessed it. This is how you set the picture to go with your tweet. Twitter allows two options, a card with a smaller or a larger picture.
You decide which one you want in the type tag. If you go for the large option, make sure it has a resolution of at least 280x150px and that the file size is not more than 1MB. You can consider using the same trick as with the Facebook thumbnail: add some text to the image to boost the message.
Example:
<meta name=”twitter:image” content=”http://www.yourdomain.com /image-name.jpg” />
Keep in mind that, before you can fully benefit from Twitter Cards, you need to request approval for your page from Twitter. Fortunately, this doesn’t take much time and can be done easily using their Card Validator. Once you get approval, Card Validator serves exactly the same purpose as the Facebook Sharing Debugger, allowing you to check your links before you commit.
Just like with Facebook, there are plenty of plugins available for implementing Twitter Cards. Here are a few:
How do you implement OG tags? Basically, they belong to the <head> part of your page’s HTML. If you don’t manage the code, you’ll need to ask your web developer for help. You can prepare the whole package yourself using the tips above to save his valuable time.
If you are using WordPress, just install one of the plugins that neatly implements the code for you. I like to use WordPress SEO by Yoast, but there is an official Facebook Plugin and others to choose from.
Here are other OG plugins/extensions/add-ons for:
The final code for both Facebook and Twitter should look more-or-less like this:
It might seem a bit confusing, but luckily there are several tools that make the process easier — you don’t need to know how to code.
It’s surprising how few people optimize these tags. It’s worth doing because it helps you stand out and draw more clicks and views, and it can even help improve your SEO —all things that lead to more profit.
Have you implemented open graph meta tags? How has it impacted your site?
Article URL: https://deepnote.com/join-us
Comments URL: https://news.ycombinator.com/item?id=27614694
Points: 1
# Comments: 0