Bill and his guests – Ronan Farrow, Ross Douthat, Ian Bremmer, Ana Marie Cox, and John Podhoretz answer viewer questions after the show. (Originally aired 04/27/18)
As a savvy internet user, you might think no one clicks on Facebook and Instagram ads.
You’d be wrong.
In 2021, Meta made over $114 billion in revenue from advertising.
Someone’s clicking.
But who, and how do you get them to click on your ads? I’ll show you.
Many marketers who tried Facebook ads, especially in their early days, decided Facebook advertising didn’t work.
Don’t believe them.
I will share everything you need to know about how to create Facebook ads, now known as Meta for Businesses.
If you’re totally new to Facebook, you’ll need to set up Meta Business Suite, then come back to this post for a deep dive into Meta advertising best practices.
In this advanced Meta advertising guide, you’ll learn which businesses are the best fit for the platform and how to run successful campaigns.
We’ll cover the most common mistakes marketers make and the biggest factor in your ads’ success.
How Do Meta Ads Work?
Meta ads work by allowing advertisers to reach users on Facebook and Instagram from one platform.
We can’t talk about Meta ads without also mentioning Facebook ads. In October 2021, Facebook renamed itself Meta. They are working to become a social technology company, not just a social media giant.
When you create ads in Meta Business Suite, you can advertise to both Facebook and Instagram users through boosted posts, videos, photos, Stories, messenger, carousel, slideshows, playable ads, and instant experiences.
Meta ads target users based on their location, demographic, and profile information.
Many of these options are only available from Meta. After creating an ad, you set a budget and bid for each click or thousand impressions that your ad will receive.
If that sounds overwhelming, don’t worry. I’ll explain what all that means.
Who Should Advertise on Facebook (now Meta)?
Many businesses fail at Meta advertising because it’s not a good fit for their audience. So before investing time and money on Meta ads, consider whether your business model is a good fit for Facebook or Instagram.
In the past, Meta ads were more like display ads than search ads — though new versions of ads, like product ads, allow advertisers to sell products directly to users.
Here are a few types of businesses that are likely to succeed with advertising through Meta..
How To Create Meta Ads For Businesses with Low-Friction Conversions
The businesses that are most likely to succeed with Meta ads ask users to sign up, not to buy. You must use a low-friction conversion to be successful.
A visitor to your website wasn’t looking for your product. They clicked your ad on a whim. You will fail if you rely on them to immediately buy something to make your ad ROI positive.
Meta users are fickle and likely to click back to Facebook or Instagram if you ask for a big commitment (purchase) upfront. Instead, stick to simple conversions like signing up for your service, filling out a short lead form, submitting an email address, or converting inside the platform using Instagram shopping or similar.
Even if you sell products, not services, you should consider focusing on an intermediate conversion like a newsletter signup. Then you can upsell later through email marketing or retargeting ads.
Daily deal sites like Groupon, AppSumo, and Fab are good examples of businesses that can succeed with Facebook advertising. After you click one of their ads, they just ask for your email address. They’ll sell you on a deal later.
Business Model with Long Sales Cycle or Small Purchases
Even if you only ask for an email address initially, you’ll need to eventually make money from these users to be profitable.
The best business model that fits Facebook ads earn revenue from its users over time, not all at once. A user may have given you their email, but you’ll need to build more trust before they are likely to buy anything.
You shouldn’t depend on one big purchase. Several smaller purchases are ideal.
Daily deals and subscription sites are great examples of business models that can thrive on Meta. Both have customers whose lifetime value is spread out over six months or more.
At Udemy, they focus on getting users to sign up on their first visit. By aiming to be profitable on ad spend in six months (not one day), they turn Facebook users into long-term customers.
They target a 20 percent payback on ad spend on day one and 100 percent payback in six months. These numbers can serve as a rough guide for your business.
Businesses in fashion, books, and other small purchases also do well on Meta, especially Instagram.
How to Target Meta Ads
The number one mistake most marketers make with Facebook ads is not targeting them correctly.
Facebook’s ad targeting options are unparalleled. You can target by demographics and create custom or lookalike audiences to target users similar to your best customers. You can also use retargeting ads to target users who have interacted with your page, or visited your website.
On Meta, you can directly target users by:
location
age
gender
interests
connections
relationship status
languages
education
workplaces
Each option can be useful, depending on your audience. Most marketers should focus on location, age, gender, and interests.
Location allows you to target users in the country, state, city, or zip code that you service.
Age and gender targeting should be based on your existing customers. If women 25-44 are the bulk of your customers, start targeting them. If they prove to be profitable, you can then expand your targeting.
Interest targeting is the most powerful but misused feature of Facebook ads. When creating an ad, you have two options: broad categories or detailed interests.
Maximizing Investment with Broad Category Targeting
Broad categories include topics like Gardening, Horror Movies, and Consumer Electronics.
Meta also added targets like Engaged (1 year), Expecting Parents, Away from Hometown, and Has Birthday in 1 Week.
Broad interests may seem like an efficient way to reach a large audience. However, these users often cost more and spend less. You’ll also need to install the Meta pixel.
This used to be an ineffective way to reach audiences because it targeted too large of an audience; however, adding the Meta pixel and dynamic ads makes this far more effective.
It is worth testing, but detailed interest targeting is often more effective.
Detailed Targeting: A Powerful Meta Ad Targeting Strategy
Detailed targeting allows you to target Meta users based on more detailed interests and onsite behaviors.
For example, you can target users based on the following:
Ads they’ve clicked on.
Facebook or Instagram pages they interact with.
Activities across Meta, including things like which device they use or travel preferences.
More detailed demographics.
Speed of their internet connection.
Detailed targeting also allows Meta advertisers to include or exclude specific people using the “or”/”and” targeting.
For example, if you can target users who “are ” college graduates, you can then focus on those that “are ” interested in travel “or” interested in food. This lets you get a lot more detailed about your target audience.
Meta Ads Lookalike Audiences
In addition to targeting users directly, Meta allows you to target a group called Lookalike Audiences.
What are Meta Lookalike Audiences? These are Meta users that are similar to your current users. You’ll need to have Meta Pixel or other custom audience data, like an email list. Then, you can ask Facebook to find similar users.
They are highly customizable — for example, you could create a “new customer” ad, then exclude current customers from seeing your ads.
Retargeting ads allow you to reach customers already familiar with your brand. You can double down by creating dynamic ads that show people items they are likely to be interested in.
For example, you could retarget users who have visited your site, left items in their cart, or clicked on an ad.
To create a retargeting ad, the first step is to install the Meta Pixel. Follow this guide in Meta’s Business Help Center to get started.
Images for Meta Ads
The most important part of your Meta ad is the image. You can write the most brilliant copy in the world, but if your image doesn’t catch a user’s eye, you won’t get any clicks.
Don’t use:
low-quality images
generic stock photography
any images you don’t have the rights to use
Also, don’t steal anything from Google Images. Unless you’re a famous brand, don’t use your logo.
Now that we have the no’s out of the way, how should advertisers find images to use? Buy them, create them yourself, or use ones with a Creative Commons license.
Below you’ll learn which types of images work best and where specifically to find them.
Use Images of People on Your Ads
Images of people work best, preferably their faces. Use close-ups of attractive faces that resemble your target audience.
Younger isn’t always better. If you’re targeting retirees, test pictures of people over 60. Using a 25-year-old woman wouldn’t make sense.
Facebook sidebar ad images are small (254 by 133 pixels), while Instagram feed ads should be no wider than 500 pixels. You can check out the specs for other Meta ads here.
Make sure to focus on a person’s face and crop it if necessary. Don’t use a blurry or dark picture.
Use this ad image guide on Facebook to see the size requirements for other ads, like a desktop news feed, a mobile news feed, instant articles, stories, etc.
Advanced tip: Use images of people facing to the right. Users will follow the subject’s line of sight and be more likely to read your ad text.
Aside from models, you can also feature the people behind your business and showcase some of your customers (with their permission, of course.)
The Importance of Typography in Advertising
Clear, readable type can also attract clicks. Bright colors will help your ad stand out.
Just like with text copy, use a question or express a benefit to the user. Treat the text in the image as an extension of your copy.
You can also combine text and images, like this ad for a podcast about Nashville:
Add Humor and Fun Into Your Ads
Crazy or funny pictures definitely attract clicks. See I Can Has Cheezburger, 9GAG, or any popular meme page.
Unfortunately, even with descriptive ad text, these ads don’t always convert well. If you use this type of ad, set a low budget and track the performance closely. You’ll often attract lots of curiosity clicks that won’t convert.
How to Create Images for Meta Ads
You have three options for images to use in your Meta ads: buy them, find ones that are already licensed, or create them yourself.
You can buy stock photography at many sites, including iStockPhoto. There are also sites with free stock photos like Pixabay. Don’t use stock photos that look like stock photos. No generic businessmen or stark white backgrounds, please.
Users recognize stock photos and will ignore them. Instead, find unique photos and give them personality by cropping or editing them and applying filters. You can use Pixlr, an online image editor, for both.
If you don’t have the money to buy photos, search for Creative Commons licensed images using Google Images:
The third option is to create the images yourself. If you’re a graphic designer, this is easy. If you aren’t, you can still create typographic images or use basic image editing to create something original from existing pictures.
Rotate Ads
Each campaign should have at least three ads with the same interest targets. Using a small number of ads will allow you to gather data on each one. For a given campaign, only one to two ads will get a lot of impressions, so don’t bother running too many at once.
After a few days, delete the ads with the lowest click-through rates (CTRs) and keep iterating on the winners to continually increase your CTR.
Aim for 0.1% as a benchmark. You’ll likely start out closer to the average of 0.04%.
Writing Successful Facebook (Now Meta) Ad Copy
After seeing your image, users will (hopefully) read your ad text. Here you can sell them on your product or service and earn their click.
Despite the 40-character headline and 125-character body text limits, we can still use the famous copywriting formula AIDA.
(A)ttention: Draw users into the ad with an attention-grabbing headline.
(I)nterest: Get the user interested in your product by briefly describing the most important benefit of using it.
(D)esire: Create immediate desire for your product with a discount, free trial, or limited-time offer.
(A)ction: End the ad with a call to action.
AIDA is a lot to fit into 165 characters, but it can be done. Write five or ten ads until you’re able to fit a succinct sales pitch into the ad.
Here’s an example for an online programming course:
Become a Web Developer
Learn everything you need to become a web developer from scratch.
Save 65%. Enroll now!
This tells users what they’ll get, why it matters, and why they should care in just a few lines.
Bidding on Meta Ads
Like on any ad network, strategic bidding can mean the difference between profit and a failed test on Meta.
After you create your ad, Meta provides a suggested bid range. When you’re just starting out, set your bid near the low end of this range, so you don’t waste ad spend on an untested ad.
Your CTR will quickly start to dictate the price you’ll need to pay for traffic. If your CTR is high, your suggested bids will decrease.
You’ll need to bid more for each click if your CTR is low. Optimize your ads and targets to continually increase your CTR.
In addition to click volume, your bid will also dictate how much of your target audience you can reach.
Meta provides a great chart for every campaign showing the size of your target audience and how much of that audience you’ve reached.
Increasing your bid will help your ad reach more of your target audience. If your ad is performing well but reaches less than 75 percent of your target audience, you can increase your bid to get more clicks.
If your audience penetration is high, increasing your budget will increase your ad’s frequency: how many times a targeted user will see it.
Meta also offers automated bidding that uses AI to determine what bids to make. If you use this strategy, make sure to keep a close eye on your budget so you don’t overspend.
Landing Pages for Meta Ads
Getting a click on your Meta ad is only the beginning. You still need the visitor to convert.
Make sure to send traffic to a targeted, high-converting landing page. You know their age, gender, and interests, so deliver a page that solves their problems.
The landing page should also contain the registration form or email submit box that you’ll track as a conversion.
Focus the landing page on this action, not the later sale. If you want visitors to sign up for your newsletter, show them the benefits or offer a free gift for their email.
How to Track Meta Ad Performance
Like PPC ads, you’ll want to track your meta ad performance. The exact metrics that are important to you will vary by goal. For example, ad impressions and clicks are important if your goal is to increase brand awareness. If your goal is to increase your email list, then you’d want more actual form fills.
Here are a few things to keep in mind when tracking Meta ad performance.
Conversion Tracking
To track conversions, you’ll need to install Meta’s pixel. Make sure to track conversions for both specific ads and ad campaigns to get a deeper understanding of what ads are converting. Pay attention to both your ads and your audience—targeting the right audience often makes all the difference.
Performance Tracking
You also need to monitor your performance within Meta Business Suite. The most important metric to track is the click-through rate. Your CTR affects both the number of clicks you’ll receive and the amount you will pay per click.
Ads with a low CTR will stop serving or become more expensive. Ads with a high CTR will generate as many clicks as will fit within your budget. They will also cost less. Keep a close eye on CTR by interests and ads to learn which audiences work best and which ads resonate with them.
Keep in mind: Even the best ad’s performance will decline over time. The smaller your target audience is, the faster this will happen. Usually, you’ll see your traffic start to drop off in 3-10 days.
When this happens, refresh the ads with new images and copy. Duplicate your existing ads, then change the image and ad text.
Do not edit the existing ad. Delete any existing ads not getting clicks. You’ll see the new ads accruing impressions and clicks the next day.
Monitor the images’ performance over time to see which generates the best CTR and maintains their traffic the longest. You can rotate high-performing images back every few weeks until they stop getting clicked at all.
Use A/B Testing in Meta
A/B testing allows you to change variables in your ads, such as the ad copy, images, or audience, to see which strategy performs best. Meta allows you to create A/B tests in Ads Manager, so you won’t even need to use a third-party tool.
Meta Ads FAQs
Does Facebook still have ads since becoming Meta?
Yes, Facebook ads still exist. Using Meta Business Suite (formerly Facebook Business Suite), you can create ads for just Facebook or Facebook and Instagram.
How does Meta (formerly Facebook) target ads?
Meta allows advertisers to target ads based on demographic information, interests, location, and past behaviors. This makes it an ideal platform for advertisers, whether they want to reach very niche audiences or very broad audiences.
What is the Meta Ads Manager?
Meta Ads Manager is a stripped-down version of Meta Business Suite that allows you to create new ads fast. It doesn’t offer as many features, but it may be easier for some users to navigate.
What is the difference between Facebook and Meta ads?
Facebook ads are only on Facebook, while Meta Ads can currently appear on Facebook or Instagram. In 2021, Facebook changed its parent company name to Meta, and changed Facebook Business Suite to Meta Business Suite, where advertisers can manage ads on both platforms.
What are some of the available Meta Ad options?
Posts, images, carousels, boosted posts, Reels, Stories, and more.
{
“@context”: “https://schema.org”,
“@type”: “FAQPage”,
“mainEntity”: [
{
“@type”: “Question”,
“name”: “Does Facebook still have ads since becoming Meta? “,
“acceptedAnswer”: {
“@type”: “Answer”,
“text”: ”
Yes, Facebook ads still exist. Using Meta Business Suite (formerly Facebook Business Suite), you can create ads for just Facebook or Facebook and Instagram.
Meta allows advertisers to target ads based on demographic information, interests, location, and past behaviors. This makes it an ideal platform for advertisers, whether they want to reach very niche audiences or very broad audiences.
”
}
}
, {
“@type”: “Question”,
“name”: “What is the Meta Ads Manager?”,
“acceptedAnswer”: {
“@type”: “Answer”,
“text”: ”
Meta Ads Manager is a stripped-down version of Meta Business Suite that allows you to create new ads fast. It doesn’t offer as many features, but it may be easier for some users to navigate.
”
}
}
, {
“@type”: “Question”,
“name”: “What is the difference between Facebook and Meta ads?”,
“acceptedAnswer”: {
“@type”: “Answer”,
“text”: ”
Facebook ads are only on Facebook, while Meta Ads can currently appear on Facebook or Instagram. In 2021, Facebook changed its parent company name to Meta, and changed Facebook Business Suite to Meta Business Suite, where advertisers can manage ads on both platforms.
”
}
}
, {
“@type”: “Question”,
“name”: “What are some of the available Meta Ad options?”,
“acceptedAnswer”: {
“@type”: “Answer”,
“text”: ”
Posts, images, carousels, boosted posts, Reels, Stories, and more.
”
}
}
]
}
Conclusion
Despite the learning curve, Meta advertising can be a great marketing channel for the right business. The most important things to remember are: target specific interests, use eye-catching images, give users a low-friction conversion, and track everything.
After a week or two of learning what works for your business, you’ll be able to generate a steady source of Meta conversions.
What are your best Meta advertising tips? Share them in the comments.
Looking for a diverse online ad platform that will put your marketing campaigns in front of tons of people? Facebook Ads is the way to go.
With an almost endless amount of detailed targeting options and features, you can reach virtually any Facebook user with an ad. Combine those targeting options with the functionality of Meta Business Suite; and you’re ready to dominate the platform.
But the sheer number of targeting options also presents big problems for the average Facebook advertiser. The platform is almost so complex that it can leave inexperienced users overwhelmed.
Case in point, most people create custom audience targeting on Facebook but have no idea how to optimize it. That’s a problem, given that there are more advertisers on Facebook than ever before. Competition is rife, which means businesses must make full use of the opportunities available to them.
If your Facebook ads are not working, it could be a problem with your custom audiences. Facebook custom audiences are the bread and butter of Facebook’s ad platform. It’s why it’s so popular in the first place. So when users don’t find success, they quickly give up, claiming that Facebook Ads don’t work. Or believing that Facebook isn’t meant for advertising.
But that’s not true. And thankfully, there are several ways you can fix your custom audiences to perform better.
Here’s why your Facebook custom audiences are failing and how you can fix them ASAP to improve your Facebook ad effectiveness.
Don’t Only Target Demographic Data
One of the biggest reasons your Facebook custom audience is not working is because you are using basic demographic data.
A standard marketing playbook will tell you to create simple buyer personas or customer profiles that describe your typical customers. These are a great tool when you are finding your target audience.
Buyer personas are a summary of basic information, including a name, age range, gender, and job title.
Now, don’t get me wrong. Buyer personas are amazing. I use them on a daily basis to drive sales and traffic to my businesses. But when it comes to Facebook Ads, buyer personas aren’t sufficient. They aren’t nearly detailed enough to find scalable growth and profit.
But I’ve seen a lot of marketers take data from buyer personas and use it to create a new custom audience.
For example, if you head to the Meta Business Suite (formerly Facebook Business Manager) and create a new audience, do you create something fairly basic like this?
Saved audiences on Facebook are great. But not when you limit yourself to demographic-based targeting. Simple metrics like age and gender aren’t going to get you qualified buyers.
Just take a look at how diverse and large this audience is:
Trying to target 33 million people with a single ad set and a niche product isn’t going to get you very far. Why? Because if 33 million people were interested in your product, you wouldn’t need Facebook to advertise.
You simply can’t appeal to everyone. And that’s fine! If anything, it’s a good thing. Larger audience sizes on Facebook often perform poorly because the targeting isn’t specific enough. You could be wasting tons of money on clicks and impressions without ever seeing a dime in return.
Part of this is Facebook’s fault. It asks you to create an audience when you create a new ad.
And the main options are demographic data.
On top of that, if you navigate to your audience insights within the Meta Business Manager, you also see a range of demographic data:
Facebook constantly promotes the use of basic demographic data in its analytics and audience options. It’s the most visible, widely-used form of targeting they offer. But it’s not sufficient.
So, if you see your Facebook custom audience isn’t working, it’s probably because you are relying only on demographic data. Creating a custom audience that is not custom enough is one of the biggest mistakes you can make when managing Facebook ads.
Luckily, there are literally a dozen different ways you can create a custom audience that doesn’t focus on demographic data. These include:
Website data using a Facebook pixel
The activity of users on your app
A list of your customers
Offline data you collect in-person
People who watch your Facebook videos
People who have interacted with your Instagram account
People who clicked on your Facebook or Instagram shopping experiences
I’ll touch on some of these in more detail below, but why not give them all a try?
Use Interests and Exclusions
You should also focus on interests and exclusions when managing Facebook ads.
As I’ve already explained, you can’t use simple demographic data and expect stellar results. But people often glance over the Detailed Targeting option of interests and exclusions:
If you like to target by demographic data, but don’t use Detailed Targeting, then it’s no wonder your Facebook custom audience is not working.
Interests and exclusions let you narrow down your audience from 33 million to a few hundred thousand. This gives you a much better shot at targeting qualified buyers.
Interests and exclusions let you target anything from income to spending habits and job positions. You can get hyper-specific with your custom audience targeting on Facebook.
For example, let’s say that I run an SEO agency that works with Fortune 500 companies. I can specifically target them using the interests section:
But even then, we’re not specific enough. My audience size is still in the millions. So let’s take a moment to think more about my ad. I can ask myself the following questions:
Do I sell to specific segments or industries?
Are there customer types that make up the majority of my sales?
What job positions do they hold?
Answering these questions can narrow down your audience even further. In this example, let’s say that I only find myself closing deals with chief marketing officers.
I’d select the following:
That gets us a little closer, but we still have a ways to go. Because even within this level of specificity, there will still be some segments of this audience that aren’t interested in my product.
For example, let’s say sales managers don’t show a lot of interest in my agency. So, I’d want to exclude them from targeting:
Narrowing down your custom audience with interests and exclusions will help you refine your custom audience to a sensible size.
For example, I’ve narrowed my audience down to just over 700,000 thanks to those three inclusions and exclusions.
Keep tailoring these groups as much as you can. Don’t limit your Facebook ad effectiveness because you haven’t been as specific as possible.
Make Sure Your Recency Window Isn’t Too Short
Most people use custom audiences when they run simple remarketing ads on Facebook. That’s because you can quickly set up a new website-visit-based remarketing campaign and audience within Meta Business Manager.
But custom audiences for remarketing often fail for one very specific reason: the default 30-day cookie window isn’t effective.
Here’s what it looks like when you create a new custom audience based on website visits:
Facebook defaults to custom audiences from the last 30 days.
This is the number of days you want people to remain in your audience after meeting the traffic criteria or goal. In plain English, this means that when someone visits your website, they will only remain in that audience for 30 days after that visit.
But that’s problematic when you look at the typical sales funnel:
Most customers won’t make a purchase the first time they see your product. They’ll need to transition through the various stages of the buying process first.
In the awareness stage, customers are still trying to figure out what their problem is and how they can solve it. They are only just beginning their research. In the interest stage, they start to explore various products or services to fix their problem. They have still not committed to a purchase, and they are considering your competitors.
Next, they decide which business they think will help them the most. They still haven’t made a purchase at this stage. It’s only when they finally take action that you see a return on your investment and a full completion of the sales cycle. And that conversion cycle can last much longer than 30 days in many cases. In fact, research shows that almost three-quarters of B2B sales to new customers take at least four months to close.
If you’re lucky enough to convert prospects to sales in fewer than 30 days, you’re probably fine with Meta Business Manager’s default settings.
But if you are like most of us who aren’t able to convert a non-brand-aware user to a customer in under one month, you should be using a much longer window for your audience.
BigCommerce first noticed this mistake when they were running ads for clients and found that the conversion windows were heavily delayed:
Tons of the sales for their client weren’t coming in until 12-30+ days. So a 30-day window wasn’t the most efficient option.
So if your retargeting Facebook ad is not working, use a longer window like 30-90 days, instead.
Experiment with this number by creating two custom audiences with different cookie windows to see which performs best over the period of two months.
Target by Specific Page Visits and User Flow
One of my favorite ways to create better custom audiences and fix Facebook ads that are not delivering is to get even more specific by targeting users who visit specific pages and take certain actions.
We know that demographics don’t cut it. Even adding in interests and exclusions might not be enough.
When all else fails, you need to jumpstart your campaign with visitors who are highly likely to buy from you. And thankfully, with custom audience targeting on Facebook, you can target users taking incredibly specific actions from your website.
Let me give you an example before we dive in. Check out this advertisement I ran for a webinar that I hosted:
Notice how specific it is? It’s not a basic, awareness-style ad aimed at grabbing the attention of millions. It’s directly relevant to the webinar that I was hosting at the time. And these ads were only targeted to a custom audience that showed a deep interest in my webinar.
I ran these because I knew that people would convert if they had shown prior interest by visiting my webinar landing page. So instead of remarketing to all my website visitors, I targeted specific page visits and URLs where leads showed an interest.
This isn’t the only way you can use site behavior to optimize your custom audience. You can also target:
High average order customers by creating a conversion event when a purchase is 20% or more above your site average.
The users who spend the most time on your site by targeting the top 25% of active users
Users who haven’t visited your site in a while.
Here’s how you can implement the same strategy to improve Facebook ad effectiveness.
Open up your Meta Business Manager and go to the audiences tab:
From here, create a new custom audience:
Select “Website Traffic” from the list of options:
But now, instead of selecting the basic remarketing option of targeting all website visitors, select “People who visited specific web pages”:
Next, you can outline specific buyer behavior patterns.
For example, do you notice that people are viewing multiple pages before they buy? Are they visiting your pricing page after a specific blog post?
What is the common user path?
If you don’t know, head over to Google Analytics and open up the “Behavior Flow” report:
This will show you how people are moving through and interacting with your site before they convert:
Start to analyze the most popular entry points and typical viewing paths customers take on your website. If you start to notice trends and common sequences, you can take advantage of them to create a specific custom audience.
For example, a common user flow on my site looks like this:
About page -> blog post -> consulting page conversion
I’ve noticed that the majority of people who convert on my site follow that same route.
Once you’ve figured out a great behavioral pattern, head back to the Business Manager and input those links:
This is the path I mentioned earlier, which will add visitors to a new custom audience when they land on these three pages over the course of 60 days.
This is a hyper-specific audience based on specific page visits that I’ve seen convert well. I’ve even received ads on my own Facebook page that I can tell are using this strategy.
For example, check out this ad from Hootsuite that I got after visiting their product page:
They didn’t target this ad to everyone on their remarketing list or everybody who visited their website once. They only targeted visitors who visited a specific landing page.
Custom audiences tend to fail due to a lack of creativity and detailed targeting. If your Facebook ads are not delivering, try to create a custom audience based on site visits and behavior flow to drive more sales.
Make Sure to Target by Frequency
Another great way to fix a failing custom audience is to simply add another parameter: Frequency.
In theory, the more someone has visited your site, the higher the chance that they’ll buy from you.
First-time visitors aren’t likely to convert.
In fact, 92% will not purchase from you on the first visit. So if you don’t sort by frequency, you continue to risk targeting too large of an audience.
As we discussed, the sales funnel is complex. Especially when it comes to Facebook. Here’s an example of just how complex a sales funnel can be when using Facebook Ads.
Sometimes it takes upwards of five ads to convert a customer.
And it’s the same way with your website. If you can’t expect first-time visitors to buy, you shouldn’t waste ad spend on anyone who hasn’t visited your site more than once. That’s why you need to enable frequency targeting when managing Facebook ads.
Enable frequency tracking by clicking “Further refine by” when creating a custom audience.
Next, select a frequency from the menu.
Now you can add an extra buffer layer to your custom audience to give you an even better shot at converting users with less money and fewer ads:
Here’s what your entire custom audience will look like:
In the above example, a user will get added to your custom audience if they visit your specified URL two or more times within 60 days. This is one of the easiest fixes when your Facebook custom audience is not working.
Simply up the frequency, and you’ll narrow your audience to users who’ve shown strong engagement levels on your site.
Create a 1% Lookalike Audience
Lookalike audiences are pretty simple. You create a custom audience from your email list, and Facebook replicates that audience with new people.
Facebook does this by taking your existing customer list, matching those emails to accounts, and then finding other users with similar data that would also be interested in your products.
And it works.
It’s great for creating fast custom audiences without doing the legwork of interests, exclusions, or detailed remarketing optimization.
Lookalike audiences give you the option of choosing what percentage of the population you want to target:
The range is from 1 to 10%, with 10% producing the largest audience size and 1% producing the most specific and smallest audience size. 10% will net you 10% of the total population in the countries you choose, with those selected more closely resembling your other audiences and customers.
Given that Facebook’s user base totals 2.9 billion people, you might think that a 10% lookalike audience sounds like a good idea. A bigger custom audience will generate better results, right?
Actually, the exact opposite is true.
AdEspresso proved this by spending $1500 on a lookalike custom audience experiment in 2017. They wanted to test the three most common levels of lookalike audiences: 1, 5, and 10%. So they conducted a study over a period of 14 days, using the same ad for each audience.
These were lead-based ads that meant to capture emails via lead magnets. They offered deals to customers who had shown interest in their blog posts or services but weren’t ready to convert just yet. So when someone clicked on the ad, they had to enter information to receive the free e-books.
Next, they created a new campaign and used Facebook’s A/B testing functionality to test their audiences against each other.
With Facebook, you can split-test multiple audiences, which is what AdEspresso used to simultaneously evaluate those three audience levels. Their timeline was 14 days with a budget of $1,500, which gave them $35 a day to spend:
They set up their three targeting percentages:
The results showed some significant data as to why many marketers were not finding success with this custom audience type. Here’s some of the most important information and concluding data that they found:
You can see the results of the study in the image above. The far left column is the 1% audience, the middle image is the 5% audience, and the far-right image is the 10% audience.
The 1% lookalike audience had a cost per lead of $3.748. The 5% lookalike audience had a cost per lead of $4.162, and the 10% lookalike audience had a cost per lead of $6.364.
One key factor stood out that proved how effective smaller audiences are on Facebook:
The 10%-based lookalike audience was found to have a 70% higher cost per lead than the 1% audience. That could be a game-changer for improving Facebook ad effectiveness.
So, what’s the reason behind the results? Larger custom audiences just aren’t specific enough to drive great results.
10% audiences sound great in theory because they give you the option to corral tons of users, but they just don’t deliver specific enough results. Targeting a large audience usually works, but on Facebook, more users mean less targeting accuracy.
Creating a 1% lookalike audience of your own is easy. Simply navigate to your audiences section under your Meta Business Suite and select Lookalike Audience.
Next, you need to choose the source for your lookalike audience.
The source could be anything from a custom audience to an email list to a specific page or profile. Once you’ve selected it, make sure you select 1% as your audience size.
If you want to perform your own A/B test like AdEspresso, click on Show Advanced Options.
Then, select the number of audiences and the sizes you want to create.
Try creating an audience at 1%, 5% and 10%, just like AdEspresso did. Once you’ve done this, head to your Ads Manager to create a new lead magnet ad.
Before continuing, make sure to select the split-testing feature to compare your audiences with the same ad.
Now that you have enabled the split-test feature, scroll down to the variables section.
This is where you can choose what variables you want to test.
You have three options here. For this custom audience test, you want to select the Audience option:
You’ll notice two different ad sets to begin with. But thankfully, Facebook allows you to test more than two ad sets at a time.
Hit “Test Another Ad Set” to add a third to your list.
If you created four or even five lookalike audience versions, feel free to add the corresponding amount of ad sets to make this split test accurate.
Next, click “Edit” on each ad set to select your corresponding lookalike audiences.
Once you’ve done this, you’re ready to push your new ads live and see which audience produces the most conversions at the lowest costs.
Remember, Facebook custom audiences are all about specificity. Don’t make the cardinal sin of trying to cast too wide of a net. The more specific your audience, the better your conversion rate.
Custom Audience Targeting on Facebook FAQs
What is a #2654 error?
A #2654 is a failure to create a custom audience. It occurs when Facebook does not have permission to create a custom audience from one or more of your event sources.
What happens if your audience is too broad when you set up a Facebook ad?
If your Facebook ad audience is too broad it won’t be very effective. Targeting too many people will result in high CPCs and low conversion rates. That’s why it’s important to use a custom audience to narrow down your target audience as much as possible.
How long do Facebook custom audiences last?
The maximum time people can stay in your custom audience is 180 days. After that time, users will be removed unless they trigger an action that includes them in the audience again.
How small can a Facebook custom audience be?
The minimum number of people you can have in a custom audience is 100. That being said, you should be creating larger audiences if you want to have success with Facebook ads.
A #2654 is a failure to create a custom audience. It occurs when Facebook does not have permission to create a custom audience from one or more of your event sources.
”
}
}
, {
“@type”: “Question”,
“name”: “What happens if your audience is too broad when you set up a Facebook ad?”,
“acceptedAnswer”: {
“@type”: “Answer”,
“text”: ”
If your Facebook ad audience is too broad it won’t be very effective. Targeting too many people will result in high CPCs and low conversion rates. That’s why it’s important to use a custom audience to narrow down your target audience as much as possible.
The maximum time people can stay in your custom audience is 180 days. After that time, users will be removed unless they trigger an action that includes them in the audience again.
”
}
}
, {
“@type”: “Question”,
“name”: “How small can a Facebook custom audience be?”,
“acceptedAnswer”: {
“@type”: “Answer”,
“text”: ”
The minimum number of people you can have in a custom audience is 100. That being said, you should be creating larger audiences if you want to have success with Facebook ads.
”
}
}
]
}
Conclusion
Meta’s advertising platform is one of the best ways to reach new customers. With boost posts and ever-powerful remarketing, you can reach almost anyone. On top of that, custom audiences are a gold mine when it comes to detailed targeting.
But with so many options to choose from, they can often cause problems for marketers. Having tons of features is wonderful, but it can also be overwhelming. Targeting is the main reason your Facebook ad is not working.
If you target the wrong audience with the wrong offer, you won’t get a single sale. But if you target the right audience with a stellar offer, you can skyrocket sales almost instantly.
One of the biggest mistakes is targeting only demographic data. Most people don’t target interests and exclusions, either. Those are both huge mistakes when using custom audience targeting on Facebook.
On top of that, people target too narrow of a recency window, limiting their sales potential. Instead, try creating custom audiences using your Google Analytics data. This will allow you to target users who have shown proven interest with specific offers.
Try targeting by frequency, too. This will help you appeal to people further down the sales funnel who are more primed to buy. Lastly, create a 1% lookalike audience to find the best results.
Facebook custom audiences that are properly optimized are a solid way to amp up your return on investment, so make sure to get them set up to work for you.
What are some of your best custom audience hacks to generate better results?
But reaching that massive audience is harder than ever before.
What’s the answer on how to grow a Facebook page? That’s exactly what we’ll cover in this article.
Let’s get started.
What Exactly Is Organic Reach On Facebook?
Organic reach is the number of people who see your content without paid distribution. It includes people who are shown your posts in their own feed or because their friends have interacted with you.
Paid reach is the people who see your content as a result of paid promotions. It is influenced by your ad targeting options and can also impact how to increase organic reach on Facebook.
But it’s not so simple.
Your content’s reach has a lot to do with engagement — that is how many people like, react, comment, or share your post.
Engagement rates are way up — but organic reach is way down.
And it is still on a rapid decline. So why aren’t our posts being surfaced more often?
More content: More content is being published than there is news feed space for it to be shown. Every minute, more than 510,000 comments and 293,000 statuses are posted on Facebook.
Personalized news feeds: Facebook provides the most relevant content to each user. To increase engagement and optimize user experience, content is tailored to each user’s individual interests.
Can businesses keep succeeding with this decline in organic reach? Absolutely.
You can still get tons of traffic from Facebook.
The network’s ad platform has cushioned the damage for those who’ve made the most of it. The advertiser count to date has surpassed 10 million.
Knowing this, should marketers really worry about how to increase organic reach on Facebook?
Wouldn’t we be better off focusing on Facebook ads?
Yes and yes.
Here’s why.
Why You Need To Think About Declining Facebook Organic Reach
Organic reach is important for several reasons. Mainly so you don’t have to pay to play. So, don’t underestimate the importance of how to increase organic reach on Facebook:
Reason 1: Nurture More Leads and Organic Conversions
Many people use social media solely for brand awareness.
That’s fine – but it leaves so much opportunity on the table to drive real results for your business.
Lead generation is one of the missed opportunities. It also happens to be the linchpin of any successful marketing campaign.
You need to attract potential buyers and lead them into your sales funnel. When you do this organically, it won’t cost you anything besides time and effort.
In turn, the price of converting these potential buyers into actual buyers will be less.
That’s because the results of an organic campaign tend to snowball. This means that when more people engage with your content, it adds context to your campaigns.
The more organic reach that you have, the better your lead generation and conversion funnels will work.
Reason 2: Reduce the Cost Per Click of Paid Campaigns
Yes, Facebook’s ad product is one of the most intuitive and impressive that we’ve ever seen.
And yes, the sophistication of the audience targeting options is every marketer’s dream.
AdExpresso analyzed over 636 million dollars of ad spend and determined the average ad cost for the whole of 2021.
Here’s what they found:
As you can see, the average CPC for ads can be very low if you master the other variables.
But here’s the deal:
You can just as easily spend a fortune on Facebook ads and see no return. This means that to increase the effectiveness of your ads and stretch your advertising dollars, learning how to increase organic reach on Facebook is critical.
Reason 3: There Are Tons of New (Under-Utilized) Facebook Features
Many companies aren’t making the most of these features — which creates an opportunity to drive organic traffic by filling the gap.
With that said, let’s look at how Facebook’s news feed algorithm works to surface content.
Then, we’ll dive into some strategies on how to increase organic reach on Facebook.
Understanding Facebook’s News Feed Algorithm
Facebook’s algorithm has changed drastically in recent years. The introduction of reactions and the “Why am I seeing this post” feature has changed how Facebook decides what posts to show users.
Facebook uses hundreds of thousands of factors to decide which posts show in a user’s News Feed.
Who you interact with, the type of media, and the popularity of the post are all used as ranking signals.
According to Mark Zuckerberg, Facebook now prioritizes posts that spark “meaningful interactions” and posts from friends and family.
There are other detailed data points that come into play:
how recently the post was published
how frequently the publisher posts content
the number of likes, comments, and shares on the post
how often the user has interacted with the page posting the update
past user interaction with the same post type
negative feedback on the post
how useful the post is
The list goes on, but these factors give us enough food for thought.
So, with this in mind, what’s Facebook’s ultimate goal for News Feeds?
Like other platforms, Facebook cares the most about its users. It wants to continuously improve their experience with high-quality, relevant content.
Facebook is a social platform and your brand needs to have a human touch. Don’t just schedule your latest blog links and product updates. Post your team photos like Zappos.
Social media marketing should show your funny or creative side, like Nutella.
Facebook is based on interest, not intent. Not every update you send out on your Facebook page should be promotional. Rather, 80% of your updates should be social. Otherwise, users won’t hesitate to click the unlike button on your page (it’s just a click away).
Instead, use Facebook to build a community. Add value and start conversations with your audience.
It’s best to vary your posts to include different types of content:
Brand story posts
Authority building posts
Lead nurture posts
Personal posts
3. Don’t Try to Cheat the Facebook Ecosystem
Buying 5,000 likes for $5. Using clickbait headlines. Bombarding your fans with 10 poor-quality updates in an hour.
It’s a sheer waste of time and money.
Facebook seriously cracks down on spammers. Stick with the Facebook code and stay in their good graces.
Not only that, these manipulative tactics add no real value to your business. In fact, they’re likely to hurt you.
AdExpresso conducted a paid like experiment where they posted an identical video on three of their fan pages. They then paid to boost each post.
The result?
The two pages where they bought likes saw zero engagement, even after Facebook had automatically deleted the likes that were paid for.
4. Don’t Build a Fanbase You Can’t Sustain
The brutal truth about a large fanbase – no matter how targeted – is that your reach will automatically be lower.
This means that you have to put in extra work to create content that is relevant and useful to several different segments of your audience.
Would you rather have a small but hyper-engaged audience or a large and unresponsive one?
It’s a no-brainer.
How To Track and Analyze Your Current Facebook Organic Reach
Now that you know what you shouldn’t do, it’s time to work on how to increase organic reach on Facebook.
The first step is to pinpoint where your shortcomings are. We’ll be gathering some key metrics to measure your performance.
Without this diagnosis, you won’t know where to focus your efforts.
Let’s jump in.
Step 1: Export Insights Data from Facebook
First, click on the “Insights” tab on the left sidebar of your Facebook business page.
At the top of the insights page, there’s a button that will allow you to export your data both on a page and post level.
A window will pop up with three different options for your insights:
Select your option and click “Export Data.” Your data will be saved onto an excel file.
Step 2: Delve in Deeper to Post Metrics
In my experience, post level metrics are more insightful than page metrics.
Page metrics give a great panoramic view of your performance. Post metrics provide a more detailed look at how users interact with your content.
And that’s what really makes the difference.
To get a deeper view, go to “Posts” and then “Post Types.”
With the data you collect, you can tell:
Which posts have the highest organic reach
What types of posts that your audience prefer
Number of likes on each post
These will give you a good guideline for launching an effective content strategy.
Step 3: Fine Tune Your Data and Select Only The Metrics You Need
Not all of the data points will be useful.
Sift through them and choose the ones that make sense for you — and that might vary based on your industry and social media goals.
Here’s the data that will tell you the most:
Organic reach
Engagement
Link clicks
Number of people who gave negative feedback
Now that you’ve analyzed your organic reach, it’s time to make some improvements.
20 Strategies to Boost Facebook Organic Reach
Remember that every industry and audience is different. I don’t recommend implementing all of these strategies right now. Instead, look at your data and see where you can make the most improvements, then pick a handful of strategies to try.
Keep what works, ditch what doesn’t, then try another strategy. Rinse and repeat.
1. Build Your Presence and Authority
I know what you’re thinking.
If organic reach decreases as the size of your audience increases, where is the value in growing your presence?
Well, there are still several benefits of having a large presence.
You get to add social context to your ads, which makes them cheaper and more effective.
You’ll have better posts and page insights to tailor your marketing efforts. This includes both demographic and psychographic data.
Your perceived influence will increase, which amps up your credibility factor.
Growing your presence is not about increasing your page likes. The number of likes your page has gives no indication of how your content will perform.
What matters is that you build enough authority to command your audience to action. This means that they will engage with your content more favorably.
Here’s what you can do to increase engagement:
Attract the Right Kind of People to Your Facebook Page
Random fans are useless.
They don’t engage and they don’t have a positive influence on your marketing campaigns.
This is why I don’t recommend trying to grow your Facebook page at the expense of building a targeted audience.
You want people who are finely tuned to your business interests.
This way, the content you publish will be more relevant to them. In turn, it will have a greater chance of showing up in their newsfeeds.
What can you do to build a targeted audience?
Have a Strong Brand Presence
If your brand is watered down, chances are your audience will be too.
What you want is a brand image that sticks in the minds and hearts of your audience.
Constantly reinforce your message, post content that is relevant to your business, and always be consistent.
Use Audience Insights to Build a Target Persona Specifically for Facebook
Earlier, we walked through the tracking of your page and post insights. This same information can be used to construct your persona.
Gender, age, background, location, and occupation are all black and white data points that you can collect.
You can then flesh it out with more substantive information like:
What are their pain points?
What are their interests?
What are their attitudes and beliefs towards your business or industry?
What are their objections and how will you address them?
Target That Demographic When you Boost or Promote Your Posts
You can create a custom audience modeled after your ideal persona. This way, when you boost or promote a post, you’re more likely to reach those people.
Later, I’ll walk you through the best practices for paid campaigns.
Make Sure Your Like Campaigns are Very Targeted
I’m all for more likes – but not if it’s only a vanity metric.
You want quality over quantity.
There are a few ways you can attract the kind of people who care about your brand:
Apart from running like campaigns on your target audience, you can invite people who have liked your individual posts to like your page.
First, plug in your page in the search bar.
Select one of your posts and click on the group of people who’ve liked it.
This is a goldmine for finding people who already have an affinity for your content.
Browse through to see how many people who’ve liked your posts but have not liked your page.
Invite them to do so.
9 out of 10 times, they will.
Add Integrations and Customizations to Your Page
You can integrate your Facebook page with other apps, tools, and platforms. These can increase the usability of your page as well as amplify your marketing efforts.
Here are some of the customizations that you can include:
Cross-Promote Other Social Media Platforms with Facebook
If you’ve built a sizable following elsewhere, you can use these platforms to grow your Facebook page.
Here’s what you can do:
Leave a link to your Facebook page in the bio of your other social accounts
Place clickable social icons on your cover photos
Broadcast to your other networks about your Facebook page and ask them to engage
2. Drive Facebook Organic Reach By Publishing Evergreen Content
Too many people aren’t strategic with their social media content.
Whatever your goals are for your Facebook page — be it to generate revenue or drive traffic — evergreen content is the most powerful tool at your disposal.
The life of a post in Facebook News Feed is also dependent on recency. If you publish timeless content, then it will be useful for your audience for longer periods. They’ll keep engaging with your post.
Be sure to let users know that they can revisit evergreen posts that they’ve liked and engaged with in the past.
This will lead to an increase in engagement and Facebook will ensure that your post gets distributed further and that it appears in feeds for longer periods.
I challenge you to boost post durability with evergreen content.
The above evergreen post appeared 18 hours after being posted.
That’s an extremely long lifespan!
For posts that perform this well, you can repurpose them to ensure that you maximize their reach.
Here’s a simple process for repurposing evergreen content:
Select posts that have done exceedingly well and continued to provide value to your audience long after it was published. Take a note of them in a spreadsheet.
Approach that piece of content from a different angle. Put a new spin on it or change the context. Keep in mind that video content can outperform the same content in text form and vice versa. The key is to test what resonates best with your audience.
Publish your repurposed content at different times. This ensures that some fresh eyes get to see and engage with your newly revamped content.
But what if you don’t want to do the legwork of creating and repurposing your own posts?
Curate Other People’s Evergreen Content
Content curation is not about taking someone else’s work as your own.
It’s about collecting posts from across the internet and sharing them with your network.
But it’s a little more than just stumbling across a post, liking it, and pressing the share button.
Instead, you should treat the curation process just like you would if you were publishing your own content. Spend some time reviewing and analyzing several posts on the same topic and share them with your audience on a consistent publishing schedule.
Prime example: Later tells the stories of brands they’ve impacted successfully through their resource offerings.
While they do this on their blog, you can adopt the same concept for your Facebook page.
Here are some examples of evergreen content using curation-type posts:
Video tutorials
Recipe posts
Testimonials
Interviews
“How To” posts
Q & A’s
Thought pieces
Lists
Checklists
Industry-specific stats
Weekly roundups
Company mentions
Industry news
How can you ensure that your audience engages with this content?
Ensure your posts have all the persuasive checks and balances.
Join a highly engaged and relevant group that serves your business goals.
We’ll focus on number 1, as it is the best addition to your Facebook marketing arsenal.
You can use it to listen and engage with your brand advocates.
Before we get into the steps for building your group, let’s talk about the reasons you may want to start your own group.
Most people form groups around:
Their brand/business
Their products/services
A specific lifestyle, e.g., a book club or a journaling club
Specific topics, e.g., a content marketing group
Of course, these aren’t your only options. As long as you can rally a group of people for a common goal, you’re good to go.
I’ve found that the most valuable groups for business are those that are either brand-specific or product-specific.
Here’s why.
You can use a branded group to build and nurture a community around your business. It also makes for a powerful tool to market your products/services.
Similarly, a product-specific group is geared towards helping customers get the most out of a product or service that you offer.
It’s all about customer success, retention, and loyalty.
You can do live coaching sessions, live Q&As, personal implementation feedback sessions, and accountability systems in your groups, to ensure that customers receive the transformation that they paid for.
Let’s get into the steps for creating a group.
Step 1. Create and Name Your Group
Find the option that says “Create Group” to begin the process.
It’s easy to find from your homepage.
After you click on this tab, you’ll be prompted to name your group.
Step 2. Create a Description
Write down your value proposition in your group description and lay down clear rules for posting in the group.
Pro Tip: Pin your rules post at the top of the group feed. It will guide new members to act appropriately.
Also, set up your group’s privacy settings properly.
Step 3. Invite Engaged Audience Members to Join
Depending on the type of group, you may have to incentivize people to join.
However, with most groups, the promise of community and support is enough to get them on board.
But in case you need some incentives, you can:
Have an actual launch for your group. Why not turn it into an event? You can set up an email capture form to get people on a notification list.
Offer a welcome gift to new members. It could be a coupon code, an ebook, or anything related to your business.
Offer a bonus referral gift to anyone who recruits other members.
Step 4. Ignite Conversations Relevant to Your Industry
Great conversations help boost post engagement. Don’t solely promote or sell your content and products.
Other ways to increase engagement in Facebook groups:
Consider giving active members of your groups admin/publisher status so they can help nurture the group.
Do live Q&As
Create challenges for group members
Step 5. Create a Content Strategy for Your Group
This can include creating content themes and inciting user-generated content campaigns. User-generated content actually drives 6.9x higher engagement than brand-generated content.
For example, you can set a designated topic or engagement theme for each day.
Melyssa Griffin’s group does this very well:
Step 6. Moderate Your Posts
Moderate all of the posts in the group and have a zero-tolerance policy when it comes to spam.
You want your group members to have the best possible experience, so weed out the spammers quickly.
This is a lot easier when you establish in your group rules what qualifies as spam.
So, that’s it for setting up a group.
I want to warn you, though: Groups require a time commitment. You’ve got to show up to welcome new members and encourage discussions.
Also, as groups grow, engagement decreases. At this point, you may want to consider segmenting larger groups into smaller, more focused ones.
Some people completely dismantle groups with tens of thousands of members because of poor engagement.
You don’t want that.
4. Use Organic Post Targeting
Targeting isn’t limited to Facebook Ads.
You can target your organic posts to make sure that they reach the right people.
While it’s been around for a while, the feature has gotten more useful with the decrease in organic reach of quality content. You can serve your post to relevant customers based on their age and location.
Your post has to at least target 20 people. You might get below this threshold if your page only has a few thousand fans.
Here are the steps to get started with targeting.
Step 1: Enable the Targeting Feature on your Page
Head to General settings to enable targeting from your page settings.
Step 2: Create Your Post and Customize Targeting Options
Dig into your Facebook Insights for data about your audience and choose targeting parameters based on your goals.
When you create your post, click the “Public” setting under your page name, and you’ll see the option to set a “restricted audience.”
Select “Restricted Audience,” then set the age and location you want to reach. This is especially useful for local businesses or those with multiple target audiences.
Step 3: Run Several Targeted Posts Using Different Parameters
This is so you can test how your content performs for different audiences.
Step 4: Check the Results
Hop on Facebook Insights and check your results. Did the organically targeted post perform better?
Compare these social media marketing results with your average engagment rate. Also, figure out the targeting parameter that’s performing better.
your audience profile (age, interests, occupation, etc.)
the type of content that you create
the scheduling tools that you have at your disposal
CoSchedule reports that the optimal times are 7:00 AM, 3:15 PM or 7:00 PM.
They even broke it down according to each day of the week:
Friday at 7:00 AM, 3:15 PM or 7:00 PM Wednesday at 7:00 AM, 3:15 PM or 7:00 PM Monday at 7:00 AM, 3:15 PM or 7:00 PM
For the most shares and clickthroughs, they’ve cited 12:00 PM, 6:00 PM, or 9:00 AM as the optimal times.
Here are a few more studies and optimal times for any media marketer or business owner to best time good content.
Scratching your head already, aren’t you? Don’t blindly post at any of these optimal times.
Dig into your Facebook Insights. Find out when your fans are online.
Then, conduct your own test.
Post in the off-peak hours (6 PM – 8 AM) with the maximum possible fans online. Your chances of appearing in the feed increase since other Facebook pages aren’t posting during this period.
Here are the results when Track Maven tested with this social media marketing strategy.
Jon Loomer also tried posting links at off-peak hours and had positive results with his organic reach.
The reasons why this strategy is effective (besides less competition) are:
If you have an international audience, you’ll reach out to fans in a different time zone.
As your post receives higher engagement, Facebook will distribute the post to more of your fans.
It might even boost post views over the newer content published during peak hours.
Note: You can monitor the social media marketing posting strategies of your industry competitors using Fan Page Karma.
6. Post the Content Your Users Like
Links have worked better for driving traffic. Sometimes.
Photos have become an unpopular post type with users, and hence, with marketers.
My recommendation is to post all types of updates that add value for your fans, be it links, images, polls, Facebook Lives, Facebook Stories, or even Facebook Watch videos.
Don’t stick with one content form into another just because a certain type of post is (currently) performing better on Facebook. Just like Google Facebook updates its algorithm regularly.
Instead, analyze your data from Facebook Insights to find the type of posts that resonate with your audience.
If you can, try serving value in the types of content that your audience likes.
You can also ask your audience what they prefer and respect their choice.
Simply create a poll on your Facebook page:
Post your question.
You might be surprised by the results! Don’t forget to test new features when they come out.
Facebook Watch, for example, drove tons of traffic when it was first released, and a lot of marketers are still not using it!
7. Publish Videos Natively on Facebook
In recent years, there has been a shift to video content.
Facebook tends to favor video updates, causing media marketers to use more video blog post content.
Native videos are one of the strongest performers in the news feed.
The video plays silently until a user clicks on it. It’s important that your video is high quality from the first frame. It also needs to capture attention, even without sound.
To further engage the video viewers, you can add a call-to-action (CTA) to visit your website or a destination of your choice. This can be included in the final frame, or you can boost the video and use Facebook’s Ad CTA buttons.
AdExpresso found that “Learn More,” “Shop Now,” and “Sign Up” are more popular.
You also get rich video insights, so you can find out what is working with your audience.
If you want, you can pin a video to the top of your videos tab on your Facebook page. Just click on “Feature this Video.”
BuzzFeed got 1.7 million views for a featured video.
The featured video also appears prominently below your About section. Social Media Examiner used it to promote their upcoming event.
You can also embed the video in a blog post. It’ll make for a good multimedia experience for your blog audience and it can also increase the engagement on the Facebook post.
But, can you embed videos from YouTube or should you upload them directly on Facebook?
Naturally, Facebook favors native uploads over embedded videos from YouTube or any other third party. A business owner should not be intimidated by this media marketing strategy.
This SEJ study was performed for two weeks on three Facebook pages – Search Engine Journal, Stunning and Interesting Facts, and Did You Know.
Here is a detailed breakdown of the numbers.
Native videos also offer a better user experience and are usually cheaper to promote.
You can use native videos for Q&As, product launches, and co-creating with other targeted users.
8. Test Your Posting Frequency
How often should you post on Facebook? Well, it depends.
Massive websites like Huffington Post, Telegraph, and The New York Times publish a huge amount of content every day. They also push their content aggressively on Facebook.
For the average brand, this isn’t realistic.
Don’t be tempted to post 20 times a day.
Engagement actually decreases when you post too often.
The rule of thumb is to keep it between 1-3 posts/day, depending on your following.
Here are a few takeaways on the frequency of posting for social media marketing on Facebook:
Avoid posting more than the recommended one to three times a day. It can overwhelm your audience.
You can post more often at widely different times if you’ve got an international audience. That’ll help you reach out to different segments of your audience (who live in a different time zone or log in to Facebook occasionally).
Always post high-quality content. Engage your audience with humor, inspirational, and educational content.
You can be successful, even with a higher posting frequency, by providing great content variety. Mix your posting schedule and post types.
Test your page frequency. Only your data can reveal your audience’s exact response.
9. Partner with Other Facebook Pages in Your Niche
A while ago, I shared a case study on how I used Instagram to earn $332,640 in 3 months. I struck deals with Instagram influencers (having a huge following) to post links to my landing pages.
You can use a similar strategy on Facebook.
I reached out to Facebook Pages having less than 30,000 likes for my Nutrition Secrets project. I offered a shoutout for shoutout deal to Facebook pages in my niche (about 1 in 10 pages accept such requests).
This helped me to increase the number of likes on the Nutrition Secrets Facebook Page. Any business owner will appreciate the simplicity of this media marketing strategy.
Similarly, have a look at the Facebook pages of media websites like Huffington Post and Elite Daily. They both have millions of Facebook fans and a similar audience (for certain types of content that they publish).
They share each other’s blog posts on Facebook regularly. This boosts post views for both parties while providing good content they didn’t need to create. This is simply smart media marketing.
Here is an example of a Huffington Post blog post shared by Elite Daily’s Facebook page.
And, here’s an Elite Daily blog post shared by Huffington Post.
Wired and Refinery29 also seem to have a similar partnership.
To achieve good results from this strategy, you’ll need to strike deals with pages that have tens of thousands of likes.
This means you need to have a solid influencer outreach strategy.
Here’s what you need to consider:
Is your target influencer the right fit, contextually? Your brand needs to resonate with its audience. Promoting your brand to a misaligned audience won’t have an impact.
How much reach do they have? Your influencer doesn’t need millions of followers. They just need a solid enough reach to make a difference.
How much authority do they have? It’s critical that your influencer has enough influence to inspire action among their audience.
What’s your leverage? If you’re targeting someone with a massive following and authority, you need to have something just as valuable to offer.
10. Use Word-of-Mouth Marketing to Grow Your Brand
There’s no better way to generate buzz for your brand than to turn your customers, employees, and fans into advocates.
Word-of-mouth marketing is the practice of leveraging devout fans to spread the word about your business.
Think about brands like Apple, Microsoft, and Nike.
They are known for their die-hard fans who constantly promote their products and content.
Reach out to the right people. Engaging your employees is one of the most effective ways of cultivating a culture of advocacy. Give them a reason to rave about your business!
Offer rewards and loyalty points to customers.
Give referral bonuses for recruiting more people into the network.
Create special brand content that your advocates can share with their networks in real-time.
Always measure the effectiveness of your advocacy program. You can track sales from referral links, engagement on branded content, and the overall performance of your advocates.
11. Put Your Email List to Work
Do you ever wonder how I receive hundreds of shares and comments on every blog post I write?
It’s triggered by my email subscribers.
I simply email them, informing them about my new post. They kick off the interaction and sharing on every post.
Jay Baer shows us the similarities between an email list and Facebook fans.
So, how can you inspire social actions from email?
Simple social media marketing suggests starting by adding Facebook share buttons to your email newsletters. Some email platforms, like Mailchimp, make this easy.
Otherwise, you will need to create an HTML version of your email and create custom code for the share buttons.
Here’s how:
Convince and Convert further recommends sending out your popular and interesting status updates to your email list on the same day.
This increases reactions and comments on the post and drives engagement on your Facebook page.
You can also combine this email list with the Facebook group strategy.
Ask your subscribers to join exciting conversations on your exclusive Facebook group.
Killer Strategy to Increase Facebook Shares
Say you already have a few hundred social media shares on your post. How would you like to increase the number of shares to a thousand?
You need to plan a strategic email outreach campaign to influencers, transitioning from just a good content strategy to boosting post views.
Identify the overlap in social media trends to your email campaigns for opportunities.
Combining the content messaging just makes sense.
The relationship between the two builds your brand engagement showing they can successfully go hand-in-hand.
12. Run Contests to Drive Facebook Organic Reach
Facebook contests are a simple way to increase your presence quickly.
But it’s a little more than just luring fans with a free gift.
Here’s what it entails:
Step #1: Set a Goal For Your Contest
Do you want to increase engagement? Grow your fan base? Generate more leads?
Whatever you decide, ensure that it is specific and measurable.
Step #2: Select What Type of Contest You’ll Run
If your goal is to generate leads, then your entry method should include a mechanism to capture those leads, for example, an email grab.
If your goal is to grow your Facebook fan base, you can require participants to follow and like your page to enter the contest.
Do you see how your method of entry should be tailored to your goal?
Step #3: Determine the Rules of Entry
Before you do so, be sure to check out Facebook’s guidelines for running contests and challenges.
You’ll still be required to set your own rules for the contest.
Simply write up a brief letting participants know how the winner will be chosen, who’s eligible to enter, and the details of the prize.
Step #4: Decide How to Select Winners
With most contests, the winner is usually chosen randomly.
If your promotion is a challenge, then you will need someone or a group of people to judge the entries. Alternatively, you can have a voting system to pick a winner.
Step #5: Choose a Prize and Develop a Promotion Strategy
This is where most brands fail miserably.
If you don’t pick your prize carefully and promote your contest, there’s a good chance it will flop.
Always pick a prize that is relevant to your business so you avoid attracting people who are in it just for the freebie.
Here are some ideas for promoting your contest:
13. Share Posts From Your Facebook Page on Your Facebook Profile
This strategy is for avid Facebook users. You should have at least 1,000+ friends on your personal Facebook profile to drive significant results.
You have the content. Now, let’s boost post views.
You first share a post on your Facebook page. Then, you share it from the page on your personal Facebook profile.
WPChronicles increased its reach from 5 people to 134, by using this strategy.
Keep in mind, this strategy isn’t scalable and you might annoy your friends if you do it to much.
However, you can use it occasionally for posts that add value to your Facebook friends.
Pro Tip: If you just started your Facebook page, you can quickly build your first 100 fans and get social proof. Just use the “Invite Friends” feature.
This feature can also be used to grow your Facebook page from your email list. It isn’t available to all Facebook pages, though.
Using it is simple. Upload your contacts from MailChimp, Constant Contact, or any other email services. Facebook will find them and ‘suggest’ that they like your page.
14. Drive Organic Facebook Traffic With Hashtags (Used Carefully)
BuzzSumo analyzed more than 1 billion Facebook posts from over 30 million pages.
Their study seems to agree with the general consensus that Facebook users are prone to hashtag fatigue.
Posts with hashtags performed worse than those without.
Does that mean that marketers shouldn’t use hashtags on Facebook at all? Not exactly.
There’s a lot of utility in Facebook hashtags.
It’s a matter of experimenting with relevant ones to see what works in your industry and for your audience.
They should also be used in moderation — one to two hashtags maximum.
Why so little?
Post Planner reported interactions are highest when one to two hashtags are used.
While the consensus is that you shouldn’t hashtag everything, Facebook is still built to accommodate their use.
This means that you can get quite a bit of functionality out of them without adding hashtags to all your posts.
Here’s how.
Create Your Own Hashtags
There’s no special protocol for creating hashtags.
Anyone can do it.
I recommend making your hashtags unique to your brand, so it doesn’t get confused with anyone else’s. It’s also smart to use the same branding style hashtags on all social media platforms, so there’s familiarity across channels.
Pro tip: Use your branded hashtags as a metric to track your brand equity on Facebook. Their popularity will give you a good indication of how many people are buzzing about your business at a given time.
You can also point your audience to the URLs of specific hashtags so they can participate in the relevant conversations.
Use Hashtags to Make Your Facebook Group Easier to Navigate
Facebook creates a unique URL for each hashtag used. This means that you can use them to search for content.
This is particularly useful in groups when you don’t want evergreen content to be buried. Simply hashtag them so users can continue to refer to these content pieces by conducting a quick hashtag search.
For example: If you create content themes like I’ve recommended, your users can find all published content for each theme by searching for the unique URL.
Take Advantage of Facebook Trending Topics
Ever heard of newsjacking?
It’s when someone piggybacks on a trend to gain exposure for their brand.
We’ve seen it is best to use hashtags sparingly.
But if there’s ever a prime time to use them, it’s when they link to a trending topic. This way, you tap into the traffic and increase your exposure.
A big piece of the organic reach puzzle is competition.
You have to fight for the attention of your audience.
Want to know the best way to always be ahead of your competitors?
Find your differentiating factor and flaunt it.
Both your visual and written content should stand out.
Some pro tips for your visual content:
Avoid blues and grays at all costs. These colors are dominant in Facebook’s theme which means you’ll morph into a user’s news feed. You want to use colors that will stop someone in their tracks. Red, yellow, and orange are great options.
Create multiple visuals per post and A/B test to see which one performs better. After you’ve conducted several tests for your posts, you’ll begin to see a pattern emerge. Your audience likely responds to a few designs better than the rest.
Add call-to-action buttons on the actual image. This is because you want as many visual cues as possible to let users know that they should “Click Here.”
Don’t use stock photos. Transparency and authenticity matter on Facebook. Create your own images to humanize your brand and share visuals your audience can connect with.
Capture and keep attention with short captions on your visuals. Posts with 80 characters or less receive 66% higher engagement.
Ask questions. Posts with a question have higher engagement than those without.
16. Take Advantage of New Facebook Features
Facebook’s constant app updates are no secret.
The changes come fast and frequently.
But here’s the thing:
They may fly under your radar if you don’t make it a priority to stay informed. That’s because new features are almost always released in different segments of the platform at different times.
You can take advantage of these updates.
When you get in on them early, you get the early mover’s advantage. This means that you can master it faster than anyone else and tap into the new capabilities for the benefit of your business.
Some recent updates that provide golden opportunities:
Feeds: Facebook has added a new dedicated Feeds tab, making it easier for users to keep track of posts from friends, family, and the different Groups they are a part of.
Multiple Profiles: Facebook is currently testing a feature that would let users have different profiles on the same account, potentially having distinct profiles for different people they want to interact with.
Facebook Reels: Facebook is now giving users the ability to create Reels from their existing videos using Creator Studio, and is also introducing API access for third-party developers.
Marketing Messenger New Features: A new option was recently announced that will allow users to send promotional messages to any customers that opt into the feature.
Political, social, and electoral ad transparency: In the wake of recent controversy around the platform, Facebook has rolled out a set of transparency tools. These can show targeting details like demographics and ad budget dedicated to said demographics.
17. Create an Effective Facebook Paid Marketing Strategy
You must be wondering, “I thought this was about organic traffic?”
Here’s the thing:
Paid reach can funnel into your organic reach and extend the lifecycle of your posts.
This means it will be shown to more people and users will be able to interact with your content for a longer period of time.
How is this possible?
It’s simple.
People can still see your post even though they weren’t targeted through paid distribution.
The audience that you pay for may decide to share and engage with the post. In that case, it will gain an organic reach when their audience also engages.
Now let’s get into how to run effective paid promotions for your posts.
Step #1: Install the Facebook Tracking Pixel on Your Site
The Facebook pixel allows you to track the specific actions taken on your website and other landing pages.
Better yet, it allows you to build custom audiences so you can retarget people who’ve visited your website.
If you haven’t installed it yet, go to your “Ads Manager” or “Power Editor.”
You’ll be prompted to create a Pixel if you don’t have an active one.
After you’ve created your Pixel, you’ll receive a tracking code that you have to copy and paste into the header of your website.
To easily place the Pixel on your website, you can do one of two things:
Use Google Tag Manager to place the code in your title tags without messing around with your website’s HTML files.
Use a WordPress plugin called PixelYourSite. After it’s installed, get your Pixel ID from your Ads Manager and simply copy it into the settings of the plugin. There’ll be no need to play with codes and title tags.
And that’s it!
Do this once, and you’re good.
Step #2: Gain Traction Organically Before Paying
We’ve seen how organic and paid reach work hand in hand.
This is an effective way to ensure that your ads reach more people at a cheaper cost.
Some tips for organic promotion:
Share your post multiple times on Facebook. Make sure you vary the format as well as the time that you publish.
Reach out to influencers to share your content with their networks.
Post to other Facebook pages and groups where you’re allowed to.
Step #3: Create Your Ad or Boost Your Post
You can either run an official Facebook ad or a boosted post campaign.
At first glance, they appear the same.
So what’s the difference?
A few things.
Ads are created using your Ad Manager while boosted posts can be run directly from your business page.
You must first publish a post on your page to boost it whereas an ad does not need to be on your page.
This means the strategy of promoting posts organically first, is best suited to boosted posts.
Let’s get into the details.
How to Boost a Post on Facebook
First, find the “Boost Post” button under your post.
Select a goal:
Narrow down your audience.
You can opt for:
People who like your page
People who like your page and their friends
People who you choose through targeting
Set your budget and duration of your campaign.
Finally, ensure that your Tracking Pixel is turned on.
So that’s it for boosted posts.
What about actual Facebook ads? The concept is not much different.
Create a custom audience: To reach people who’ve already engaged with your business. For example, you can import your email list to form a custom audience.
Create a lookalike audience: To reach new people who are similar to an audience you already have elsewhere.
Use a saved audience: If you’ve run ads in the past, you can use the same audience.
Select your ad placement.
Set your budget and schedule.
Format your ad, write a click-worthy caption, and add an eye-catching image.
After you’ve finalized the creative elements, you can place your ad order, and you’re set to go.
As you see, this is brilliant for recapturing lost leads.
The whole premise is that it’s easier to convert someone who’s already engaged with your business rather than a total stranger.
Now:
Your retargeting ads are set up with the same steps that I detailed above for a normal ad campaign.
Your targeting is the only variant.
Something to keep in mind: Retargeting campaigns take some time to gain traction. Set a goal, decide on a time frame, and commit to running your ads for the duration of that time frame.
Step #7: Determine the ROI of your Facebook Ads
Let’s talk about results.
Facebook campaigns aren’t difficult to set in motion.
Yet, many marketers don’t see the results that they hoped for.
But here’s the brutal truth:
Unless you track your ads, how much they cost, and the return you’re getting, there’s no way you can keep optimizing your performance.
So which metrics should you be tracking?
Conversion rates
Number of times an ad has been served to a user
Return on dollar investment
Click Through Rate (CTR)
Cost per Click (CPC)
These are all available in your Power Editor with Facebook’s Ad reporting function.
Analyze your results and work towards improving them.
18. Harness the Power of Facebook “Dark Posts”
Facebook “dark posts” have been around for a while.
Yet, they’re one of the most underutilized marketing tools.
Is the concept as sinister and shadowy as the name sounds? A bit.
“Dark posts,” otherwise called unpublished posts, are news feed style ads that don’t get published to your news feed. This means that they won’t be found on your timeline or in your fans’ feed.
So what’s the point?
You can:
Create as many ads as you want without turning off your audience
Split test several elements of your ads to select the highest-performing variations
Decide to expose only the high-impact ads to your organic audience and be confident that they’ll perform
Stay in Facebook’s good graces. Your page will be less promotional which is what Facebook’s algorithm favors
Personalize your ad copy for different segments of your audience
Now that you know the benefits, here’s how you can put unpublished “dark posts” to work for your business.
You need to test different aspects of the creative. This includes split testing your copywriting and visual elements to find the highest performing combinations.
It will serve you well for both paid promotions and your organic reach.
We’ve already been through the visual elements.
So let’s talk about copy.
The purpose of persuasive copy is to:
1. Improve Your Click Through Rate (CTR)
CTR refers to the number of people who click through to your website after they’ve been served your ad.
If it’s low, that’s a pretty good indication that your ad copy and visuals need work.
CTR is not a metric that will make or break your media marketing performance, but you also don’t want to get it wrong.
That would mean leaving a better result on the table.
2. Lower your Cost per Action (CPA)
An action will depend on what your conversion goal is.
It could be:
Video views
App installs
E-commerce store visits
Page visits
Shares, comments, and likes
Any action that you want users to take when served your content comes into play here.
The less it costs you to drive these actions, the higher your conversion rates.
So, what does persuasive copy have to do with CPA?
Well, users will only move on a solid call to action (CTA).
In turn, the strength of your CTAs depend on your copy.
How to Craft Compelling Facebook Call-Actions That Convert
Always tailor your CTA to your conversion goal. Generic, one-size-fits-all copy won’t cut it.
Use exclusivity to amp up perceived value. This goes hand in hand with urgency. In fact, words used to convey exclusivity can also be used to drive urgency.
Create urgency to give users an extra push. Think of relevant words and phrases that evoke a sense of now. The fear of missing out (FOMO) will kick in, and users will have a greater chance of taking action.
Eliminate weak verbs like download, save, learn, and find out. These lack the energy and punch to get people excited. If you must use them, add urgency words to modify. For example,CTAs with “Now” at the end always convert better than those without.
Don’t get caught up in the rules. Yes, the tips above have been proven time and time again to generate results. But your audience and what they respond to is what matters. The other elements in your content also factor in, so don’t look at calls to actions in isolation.
20. Focus on Value and Don’t Worry About Reach
As a marketer, everything comes down to conversions and ROI, right?
The organic reach of your posts on Facebook is like a secondary metric.
Jon Loomer puts it perfectly.
If you go after reach rather than valuable content, you’ll be trying to game Facebook’s algorithm.
Deja vu?
Remember Google cracking down on black hat SEOs trying to game their search results?
Every platform wants to improve the experience of its users and increase engagement.
So, don’t go around chasing Facebook’s organic reach.
Instead, share every post with an objective.
With links, you want to get clicks and drive traffic to your website.
Status updates should be focused on engaging with your audience and getting comments.
Share graphics to inspire your audience and get engagement.
Share videos to primarily get video views. The CTA in the video can be used to drive traffic to your website.
The organic reach of your page is not the best performance indicator.
So while you may want to amp up your game, you need to consider how much reach is enough to justify the time and effort it takes to build your Facebook assets.
Write down the goals you want to achieve through your Facebook page.
Consider :
The size of your business
The scale of your operations
Your objectives
Your audience
The ROI of increasing Facebook reach
Only then should you devise a Facebook marketing strategy around these goals.
Choose the metrics you’ll use to measure your results.
Don’t let algorithmic changes dictate your marketing strategy.
FAQs
What does organic reach on Facebook mean?
The number of people who see your content without paying for it is referred to as organic reach. People who see your posts in their own feeds or because their friends have interacted with you are included.
What is a good organic reach?
Since reach is based on unique views of your content, it can be assessed across your entire page or from post to post. Organic, non-sponsored reach is the hardest to gain, but viral reach and ad reach are also options when targeting your audience.
Is Facebook organic reach dead?
Organic reach on Facebook may be down, but it’s not dead. If your reach is close to 3%, you’re at a scalable target. You can also use a paid strategy to boost your numbers if you need to.
The number of people who see your content without paying for it is referred to as organic reach. People who see your posts in their own feeds or because their friends have interacted with you are included.
”
}
}
, {
“@type”: “Question”,
“name”: “What is a good organic reach? “,
“acceptedAnswer”: {
“@type”: “Answer”,
“text”: ”
Since reach is based on unique views of your content, it can be assessed across your entire page or from post to post. Organic, non-sponsored reach is the hardest to gain, but viral reach and ad reach are also options when targeting your audience.
Organic reach on Facebook may be down, but it’s not dead. If your reach is close to 3%, you’re at a scalable target. You can also use a paid strategy to boost your numbers if you need to.
”
}
}
]
}
Conclusion
Facebook is a brilliant marketing tool.
There’s no doubt about that.
The number of businesses that actively use the platform continues to increase by millions, year over year.
Every marketer knows the phrase ‘content is king’, but that content is nothing without readers and followers.
These days, there’s one sure-fire way to get your content out to a broader audience and share your awesome new blog post: social media.
With a ready audience of millions, sites like Facebook and Twitter are some of the best ways of getting the word out. However, if you want to optimize that outreach potential, there’s a super-easy way to do it: open graph tags (OPGs).
Not heard of the open graph protocol behind OPGs? Then let me explain what are they, why do they matter, and — most importantly — how do you use them?
What Is Open Graph and Why Was It Created?
Facebook introduced Open Graph in 2010 to promote integration between Facebook and other websites by allowing posts to become rich objects with the same functionality as other Facebook objects.
Put simply, it helps optimize Facebook posts by providing more control over how information travels from a third-party website to Facebook when a page is shared (or liked, etc.).
To make this possible, information is sent via Open Graph tags in the <head> part of the website’s code.
Other social media sites are also taking advantage of social meta tags. For instance, Twitter and Linkedin recognize Open Graph tags; Twitter has its own meta tags for Twitter Cards, but if Twitter robots cannot find any, it uses OGP tags instead.
See How My Agency Can Drive Massive Amounts of Traffic to Your Website
SEO – unlock massive amounts of SEO traffic. See real results.
Content Marketing – our team creates epic content that will get shared, get links, and attract traffic.
Paid media – effective paid strategies with clear ROI.
OGP tags are vital for marketers because they help ensure that when a user shares a link to your content on social media, the correct information is automatically populated. This can help increase engagement and help potential customers learn more about your brand or product.
Additionally, marketers should care about OPG tags because social media sites are the primary drivers of most web traffic. Consequently, the ability to harness the power of social meta tags is a vital skill for today’s marketers.
Also, using OGP tags can help you track how your content is performing on social media, enabling you to adapt your sharing strategy.
However, most notably: open graph tags can have a massive impact on conversions and click-through rates by solving common issues.
For instance, have you ever shared a link on Facebook only to find the thumbnail was missing, or there was a different picture than you expected?
Knowing just a little about OGP tags can help you tackle these problems and improve your social media marketing.
There’s one thing they won’t do, though, and that’s influence your on-page SEO. However, the boost you can get from the extra reach on social media means it’s worth looking into.
Now, let’s look at the most essential OGP tags for Facebook and how to optimize them for better sharing.
Understanding Facebook OGP Tags
As explained in the intro, OGP tags are crucial because they allow you to control how your content appears when it’s shared on sites like Facebook. The open graph tags let you control the title, description, and image in the post; it’s a great way to ensure your content looks amazing when you share it.
In addition:
Adding OGP tags ensures that you use the correct image and description, which can help improve click-through rate, while enabling you to add specific details such as whether it’s a movie, book, or product.
Using OGP tags allows you to track how your content is performing on Facebook. When someone shares one of your articles on the site, the OG tags send traffic data back to Facebook. This data then lets you see which articles are getting the most engagement, and which need improvement.
Including OGP tags ensures you use the correct image and description when sharing your links on Facebook, which can help improve click-through rates.
Adding OGP tags is easy, and most content management systems have plugins or extensions to simplify the process.
Facebook has several open graph tag types. You can use OGP tags to specify things like the site’s name, the image used as the thumbnail on Facebook, and the description that will appear when someone shares your page.
In this section, I cover the different types, and then explain how to use them.
An example of various OGP tags being used in a post from VentureBeat.
og:title
The og: title is how you define your content’s title. It serves a similar purpose as the traditional meta title tag in your code. In fact, if Facebook doesn’t find the og:title tag on your page, it uses the open graph tag title instead.
As Facebook explains, most content is shared as a URL. If you want control over the way your content looks on its site, you must add OGP tags.
“Without these Open Graph tags, the Facebook Crawler uses internal heuristics to make a best guess about the title, description, and preview image for your content. Designate this info explicitly with Open Graph tags to ensure the highest quality posts on Facebook.”
To get the best from OGP, you also want to think about the way your text appears and its length.
Keep in mind that the text shown on a Facebook feed is bold and extremely eye-catching. It must be compelling, just like a good post title.
There is no limit on the number of characters, but it’s best to stay between 60 and 90. If your title is longer than 100 characters, Facebook will truncate it to only 88!
Example:
<meta property=”og:title” content=”Your eye-catching title here” />
og:url
When you share a link on Facebook, you can add Open Graph tags. These tags help Facebook display rich information about the link, such as an image, title, and description.
This is how you set the canonical URL for the page you are sharing. This means that you define one page to which all your shares go. It’s helpful if you have more than one URL for the same content (for example, using parameters). Important note: URL provided is not shown on the Facebook newsfeed, only the domain is visible.
This is how you describe the kind of object you share: blog post, video, picture, or whatever. The list to choose from is long. Here are some examples:
This tag is important if your page has a “Like” button and represents a real-life object (like a book or a movie). It determines if your content appears in a user’s interest section of her profile in the event they “Like” it.
In most cases, you will use the “website” value since what you are sharing is a link to a website. In fact, if you don’t define a type, Facebook will read it as “website” by default.
Example:
<meta property=”og:type” content=”website” />
og:description
This metadata descriptor is very similar to the meta description tag in HTML. This is where you describe your content, but instead of it showing on a search engine results page, it shows below the link title on Facebook.
However, unlike a regular meta description tag, it won’t affect your SEO, but it’s still a good idea to make it compelling to get people to click on it.
Og: description tags don’t limit you to a character count, but it’s best to use around 200 letters. In some cases, depending on a link/title/domain, Facebook can display up to 300 characters, but I suggest treating anything above 200 as something extra.
Example:
<meta property=” og:description” content=” Your entertaining and descriptive copy here, if your meta description is good, use it.”/>
og:image
This is the most interesting OGP tag for many marketers because a picture always helps content stand out. This is how you ensure that Facebook shows a particular thumbnail when you share your page, and it can be beneficial for your conversion rates.
Make sure you set the og:image you choose, otherwise, Facebook shows something stupid like an unwanted ad banner scraped from the page or nothing. You definitely don’t want that!
Here’s a few more pointers:
It’s important to remember that if your page is static and you don’t use any sort of content management system (CMS) (like WordPress), you need to change the og:image manually for each of your pages.
If you control your website with a CMS and you install the relevant plugin, the og:image tags are assigned automatically for each page. Look for the list of plugins further down.
The most frequently recommended resolution for an OG image is 1200 pixels x 627 pixels (1.91/1 ratio). At this size, your thumbnail will be big and stand out from the crowd. Just don’t exceed the 5MB size limit.
An example of the og:image OGP tag with the image rendered at full size.
If you use an image that is smaller than 400 pixels x 209 pixels, it will render as a much smaller thumbnail. It’s nowhere nearly as eye-catching.
An example of the og:image OGP tag with the image rendered at a smaller size.
Keep in mind that the picture you use as an Open Graph image can be different from what you have on your page.
Why wouldn’t you leverage that opportunity to stand out even more?
For example, if your title is good, but the picture you are using is not very exciting (not an infographic or a good-looking person, etc.), consider using an image with a good line or two of copy instead (see example below).
One thing you need to remember if you do this: place your text, or the most significant part of it, in the middle of the image. This matters because Facebook trims the sides of thumbnails.
An example of putting text in the most effective part of a thumbnail.
The Open Graph tags above are the ones you need to know. However, you can use other, more advanced tags to provide even more in-depth specifications.
For example
og:locale – defines the language; American English is the default
og:site_name – if the page (object) you are sharing is part of a larger network
og:audio or og:video – to add additional audio or video files to your object
fb:app_id – for linking to a Facebook application (e.g., FB Comments) with the object
Check Your OGP Tags
Once you’ve set up your open graph tags, you need to check they’re working okay. To do this, you can use the Sharing Debugger to see how the information displays when you share your website content on Facebook, Messenger, and other places. Also, the Batch Invalidator will let you refresh this information for multiple URLs at the same time.
To use it, simply enter the URL of the page you’re having problems with and click Debug.
First, when you type in the link you want to check, it returns any errors and suggestions for OG tags, if there are any. You can also check what the og:image looks like, your description, and so on.
Second, it clears the Facebook cache. Imagine this: you post a link to Facebook, but then you see a mistake in the thumbnail, so you go back to your site and adjust the OGP tags, and you post it again on Facebook.
Probably, nothing will happen. The thumbnail will stay the same. This is because of the cache. The Facebook Sharing Debugger will refresh the cache on your links after any adjustments, so remember to use it each time.
The Facebook Debugging Tool.
Open Graph Tags for Twitter: Twitter Cards
If you’re not familiar with Twitter’s cards, they allow you to attach media files and add extra information to your tweets. This can be useful for increasing the visibility of your tweets and providing additional context for users who click through.
Although they’re not the same thing, Twitter’s cards use the same open graph protocol and it looks similar to OGP tags. Implementing these tags makes it much easier to create Twitter cards without duplication issues.
Like Facebook’s Open Graph tags, Twitter Cards let you stand out from the crowd of tweets. In short, they allow you to generate some additional content from your 140-character tweet.
This doesn’t show up on people’s feeds automatically, but it adds a little “View summary” button below the tweet.
You can use open graph tags to specify your content’s title, description, and image, and to determine your page’s content type and the audience you want to reach.
An example of open graph tags for Twitter.
When you click it:
An example of how title, description, and image tags are used on Twitter.
The Twitter card is tempting to click and provides a handy summary of the shared page. However, surprisingly, not many sites take advantage of these tags, giving you a great opportunity to make your tweets stand out from other feeds.
Installing these cards isn’t difficult, and there’s a quick workaround, even if you’re not tech-savvy. Just install a WordPress plugin.
WordPress SEO by Yoast does the job perfectly well.
To activate Twitter cards in Yoast:
Showcasing how to activate Twitter cards in Yoast.
Log into WordPress
Go to your dashboard,
Choose the ‘SEO’ option from the list.
Click on SEO and choose social. Click.
Go to accounts and click on your Twitter username
Select the ‘Twitter’ tab by clicking
Scroll down to ‘Add Twitter Card Meta Data’
Click ‘enabled’
Finally, save any changes.
If the above method isn’t an option, ask your web developer and give them the ready-to-implement Twitter Card tags. Here’s how you’ll make them.
twitter: card
This required tag works in a similar way to og:type. It describes the type of content you are sharing. There are seven options: summary, photo, video, product, app, gallery, and “large version” summary.
Depending on the type of content you choose, the link at the bottom of your tweet changes. You can get “View summary” for summaries, “View photo” for photos, etc. If this tag is not set, Twitter reads your link as a “Summary” by default.
Example:
<meta name=”twitter:card” content=”summary” />
twitter:title
This basically does the same thing as its OG counterpart. You specify the title for your article that will show up in bold. It’s smart to avoid repeating the same text you have in your tweet. Make the most of the space provided and let the two pieces of copy play on each other to reinforce the message. Use up to 70 characters.
Example:
<meta name=”twitter:title” content=”Your title here” />
twitter:description
Use this tag to write a descriptive lead to the page you are sharing. As with Open Graph tags, don’t focus on keywords because they won’t matter for your SEO. Create compelling copy that nicely complements your tweet and the title. Twitter limits this part to 200 characters.
This sets the canonical URL for the content you are sharing. (For more information, review the description for the equivalent Facebook Open Graph tag above.)
Yes, you guessed it. This is how you set the picture to go with your tweet. Twitter allows two options, a card with a smaller or a larger image.
You decide which one you want in the type tag. If you go for the large option, make sure it has a resolution of at least 280x150px and that the file size is not more than 1MB. You can consider using the same trick as the Facebook thumbnail: add some text to the image to boost the message.
Adding cards to your tweets is easy – all you need to do is include some extra code to the end of your tweet. The code tells Twitter which card type you want to use and how you wish the content to look.
There are several types of Twitter Cards, so you can choose the one that best suits your needs.
However, keep in mind that, before you can fully benefit from Twitter Cards, you need to request approval for your page from Twitter.
Fortunately, this only takes about 15 minutes and can be done easily using their Card Validator.
To get started,
Select the type of card you wish to use.
Add your meta tags
Check the URL with Twitter’s validator tool.
Test in the validator or get approval for your card, then tweet the URL to see your card displayed. https://developer.twitter.com/en/docs/twitter-for-websites/cards/overview/abouts-cards
Once you get approval, Card Validator serves the same purpose as the Facebook Sharing Debugger, allowing you to check your links before committing.
Twitter Card Plugins
Like with Facebook, plenty of plugins are available for implementing Twitter Cards. Here are a few:
How do you implement OGP tags? Basically, they belong to the <head> part of your page’s HTML. If you don’t manage the code, you’ll need to ask your web developer for help. You can prepare the whole package yourself using the tips above to save their valuable time.
If you are using WordPress, just install one of the plugins that neatly implements the code for you. As I’ve explained, I like to use WordPress SEO by Yoast, but there are some other free tools you can use, including:
Open Graph Protocol Framework. Please note that this one hasn’t been updated for compatibility with some of WordPress’ latest updates.
Like Facebook. Twitter offers a tool to validate your OGP tags,Twitter Card Validator is a tool that allows you to test and preview how your tweets will appear when they are shared on other websites. To use the validator, enter the URL of the website on which you want to share your tweet and click “validate.”
The validator will show you a preview of how your tweet will appear on the website, and display the title, description, and image.
FAQs
What Is Open Graph, and why was it created?
Open Graph Protocol (OGP) is a set of tags used on websites to define the structure of a web page so that it can be more easily shared on social media platforms. OGP tags allow web admins to control how their content appears when it is shared on social media sites like Facebook and LinkedIn.
How do you find Open Graph tags?
You find open graph in the webpage’s <Head> section.
There are free tools available to check your OGP Tags. Sites like Facebook also offer a validator so that you can check your tags for errors.
Conclusion
The final code for both Facebook and Twitter should look more-or-less like this:
Optimized code for both Facebook and Twitter posts.
It might seem a bit confusing, but luckily several tools make the process easier — you don’t need to know how to code.
There are three main types of Open Graph meta tags: og:title, og:image, and og:description, and taking the effort to implement them has distinct advantages, including better click-throughs and engagement, which can all lead to added conversions. The additional measures of adding Open graph also increase visibility.
However, despite these advantages, it’s surprising how few people optimize these tags. It’s worth doing because it helps you stand out and draw more clicks and views, and it can even help improve your SEO —all things that lead to more profit.
Have you implemented open graph meta tags? How has it impacted your site?
Businesses spend nearly 115 billion total on advertising across the Meta (formerly Facebook) platforms. Why? It works! And not only that; Meta has great tools that allow you to easily manage and track your business accounts.
Are you struggling to keep up with your Instagram and Facebook marketing?
DMs and comments falling through the cracks?
Do the multiple tabs for all your accounts and features like the Ad Manager drive you nuts?
Then you’re going to fall head over heels with Meta Business Suite, called Facebook Business Suite before Facebook changed its name to Meta.
It’s the platform’s newest creation, designed to iron out the time-sucking road bumps in social media management and make it easier for businesses to manage their Instagram and Facebook profiles.
Below, I’m breaking down everything you need to know about Meta Business Suite. We’ll unpack what it is, everything you can do with the tool, how it can benefit your business and a quick walkthrough on how to set up your account.
What Is Facebook Business Suite (now Meta Business Suite) and How Does It Work?
Meta Business Suite streamlines your Facebook and Instagram accounts into one easy-to-use dashboard.
Through the platform, you can manage all accounts you own or administrate with various tools to make controlling your business’s social media presence much easier.
The best part? It’s free and available on mobile and desktop.
All you need to do is link up your accounts, and you’ll instantly have access to an overview dashboard of your Facebook Pages and Instagram accounts.
You’ll be able to:
create a to-do list of notifications to manage
check insights on your performance and audience growth
create or see recent posts or stories
create or manage recent ads
see content calendar
view content inspiration
communicate with an inbox for Facebook and Instagram DMs and comments
access the Commerce Manager
check Business Suite updates
That’s only the tip of the iceberg.
There’s an entire “more tools” section with 12 other features to play around with, including:
appointments
ad manager
events manager
instant forms
media library
Facebook (Meta) Business Suite vs. Facebook Business Manager
Before Facebook became Meta, they offered both Facebook Business Suite and Facebook Business Manager. Both options are still offered under Meta.
The Business Manager is a backend tool used to share or limit access to your business accounts by assigning one of six different “roles” to those with access to your accounts.
The Business Suite offers front-end management, like merging notifications, scheduling posts, and managing your inbox.
Facebook (Meta) Business Suite allows you to combine and streamline your activity across the Meta social media and messenger platforms.
Leveraging Meta Business Suite Insights
Meta Business Suite makes it easy to track your business accounts and campaigns across the Meta social and messenger platforms.
Ad spend: You can track your ad spend across all Meta platforms. Based on how well you’re performing, you can adjust your spend accordingly. For example, if you’re spending a lot on Instagram ads but see via other insights that the ads aren’t performing well, you can redirect your budget towards the Meta platforms you’re more successful on.
Engagement: Meta (Facebook) Business Suite allows you to see engagement with your organic and boosted content. You can see what content performs best and use that to inform your future strategies and the content you publish on social.
Audience demographics: With Business Suite, you can see data about the users who interact with your profile and content. For example, you can see where they’re from, their other interests, their age, and more. You can use this information to continue creating content that targets your existing users, or adjust your strategies if your content isn’t reaching the right audience.
Everything you can do on desktop, you can also do on mobile. You can monitor your account activity, manage your inbox, and even get audience insights.
How to Use Meta Business Suite
Before you can start streamlining your social media management with Facebook (now Meta) Business Suite, you’ll need to follow a simple setup process.
Step 1: Create a Facebook Business Account
Go to https://business.facebook.com/ and select “Create a Facebook Business Account.” Enter your business account name and select “Next” when you’re done.
Step 2: Fill in Your Contact Information
Enter your full name and business email address. This information won’t be shared with your followers. Facebook will only use it to contact you.
Step 3: Select Your Facebook and Instagram Accounts
The Facebook and Instagram accounts you own are available for you to claim. If you’re managing an account someone else owns, you won’t be able to select it.
In order to select an Instagram account, it needs to be converted to a business or creator account. If you try to select a personal account, Facebook will ask you to switch before continuing the setup process.
Step 4: Add People to Your Business Account
Here, you can select your page admins. Enter their email address and assign each contact as an employee (limited access) or business admin (full access).
If you’re running your accounts solo, you can skip this step.
Step 5: Review Your Business Account
When you’re happy with your selection and who has access to your Business Suite, click on “Confirm.” Facebook will then take you to your dashboard overview, and you can start using all the tools inside the platform.
Tools to Use in Meta Business Suite
Curious about the tools inside Facebook Business Suite? Let’s take a deep dive and look at what you can do with the platform and how it can benefit your business.
Monitor Your Inbox
Are comments one of your biggest time suckers? Do you constantly find yourself hopping between apps on your phone or getting inundated with notifications on your desktop?
With the inbox tool in Business Suite, you can see all your Instagram and Facebook comments in one place.
Pop the kettle on, make some coffee, block out 30-minutes in your calendar and respond to everything at once.
What about direct messages (DMs)? You’ll find that here too.
Got the Facebook chat plugin on your website? You can manage all your messages here as well.
Sick of replying to the same question every single day? Business Suite lets you create automated replies for your frequently asked questions.
How’s that for efficiency?
Explore Insights
There are tons of free and paid tools that show you Facebook and Instagram analytics, but few compare the platform’s built-in option.
With Business Suite, you can see your latest statistics for all your accounts.
Gone are the days of toggling between the different apps or going in and out of individual posts.
On the Insights dashboard, you can see an overview of how your content is performing over a specific time period, and sort your posts by:
reach
likes and reactions
comments
shares
results
cost per result
link clicks
recent content
One of the most interesting features of Insights is the Audience section. It breaks down your current audience for both platforms, and you can see at a glance:
age and gender
towns and cities
top countries
There’s also a potential audience tab. It details your estimated audience size if you run an ad, as well as the top pages liked by your potential audience.
Not liking what you’re seeing? You can create a custom audience by clicking on the “filter” button and refining the results based on:
location
age
gender
interests
language
Create Posts and Stories
Are you using post-creation apps like Later or Planoly? Business Suite sets itself up as a rival by giving you the ability to create your posts and stories in one place and schedule each one out.
That’s not all.
If you go to the Planner section on your dashboard, you’ll see a calendar view of your past and upcoming posts.
Facebook also recommends a timeslot of when your audience is most online. Click on it, and you can start creating a new post or story.
One of my favorite features in the “New Post” box is the hashtag tool. It shows you which hashtags are trending, the number of posts using a tag, and lets you save your favorites for later.
Plus, it shows you hashtag results for each platform and gives you recommendations based on what you’ve already selected.
While in create mode, you can put together your Instagram and Facebook posts at the same time. Switch between the different tabs, and you can see exactly how your post will look on the two platforms.
For Stories, it works the same. Upload up to 10 photos or videos at once and schedule each one out when you’re done.
Create Ads
Don’t want to have another tab open for Facebook Ad Manager? You can keep track of your ad performance and create ads from the Business Suite.
It’s another time-saver and allows you to see how you’re tracking towards goals.
On the dashboard, you can see:
reach
post engagement
link clicks
page likes
Switch between the different filter views to see your results over the last 90, 60, 30, and 7 days.
Click on the blue “Create Ad” button in the top right-hand corner to create an ad. A pop-up will load and take you through a step-by-step process for setting up a creative that converts.
First, you’ll select your ad goal. You can choose from:
automated ads
get more leads
boost a post
boost an Instagram post
promote a page
get more website visitors
get more messages
Next, start designing your ad creative. You’ll see a live preview as you adjust your text and media.
Turn on automatic adjustments if you want Facebook to tweak your ad for each viewer. For example, the platform might adjust the brightness or show the original aspect ratio if it thinks the ad will perform better.
Scroll down to select your audience or create a new one, placements, and set your campaign budget and duration.
When you’re done, click on “Promote Now” for your ad to go into review.
Create Appointments for Your Business
Remember those extra options I spoke about earlier?
One of the most important features of an online business is the appointments scheduler.
If you’re running a service-based business, take advantage of Facebook’s capabilities and empower your audience to book directly through the platform.
When people don’t need to log onto another site to complete the process, you’re removing an extra step and making it that much easier to close a sale.
The result? A boost in your bottom line!
Inside Business Suite, you can manage your appointments, view requests, and adjust the settings to suit your schedule.
Generate Leads With Instant Forms
Does your business rely heavily on lead gen? Start using Facebook’s Instant Forms.
What are Instant Forms? Think of it as a mini CRM system. When you create an ad and set your objective to find leads, you can create custom forms users can fill out without leaving the platform.
Again, you’re removing the obstacle of trying to get them to go from one website to another. Thus, improving your chances of someone filling out the form and requesting a callback.
With Business Suite, you can manage your forms and set up the CRM system.
When you create a form, Facebook offers different options depending on your lead generation goal.
For example, you can create a “more volume” form (a quick option) or a “higher intent” (adds an extra step for users to review their information before submitting).
Frequently Asked Questions About Meta Business Suite
What is Meta Business Suite (formerly Facebook Business Suite) used for?
The Meta Business Suite is used for managing your Facebook Pages and Instagram accounts in one dashboard. You can reply to comments, create posts, schedule stories, run ads, and more.
How do you qualify for Meta Business Suite?
You need to have a Facebook page. If you have an Instagram account, you’ll need to convert it to a business account if you want to sync it to your Business Suite.
Is Business Suite on Facebook free?
Yes, Business Suite is free on Facebook to set up and use. All you need is a Facebook account and a Facebook Page to get started on the platform.
Is Facebook Business Suite the same as Meta Business Suite?
Yes, Facebook Business Suite is the same as Meta Business Suite. It was renamed “Meta Business Suite” when Facebook rebranded to Meta.
{
“@context”: “https://schema.org”,
“@type”: “FAQPage”,
“mainEntity”: [
{
“@type”: “Question”,
“name”: “What is Meta Business Suite (formerly Facebook Business Suite) used for?”,
“acceptedAnswer”: {
“@type”: “Answer”,
“text”: ”
The Meta Business Suite is used for managing your Facebook Pages and Instagram accounts in one dashboard. You can reply to comments, create posts, schedule stories, run ads, and more.
”
}
}
, {
“@type”: “Question”,
“name”: “How do you qualify for Meta Business Suite? “,
“acceptedAnswer”: {
“@type”: “Answer”,
“text”: ”
You need to have a Facebook page. If you have an Instagram account, you’ll need to convert it to a business account if you want to sync it to your Business Suite.
”
}
}
, {
“@type”: “Question”,
“name”: “Is Business Suite on Facebook free?”,
“acceptedAnswer”: {
“@type”: “Answer”,
“text”: ”
Yes, Business Suite is free on Facebook to set up and use. All you need is a Facebook account and a Facebook Page to get started on the platform.
”
}
}
, {
“@type”: “Question”,
“name”: “Is Facebook Business Suite the same as Meta Business Suite?”,
“acceptedAnswer”: {
“@type”: “Answer”,
“text”: ”
Yes, Facebook Business Suite is the same as Meta Business Suite. It was renamed \”Meta Business Suite\” when Facebook rebranded to Meta.
”
}
}
]
}
Conclusion: Meta Business Suite (Formerly Facebook Business Suite)
Meta Business Suite is perfect for creators, personal brands, and businesses to streamline their social media management across Facebook and Instagram.
It gives you everything you need to monitor your growth, stay on top of comments and DMs from your audience, schedule your content, create ads, and so much more.
If you’re only using these two platforms to run your business and you’re using other social media management tools, it’s worthwhile to take a peek inside Business Suite. You might find it’s a more robust tool, and you can nip another business expense from your monthly budget.
What are your thoughts on Meta (Facebook) Business Suite? Are you going to make the switch and use it to manage your Facebook and Instagram accounts?
For example, I once spent $400,000 on Facebook fan page likes.
I still feel dumb for that one.
The engagement just wasn’t there. I had a large number of fans, but very little actual engagement.
I had no idea that hidden tools within Facebook’s apps, extensions, and insights (and a few external tools) could have made my Facebook ad spend 80 times more effective.
Facebook marketing is like an iceberg. Most people see the top part — Facebook ads. They spend their entire time optimizing that little bit of potential.
The real power is underneath. It’s hidden.
That’s why I created this list.
I want you to know exactly what those hidden Facebook marketing tools are and how you can increase your engagement by 154 percent, as I did.
Before we get started, for the first few hidden tools you need Mobile Monkey to utilize all of the tactics (it’s free).
Some of the hidden tools I’ll share are within Facebook; you just don’t know about them.
For some reason, not very many marketers are taking advantage of Messenger marketing, even though it’s the hottest opportunity in digital marketing today.
Where else can you get engagement results like that?
I don’t know of any, and I’ve done quite a bit of online marketing.
The best way to get started with Facebook Messenger marketing is with MobileMonkey.
MobileMonkey is a powerful chatbot builder that I use personally. Chatbots are essential for scoring sky-high open rates, CTRs, and conversion rates.
And best of all, it’s free.
Hidden Facebook Tool #2: Comment Guard (Private Reply via Messenger)
A comment guard is a Facebook Messenger marketing feature that allows you to add new contacts to your contact list when they comment on your Facebook post.
Here’s how it works:
You post something on Facebook as usual.
People comment on your post.
Anyone who comments on the post gets your automatic private reply in Messenger.
When they engage with this reply, they are added to your Facebook Messenger contact list.
The mobile screenshot below displays exactly what happens.
Say you post something on your Facebook page that has high engagement potential, such as a meme, a quiz, a contest, a question, whatever. All the comments aren’t just comments anymore; they’re warm leads.
Just click the “FB comment guard” button using the MobileMonkey app.
Create an autoresponder message.
Point them to your Messenger chat landing page.
Add the comment guard to your selected Facebook post.
Hidden Facebook Tool #3: Click to Messenger Ads
A Click-to-Messenger Ad is a normal Facebook ad with a twist. Instead of sending people to a landing page, you send them to a Facebook Messenger bot sequence.
It looks like this:
Once the person starts the Facebook Messenger sequence, they are a lead. Then, the chatbot takes over to bring them through the conversion funnel.
For example, you could have your chatbot ask users questions, and send them offers based on their responses.
It can be hard to manually respond to thousands of messages. Instead, you can direct those chat from your Messenger Ads directly to a MobileMonkey chatbot, which can ask qualifying questions and engage users at scale.
I’ve managed chat blasting campaigns that scored a 96.9 percent open rates in just sixty minutes.
With MobileMonkey, you can schedule chat blasts, bulk send, develop interactive Messenger sequences, create special offers, and anything else that helps your marketing.
To start, just click “Chat Blaster” in the app.
Chat Blaster also has the ability to segment audiences. Many of the campaigns I manage involve thousands of contacts, so I want to narrow down my contacts to just the right targets.
Creating segments is simple using MobileMonkey, which allows you to “Create Audience” with a click.
Your audience can perform self-segmentation when the chat blast sends.
Hidden Facebook Tool #5. Warm Engaged Invites
One tactic that I’ve used to build my Facebook audience is by personally inviting people who engage with my Facebook page to become a page fan.
From your business Facebook page (desktop), find a post that has engagement.
Using this tool, you view the people who engaged with your post and can invite people to like the page.
The reason why this is valuable is that you’re able to target engaged fans. If you have a lot of Facebook fans, but not a lot of engagement, Facebook’s algorithm will punish you.
Instead, identify those people who will be engaged and manually invite them.
Hidden Facebook Tool #6: Send Personal Invites in Messenger
Another strategy is inviting your friends to like your business page, and also sending the invite in Messenger.
This allows you to personalize the message and give them two touches instead of just one.
Click on the “Community” button on your Facebook page, then click “Invite Friends to Like Your Page.”
Here, you can invite friends and create a personalized message. Be sure to check the box at the bottom to send the invite using Messenger.
With so many brands now spending millions of dollars on Facebook ads, how do you get a handle on that kind of information?
You will not be able to get your competitor’s targeting info and ad spend but you can find out where, how often, and what the competition is advertising.
Hidden Facebook Tool #8. View Competitor’s Ads
Ever wish you could see exactly what ads your competitors are running? Actually, you can — right in Facebook.
Let’s say I’m the competition and you want to spy on me. First, find my Facebook page and tap the “i” button. (It might be on the right or under the “Details” tab, depending on the device you’re using.)
On this page, you can find out if the page has ever changed names, when it was created, and where the page managers are located. This can be handy intel.
Tap on “Go to Ad Library.”
If the page is (or has) run ads, you’ll be able to see them here. This means you can see the ads they are running now and see what they have run in the past.
Granted, you don’t have access to insights about how well ads performed, but you can see if they tend to use the same ad copy or types of images and use those strategies for your own page.
Hidden Facebook Tool #9: Page Competition Gauge
I like to have a solid understanding of who my competition is and what they’re up to.
How do I know who my competition is? Thankfully, Facebook’s algorithm has figured it out for me.
To use this feature, go to your Facebook Page Insights. From Insights, scroll down until you see “Pages to Watch.”
By default, Facebook shows you five potential competitors, but you can view more by clicking “See More Suggested Pages.”
When you add a competitor to your watched pages, you’ll be able to keep up with their activity, growth rates, total likes, and the frequency of their posts.
This information will help you understand how you’re doing and what you might need to change.
Hidden Facebook Tool #10: Find Where Your FollowersAre Coming From
It is important to figure out where your followers are coming from so you can know how to get more.
One helpful way to get this information is again through Page Insights.
Then look for “Where your page follows happen.”
Facebook shows you follow quantities according to five locations:
Uncategorized Desktop
On Your Page
Search
Page Suggestions
Ads
If a particular source shows large follow rates, try to reverse engineer what happened, then do it again.
Hidden Facebook Tool #11: Identify Audience Signals on Page Insights
One way that I use metrics to improve my targeting is to view my Facebook page insights, particularly the demographic information.
When viewing this information, I’m looking for strong positives — indications that my audience favors a particular demographic.
For example, this page demonstrates a strong positive for men and women between the ages of 25-44.
If you’re 21, there’s only a small chance you’re going to be interested in my page. By contrast, if you’re a 30-year old male, there is a far stronger likelihood that you will have an interest in this page.
This information helps me know how, where, and upon whom to focus my marketing and advertising efforts.
Hidden Facebook Tool #12: Pull Email Addresses
Building an email list is tough these days. No matter how appealing your content upgrade, asking for someone’s email address is tantamount to asking for their social security number.
With Facebook Messenger marketing, that’s no longer the case.
You can create a Facebook Messenger chatbot that asks for an individual’s email address. Then, all they do is click a button to pre-fill their address.
Facebook does all the work for you.
Here’s what the bot looks like in MobileMonkey.
As long as you set the input type as email, Facebook will know to pull the user’s email address as they’ve entered it when creating a Facebook account. No typos, nothing.
This is another case of using two different channels to get information and engage your users. When you use a chatbot, it makes the process automatic and easy.
Hidden Facebook Tool #13: Pull Phone Numbers
If there’s one thing harder to get from a customer than their email address, it’s their phone number.
Again, powered by chatbots, it’s a cinch. Using input type “phone” in MobileMonkey means that you’re guaranteed to get the user’s primary phone number as they provided when and if they stored their phone number in Facebook.
It’s understandable that people are hesitant to enter their phone number on an unfamiliar platform
Understandably, people are hesitant to enter their phone number on an unfamiliar platform — a contact form on your website, for instance.
It’s quite a different comfort level when they are asked for a phone number in a familiar messaging app, and Facebook automatically adds the number.
All that your contact has to do is tap their phone number.
Hidden Facebook Tool #14: Website Chat Widget
This one seems obvious, but again it’s surprising how few websites are putting the power of a website chat widget to work.
Check this out. If you go to MobileMonkey’s website, there is a chat widget on nearly every page.
If you’ve logged into Facebook Messenger on that browser, all you have to do is click and you’re introduced to a Messenger sequence with MobileMonkey.
This sequence powered by a chatbot brings you further down the funnel.
One of the unique and powerful features of this funnel is that it is self-guided. You feel as if you’re in control — making choices and selecting options.
Regardless of your choices, however, you are making deeper connections with the brand and the marketing funnel.
Hidden Facebook Tool #15: Track Specific Facebook Conversions
The good thing about Facebook Ads Manager is that you have access to a ton of information.
The bad thing about Facebook Ads Manager is that you also have access to a ton of information.
Take conversions, for example.
If you’re tracking them, good for you. But which conversions are you tracking? Here are the options:
I call this one “hidden” because true conversions are essentially in Ad Manager underneath a lot of other noise.
You have to narrow down your conversion tracking to just the conversions that you need to know about.
For one of my businesses, I only focus on five types of conversions.
Everything else is useless.
I’ve written about this before; when you get clarity on what to track, you’ll do a lot better at making real progress with your Facebook advertising.
If you’ve been in internet marketing for any amount of time, you know how potent a good drip campaign can be.
Imagine increasing this potency by 10x.
That’s exactly what a Facebook Messenger drip campaign can do. Again, the power is in the chatbot builder.
MobileMonkey’s drip campaign feature just takes a click to get started.
Unlike an email drip campaign, which can take days or weeks to complete, a Facebook Messenger drip campaign can be completed in a matter of minutes or hours.
Plus, when you use a chatbot, the entire sequence can be interactive. You can create choices and engage the user on a far deeper level.
Facebook Hidden Marketing Tools FAQs
How can I use Facebook as a marketing tool?
You can use Facebook to run ads, create and promote your own Facebook business page, join groups related to your industry and post your promotional content there.
Why is Facebook a great marketing tool?
As of 2021, there are about 2.85 billion Facebook users, meaning you have access to an unbelievably huge audience.
What are some Facebook marketing tools?
Facebook offers content curation, ad builders and campaign building, A/B testing, campaign measurement and reporting, hashtag targeting, and more.
How do I start marketing on Facebook?
If you want to market on Facebook, your first step should be to perform competitor research. Look into how your competition uses it to market their products or services, and figure out what they are doing well, and go from there.
Hidden Facebook Marketing Tools Conclusion
There’s way more to Facebook than meets the eye.
There’s a reason why so many of the hidden marketing tools above focus on Facebook Messenger.
Facebook Messenger marketing has fundamentally changed the game, and it’s done so in two areas where marketing rises or falls:
Interactivity and dialogue: Messenger marketing, even when powered by a bot, has a personal feel. Instead of bullhorn marketing — telling your audience to do buy, read, visit, or watch, you are opening up a conversation.
Speed of engagement: Unlike the glacial speed of email marketing (like drip campaigns), Messenger marketing has a much swifter cadence. Many people have a Pavlovian response to the crisp ding of their Messenger notifications. They want to see who’s sending them a personal message. This means your open rates and click through rates are shooting up.
It’s not going to last forever. Like the banner ads of decades past, Messenger marketing will lose its luster as people become accustomed to it.
By engaging Messenger marketing now, you’ll have a far stronger advantage.
What Messenger marketing tactics does your brand or business currently use?
What if you could see every ad currently live on Facebook? Imagine the data, ideas, and revenue you could generate.
You no longer have to imagine. Facebook Ad Library gives you free access to view any ad currently live on the Facebook ecosystem.
With one of the largest advertising audiences on the internet at an estimated 2.74 billion people and a ridiculously competitive CPC of $0.43, Facebook is one of the best places to advertise online.
Today I’m going to show you how you can use the Ad Library to make it even better and send the conversion rates of your Facebook ads soaring.
What Is the Facebook Ad Library?
Facebook Ad Library is a free, public database of every ad currently active on Facebook, Messenger, and Instagram. Users can view every detail of the ads, including the copy, the image, how long it’s been live, when it launched, and any versions being A/B tested.
Facebook initially launched the library to improve the transparency of advertising on the platform and avoid claims of election interference. But the Ad Library is so much more than this. It’s an incredibly powerful tool marketers can use to transform their Facebook Ad campaigns.
How Do I Get Started With Facebook Ad Library?
You don’t need a Facebook account to access Facebook’s Ad Library, but you won’t be able to take advantage of all its features, so you should get one. (That said, if you want to advertise on Facebook, you should have one anyway.)
Start by searching for a brand and clicking on the relevant name from the drop-down menu.
You’ll now see a page displaying information about the advertiser, including when they created the ad, how many ads they have running, and the location of moderators.
Scroll down a little further to see ads in a grid. You can click “See Ad Details” to see more information about a particular ad.
8 Ways to Use the Facebook Ad Library to Create Better Ads
There are many different ways you can leverage the power of the Facebook Ad Library to create better ads. Here are eight to get you started.
1. Explore Ads From a Variety of Industries
The first thing everyone does when they access Facebook Ad Library is search for their competitors and see what ads they’re running. Not only is this a perfectly natural reaction, but it also makes business sense to spy on your competitors.
Don’t get hung up on your competitors, however. There are hundreds of industries out there, and you can learn a lot from all of them, whether it’s high-end luxury retail, insurance, or the law.
Start by searching for any brand you love, then look at that brand’s competitors. See what they have in common.
Next, look a little closer to home and analyze brands tangentially related to your own. For instance, if you run a dog-focused e-commerce store, you could look at cat or reptile brands to see which strategies they use.
Find one or two angles you’re not using and start testing.
2. Find Similar Ads and See Which Was More Successful
One of the most underrated features of the Facebook Ads Library is seeing different versions of the same ad brands are split testing. A/B testing is a fundamental part of succeeding with Facebook Ads, but working out what to test is easier said than done.
That’s what makes Facebook Ads Library so powerful. In 10 minutes, you can build a checklist of ad features to A/B test the next time you create an ad.
Best of all, you know they are all worth testing because the biggest brands in the world are testing the same thing.
3. View Active Ads to Determine What’s Trending
Spend half an hour browsing the Ad Library, and you’ll quickly see a few trends emerging in terms of layout, offer, and imagery. It’s essential to bear these trends in mind, particularly if ads in a specific format have been running for a long time.
But don’t feel the need to run the same ad as everyone else. While it’s important to understand what works and what doesn’t, you don’t want your ad to be lost in a sea of faceless ads.
4. Check Out Ad Copy and Tone
Are your ads enticing? Do they sell? One way to tell is to compare them to ads by the biggest brands in your industry (or any other industry, for that matter).
Read a few dozen ads to quickly see the similarities in word choice, copy length, and tone. All the best copywriters take inspiration from the ads that came before.
Take note of how long the ads have been running, too. Tried, tested, and proven ads are worth paying attention to, even if you don’t think they read the best.
5. Identify Other Promotion Opportunities
Selling products or courses isn’t the only use for Facebook ads. Browse the Ads Library, and you’ll probably find dozens of other ideas and promotional opportunities.
For instance, you may find your competitors promote things like videos, ebooks, or other content. Advertising your versions of these products is a great way to build an email list and position your brand as an authority.
You’ll also find dozens of examples of branded ads that don’t promote anything in particular and just increase brand awareness. If you’re looking to grow your following through ads, you can find a lot of inspiration for that, too.
6. See Which Ad Formats Have Longevity
No one wants to have to create new Facebook ads every week. That’s way too time-consuming.
The trick is to find a message that resonates well over a long period, and doing so is easy with Facebook Ad Library. Simply search the database for a major advertiser, select active ads only, and scroll to see ads with the longest run time.
Make a note of the media, copy, and offers used, then do the same with other major advertisers in your industry. If many of the long-running ads share the same tone or offer, this can help you create a valuable ad of your own.
7. Discover Effective Media Types
Use Facebook Ad Library to find what media other brands in your industry use in their ads. If many advertisers use stories or carousels and you aren’t, for instance, it may be time to experiment.
Conversely, it may be you’re already using the most popular media type. If so, you can still get inspiration for other ways to implement it differently.
8. Find the Best Time to Run Ads
The creative isn’t the only thing to think about when it comes to ads. Timing is also critical. Your ads can live or die on the running times you set for them, so it pays to see what successful advertisers are doing and take cues from them.
Around big sales days like Valentine’s Day or Black Friday, you can also use the Ad Library to see when competitors start running their ads, so you aren’t left behind. You can even use historical data to beat them to the punch next year.
FAQs About the Facebook Ad Library
How do I access the Facebook Ad Library?
You can access the Facebook Ad Library by clicking the link or visiting www.facebook.com/ads/library.
What is the Facebook Ad Library?
The Facebook Ad Library is a free database of every live Facebook, Instagram, and Messenger ad.
How does Facebook Ad Library work?
You can search the library by typing in an advertiser’s name. This will display a complete list of every ad they run.
Is there a Google Ads Library equivalent?
Google offers a politics-focused archive of ads, which it hopes will increase transparency. Unlike Facebook, however, you can’t search all ads on the Google platform.
Is creating my own Facebook ads worth the money?
Absolutely! Facebook ads are some of the cheapest, most targeted, and highest converting ads on the Internet.
{
“@context”: “https://schema.org”,
“@type”: “FAQPage”,
“mainEntity”: [
{
“@type”: “Question”,
“name”: “How do I access the Facebook Ad Library?”,
“acceptedAnswer”: {
“@type”: “Answer”,
“text”: “You can access the Facebook Ad Library by clicking the link or visiting www.facebook.com/ads/library.”
}
}
, {
“@type”: “Question”,
“name”: “What is the Facebook Ad Library?”,
“acceptedAnswer”: {
“@type”: “Answer”,
“text”: “The Facebook Ad Library is a free database of every live Facebook, Instagram, and Messenger ad.”
}
}
, {
“@type”: “Question”,
“name”: “How does Facebook Ad Library work?”,
“acceptedAnswer”: {
“@type”: “Answer”,
“text”: “You can search the library by typing in an advertiser’s name. This will display a complete list of every ad they run.”
}
}
, {
“@type”: “Question”,
“name”: “Is there a Google Ads Library equivalent?”,
“acceptedAnswer”: {
“@type”: “Answer”,
“text”: “Google offers a politics-focused archive of ads, which it hopes will increase transparency. Unlike Facebook, however, you can’t search all ads on the Google platform.”
}
}
, {
“@type”: “Question”,
“name”: “Is creating my own Facebook ads worth the money?”,
“acceptedAnswer”: {
“@type”: “Answer”,
“text”: “Absolutely! Facebook ads are some of the cheapest, most targeted, and highest converting ads on the Internet.”
}
}
]
}
Facebook Ad Library: Conclusion
Advertisers weren’t happy when Facebook made ads accessible to everyone, but you should be delighted. The Facebook Ad Library offers a huge opportunity to anyone looking to upgrade their ad creatives, nail down their copy and send conversion rates soaring.
Whose ads are you going to look at first?
GDPR Cookie Consent Agreement
This website uses cookies to improve your experience. We'll assume you're ok with this, but you can opt-out if you wish.AcceptRejectRead More
Privacy & Cookies Policy
Privacy Overview
This website uses cookies to improve your experience while you navigate through the website. Out of these, the cookies that are categorized as necessary are stored on your browser as they are essential for the working of basic functionalities of the website. We also use third-party cookies that help us analyze and understand how you use this website. These cookies will be stored in your browser only with your consent. You also have the option to opt-out of these cookies. But opting out of some of these cookies may affect your browsing experience.
Necessary cookies are absolutely essential for the website to function properly. This category only includes cookies that ensures basic functionalities and security features of the website. These cookies do not store any personal information.
Any cookies that may not be particularly necessary for the website to function and is used specifically to collect user personal data via analytics, ads, other embedded contents are termed as non-necessary cookies. It is mandatory to procure user consent prior to running these cookies on your website.

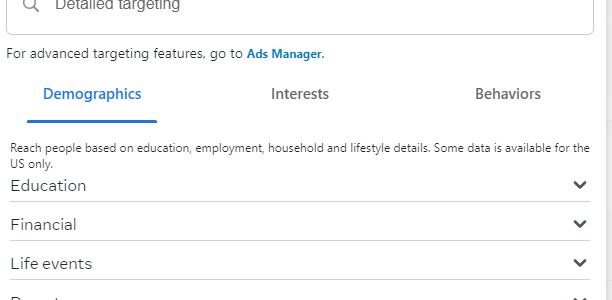
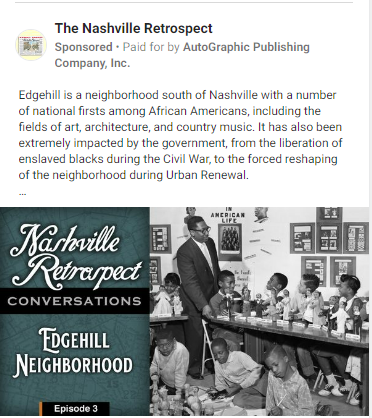
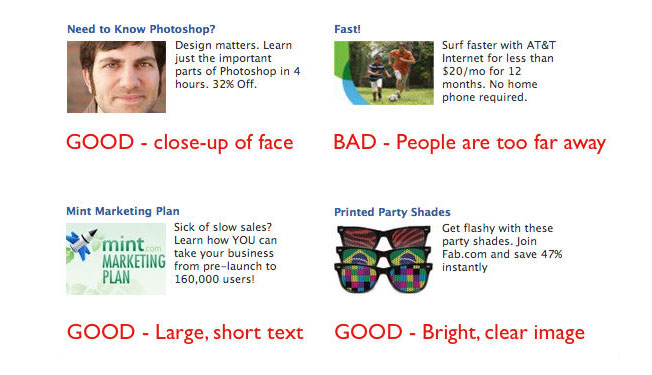
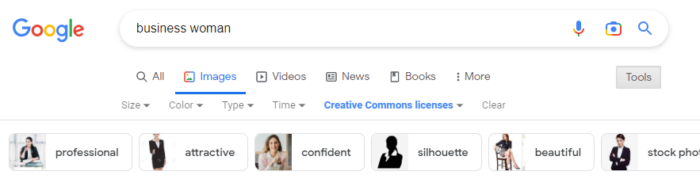
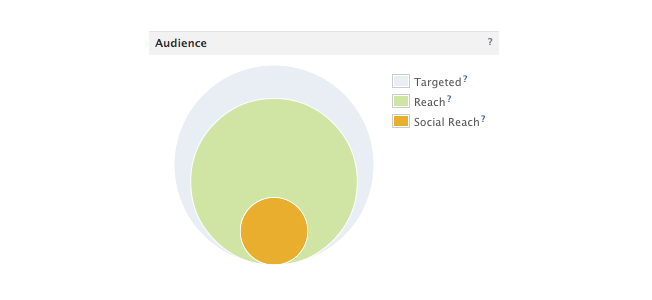
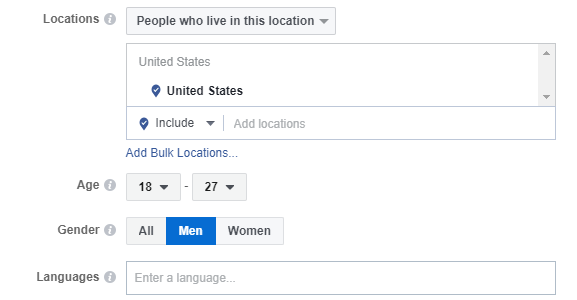
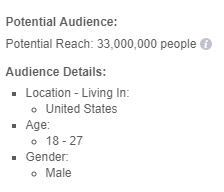
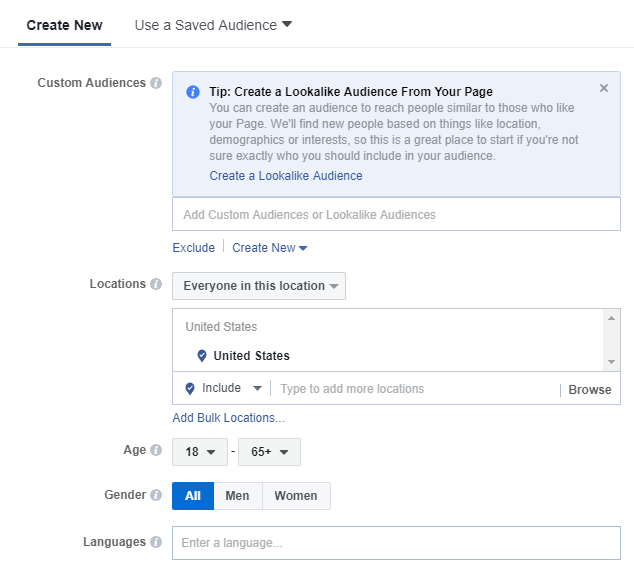
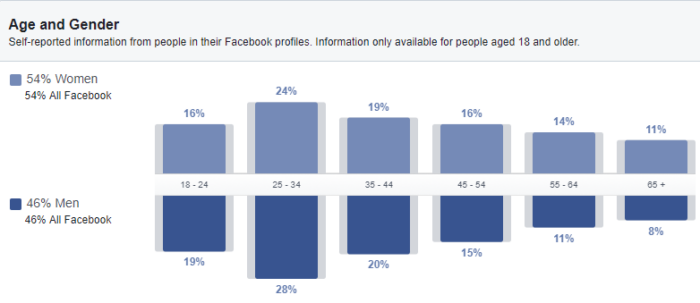
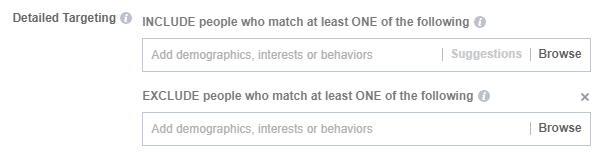

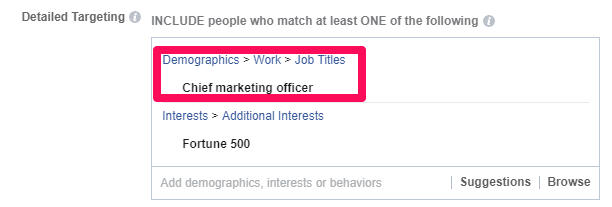
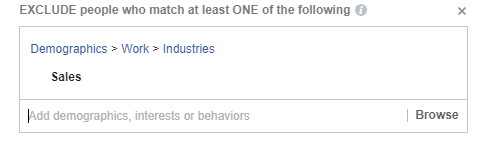
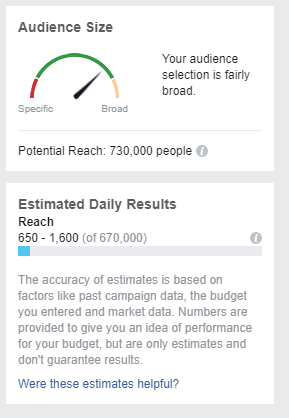
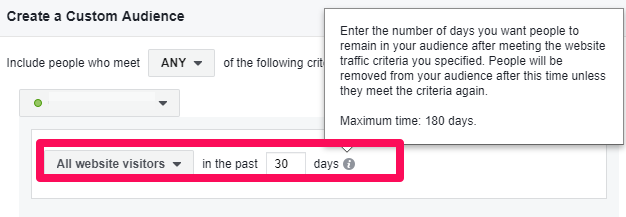
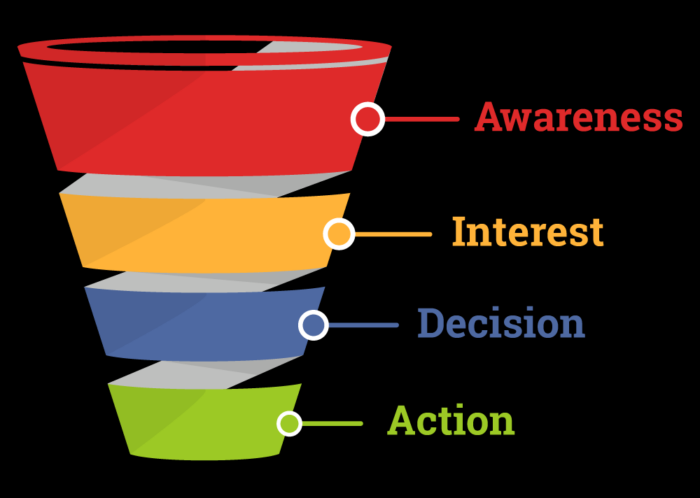
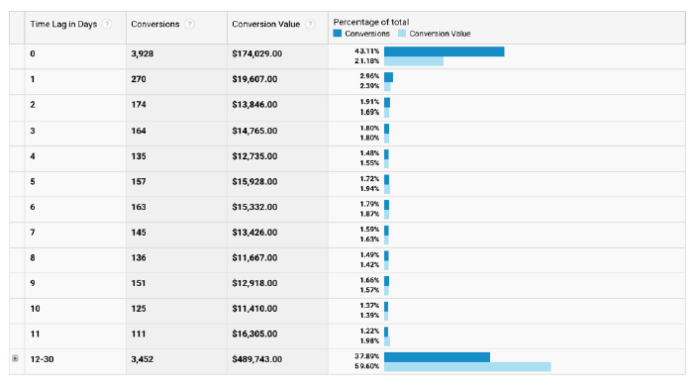

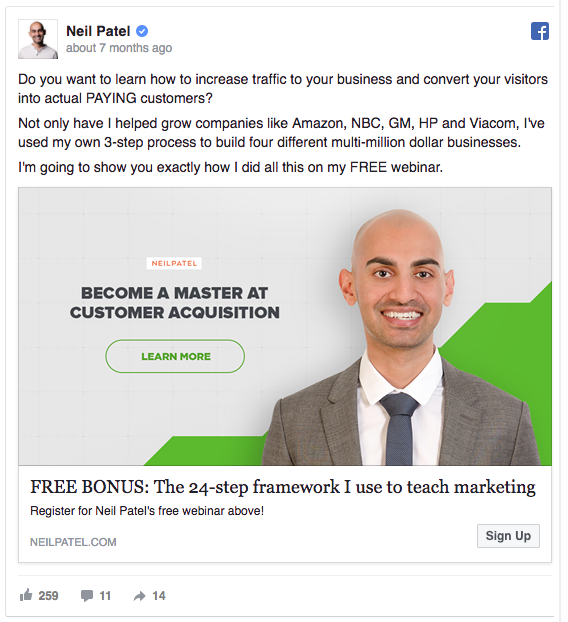
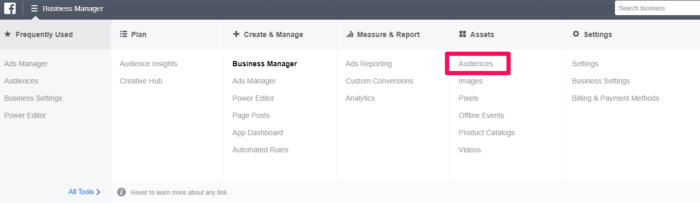
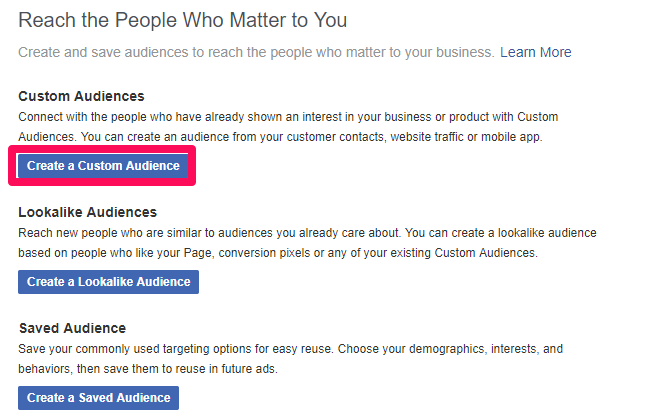
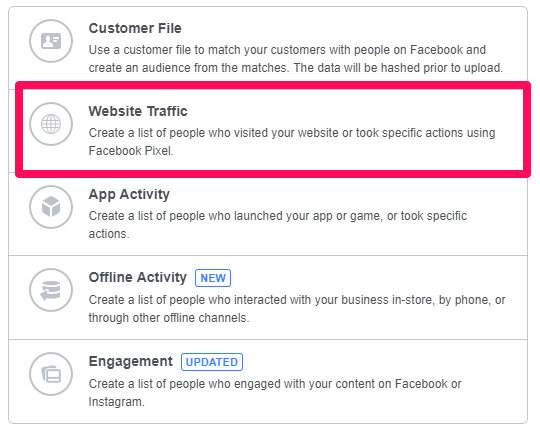

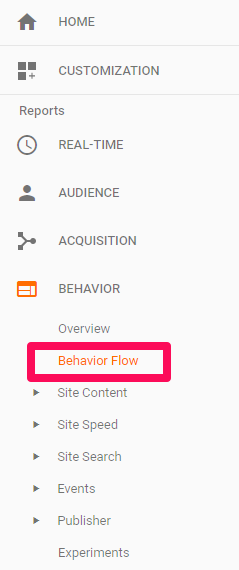
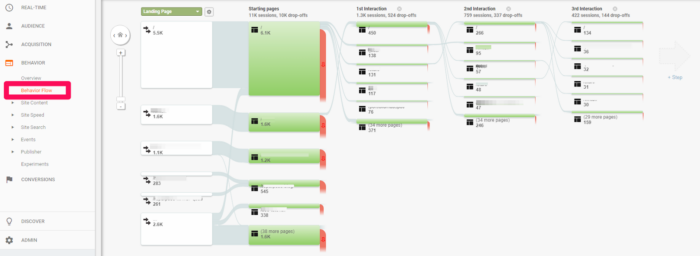
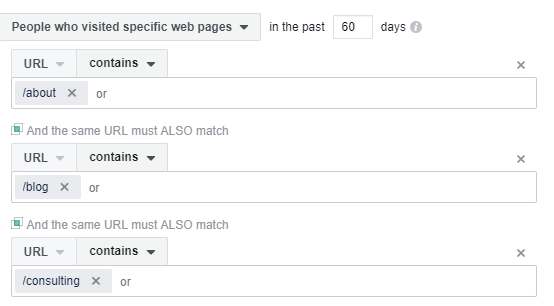
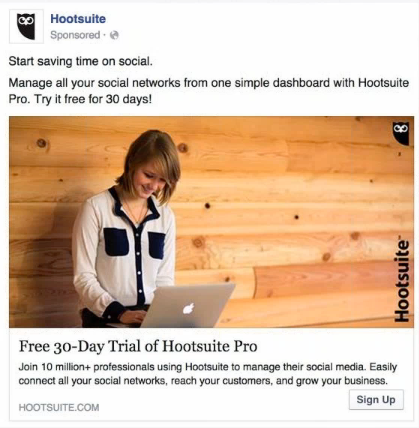
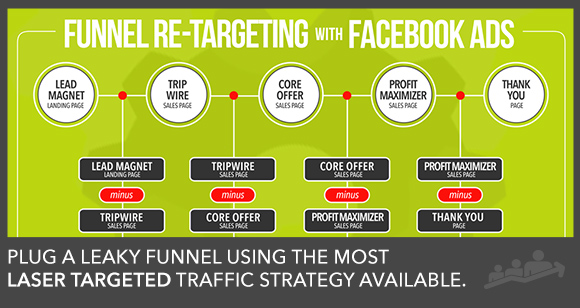
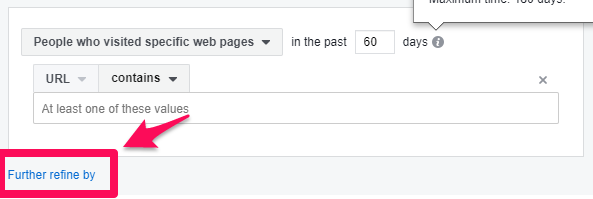

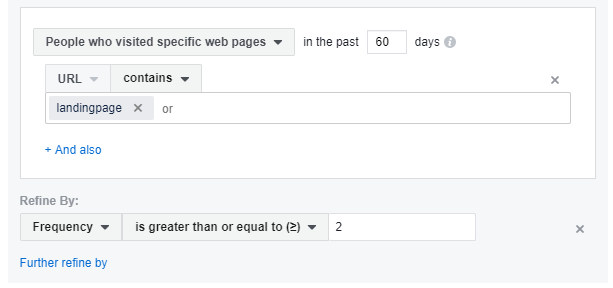
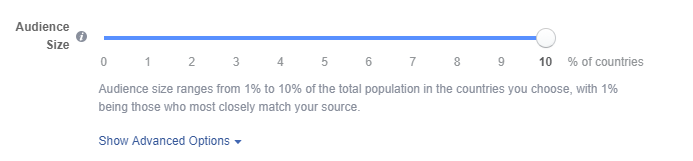
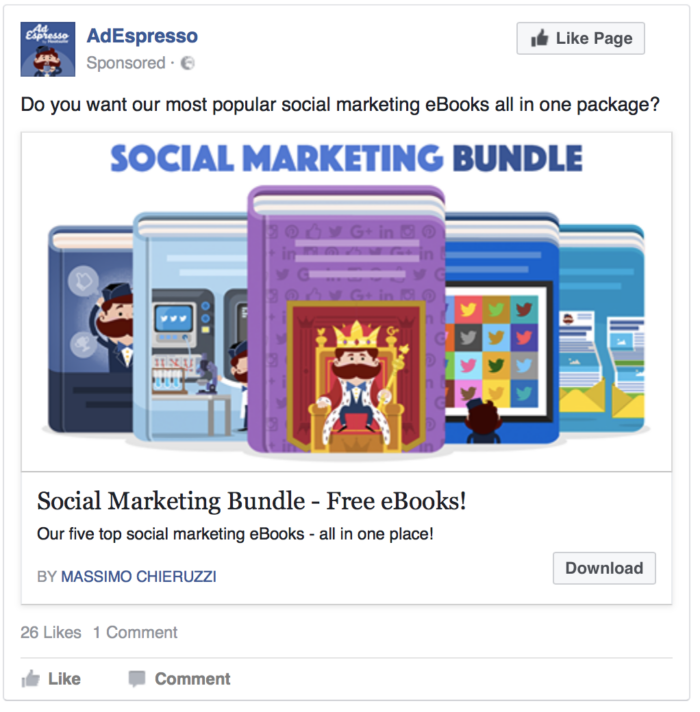
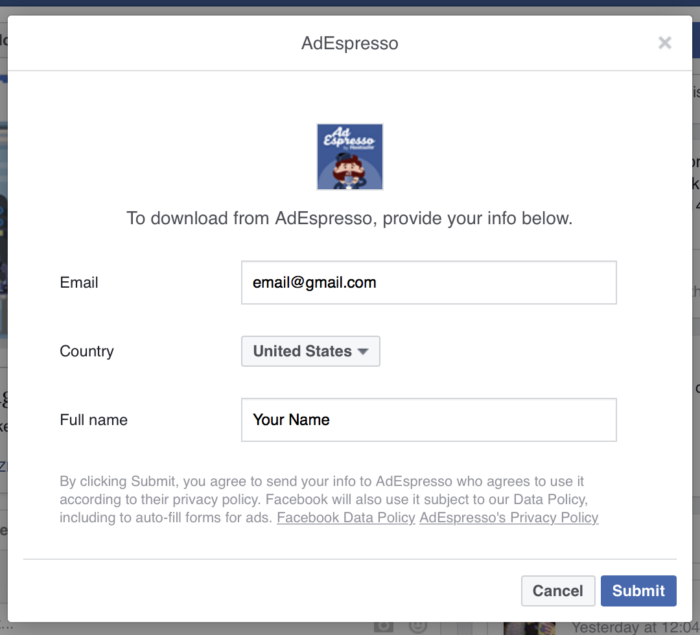
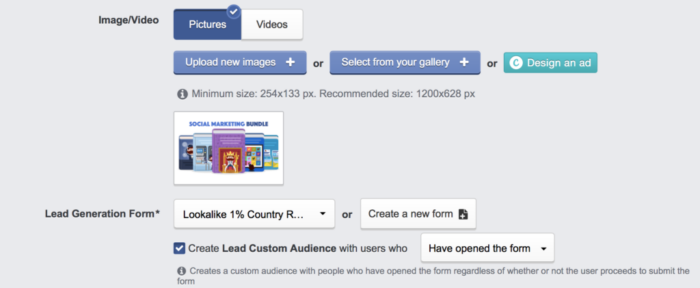
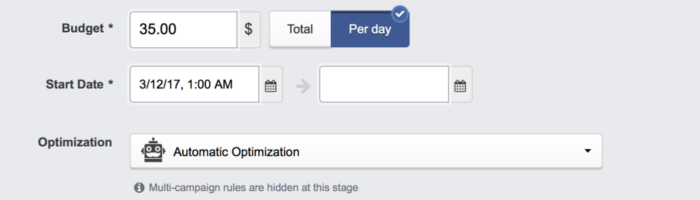
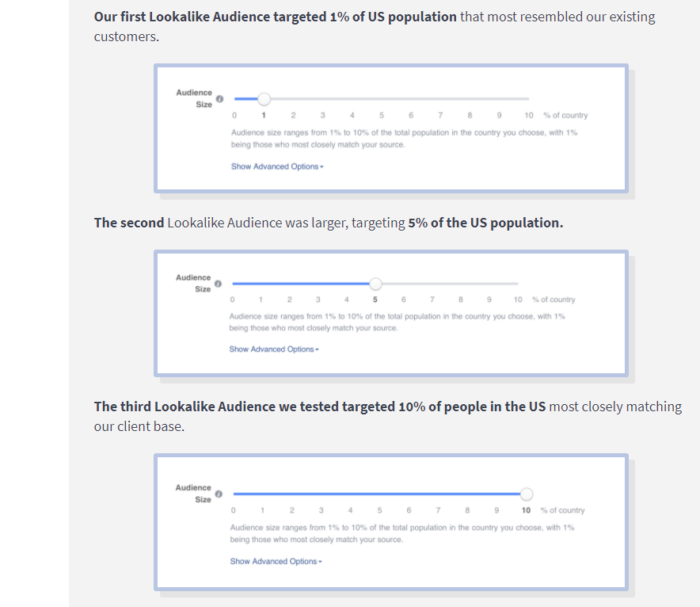
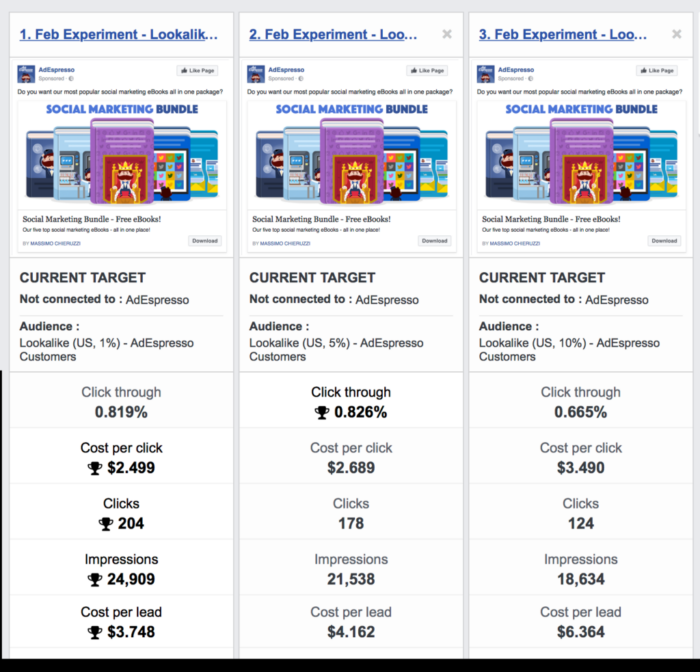
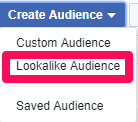


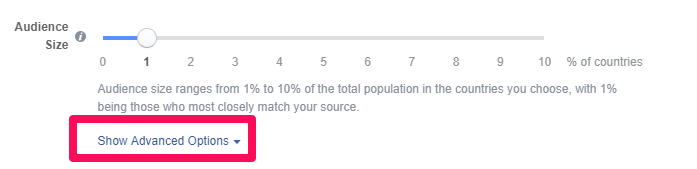
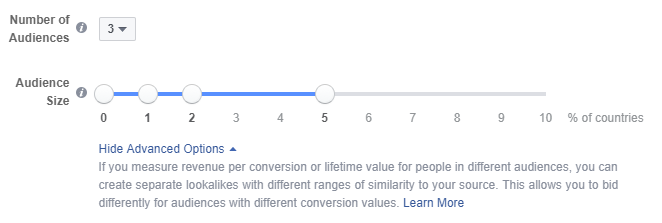
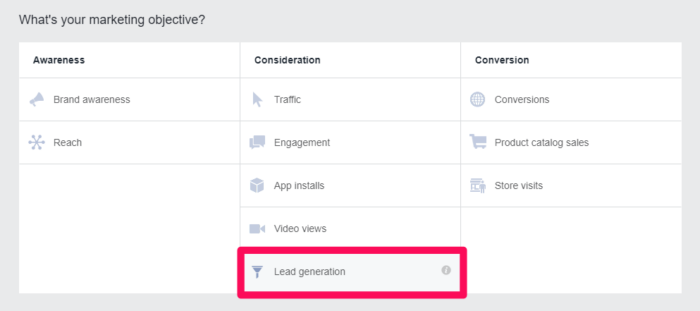
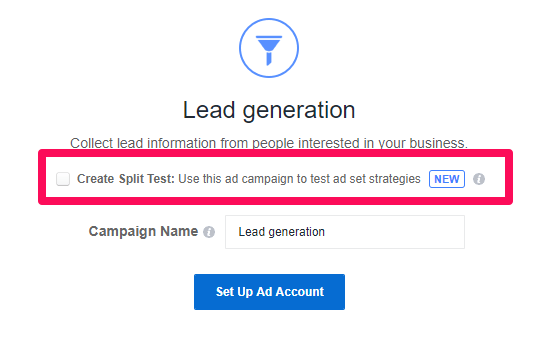
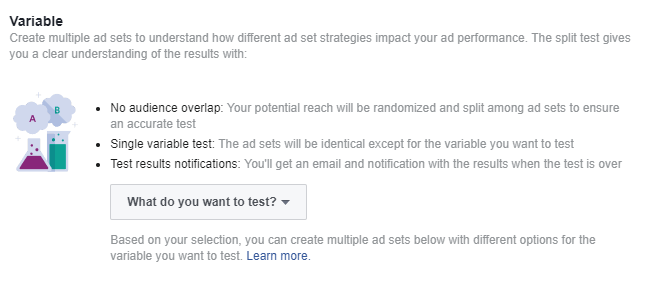
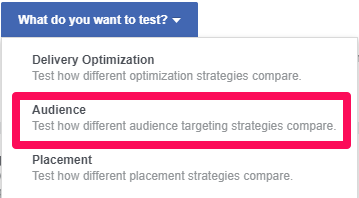
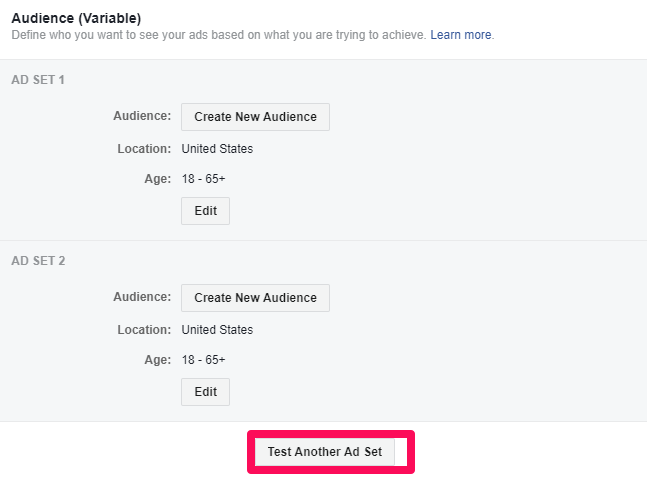
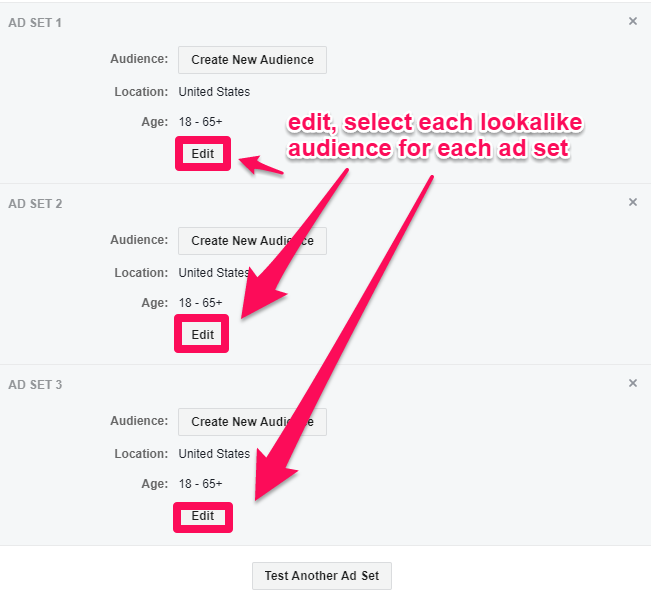


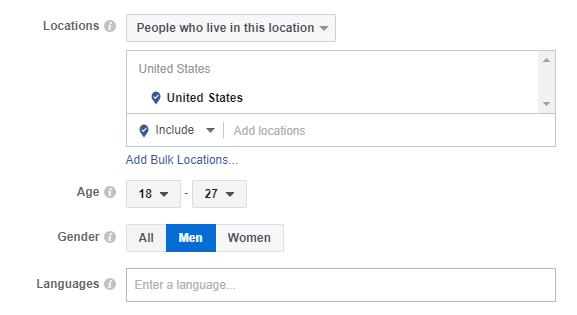

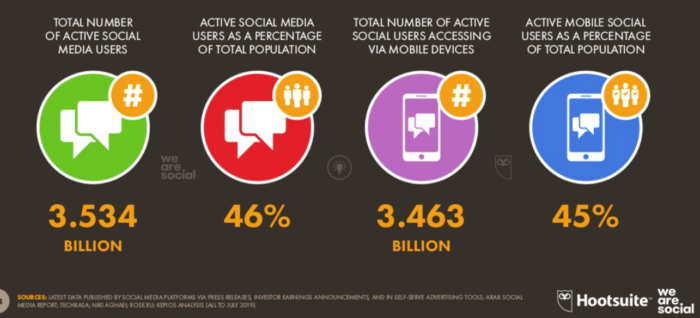
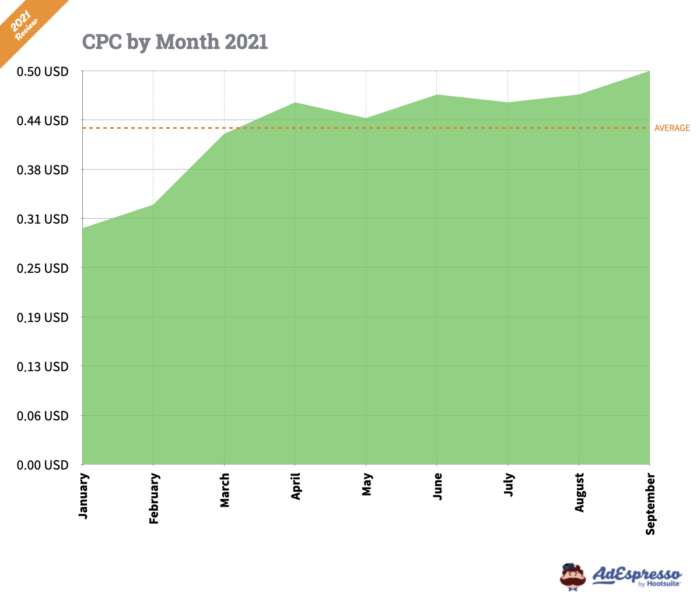
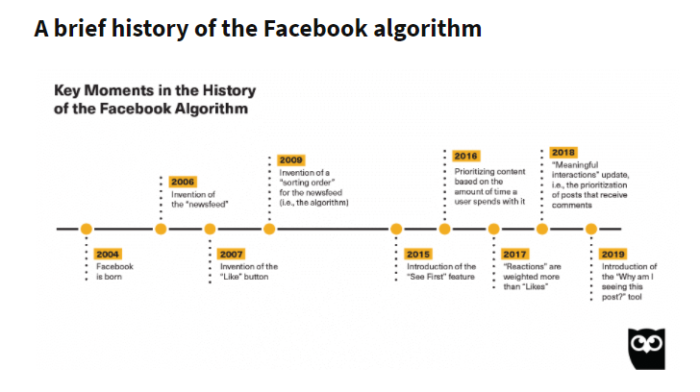
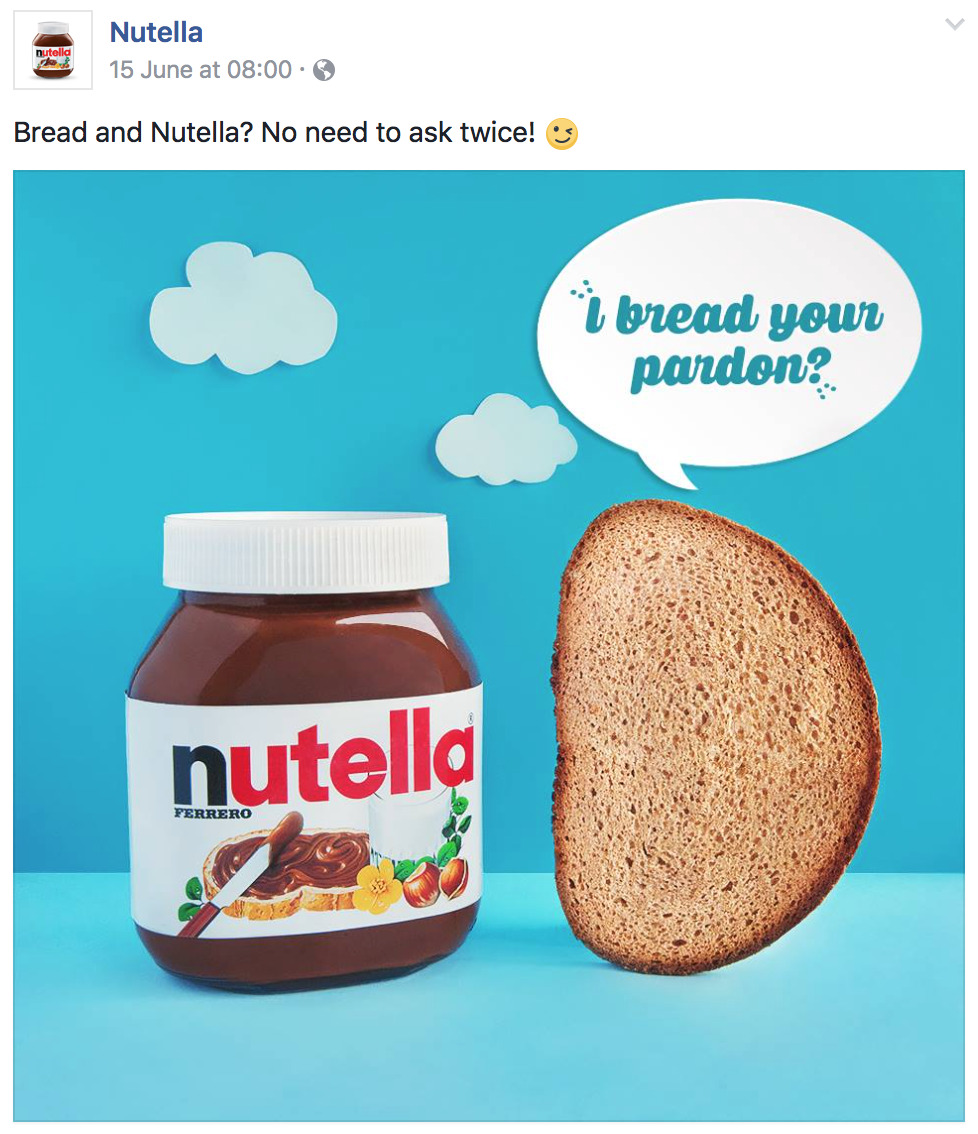
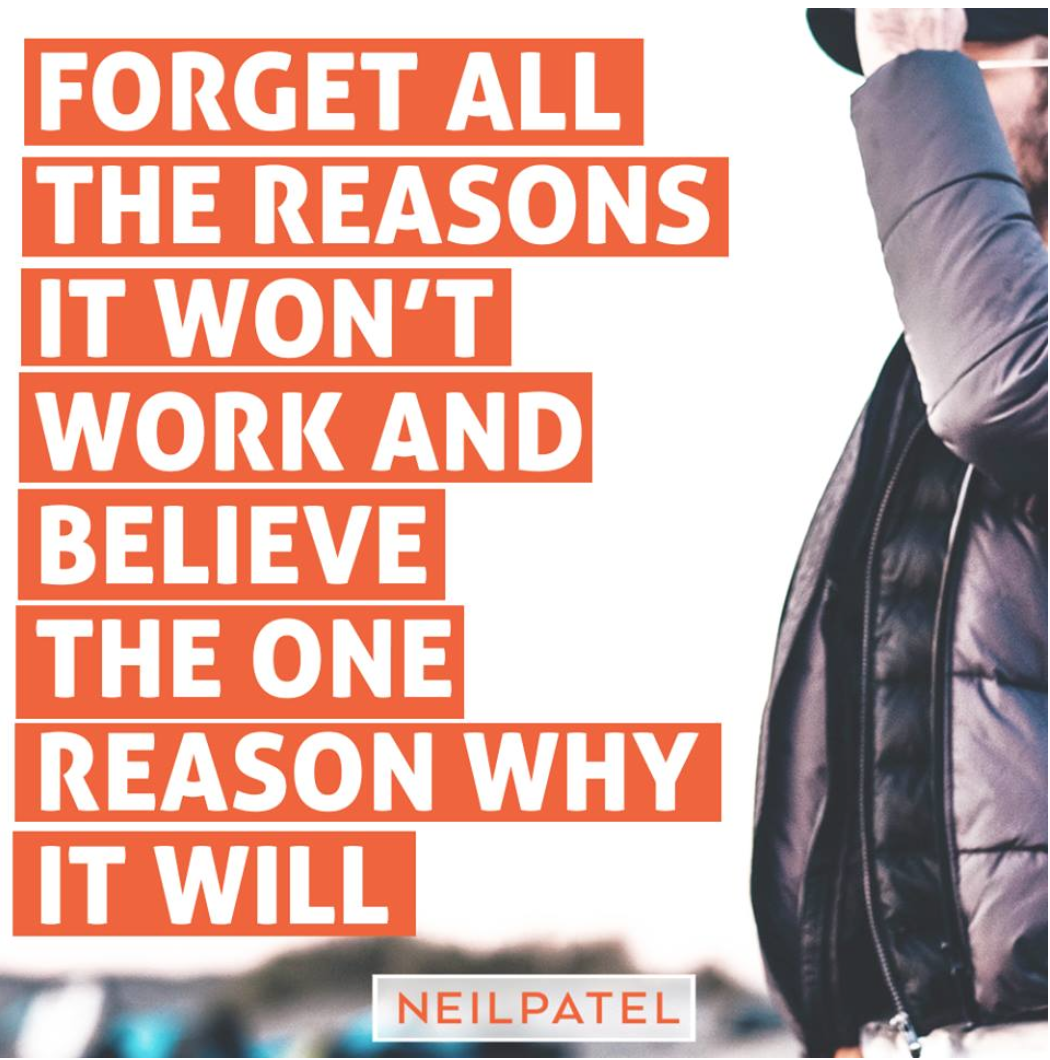
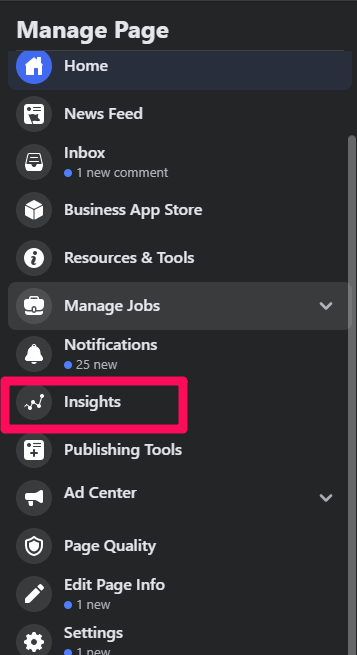
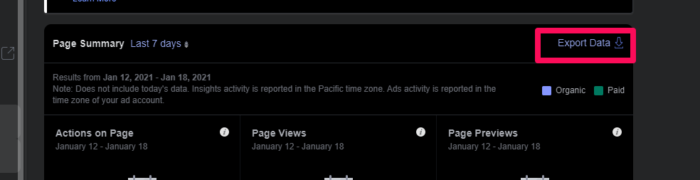
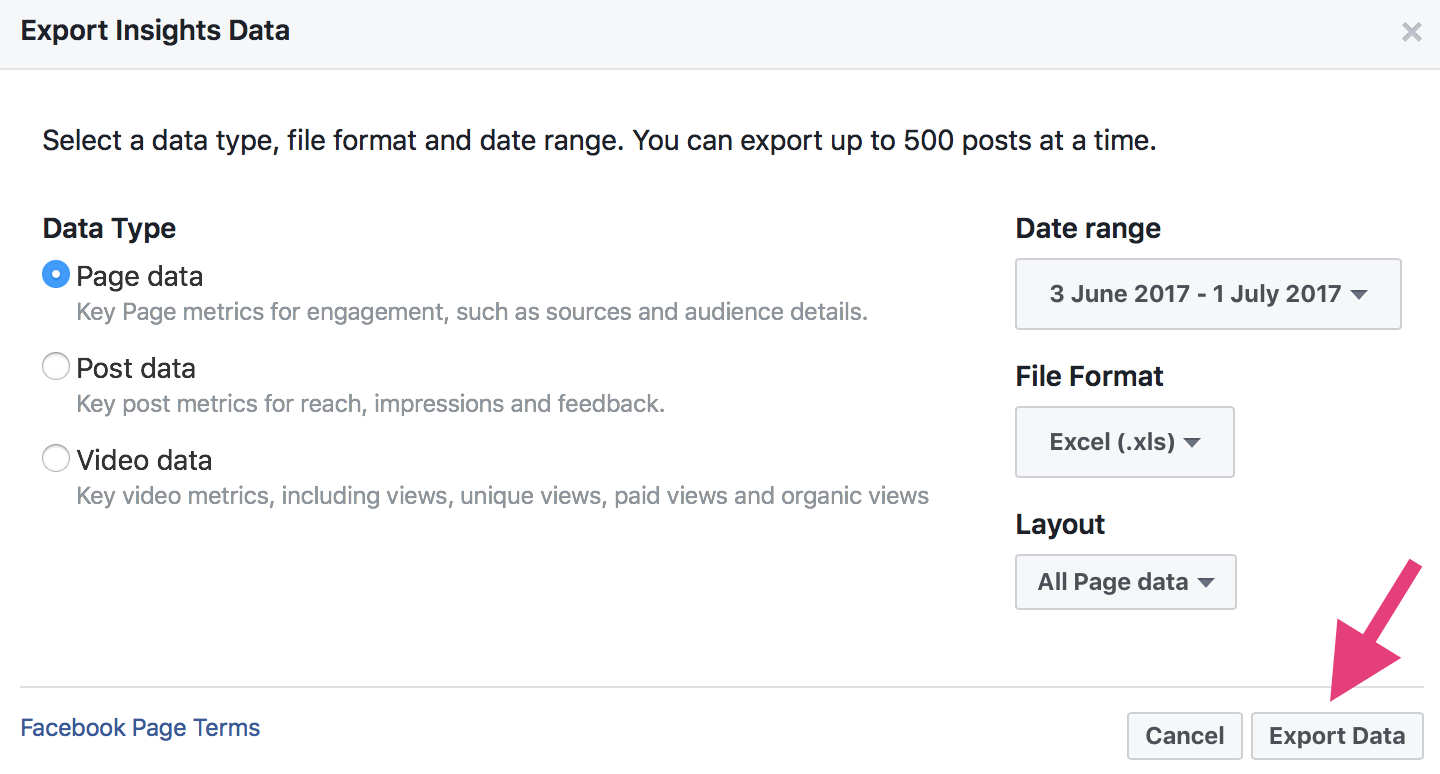


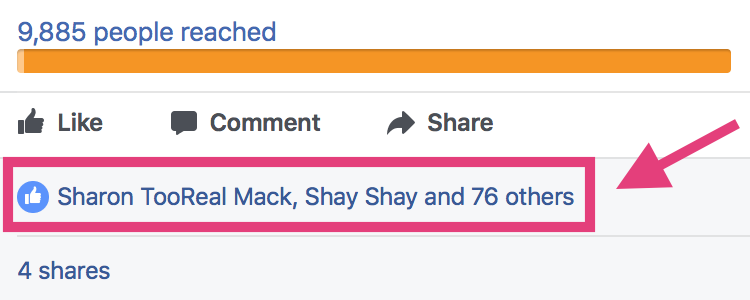

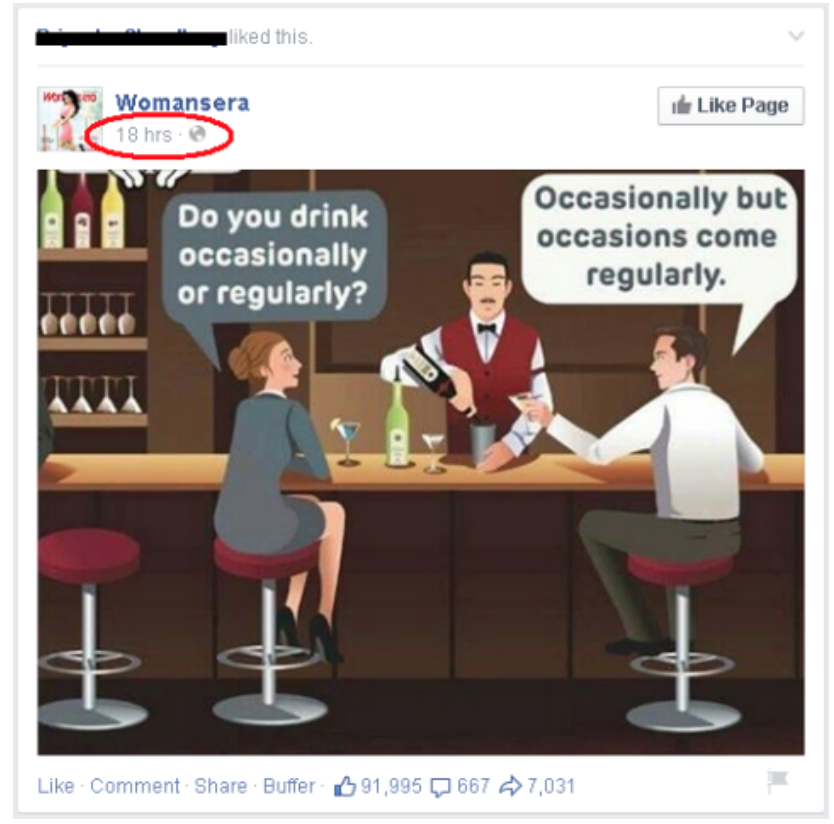
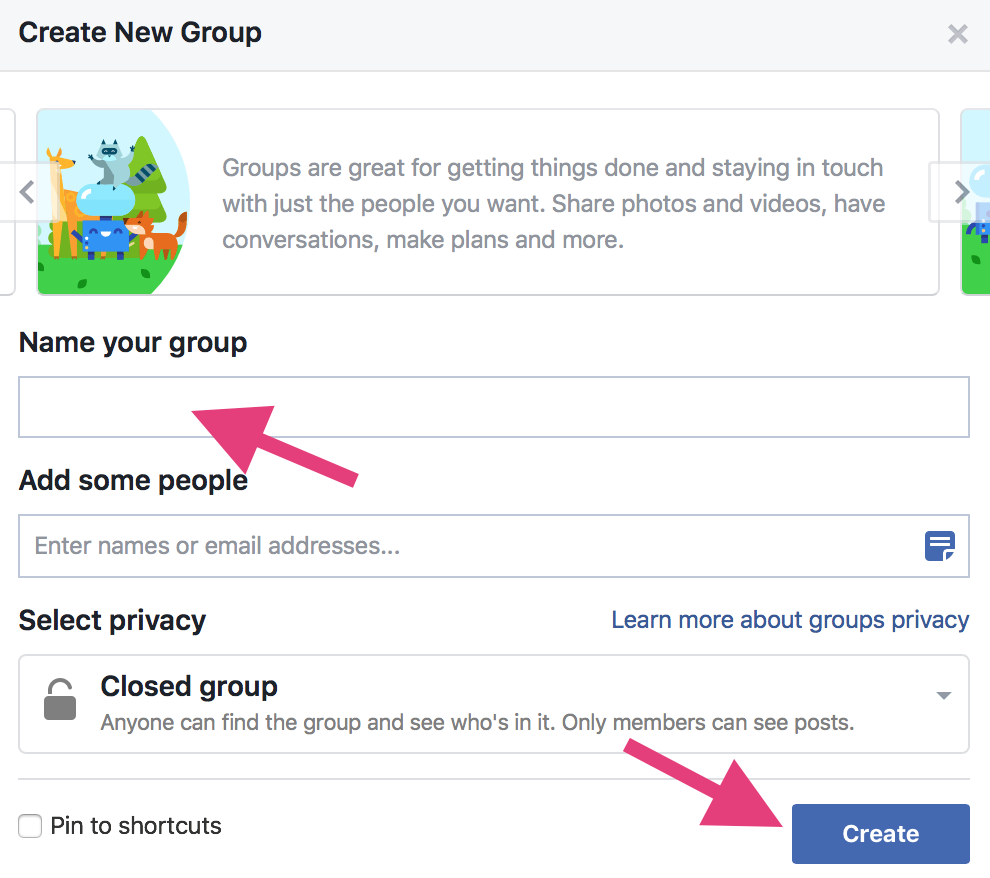
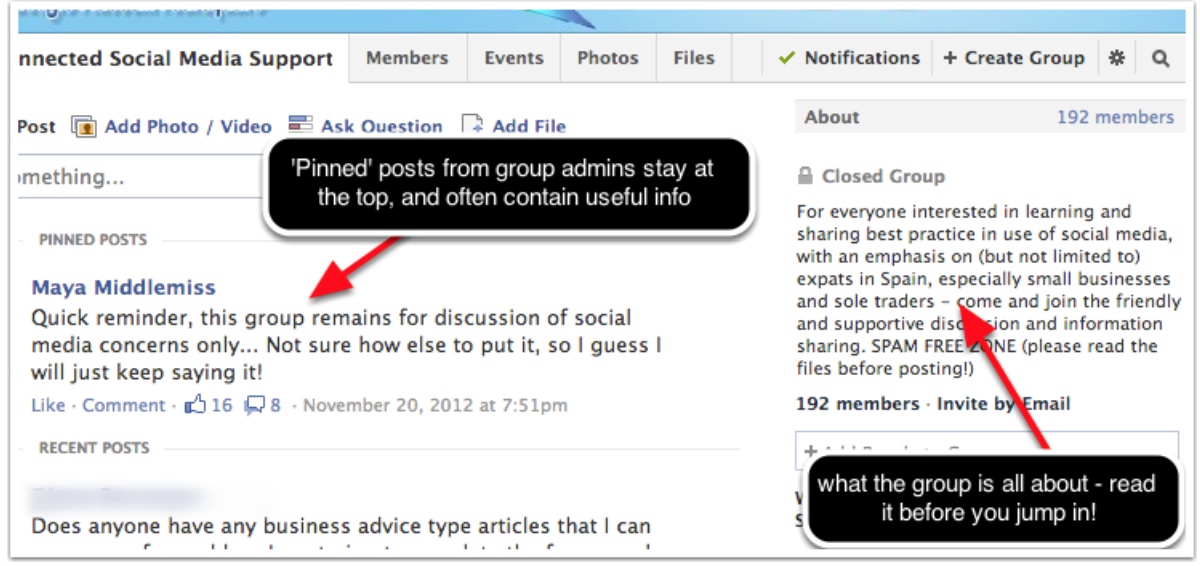
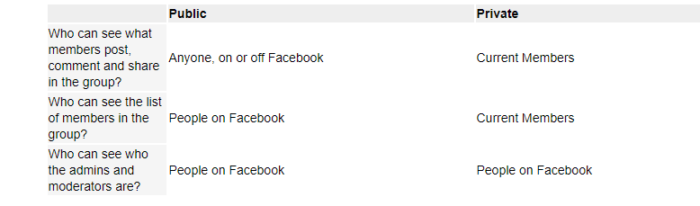
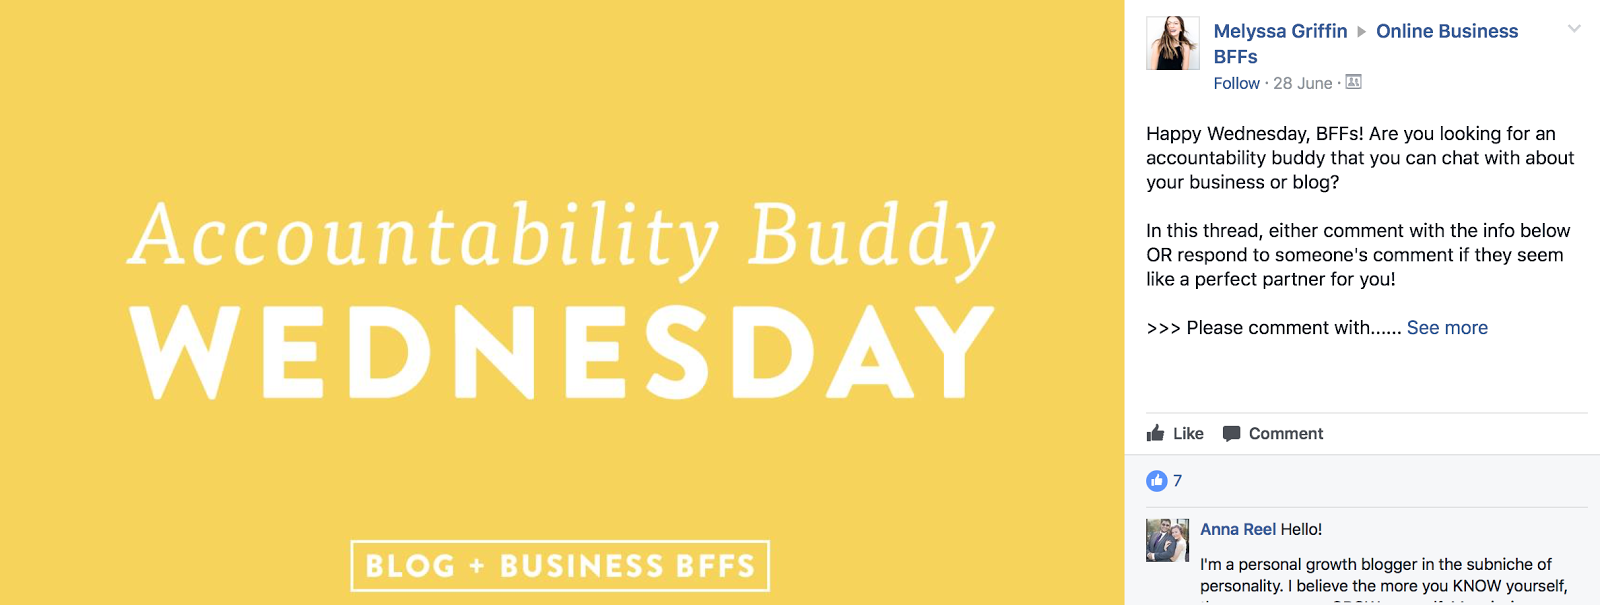

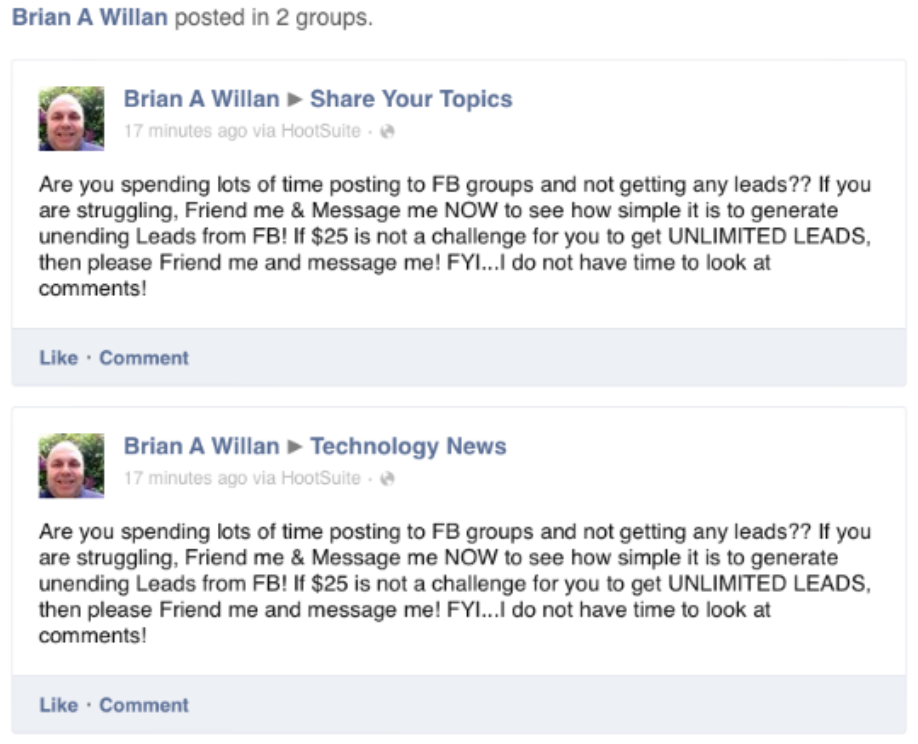
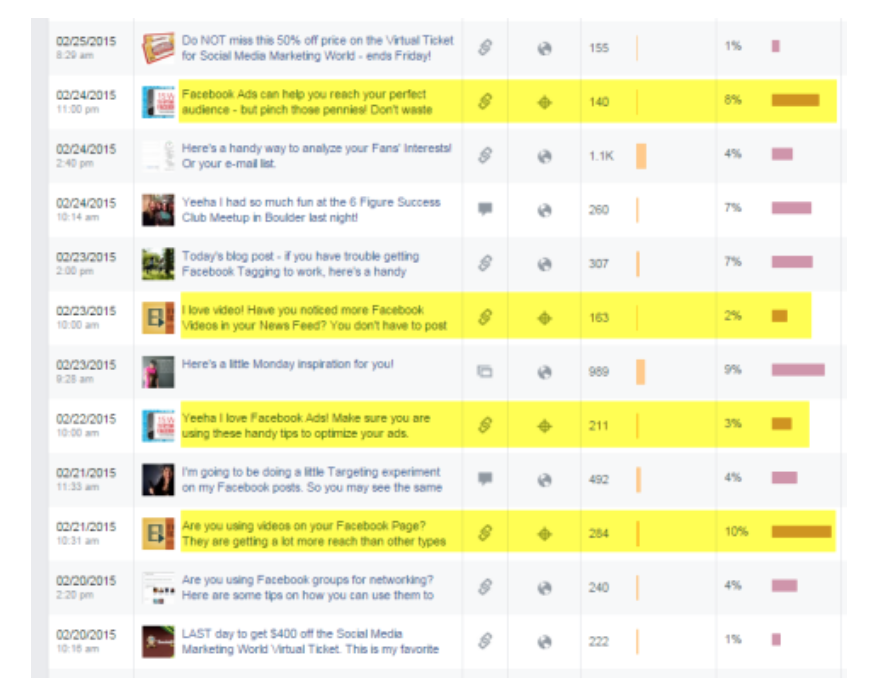
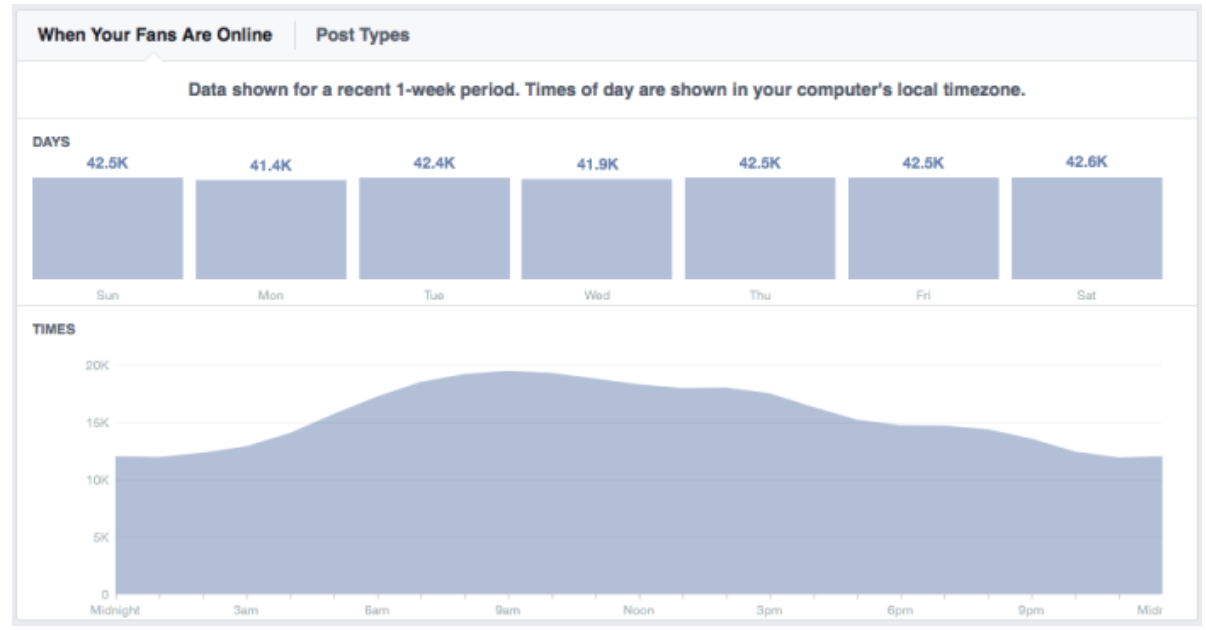
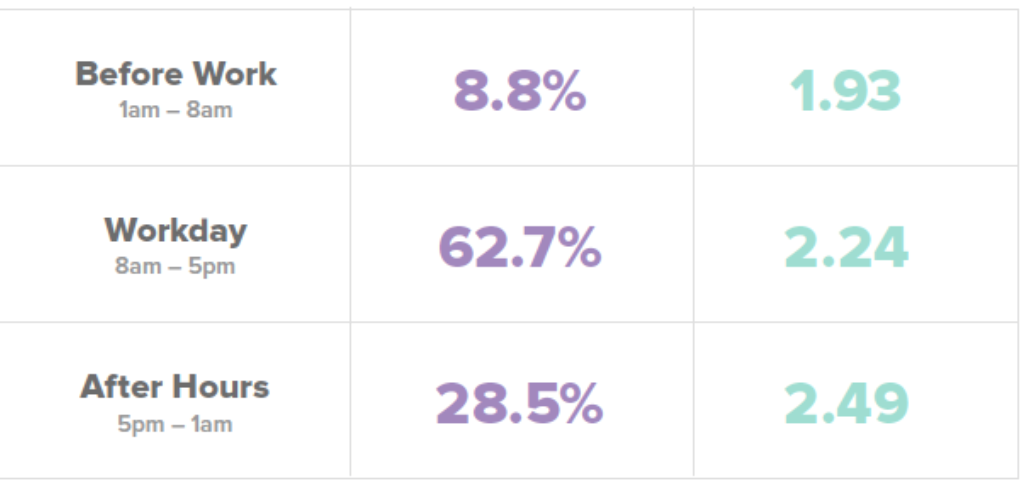

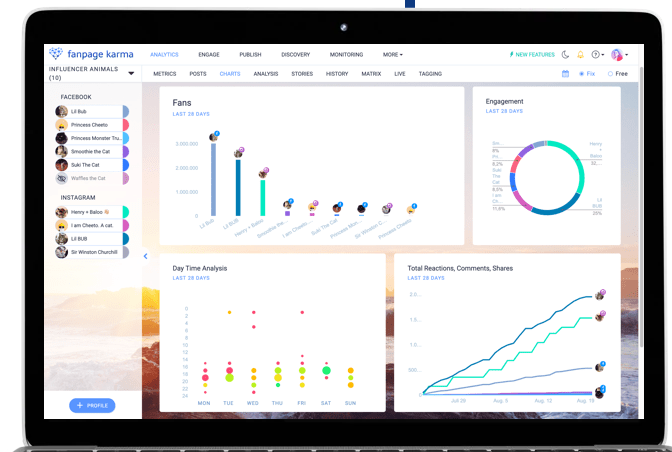
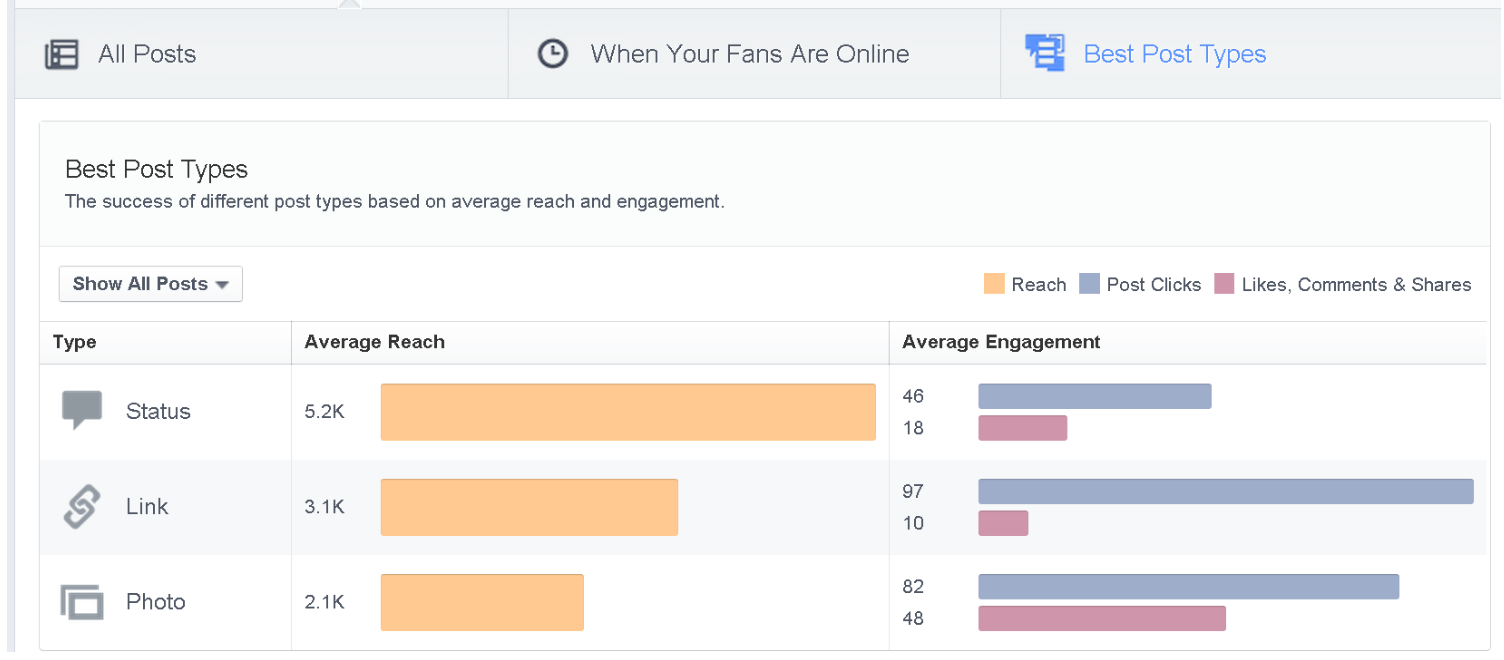
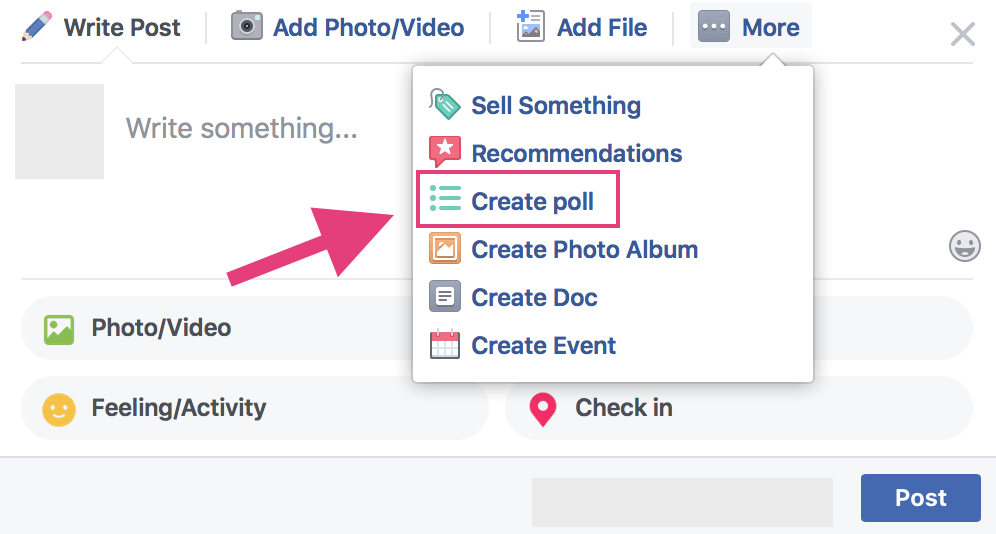
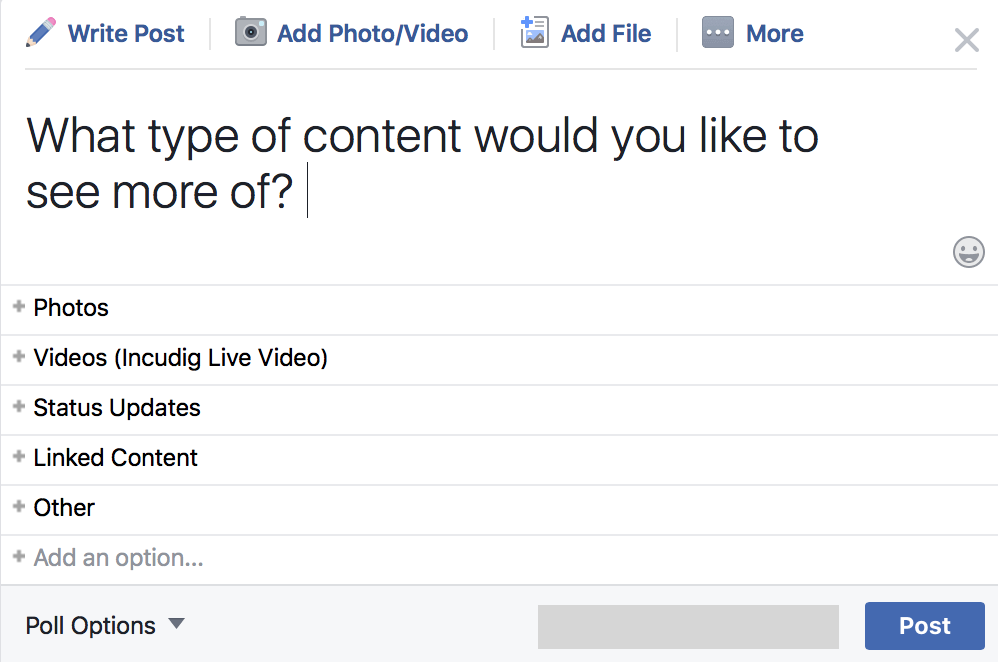

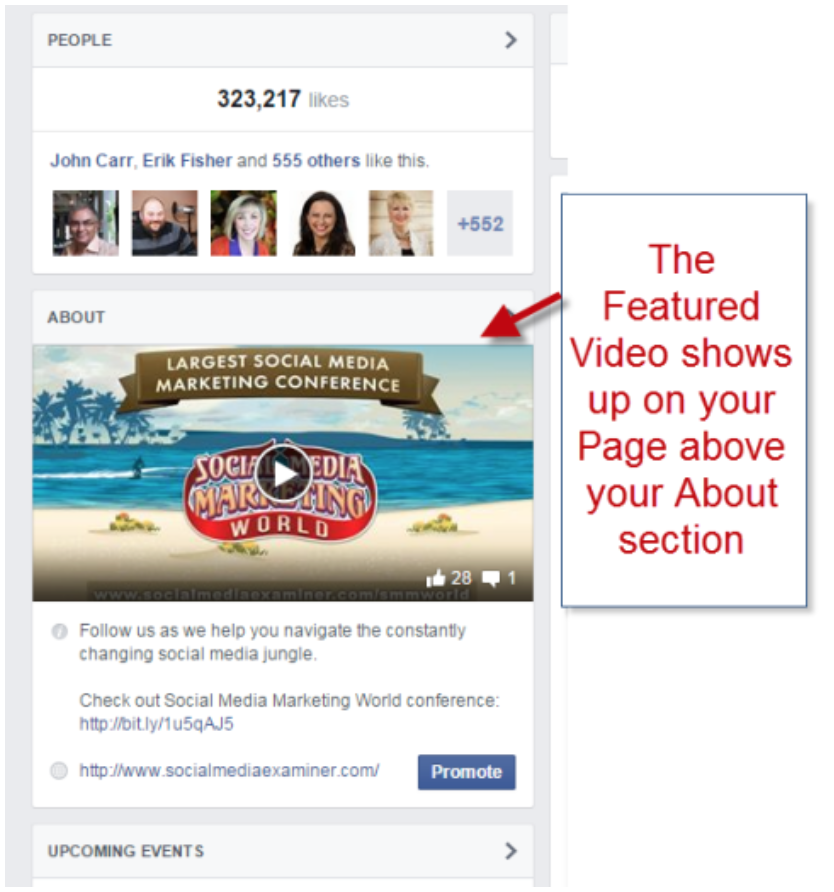
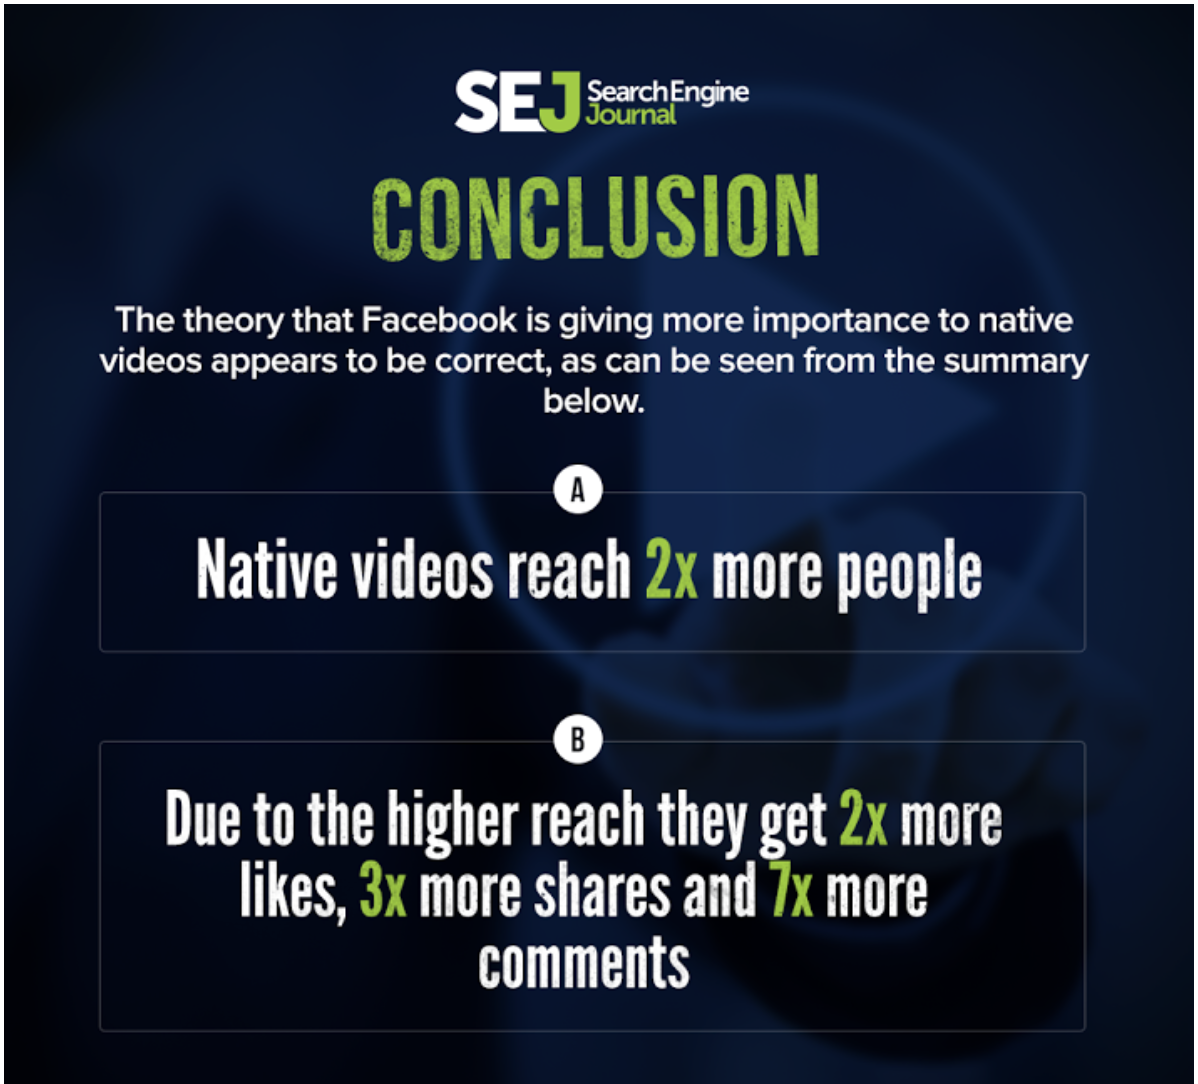
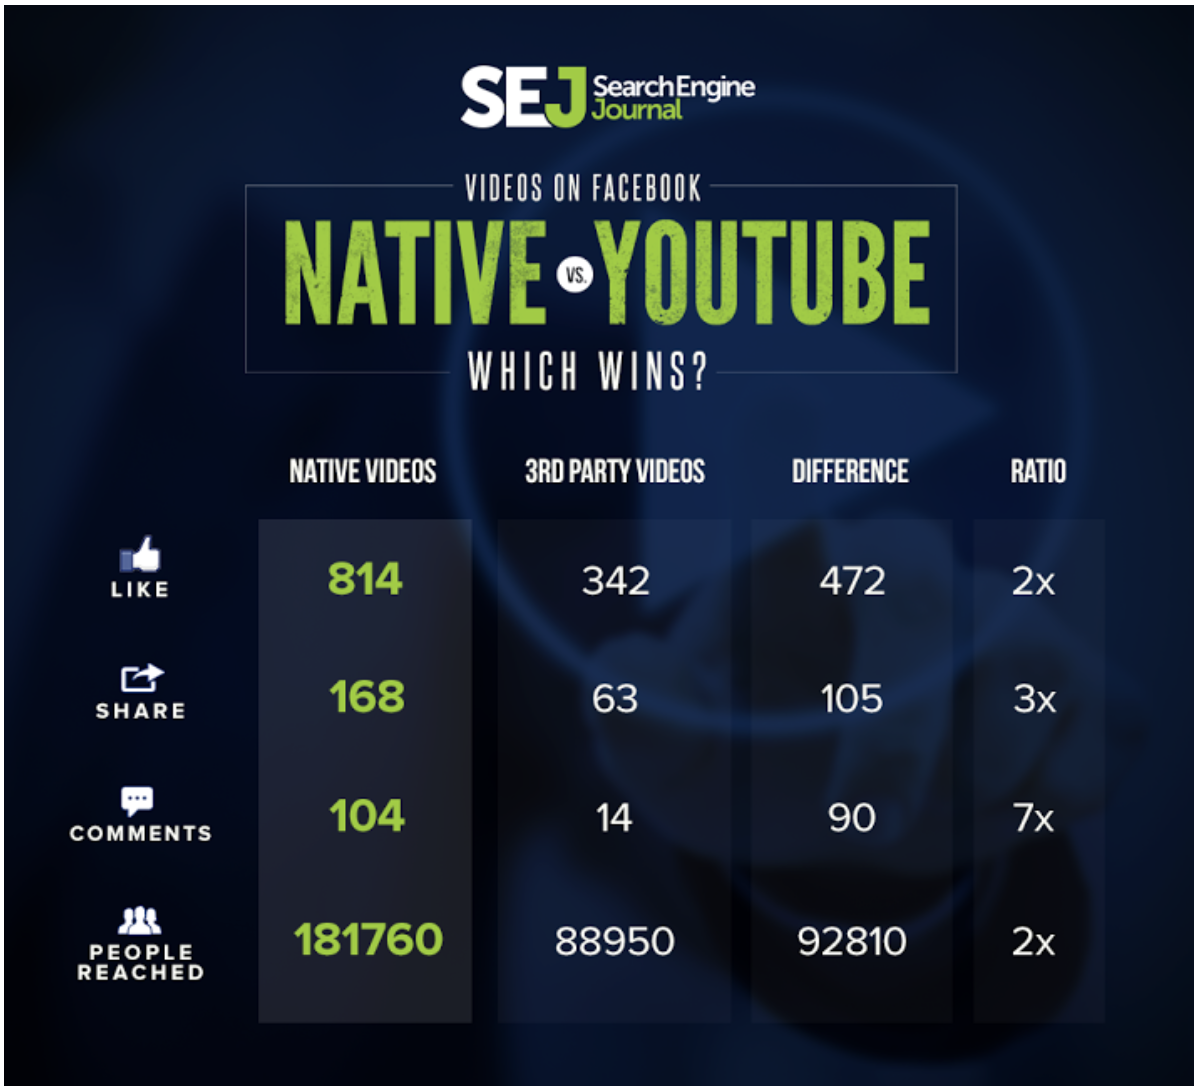
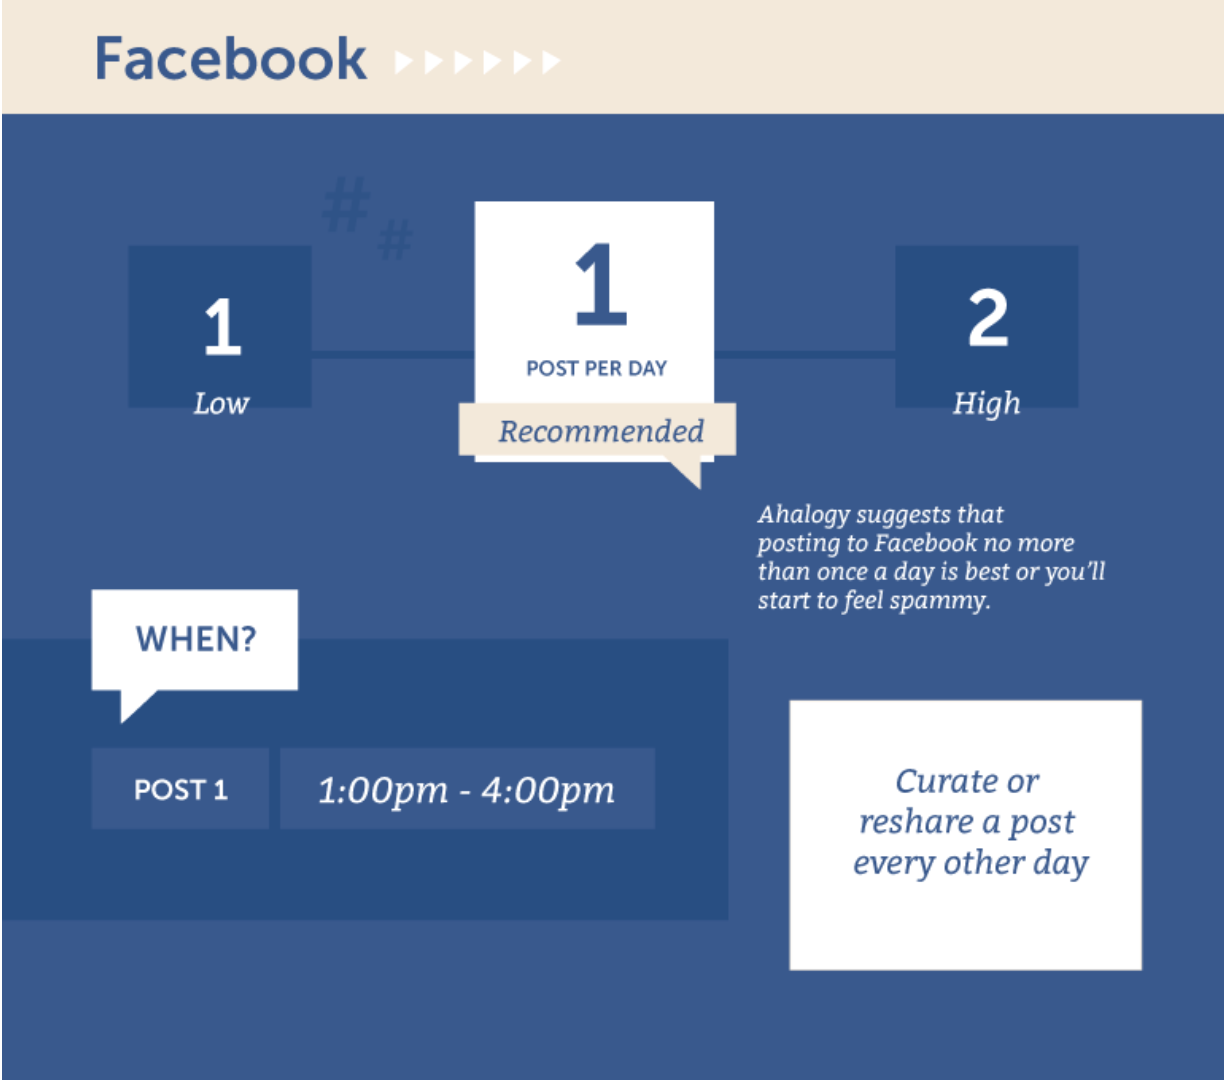
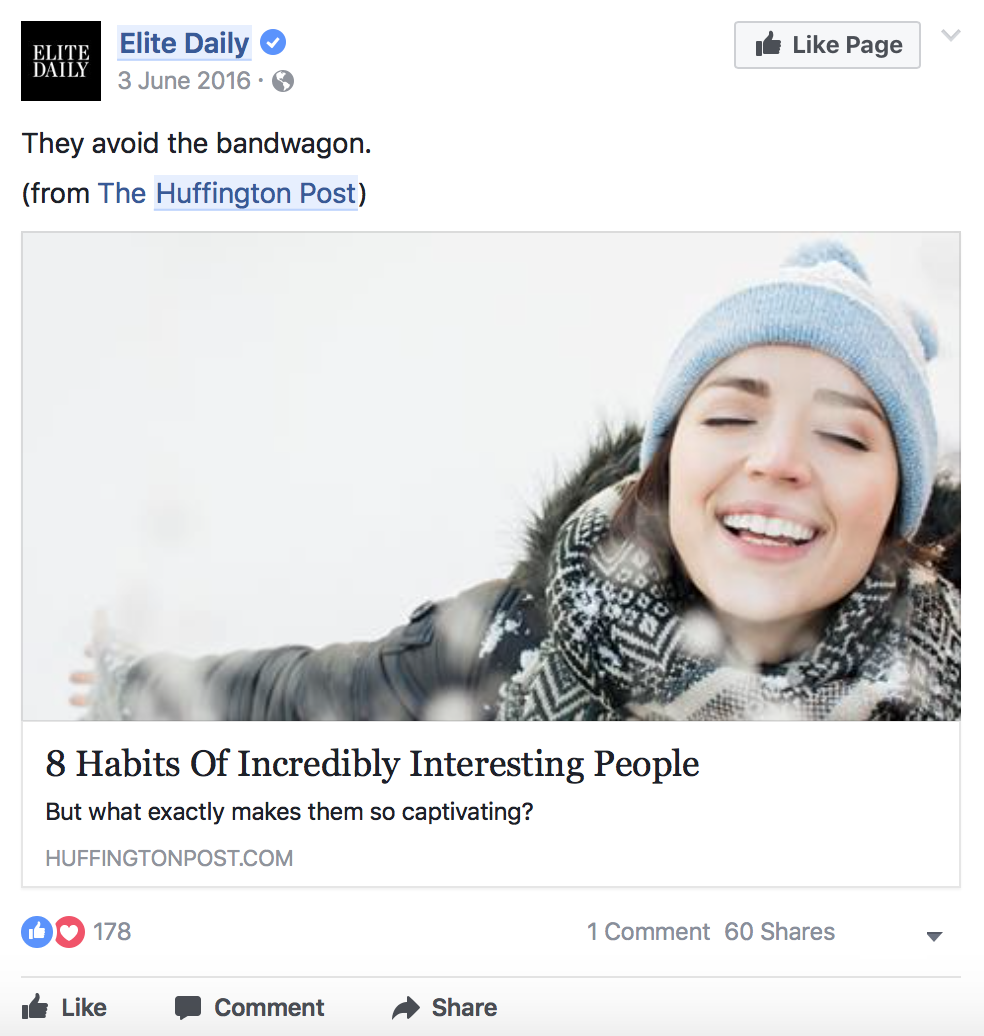


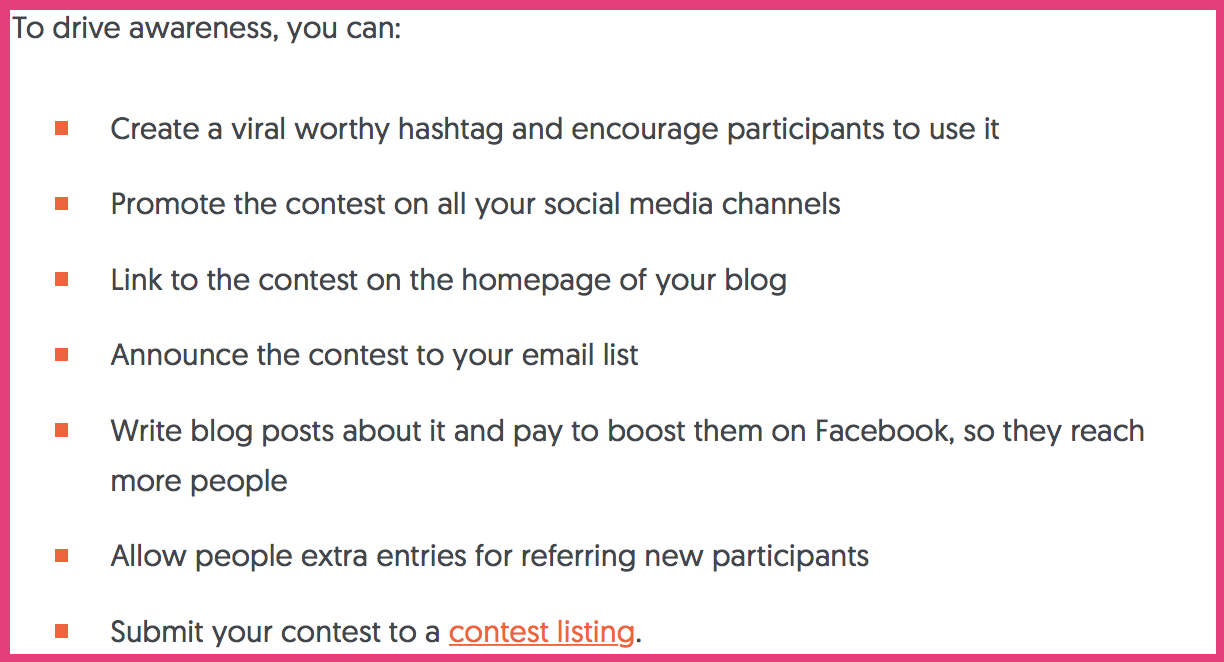
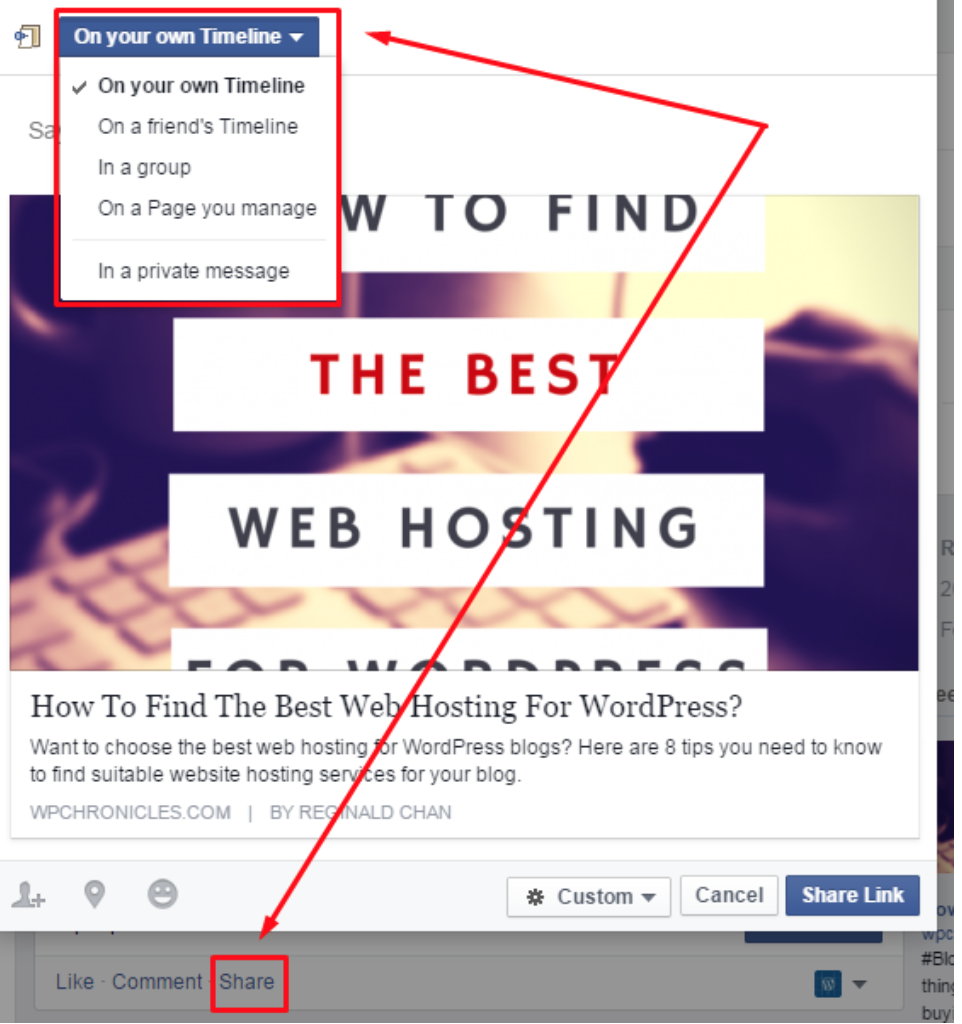
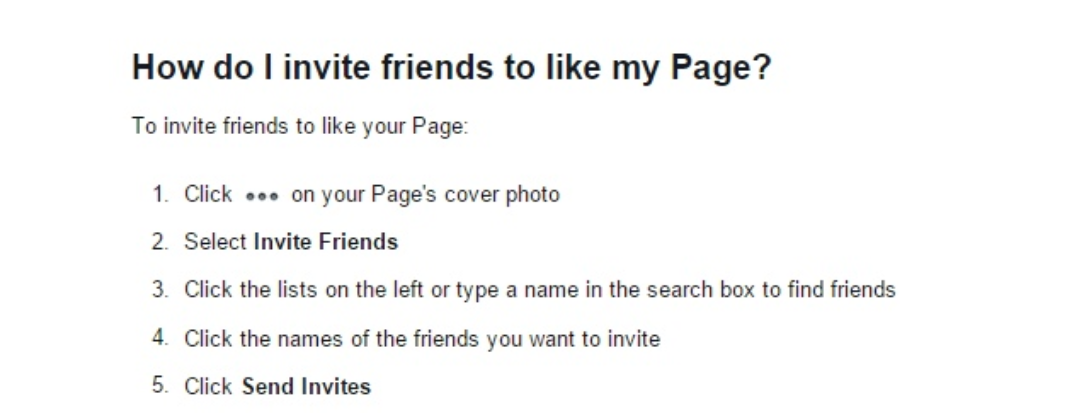
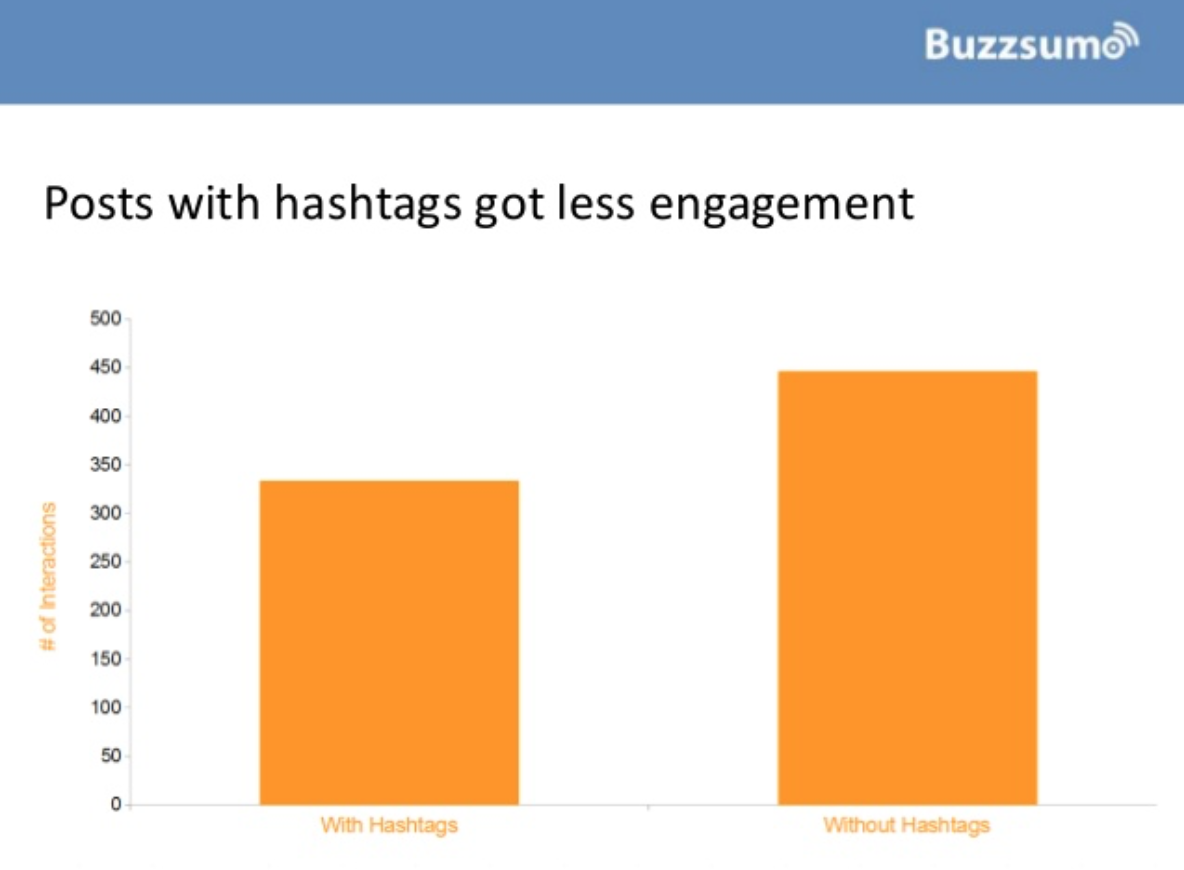
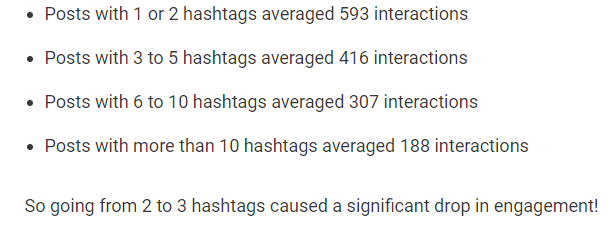
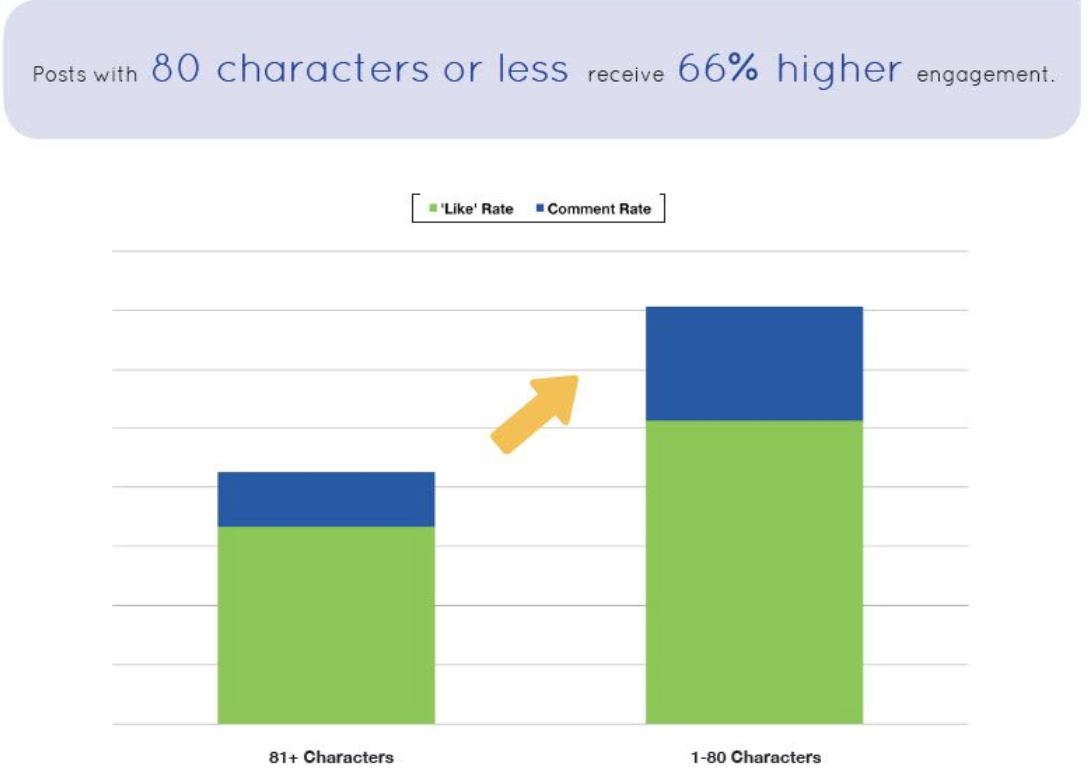
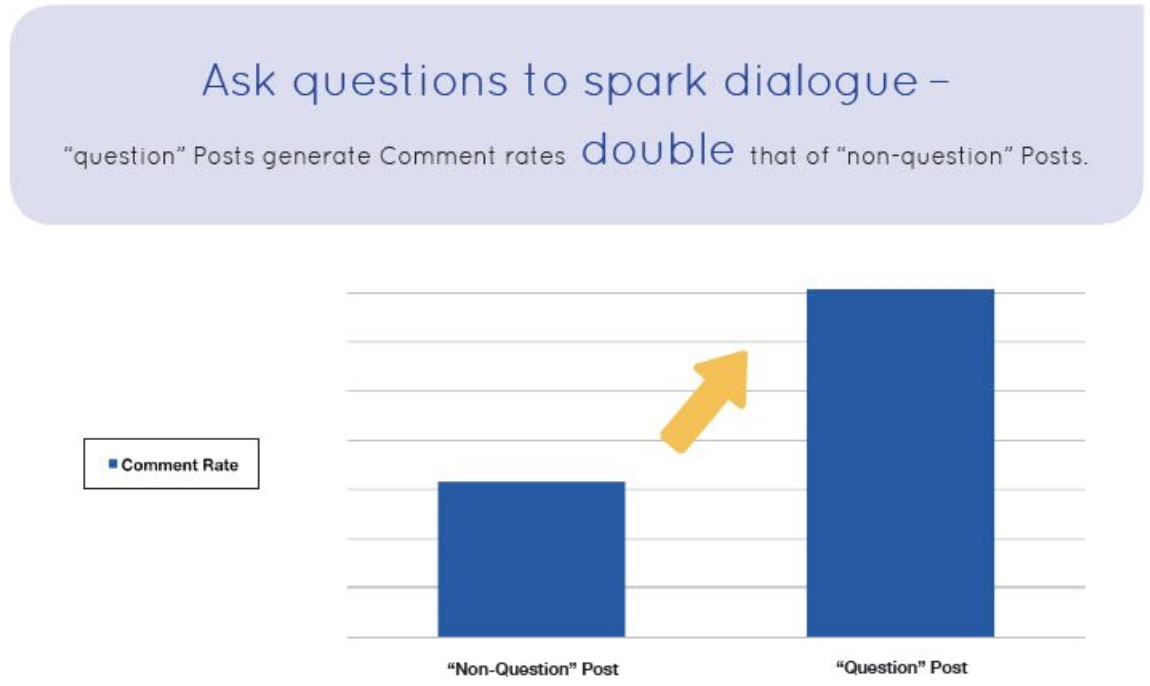
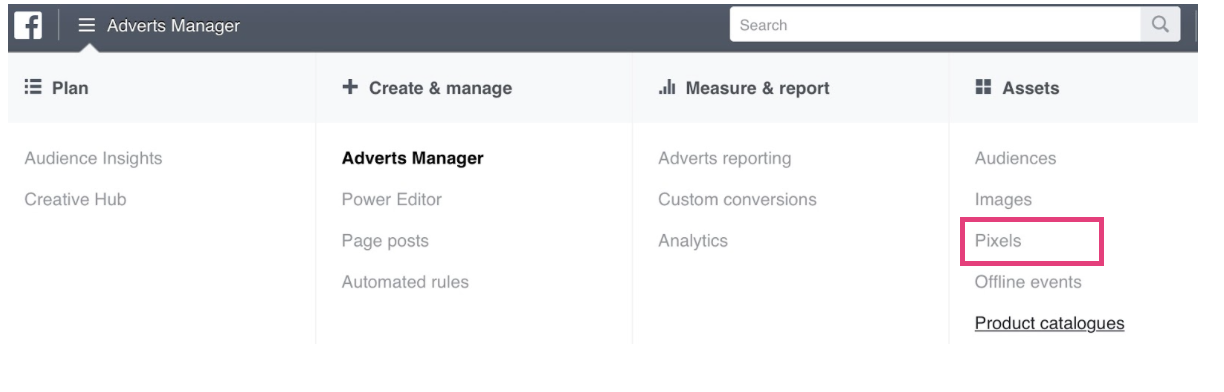
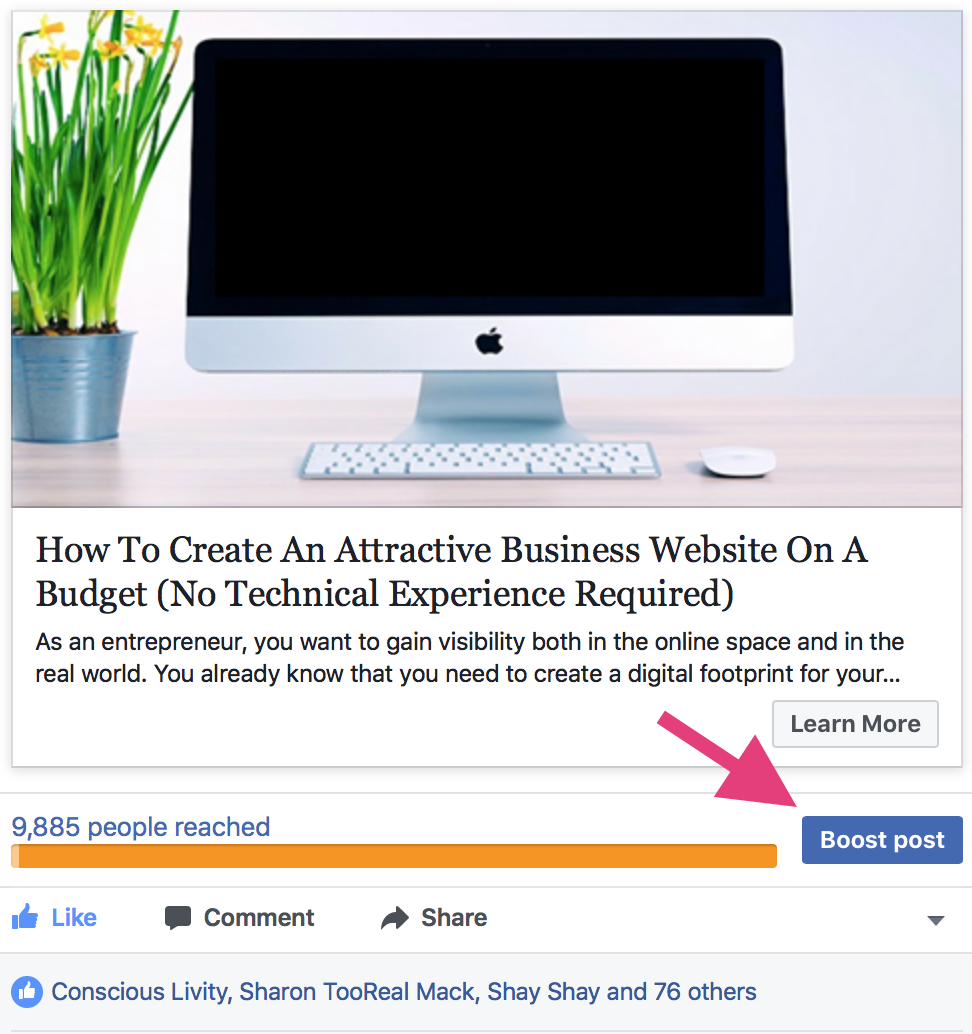
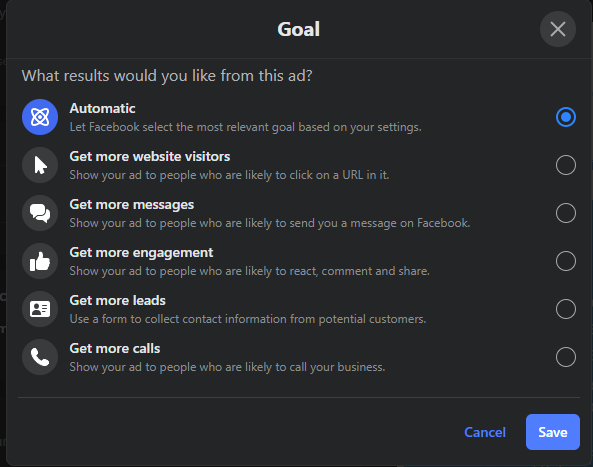
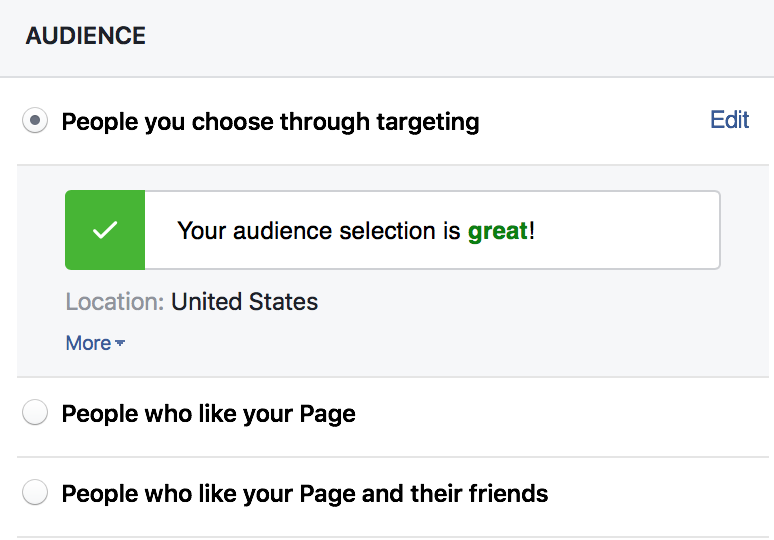
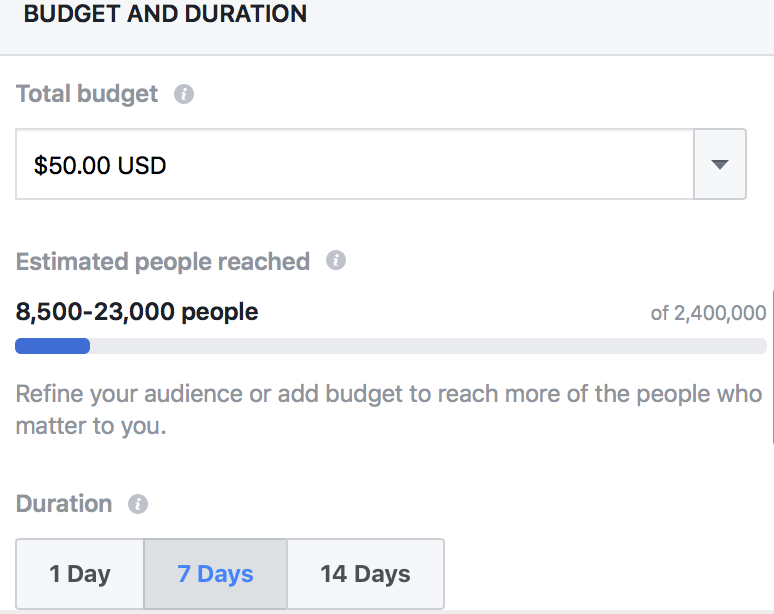
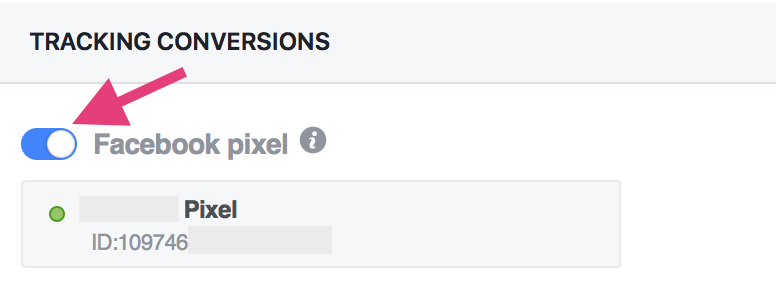
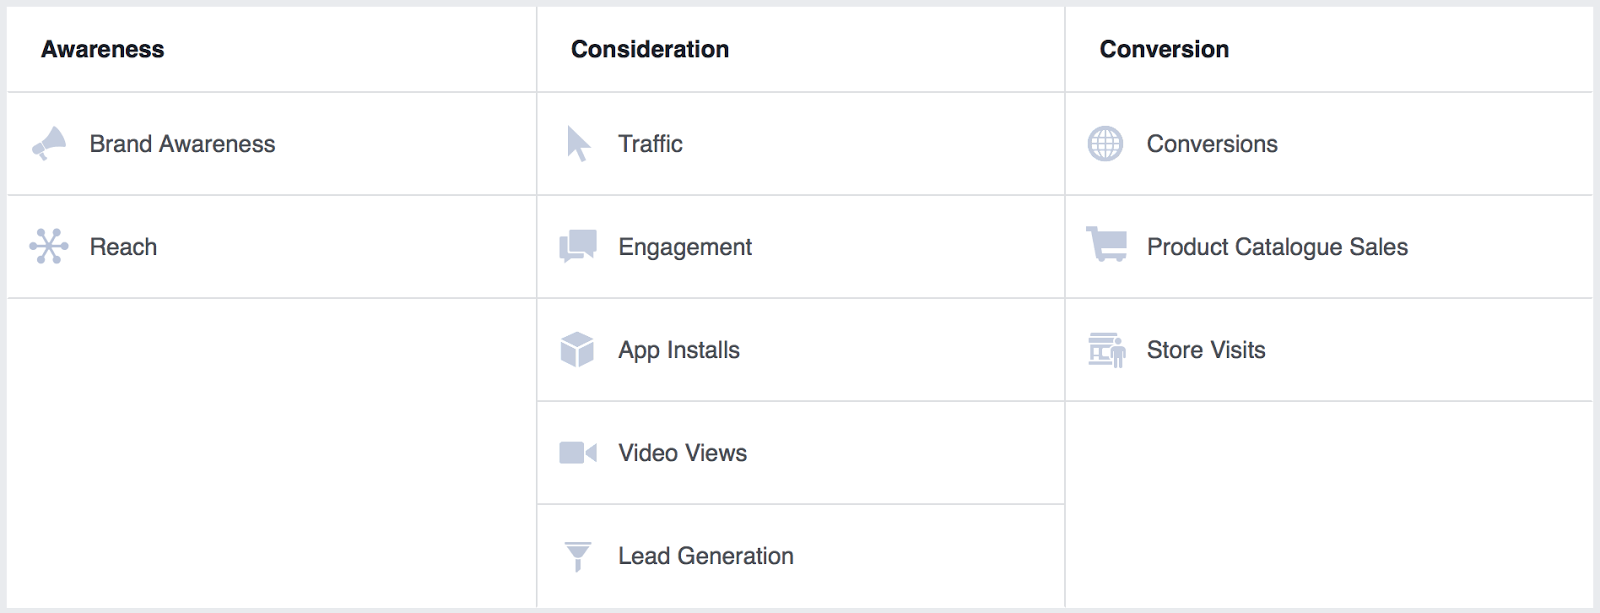

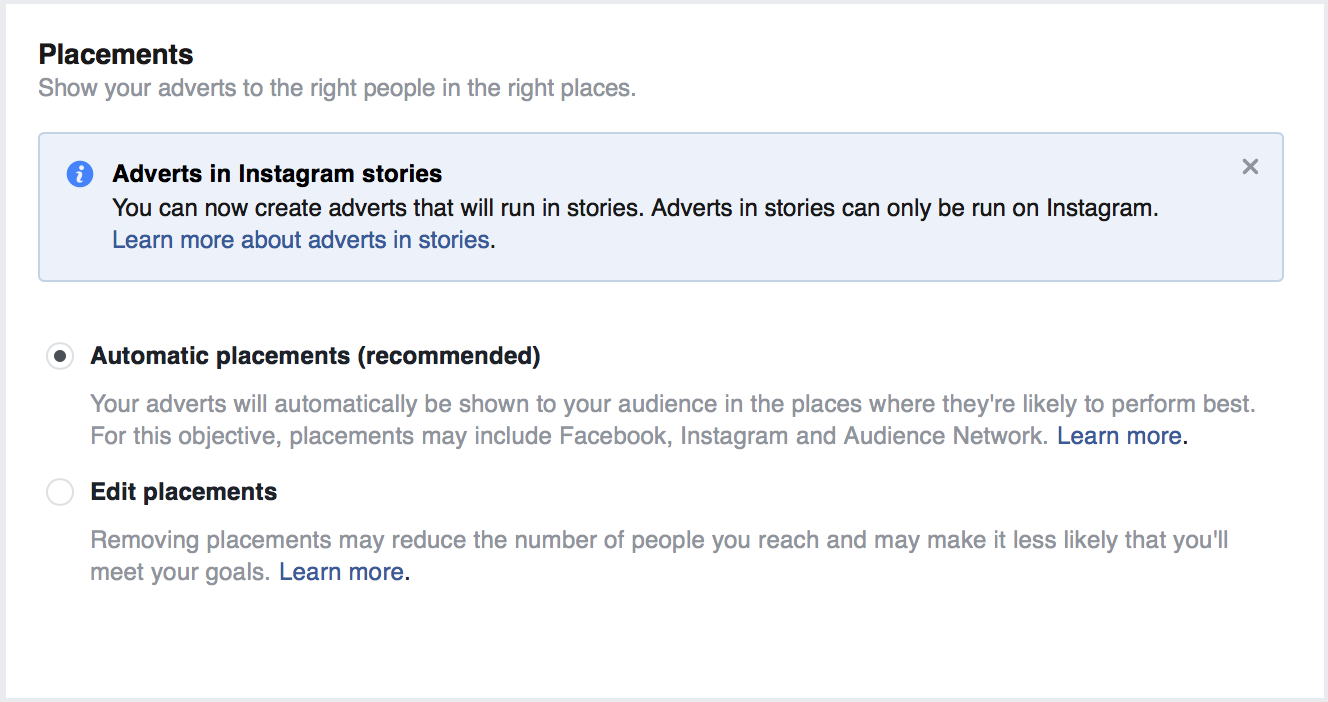
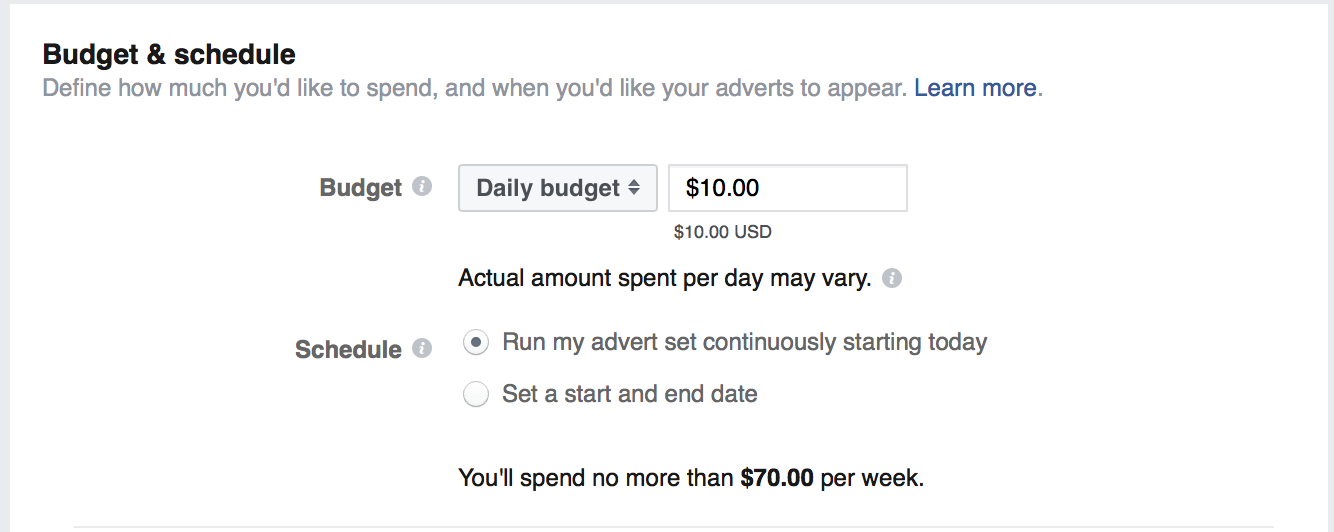
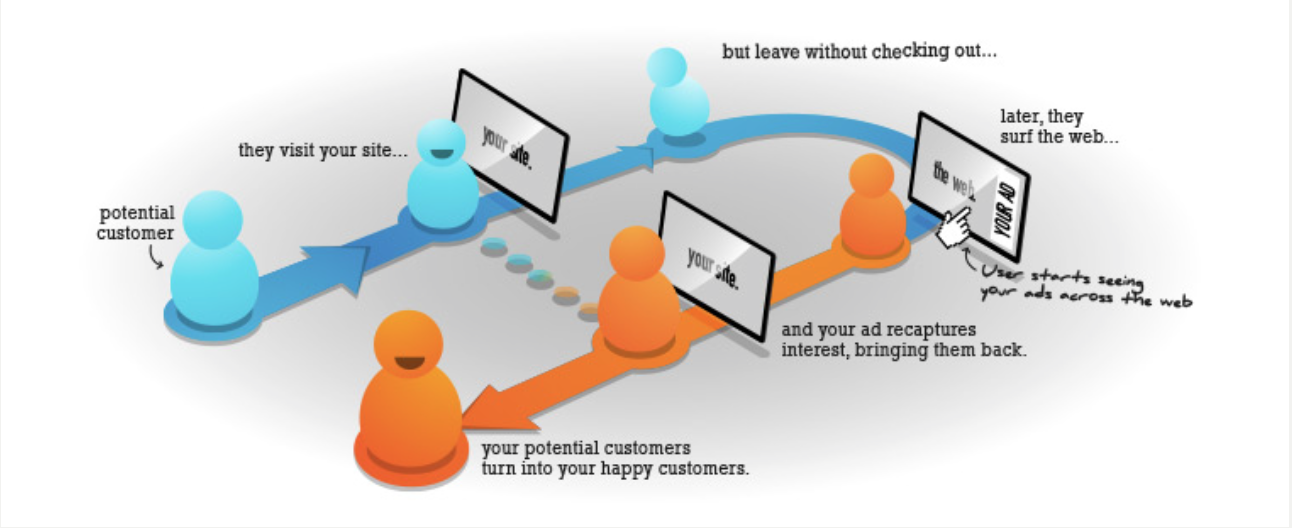
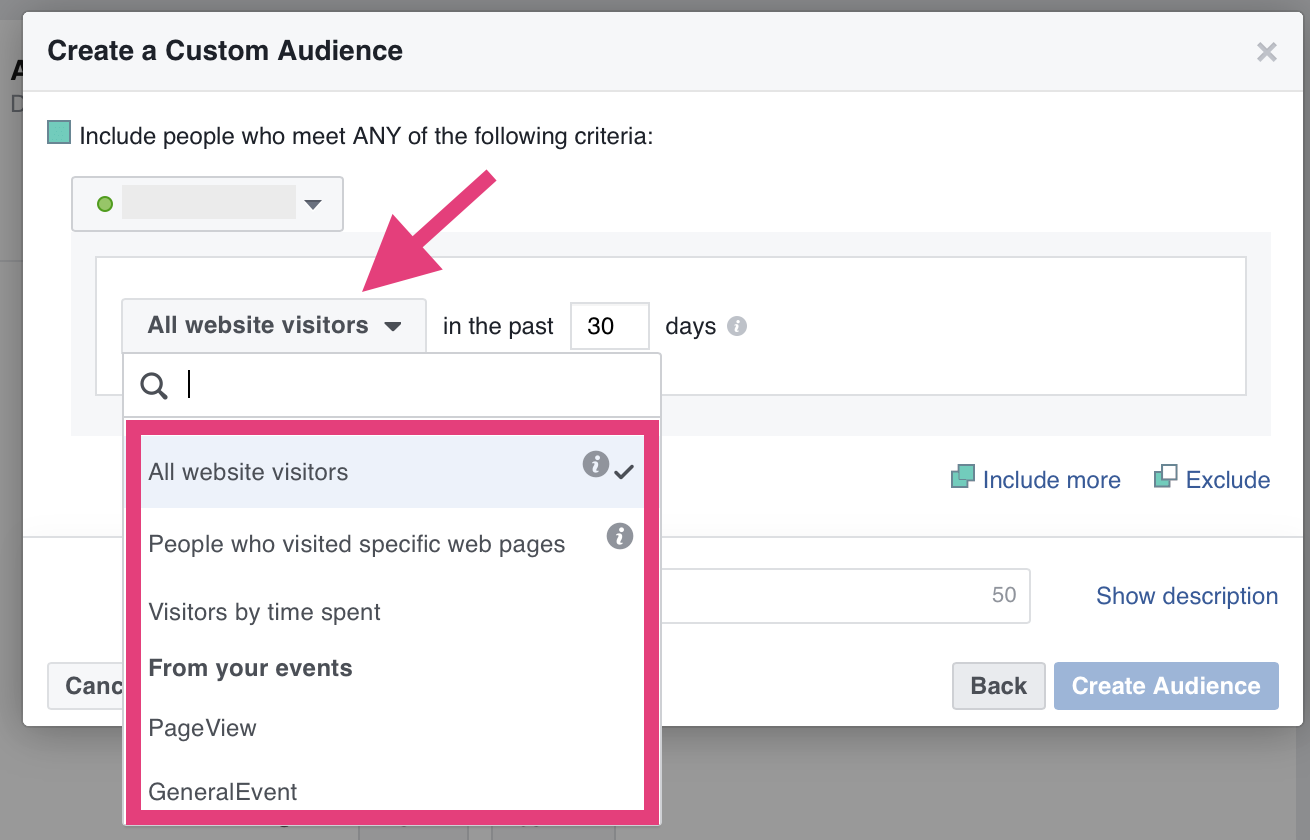


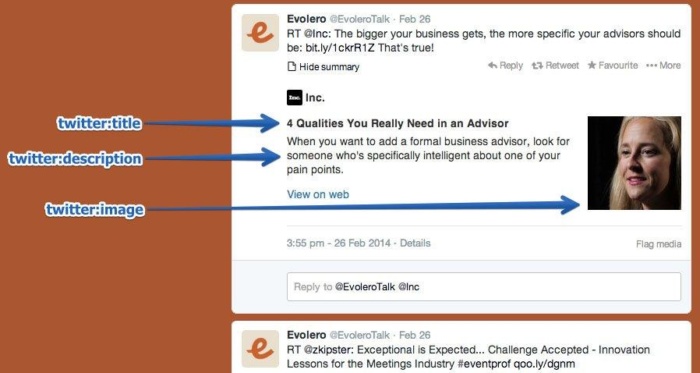


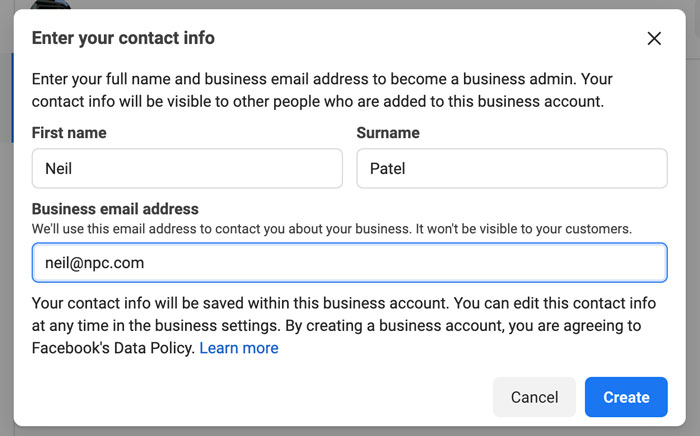

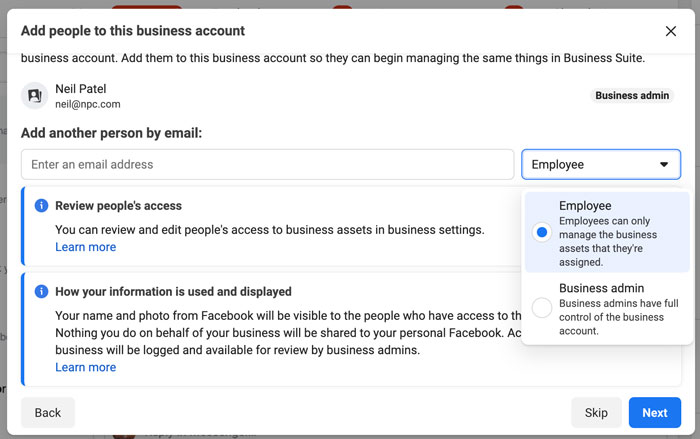
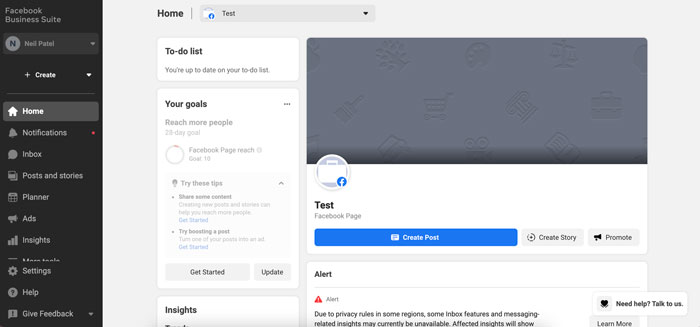
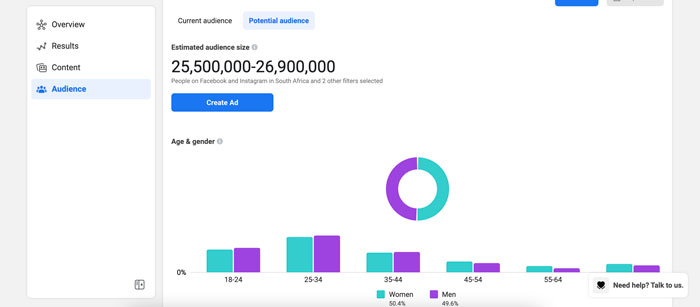
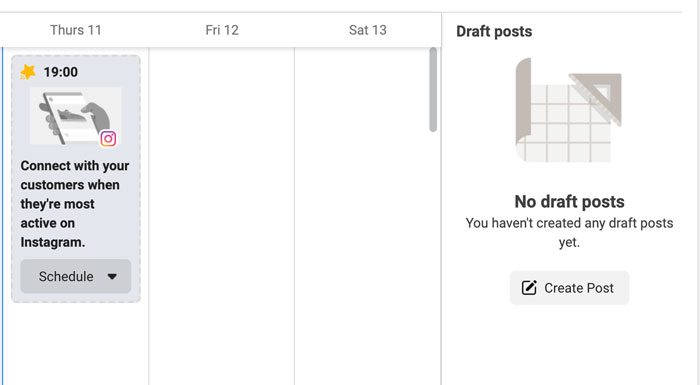

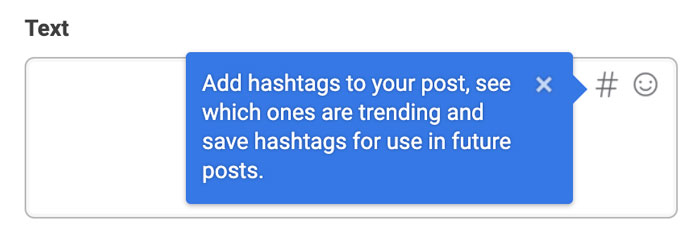
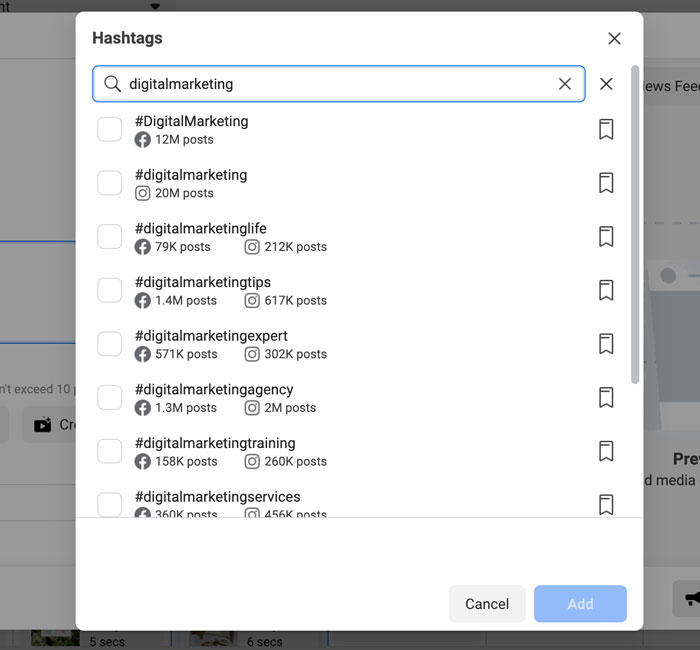
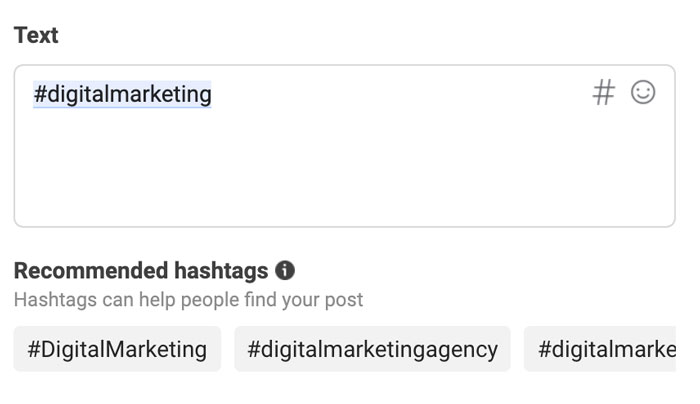
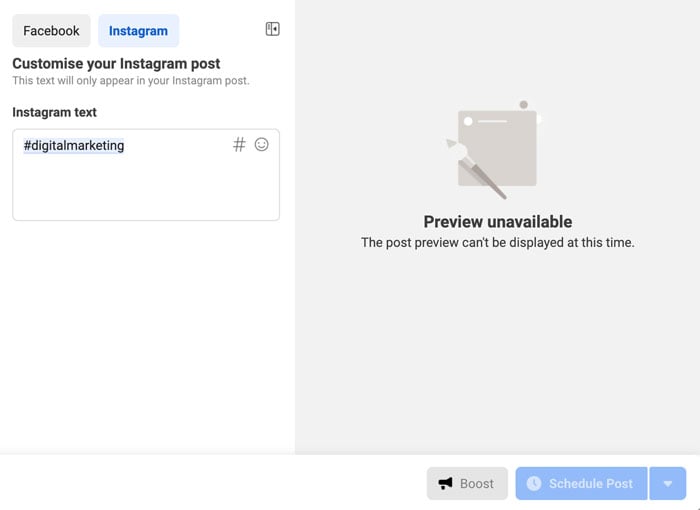
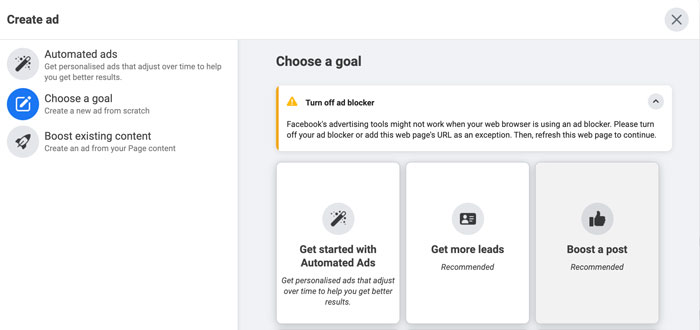
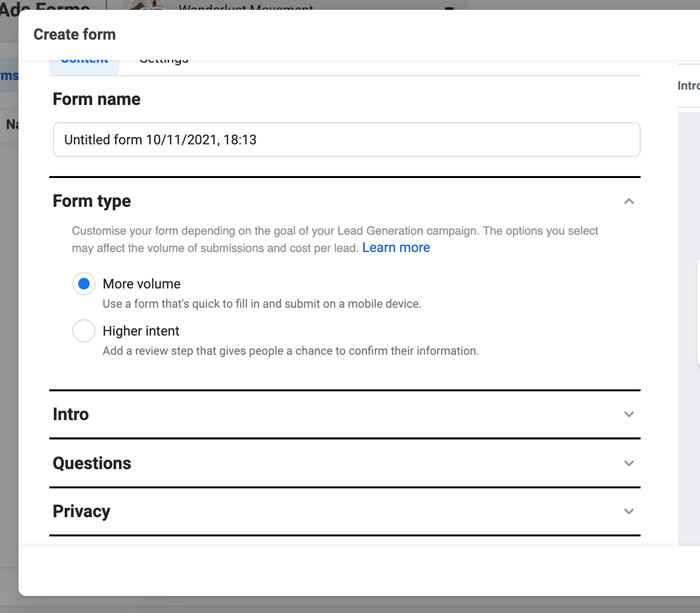

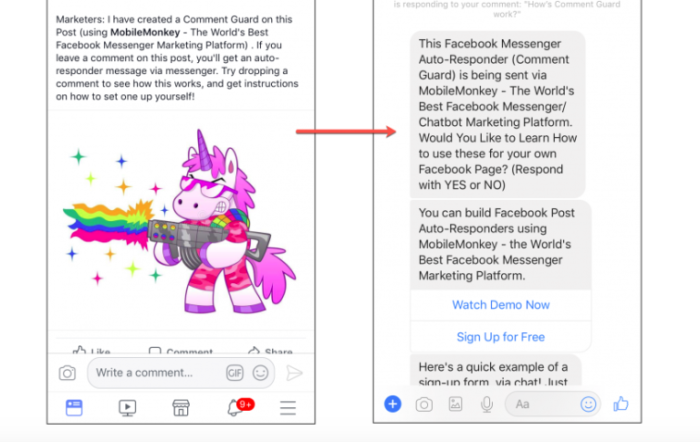
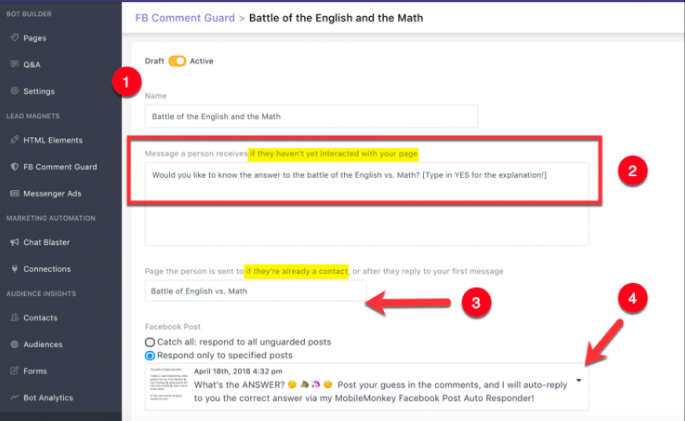
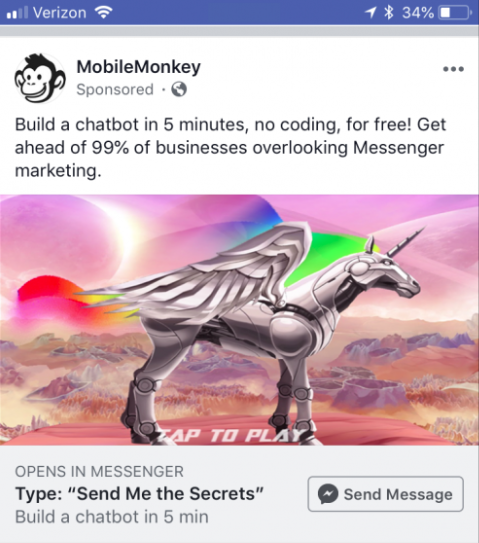
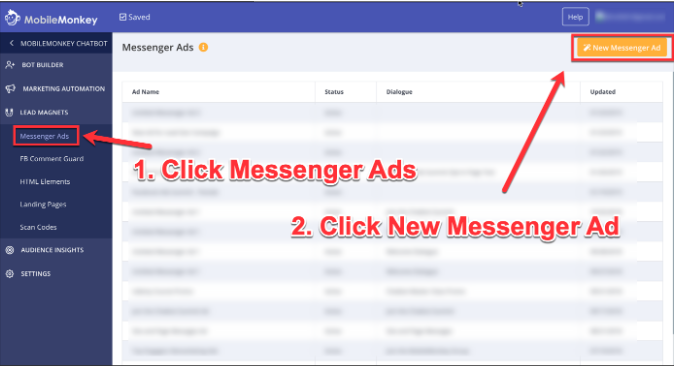
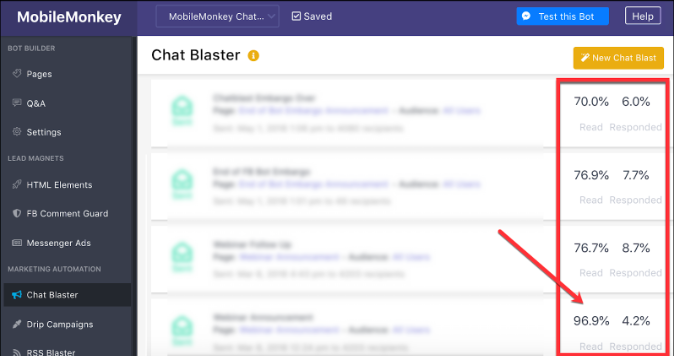
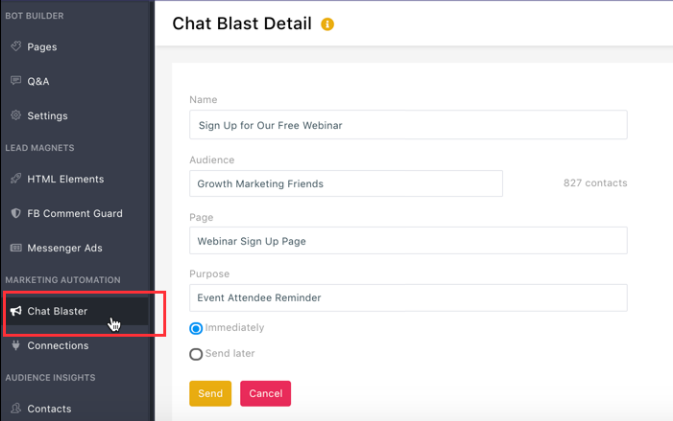
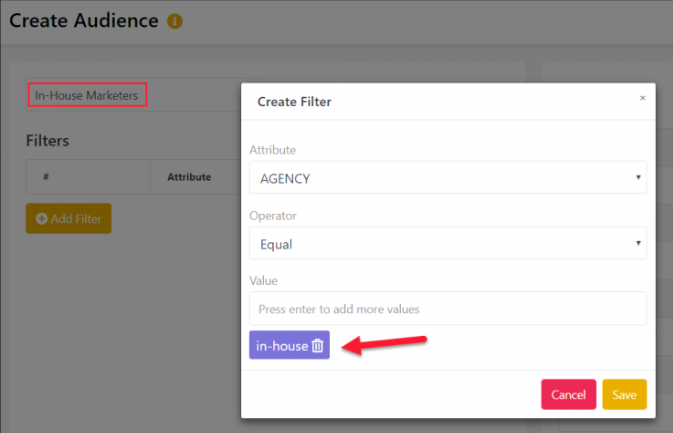
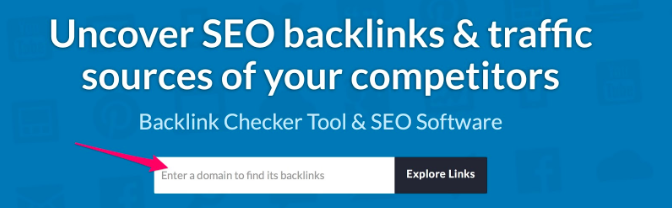

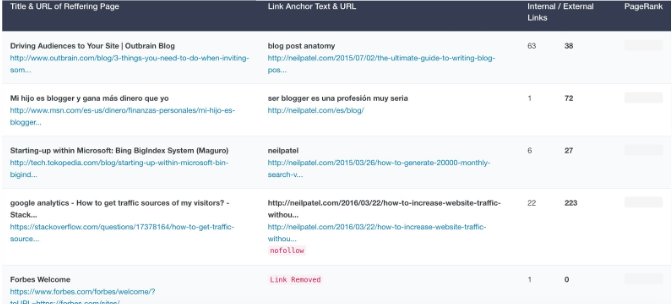

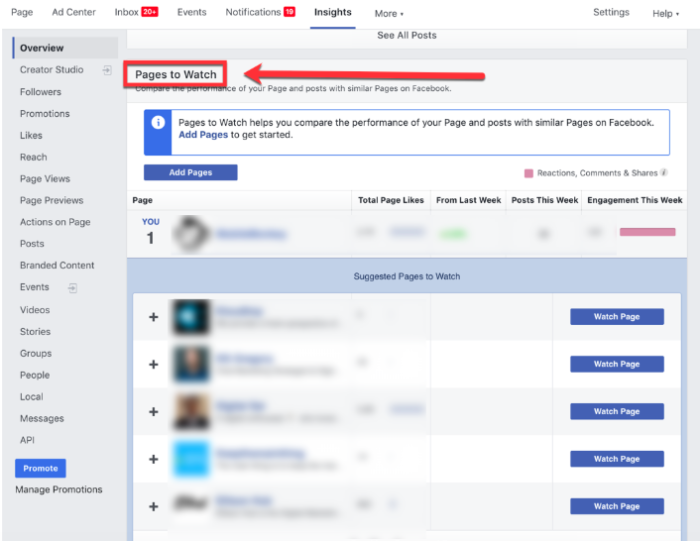
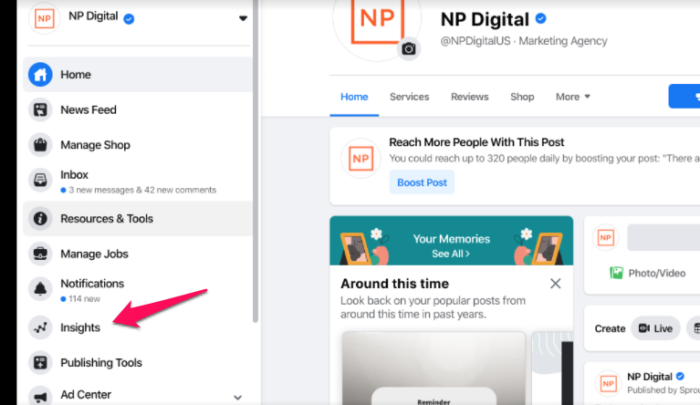
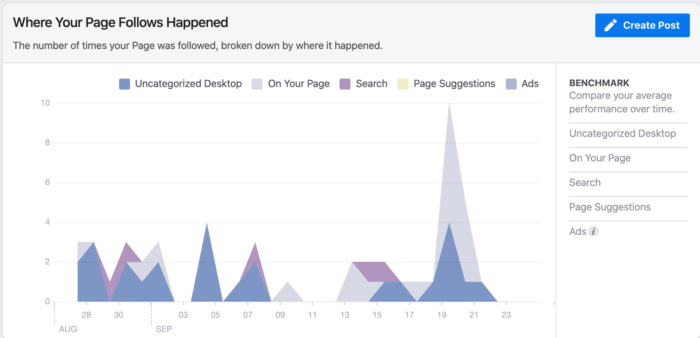
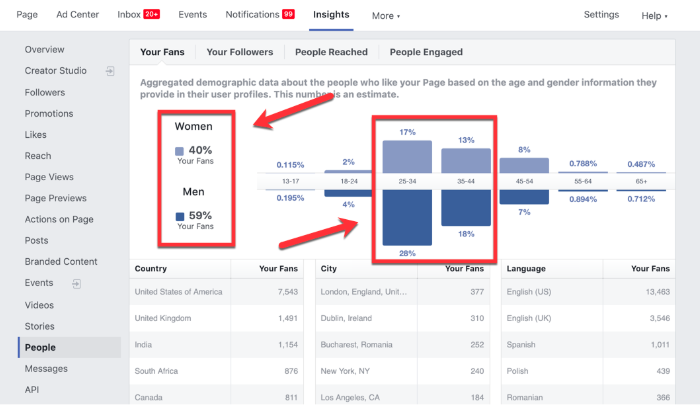
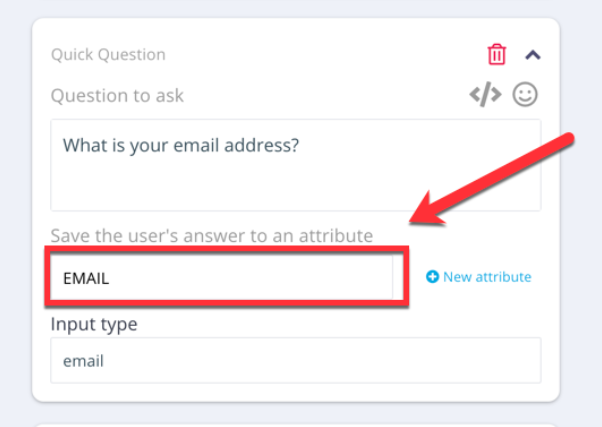
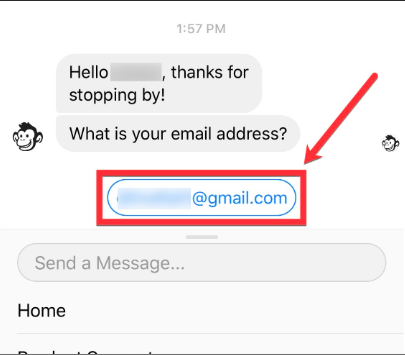
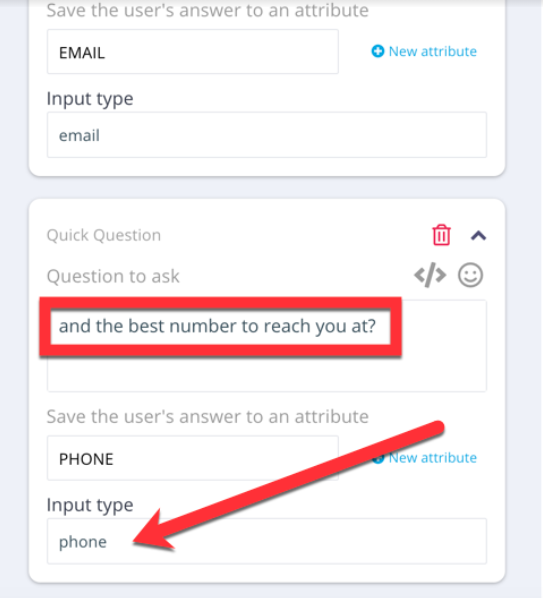
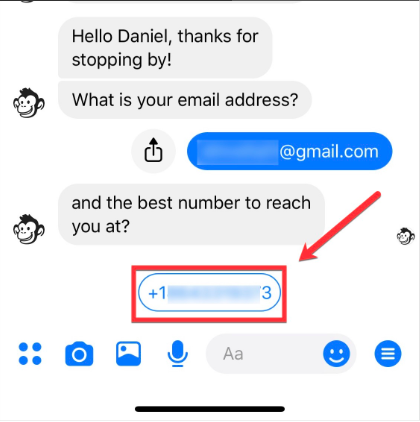

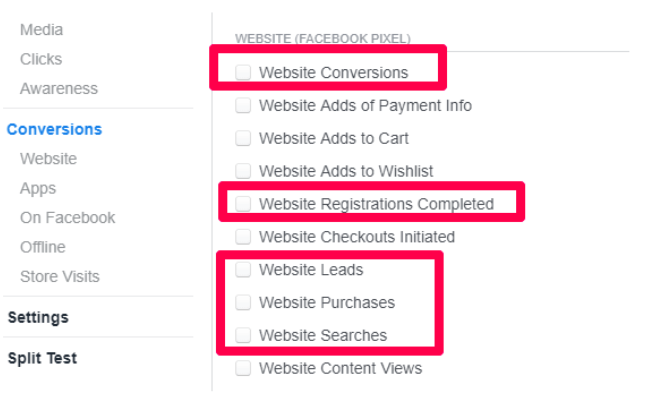


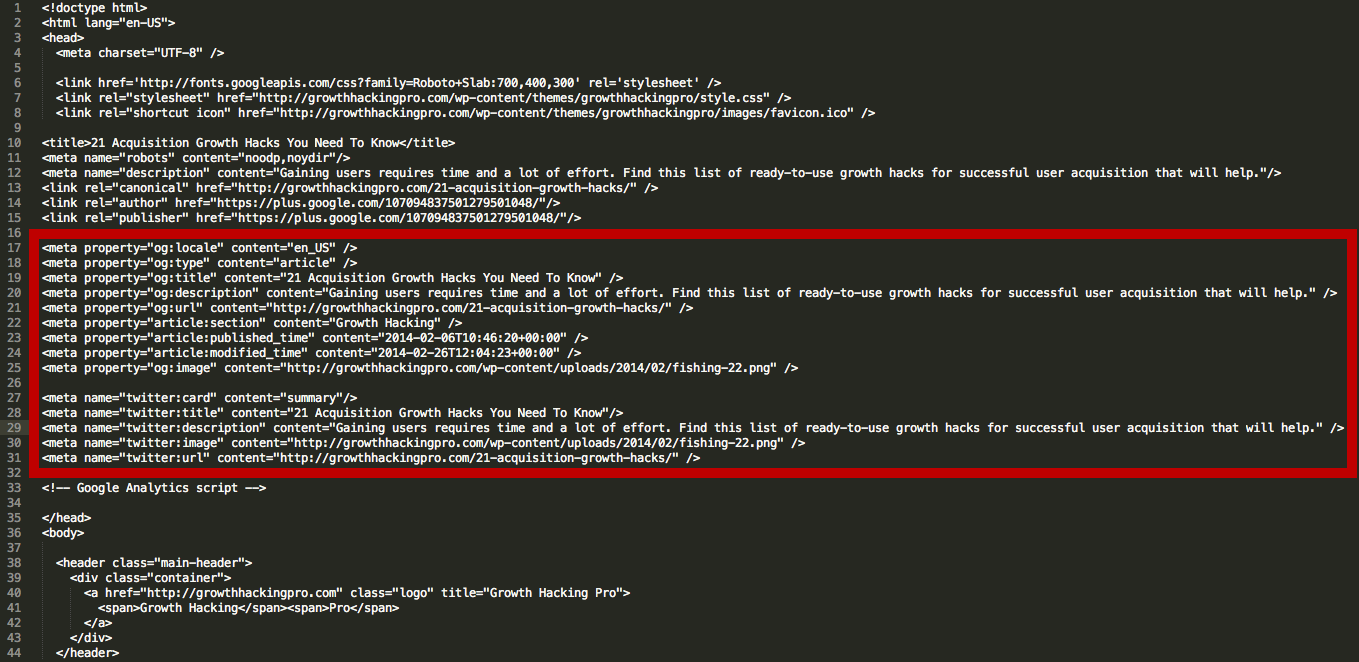
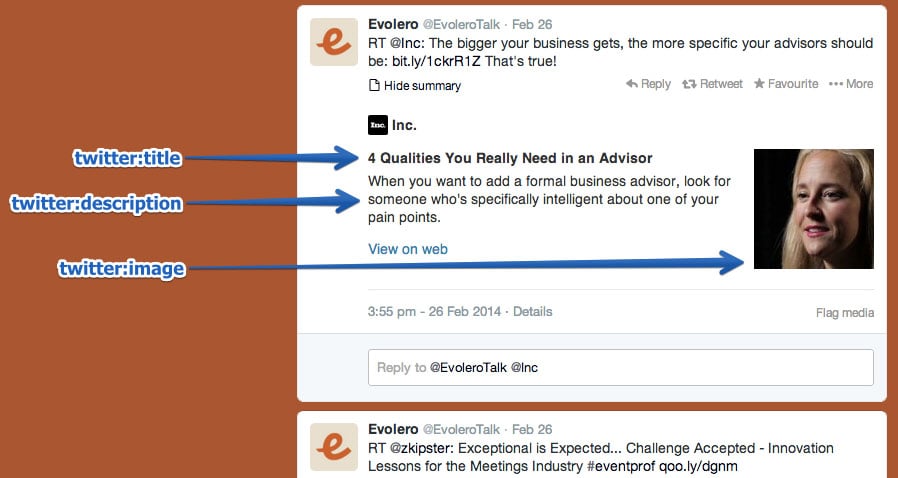
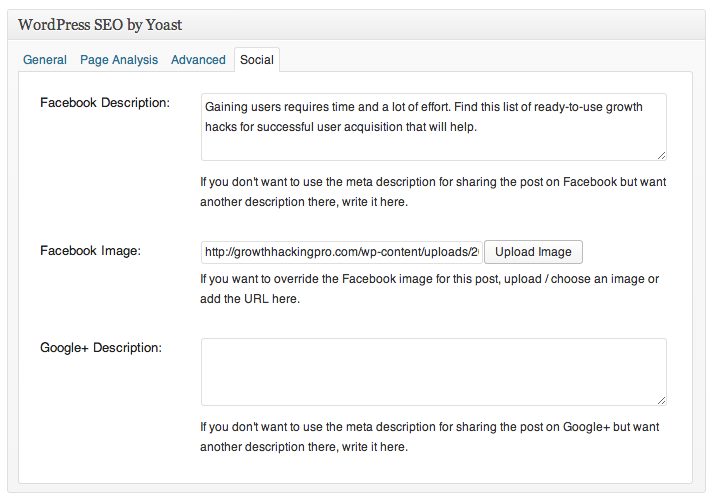