  Location: Colorado Springs, CO
  Remote: Yes
  Willing to relocate: No
  Technologies: Python, Git, AWS, Bash, Docker, PyTorch, YoloV8
  Résumé/CV: https://drive.google.com/file/d/19PTw1oNtkXSV92JhRiOYJvQCnhFFRLEq/view?usp=sharing
  Email: bradyjohnson84@gmail.com
Dedicated and innovative Machine Learning Engineer with a strong background in machine learning and cloud infrastructure. Proven track record of developing high-impact solutions and optimizing processes in technology-driven environments.
Back-end/platform developer experienced in machine learning, python, and data processing, but most excited about compilers, type systems, and functional programming.
Currently working in Scala (with typelevel libraries) at Disney Streaming on the Streaming Data Platform team providing schema registries and code generation for Kinesis.
  Location: Portland, OR
  Remote: Yes
  Willing to relocate: Yes
  Technologies: Python, Scala, Haskell, Terraform
  Résumé/CV: https://julianfortune.com/resume/resume.pdf
  Email: juliandfortune at gmail
A Florida landlord is launching a website to assist other property owners with squatters after she spent thousands of dollars to remove illegal residents from her own property.
“My goal is to drive state and federal laws to treat squatters as criminals and to expedite the review of fraudulent leases,” Patti Peeples, 61, told Fox News.
Earlier this year, Peeples and her business partner Dawn Tiura ejected two female squatters from their home after they moved in illegally for over a month and left thousands in damages.
The website, PushOutSquatters.org will launch later this week and will intentionally go by the abbreviation “POS.”
“So many who responded to news articles used that abbreviation, so I went with the double entendres,” said Peeples, who is a retired entrepreneur with experience in marketing.
The website will be both informational and community-oriented, she said.
“The purpose of the website will be to present the risks associated with squatting, the rise in frequency and to offer resources for those attempting to get squatters out, including everything from security resources to legal resources on how to review state statutes,” Peeples said.
She added that other squatter victims will be able to share their stories on the website so others can learn from those experiences.
Peeples plans to also sell hats and t-shirts with the website’s logo featuring a stick figure kicking another stick figure out of a house.
“We will use the funds to lobby state legislators for better laws,” Peeples said.
Although Peeples successfully removed the two squatters from her Jacksonville, Florida, investment property, they illegally occupied it for 34 days and left behind $38,000 in damages. During the ordeal, Patti lost an interested buyer in the house, was physically pushed out of the house by the squatters and decided that she has had enough of working in real estate.
“This is my retirement, and so any sort of income that I was trusting to live off of for this year is diminished because of this act of stealing,” Peeples told Fox News. “That’s essentially what they’ve done – they’ve stolen my home from me.”
The squatters, who have a history of illegal occupancy, produced a fraudulent lease when police were called, allowing them to remain in the home until Peeples took them to court.
Peeples and Tiura were forced to pay $5,000 in legal fees to eject the squatters.
Peeples said that since her story became public, she’s seen a positive impact, including former President Trump mentioning squatters in Florida in a jab at Gov. Ron DeSantis.
“I’ve had hundreds of people send me messages on social media,” Peeples said, adding that the stories about her situation have been seen by millions of people.
“The publicity has also encouraged our local sheriff’s office to pay more attention to this and pursue criminal charges if they can find the squatters,” she added.
Click here to learn more about the squatters in Jacksonville, Florida.
I am a self-taught developer whose experience is in reading and writing my own software, tinkering with and contributing to open source software, and a few short bouts of freelance one-man-shop full stack development for startups. I am looking for an entry-level position where I can learn from and make a contribution to the success of a team of experienced software engineers.
Russell Wilson nearly led the Denver Broncos to an incredible comeback victory against the Kansas City Chiefs on Sunday but left the game early with a concussion.
On 3rd-and-11 from the Chiefs’ 16-yard line, Wilson scrambled for a first down and was about 2 yards short of the end zone when he was tackled by safety Juan Thornhill. Wilson went down hard and appeared to be in a daze. He needed to be helped up by medical personnel.
He wouldn’t return to the game and the broadcast camera showed the veteran quarterback with a big knot in his head as he roamed the sideline.
Brett Rypien came into the game and threw a touchdown pass to Jerry Jeudy to cut their deficit to just six points. But Rypien failed to complete the comeback and the Chiefs won the game 34-28.
Wilson was 24-of-36 passing with 247 yards and three touchdowns and an interception. It was the first time all season the Broncos had scored more than 25 points in a game.
“He was fighting the whole game,” Broncos coach Nathaniel Hackett said. “I give him so much credit and you see it, day-in and day-out. No matter what the situation is, just watching him there in that third-down situation to be able to break the pocket, and he was using his legs a lot. He obviously ended up getting a concussion. I think our medical team did a great job of getting him in here. He’s in the concussion protocol now. So we’ll go through that step-by-step process and do it the right way. But he played really well.”
Wilson’s status is unclear but the Broncos’ chances of making the playoffs are over.
Disclosure: This content is reader-supported, which means if you click on some of our links that we may earn a commission.
Website design used to be very hard, but that is no longer true.
Years ago, when I first started designing my websites, there weren’t a ton of resources. There were basically two options—learn the basics of website programming languages or hire a designer. The first choice is difficult and time-consuming. The latter is expensive.
After a brief attempt of trying to design everything on my own, I ended up spending top dollar on a designer. It was more than I wanted to spend, but I didn’t really have much choice.
Today, new website owners have more resources at their disposal. It’s possible to design a professional website without hiring a designer or learning how to code.
Whether you’re a complete beginner or just looking for an alternative way to design websites, you’ve come to the right place. I’ll explain how to design a website below in this step-by-step guide.
My Favorite Tool For Website Design
Wix is my favorite tool for website design. It’s essentially an alternative method to sidestep web design altogether.
As a free website builder, Wix makes it easy for anyone to build and design a website from scratch—no experience, development skills, or design knowledge required.
The reason I love Wix so much is that it’s just so effortless. Even for such a simple tool, the final design always looks professionally made. People will just assume you hired a designer—it’s that good.
That effortlessness extends to important things you don’t want to deal with on your own, like security and reliability.
Wix manages optimization for both on their end, so your site is always protected and their servers are always able to deliver your website to visitors.
Plus, they go the extra mile with automated site data backups that make sure you’re never left starting from scratch should something terrible happen.
Another reason why I recommend Wix so highly is because of its versatility. It can accommodate the design needs of virtually every type of website under the sun.
From simple blogs to portfolio sites, online stores, restaurant websites, small business sites, and more, Wix can do it all. Other website builders on the market just don’t have the same versatility.
Continue below, and I’ll teach you how to design a website for free using Wix.
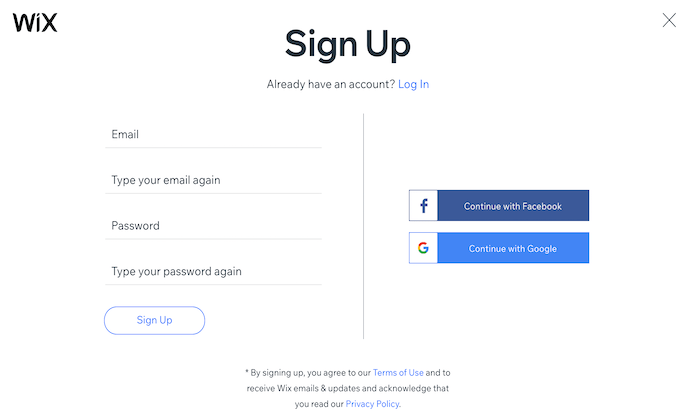
The first thing you need to do is sign up for Wix. So head over to Wix.com and create an account. This is 100% free to do, and you don’t even have to give your credit card information.
Just click one of the many “Get Started” buttons on the homepage or anywhere else on the site.
Unlike other platforms, the Wix sign-up process can be completed in a matter of seconds. There aren’t any complex form fields to fill out. They just need your email and a password.
You can even bypass typing anything and sign-up with a single click using Google or Facebook.
Once you’re signed up, Wix will automatically walk you through the website design process.
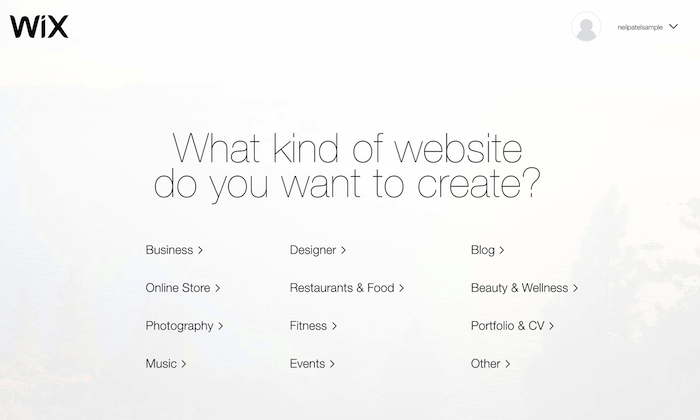
Step #2: Choose Your Website Type
Next, you’ll need to figure out what type of website you want to design. Your answer will have a significant impact on your design choices.
For example, a personal blog and an ecommerce website will have major differences in design choices. A portfolio site used to showcase photography or custom art won’t have the same design as a local restaurant website.
Wix makes this step easy for you. You’ll be prompted to select your website type from a wide range of potential options.
Based on your answer, Wix will automatically present you with applicable templates in that category. For example, if you select “online store,” then the layout will accommodate product pages, product categories and make it easy for you to design a checkout process.
Once you choose a website type, Wix presents you with two options for your design:
Let the Wix ADI create a website for you.
Create your website with the editor.
The first option is straightforward and is excellent for people who are in a rush. You’ll just answer a few simple questions, and Wix will design a site for you based on your responses. It’s impressive how quickly the process takes.
You’ll have a brand new custom website design in less than a minute. The design comes out beautiful, and aside from customizing the pages with your own content, you’re done.
For the purposes of this tutorial, we’re going to stick with the second option—creating a site with the Wix editor. This will give you more freedom and control over every aspect of the design choices.
Step #3: Select a Template
Rather than trying to design a website with a blank canvas, it’s much easier to start with a template.
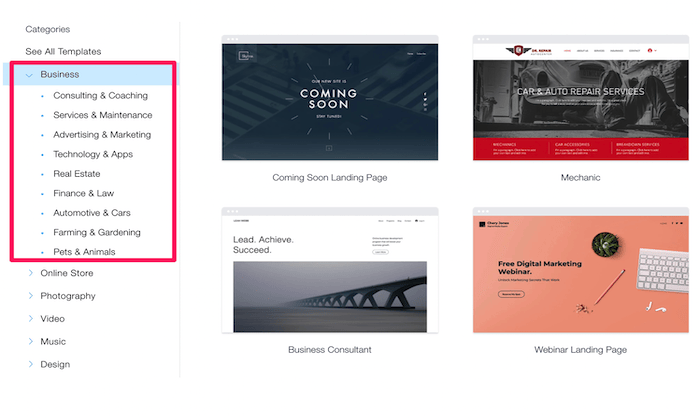
Take a few minutes to browse through the different options. What styles do you like? Which templates emulate your brand image? Wix has thousands of templates to choose from. It can be a bit overwhelming at first. But narrow your focus based on your specific type of website.
For this example, I choose a “business” website. But that’s a really broad category. If you look to the left side of the screen, you can narrow your focus further into types of businesses.
Wix has specific templates for consultants, real estate companies, professional services like finance and law, marketing, and so much more. Every website type has different subcategories with templates.
For example, if you select “online store,” then you’ll see templates for clothing, jewelry, electronics, home decor, beauty supplies, sports equipment, and more. If you’re designing a blog website, Wix has templates for personal blogs, travel blogs, fashion blogs, podcasts, etc.
Your template will become the foundation for the rest of your website design. So it’s important to take your time and not rush through this step. You’ll still be able to customize different design elements to your liking, but that’s much easier with the right template.
Step #4: Edit Your Layout
Website visitors will form an opinion about your website in less than one second of landing on the home page. That’s why the design is so important, and it all starts with the right layout.
Wix templates have already been optimized for a user-friendly design. But you have the freedom and flexibility to make some changes here.
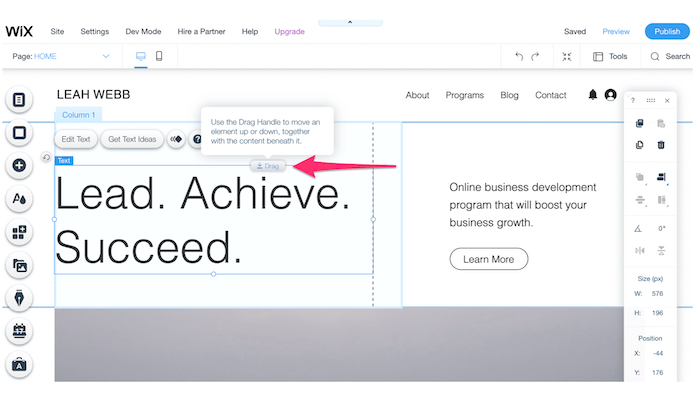
In this example, I’m editing the “Business Consultant” template. Let’s say I wanted to move the positioning of the headline on this homepage. I’d simply click the box in the Wix editor and drag it somewhere else on the page.
Or maybe I want to reposition that “Learn More” call-to-action on the right half of the screen. I can click on it and drag the button anywhere I want.
I encourage you to move a few things around when you’re first getting started. This will introduce you to the Wix editor, so you’re comfortable down the road. If you ultimately don’t want to make any layout changes, you can always revert back to the original design.
Step #5: Prepare Your Content
Content is a significant component of your site’s design. You can’t completely finalize the design without understanding exactly what materials will be featured on the website.
Gather images, videos, GIFs, logos, slogans, text (copy), and whatever else you want to display on your site.
Let me show you an example to illustrate my point.
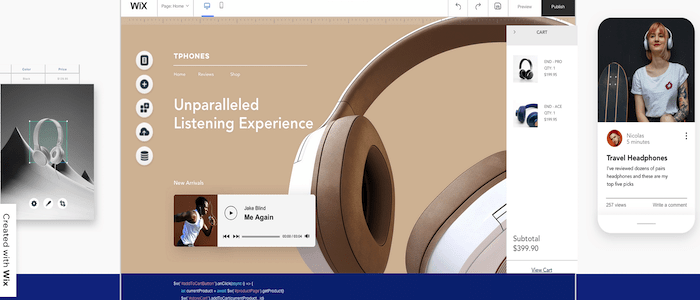
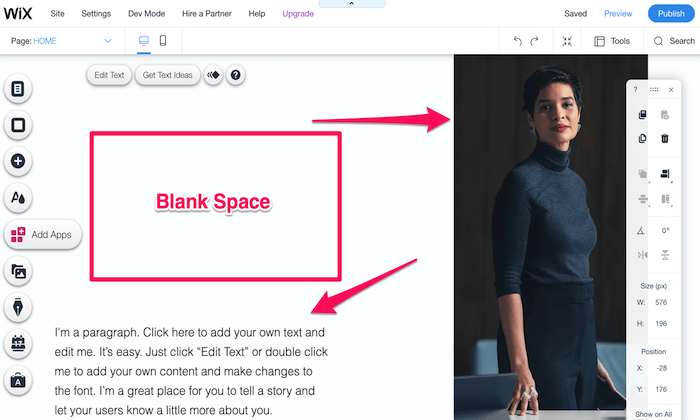
I’m still editing that same business consultant template. One of the first things I’d do on this part of the page is swap the image with a picture of myself. But before I do that, I’d also need to think about the corresponding text copy on the screen’s bottom left side.
By default, the template has some blank space here, as I’ve highlighted above. While blank space is an important web design feature, I don’t love how it’s used in this instance.
So these are my options:
Use a full-length photo (like the one above) and add a paragraph in the blank space.
Use a smaller photo (like a headshot) and just use a single paragraph of text.
Both will achieve my goal of eliminating that empty section of the page. Do you see how one component impacts another? All of this is related to the design, and it’s much easier if you have your content prepared ahead of time.
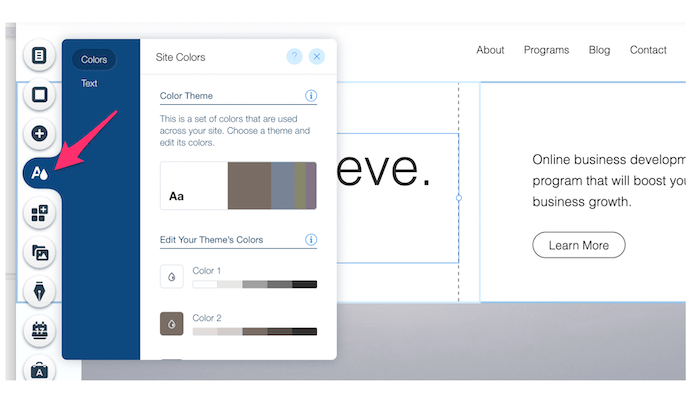
Step #6: Define Your Branding Strategy
Start to think about how visitors will perceive your website. Things like the color scheme, fonts, and other design components will directly impact your brand image.
Click the “Theme Manager” on the left side of your Wix editor. This is the button with an “A” and what looks like a raindrop or paint drop.
From here, you can change your site’s theme colors. You’ll also have the ability to edit your default text themes for headers and paragraphs.
In this case, the current color scheme works well for a business consultant. It’s modern and professional. But let’s say you were designing a website for kids. You could have a bit more fun with bright colors and big, bold fonts.
If you added your company logos and other materials back in step #5, you’ll want to make sure that the color scheme flows well with the rest of your content.
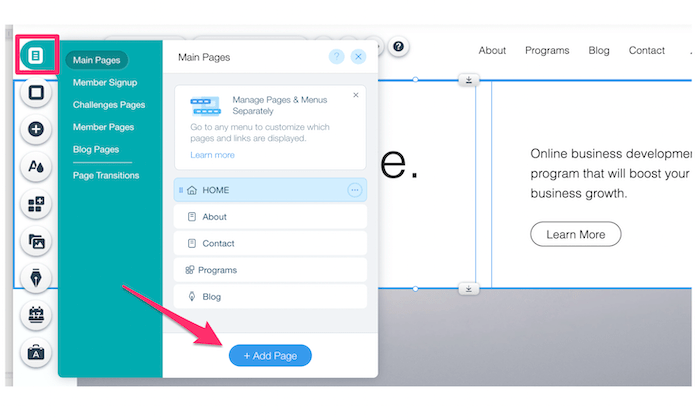
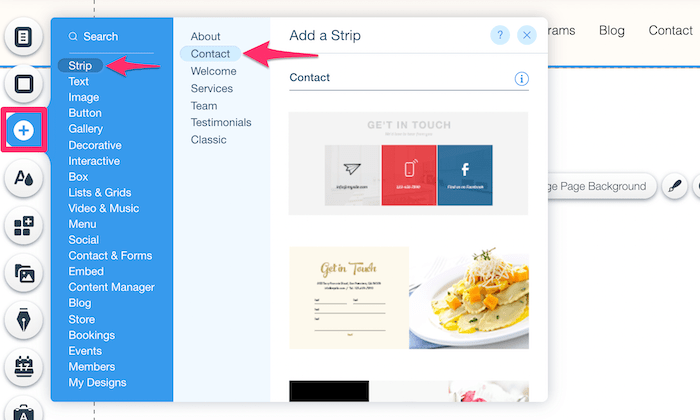
Step #7: Add Landing Pages
Your landing pages will each have unique designs. While they should all follow the same branding principles and theme of your home page, the design choices will have some variations.
To add a page, click the top icon on the left side of your Wix editor. Then click “add page,” as I’ve highlighted below.
New pages will essentially be a blank canvas, except for your header and footer. But rather than starting from scratch, you can “add a strip” to any page based on what content it will contain.
Just click the “+” button on the editor to browse through some options.
Think of this as a mini template. Apply the same principles you used back in step #3 when you first chose your overall site template.
This is just an easier way to design new landing pages. Wix already has so many great options that it’s not worth trying to build your pages from scratch.
Step #8: Focus on Usability
Sometimes during the design process, you can start to lose focus on how visitors will engage with your site. But user experience (UX) can’t be overlooked.
There are certain design best practices people expect when they visit a website. For example, they expect the navigation menu to be at the top of the page. They expect the footer to contain contact information. They expect the logo to take them back to the home page.
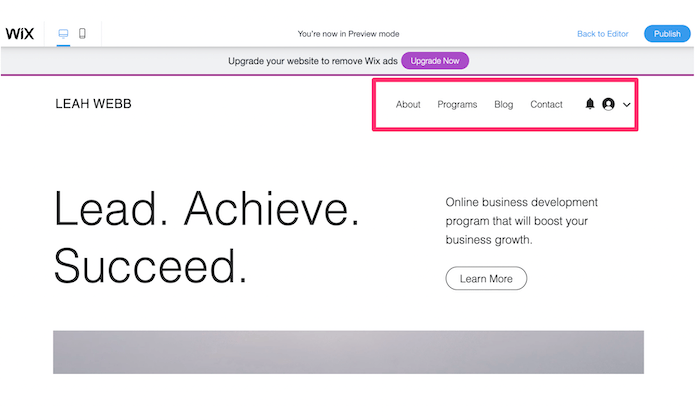
Let’s look at something simple, like a navigation menu:
In this example, there are only four pages in the menu. You could maybe get away with adding one or two more. But beyond that, it’s too much.
Imagine if this website had 10 or 20 pages in the menu. It would be a disaster. The top of the page would be too cluttered, and visitors would never find what they’re looking for. Overall, that would be a poor design choice.
Think about usability with every design choice you make, from CTA placement to scroll effects, white space, architecture, and everything in between.
Don’t try to reinvent the wheel here. Follow web design best practices, and the UX will be fine.
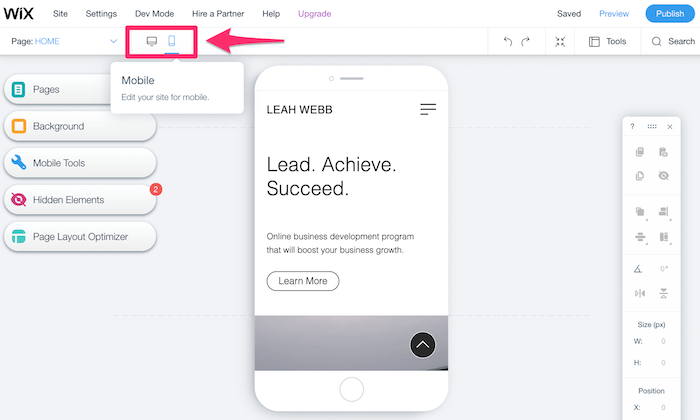
Step #9: Optimize the Design For Mobile Devices
According to Statista, roughly half of all global web traffic comes from mobile devices. So there’s a coin-flip chance that each visitor on your site will be browsing from a smartphone or tablet.
You need to make sure your website design is mobile-friendly. Otherwise, visitors will bounce, and you’ll never get mobile conversions.
Fortunately, Wix makes this process easy for you.
From the editor or previewer page, simply click the mobile icon to switch away from the desktop view of your website.
Wix will automatically optimize your website for mobile. But it’s still a good idea to check everything out for yourself to see if you want to make any changes. If you see something you’d like to change, you can edit your site’s mobile design without changing the desktop version.
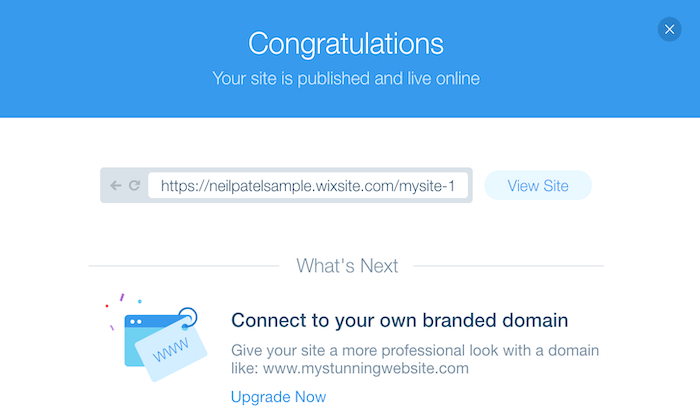
Step #10: Publish Your Website
Once you’ve finalized the design, it’s time to get your site live on the web.
It’s worth noting that your site doesn’t have to be 100% finished to publish it. You can always go back and add pages at a later time. But once you have a homepage, about page, contact page, and a handful of site elements, get it published so you can start generating some traffic. Just be sure you don’t publish any incomplete pages.
Click the blue “Publish” button at the top right of your Wix dashboard to continue.
As I said before, you can design and publish a site with Wix 100% for free. But there’s a catch.
Free Wix users won’t get to customize their domain. All domains include your Wix account name, followed by Wix’s branding, and then your site’s name. As you can see from the example above, the domain here would be:
http://neilpatelsample.wixsite.com/mysite-1
This is not a viable option for any business-related website. It’s okay if you’re just using the site to play around with web design principles. But if you want a legitimate site with real visitors, you’ll need to upgrade to a premium Wix plan.
Now you’ll be able to use a custom domain name, either purchased directly through Wix or from a third-party domain registrar. If you don’t already have a domain, just get it from Wix. It’s easier to manage everything through a single platform.
Conclusion
Website design has really evolved over the years. What was once a major challenge or expensive venture for new site owners can now be accomplished with ease.
Website builders like Wix essentially eliminate the need to design websites from scratch.
Non-technical users and people with zero design experience can choose a template and populate their site with custom content. There’s no need to learn any web programming languages or hire a designer.
Sign up for Wix, follow the step-by-step process listed above, and you’ll have a professionally designed website in a matter of minutes. It’s that simple!
If you’re looking to build an SEO-friendly website, Squarespace is a solid choice. It offers easy-to-use templates and plenty of SEO tools to help your site rank better in Google search results.
Not sure where to get started? I’ll guide you through everything you need to know about Squarespace SEO, including what best practices to follow and the tools Squarespace offers.
Why Should You Care About SEO for Squarespace?
Even the most elegant website won’t do you much good if no one sees it. SEO is the act of optimizing a website so your target audience can easily find it.
SEO for Squarespace is about ensuring your Squarespace website plays well with search engines.
If you’ve used other website builders such as WordPress, you might be familiar with SEO plugins like Yoast. Unfortunately, those won’t work with Squarespace.
Other site builders, like Wix, offer minimal SEO tools that make it challenging to improve your ranking.
The good news is Squarespace comes with a ton of advanced SEO tools built-in. Understanding how to use them to optimize your site is crucial to your online success.
10 Tips for SEO for Squarespace
It’s easy to get overwhelmed by all the SEO advice out there. There’s on-page SEO, off-page SEO, and even SEO best practices for developers.
With Squarespace, you don’t have to worry about the most technical aspects of SEO. For example, all their sites are mobile responsive out of the box.
However, several steps will help your site rank well in Google, Bing, and other search engines. Here are ten best practices to improve your Squarespace SEO.
1. Perform Keyword Research
The core of SEO is keyword research. No matter what builder you use, it’s essential to take the time to find out what keywords your site should target. I’ve written several in-depth guides about keyword research, but I’ll explain the basics here.
Keywords are the words or phrases users type into search engines to find your website.
Sometimes they are pretty obvious; for example, a dentist in Chicago will probably target keywords like “chicago dentist.”
Other terms might be less obvious, such as “dentist near me” or “root canal.” That’s where a good keyword research tool, like my tool Ubersuggest (it’s free!), can be helpful.
Type in your main keyword and see what other terms come up:
These are terms you’ll want to use on your website in your domain name, URLs, and SEO page titles. (Don’t worry, we’ll cover how to do all that later.)
Consider researching what terms your competitors use as well. This can provide insight into what terms users are searching for.
2. Optimize Your Domain Name
While domain names aren’t a direct SEO factor, they can impact your overall SEO performance.
For example, if someone wants a dentist in Chicago, do you think they’ll click on a site like www.chicagodentist.com or www.marymandyddc.com?
Using keywords in your domain name is a simple way to clarify what your site is about and start building your brand.
If you already have an established website that is ranking well, there’s no need to change it (though you could redirect your site to a more SEO-friendly domain if you wanted).
If you are just getting started, make sure to include keywords in your domain name and make it easy to remember.
3. Use Keywords in Your URLs
Remember those keywords we looked at in step one? Make sure to include them in your URLs.
You’ll also want to make sure your URLs are clean and easy to understand, especially for service or product pages.
For example (sticking with the dentist example from above), the pediatric dentist service page should be www.chicagodentist.com/pediatric,not www.chicagodentist.com/he12909vhsw#.
Clean URLs perform better in search, and they look more trustworthy to users.
Here’s how to change your URL in Squarespace:
From the Home menu, click Pages.
Click the gear icon to open page settings.
Type your new URL in the URL slug field.
Select Save.
4. Integrate With Google Search Console
Google Search Console is a free tool that helps you monitor and maintain your Google presence. Integrating it with Squarespace allows the two sites to share data and makes it easier to see where your SEO efforts are paying off and where they’re falling flat.
The console makes it easy to verify your site and lets you see all that awesome Google data right in your Squarespace Analytics dashboard—no need to visit two sites.
To integrate, follow this guide on the Squarespace support page.
5. Add SEO Page Titles and Descriptions
SEO page titles and descriptions (also called meta titles and descriptions) are short blurbs displayed in the search results that tell users what they’ll find on your page.
Get these right, and your traffic can skyrocket. Ignore them, and Google will create them for you—and they might not be as effective.
Here’s how to update your SEO page titles and descriptions on Squarespace:
In the Home menu, select Pages.
Click the gear icon next to the title.
Select the SEO tab, then add your title to the SEO title field.
Select Save.
You can (and should) add SEO titles to all your pages, including blog posts and product pages. This guide to meta titles and descriptions will walk you through how to create SEO-friendly titles.
In general, meta titles and descriptions should:
include the main keyword you want to target
offer clear details about what the user will find if they click
6. Integrate With Google My Business
If you have a brick-and-mortar business, this is a step you can’t ignore. Google My Business is a free tool that lets you manage how your business appears in Google Maps and the search results.
For example, you might have seen the “Google three-pack” when you search for a local business:
Google pulls the information about reviews, pricing, and hours from the Google My Business account.
GMB is valuable, but for many smaller businesses managing another platform is a hassle. Squarespace makes it easy by interacting directly with Google My Business to manage your listing.
Here’s how to integrate your Squarespace site with GMB:
From the Home menu, select Marketing, then Location Management.
Select Add Location.
Click Import from Google.
If you don’t already have a GMB account, you can set it up in Squarespace by following the prompts. Once you’ve integrated, you can push and pull data from your website to Google automatically.
7. Create a Custom 404 Page
A 404 page is the page users see when they click on a link that doesn’t exist or has been moved but not redirected. Here’s mine:
I use it to direct users to my SEO tool, but you can also direct users to blog posts, product pages, or other important site pages. This keeps users on your site and helps them find the information they need.
A custom 404 page increases time on page, which can improve SEO.
SSL certificates (secure sockets layer) encrypt the data that passes between your website and your server. It improves website security, making it crucial for all websites but especially e-commerce sites.
In addition to just being a good idea, it’s also a Google ranking factor, which means enabling SSL on Squarespace is beneficial for SEO.
Luckily, Squarespace makes this process pretty easy. In fact, all their sites are automatically protected with an SSL certificate. However, you can adjust several settings based on your needs.
Here’s how to check your SSL certificate settings in Squarespace:
From the Home menu, select Settings, then Advanced.
Choose SSL.
Select Security Preferences.
Check the box for Secure and HSTS Secure.
Click Save.
9. Create High-Quality Content
High-quality content is a cornerstone of good SEO. It provides fresh content (which Google likes) and offers useful information your users want and need.
Squarespace makes it easy to add a blog to your website, though many themes come with them already in place.
Once you’ve created your blog page, it’s time to get writing. You can write yourself or outsource it to a freelancer. I recommend writing yourself at first to get an idea of what type of content your target audience wants.
Start by coming up with topic ideas. What questions do you answer most often? What pain points do your customers share? Aim to solve those problems.
Offer useful information: Answer a question, provide a step-by-step guide, or give advice. Keyword research can help with this.
Break up content: Use headings, lists, and pictures to break up longer content and make your piece easy to read.
Be specific: Don’t write for everyone; instead, write for your specific target audience (or even a subset of your audience). For example, this post isn’t just about SEO in general; it’s specifically for Squarespace users. A dentist could write about “how to brush your teeth,” but “how to teach your kids to brush their teeth properly” is likely to be more useful.
Optimize your content: Once you’ve created your useful, high-quality content, review Squarespace’s content best practices to ensure your audience can find your great content.
10. Add Internal Links to Important Content
Internal links are links on your website to other pages on your site. They improve user experience by helping users find pages, but they’re also great for SEO.
Internal links help Google understand which pages on your site are most important. Search engines also use internal links to pages on your site.
However, don’t go overboard with internal links. I aim for 5 to 10 internal links per 2,000 word article, which seems to be a happy medium. If you only have 10 pages on your site, you’d include fewer links.
Finally, make sure the internal links you add are useful. This isn’t a place to spam users about your newest product; it’s about leading them to useful pages.
Most Squarespace templates are pretty SEO-friendly. However, Brine gets top marks for the ability to customize headers, content insets, and adjust mobile styles. You can also add advanced features like parallax scrolling.
Is Squarespace good for SEO?
Yes. Squarespace offers plenty of SEO tools and features to help you optimize your website. While there are some things you can’t access, it offers a number of SEO tools and features.
Is optimizing SEO for your Squarespace free?
SEO features are included in their paid plans, so it is free in the sense that you don’t have to pay extra just for SEO. However, some features are only available to Business or Commerce customers. Make sure to consider your SEO needs when comparing plans.
What are the downsides to Squarespace, and how can you overcome them?
One of the major downsides to Squarespace is the lack of control. Although many templates are easy to adjust, the customization is limited. You can overcome these issues by carefully considering your template options and choosing a format that will grow with your business.
{
“@context”: “https://schema.org”,
“@type”: “FAQPage”,
“mainEntity”: [
{
“@type”: “Question”,
“name”: “Which template is best for Squarespace SEO?”,
“acceptedAnswer”: {
“@type”: “Answer”,
“text”: ”
Most Squarespace templates are pretty SEO-friendly. However, Brine gets top marks for the ability to customize headers, content insets, and adjust mobile styles. You can also add advanced features like parallax scrolling.
”
}
}
, {
“@type”: “Question”,
“name”: “Is Squarespace good for SEO?”,
“acceptedAnswer”: {
“@type”: “Answer”,
“text”: ”
Yes. Squarespace offers plenty of SEO tools and features to help you optimize your website. While there are some things you can’t access, it offers a number of SEO tools and features.
”
}
}
, {
“@type”: “Question”,
“name”: “Is optimizing SEO for your Squarespace free?”,
“acceptedAnswer”: {
“@type”: “Answer”,
“text”: ”
SEO features are included in their paid plans, so it is free in the sense that you don’t have to pay extra just for SEO. However, some features are only available to Business or Commerce customers. Make sure to consider your SEO needs when comparing plans.
”
}
}
, {
“@type”: “Question”,
“name”: “What are the downsides to Squarespace, and how can you overcome them?”,
“acceptedAnswer”: {
“@type”: “Answer”,
“text”: ”
One of the major downsides to Squarespace is the lack of control. Although many templates are easy to adjust, the customization is limited. You can overcome these issues by carefully considering your template options and choosing a format that will grow with your business.
”
}
}
]
}
Squarespace SEO Conclusion
Understanding how to implement successful SEO practices on Squarespace is crucial to online success. While SEO for Squarespace is a little different than other website builders, they still offer a wide range of SEO tools.
If you haven’t built your site yet, I strongly recommend starting with keyword research. If you get stuck, my team is happy to help.
Do you use Squarespace? Have you had success with their SEO tools?
Working from home has many advantages. One of the easiest ways to start a business is to start it from your own home. It’s the most natural way to start for many. Whether you are baking, woodworking, offering a service, or anything else, doing so out of your house has many advantages. What isn’t discussed as often are the disadvantages of working from home.
5 Surprising Disadvantages of Working from Home
Most business owners just assume that if they are running their business from home, their home address and their business address will be one and the same. That’s fine, but what if you decide to move out of your home? Changing business address can cause issues. This is just one of many surprising disadvantages of working from home.
Disadvantages of Working from Home #1: Your Home May Not Be Conducive to Productive Work
A home may not necessarily be well equipped to handle working. You need a workspace that will help you be productive. This will be different for everyone. But, consider that you at least need a room with a door you can close. Drawing boundaries between home life and work life can be hard.
Learn more here and get started with building business credit with your company’s EIN and not your SSN.
Managing time can be harder when working from home as well. It can be easy to work all day when you are at home, or not work enough due to “home” distractions. It’s hard to get people to respect your time and boundaries. Also, isolation and depression are not uncommon.
Disadvantages of Working from Home #2: You May Not Be Allowed to Run Your Business From Your Home
In some situations, you may not be allowed to run your business from your home. If you rent, you will need to check your lease to make sure there are no issues. Whether you rent or own, you need to check zoning requirements. Also, agencies like the Health Department and the FDA have guidelines related to running certain types of businesses from your home.
Disadvantages of Working from Home #3: Home Address on Public Record
Many people worry about their home address as their business address. They feel it is unsafe, so they turn to a PO Box or an UPS Box. However, that can make it difficult to get funding. Lenders require a physical address.
This is a unique disadvantage of home-based businesses. Even home based businesses need funding for a number of things:
One option is to use a virtual address. Be aware however, that some lenders will not accept those either. The truth is, if someone wants to find your home address, it’s easy enough regardless of whether you use it as your business address or not. In the end, to get funding for your business you are going to need to use a physical business address where you an receive mail.
Learn more here and get started with building business credit with your company’s EIN and not your SSN.
Disadvantages of Working from Home #4: Changing Your Business Address Later Can Cause Problems
You may think you can get by with using your personal address now, and just change it later. That’s not a good idea. If you think about it, your business address goes everywhere. For example:
All legal documents
Licences
Marketing materials
Your website
Insurance papers
Everywhere!
The longer you wait, the more places you will have to remember to change it. It is a bigger deal than you may think if you miss one. If lenders start looking into your business and see your business address is listed differently in different places, it can cause unnecessary issues. It brings up fraud concerns.
A bank will not take the time to try to figure out all the different ways a business may be listed. Even something as simple as using Street vs St, or using an ampersand in one spot and the word “and” in another can cause issues. So you can imagine using your home address in one spot and a separate business address in another will definitely cause problems.
That doesn’t mean that if you move your business out of your home you have to keep your home address. Just be aware that you will need to make sure the address is changed everywhere.
Disadvantages of Working from Home #5: Legal Issues
There are a number of legal considerations that you have to think about when it comes to running a home based business. For example, even if zoning laws allow you to run your business from your home. You need to check out what requirements those laws lay out. Some cities have regulations regarding foot traffic. Some even regulate yard sign use for advertising. And if you have an Homeowners Association (HOA) you may need their permission as well.
Learn more here and get started with building business credit with your company’s EIN and not your SSN.
Some cities limit the number of employees a home based business can have. Some even regulate the number of customers that can come to your door. You’ll need to check with your local city officials to determine what if any regulations apply to you. And figure out what licences and permits you need to operate.
Consider the tax issues as well. While you can deduct some expenses when it comes to home-based businesses, it can get complicated. You need to make sure you thoroughly understand the home business deduction on the front end and plan accordingly.
Insurance needs to be considered as well. If you have employees or customers coming in and out, you need to think about what would happen if they were injured. Will homeowners’ insurance cover it? Often you will need to purchase a separate policy or a rider. All insurance needs to be in place on the front end. Be sure it has the proper business address on it!
Avoid Many Disadvantages of Working From Home
Nothing is perfect. Running a business from your home is no different. However, you can avoid many of the disadvantages of working from home by building fundability from the beginning. Not only will it help with legal issues, but it makes a bigger difference than you may think when it comes to funding.
The best way to start building fundability, whether you own a home-based business or run a business from a different location, is to work with a business credit expert. Contact us today for a free consultation.
This website uses cookies to improve your experience. We'll assume you're ok with this, but you can opt-out if you wish.AcceptRejectRead More
Privacy & Cookies Policy
Privacy Overview
This website uses cookies to improve your experience while you navigate through the website. Out of these, the cookies that are categorized as necessary are stored on your browser as they are essential for the working of basic functionalities of the website. We also use third-party cookies that help us analyze and understand how you use this website. These cookies will be stored in your browser only with your consent. You also have the option to opt-out of these cookies. But opting out of some of these cookies may affect your browsing experience.
Necessary cookies are absolutely essential for the website to function properly. This category only includes cookies that ensures basic functionalities and security features of the website. These cookies do not store any personal information.
Any cookies that may not be particularly necessary for the website to function and is used specifically to collect user personal data via analytics, ads, other embedded contents are termed as non-necessary cookies. It is mandatory to procure user consent prior to running these cookies on your website.