How to Create and Use Facebook Polls

Facebook Polls can help you unravel the problems of your audience, what you should create next, and their true sentiments about your brand. While it can help you make more strategic business decisions, Facebook Polls can do other wonderful things for your online presence like:

  • Boost your Facebook page’s engagement (asking questions is one of the best ways to generate high engagement)
  • Help you beat the newsfeed algorithm without ads
  • Foster a strong sense of community around your brand

In this post, you’ll learn all the different ways you can create polls on Facebook, how to use them effectively, and how polling your audience can help your business grow.

How to Create Facebook Polls

Gone are the days you could create a Facebook poll from your Newsfeed or timeline. At the moment, the only way you can share a poll is on a Facebook Group, a story, an event page, or on Messenger.

Facebook Group Polls

Facebook Groups are one of the best tools for brands on the social media platform. It allows you to create a community and improve customer engagement.

While Business Pages struggle to get an organic reach above 5%, Facebook Groups are different. The algorithm pushes group posts to newsfeeds, which means you have a much higher organic reach without paying for ads.

Below, we break down the steps to create a poll within your group with an actual profile and business page example.

Step 1: Go Your Group

On your desktop or mobile, go to your Facebook Newsfeed, click on the “Groups” icon on the left-hand side menu and select the group for your poll.
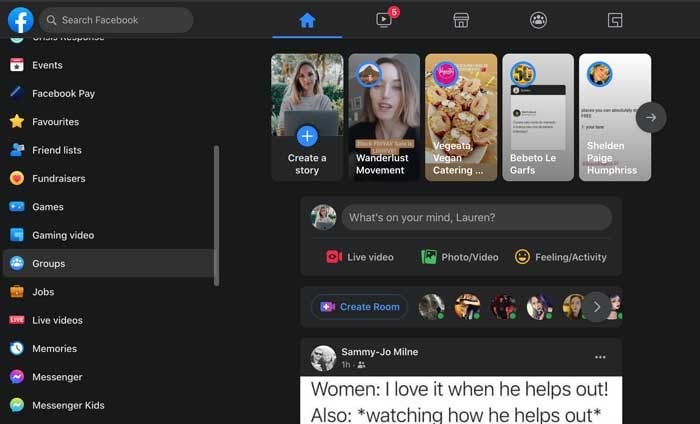
Facebook Polls how to add one to your facebook group

Step 2: Create a Post

Click the “What’s on your mind” section to create a post. When the pop-up loads, navigate to the “Add to your post” section and click on the three dots to see more options.
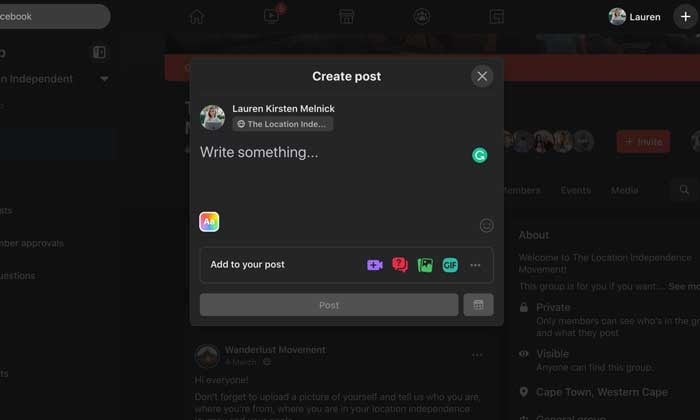
Facebook Polls create a post

Step 3: Create Your Poll

A new “Add to your post” screen will load with various options. Select “Poll” from the list. It will take you back to the “Create post” pop-up, and you can start adding your poll options in the “Write something” section.
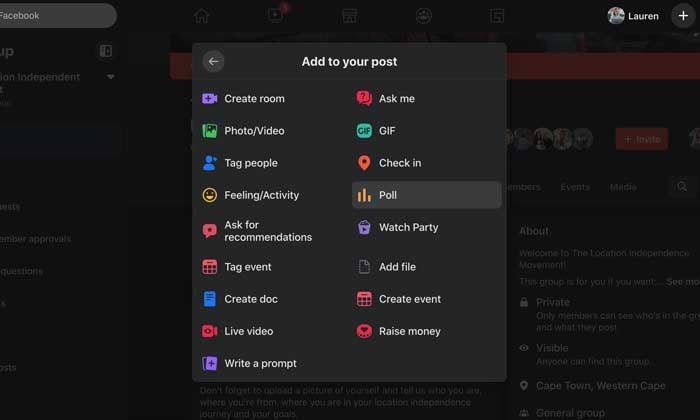
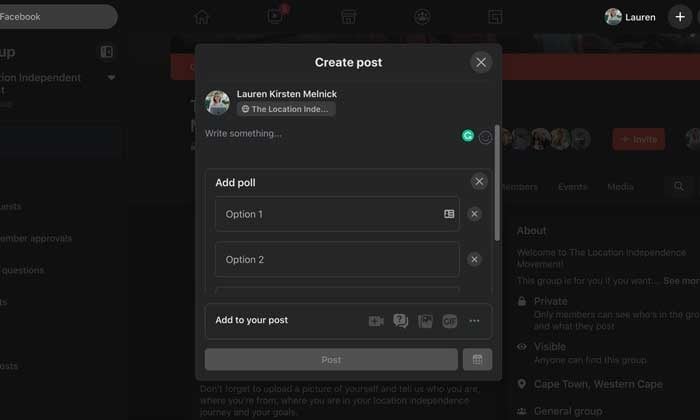
Facebook Polls how to create your facebook poll
Facebook Polls adding poll options

Step 4: Publish Your Poll

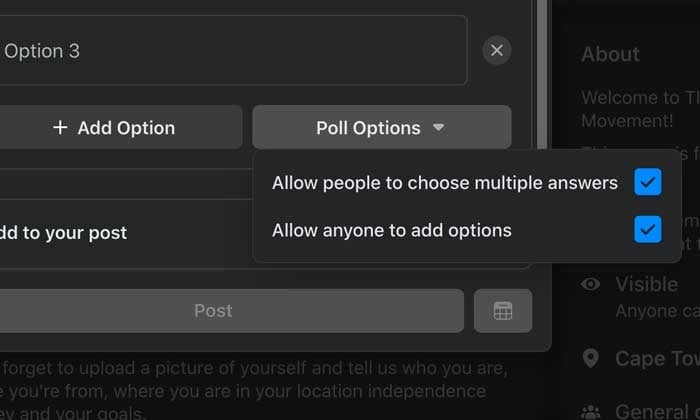
When you’ve added all your options, click on “Poll Options.” Here you can choose if people can add options and if they can vote for more than one option.

Once you’re done, click “Post.”
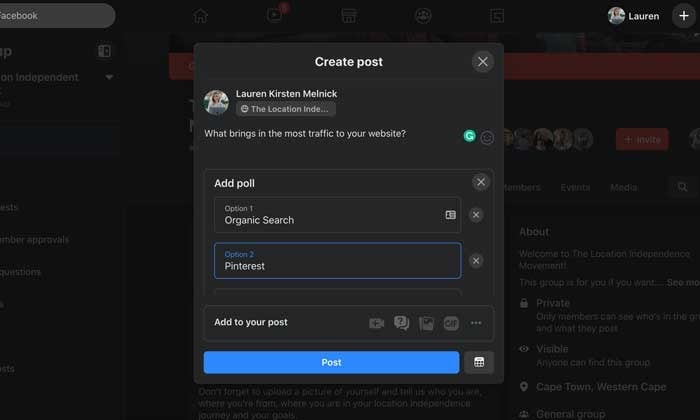
Faebook Polls how to publish your poll
Facebook Polls options

Facebook Story Polls

With 250 million people using Stories every day and it’s prime real estate on users’ News Feeds, creating a poll is an invaluable (and fun!) way to connect with your audience.

Let’s see how it’s done.

Step 1: Open the Facebook App on Your Smartphone

Navigate to your Facebook Page by tapping on the “Hamburger” icon on the left-hand side of the screen. You’ll see your page in your shortcuts section or by scrolling down and tapping on the “Pages” button.
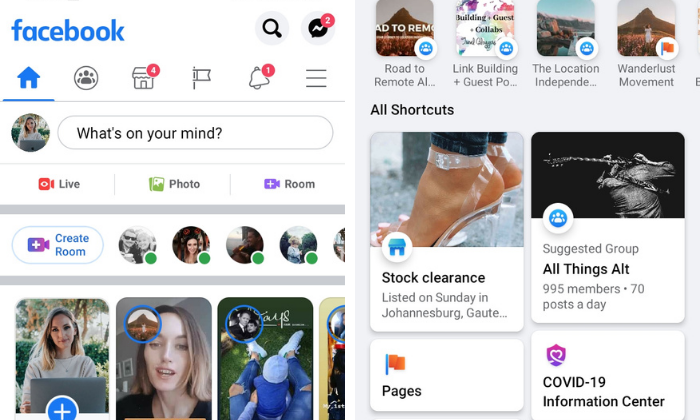
Faebook Polls how to make a poll on facebook stories

Step 2: Create a New Story

Tap on the blue circle with the plus sign around your profile picture and select “Create a Story” from the dropdown list.
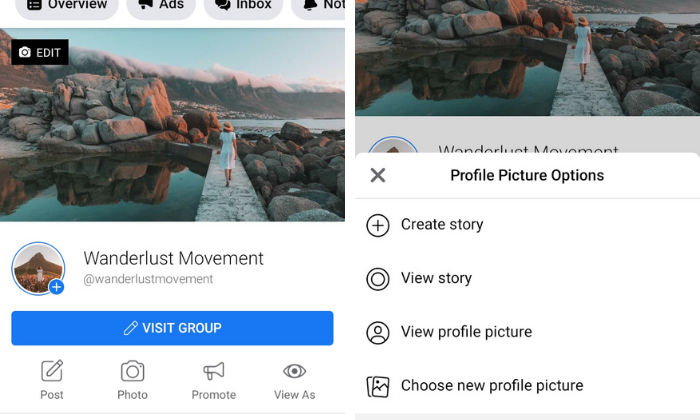
Facebook Polls creating one on facebook stories

Step 3: Create a Poll

Swipe to the left until you see the “Poll” card. Write your question and customize the “Yes” and “No” options.

Choose a color gradient background or upload a photo from your camera roll.

When you’re done, tap the “Share Now” button.

Your followers will see the percentage of who voted for which option but only you can see how many votes each option received and how each person voted.
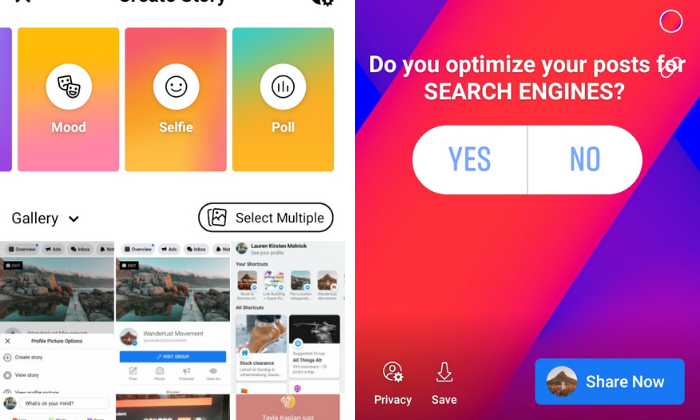
Facebook Polls publish one on facebook stories

Facebook Messenger Polls

While you can no longer post polls on your News Feed, Facebook added the functionality to group chats in Messenger for your personal account.

Hopefully, Facebook will roll out the feature to chats for business pages. It would be an excellent way to carry out quick customer satisfaction surveys.

Here’s how to do it.

Step 1: Open a Group Chat or Create a New One

Faecbook Polls how to create poll in messenger

Step 2: Tap the “+” at the Bottom of the Messenger Window Next to the Text Box

Step 3: Select the Poll Icon and Type in Your Question
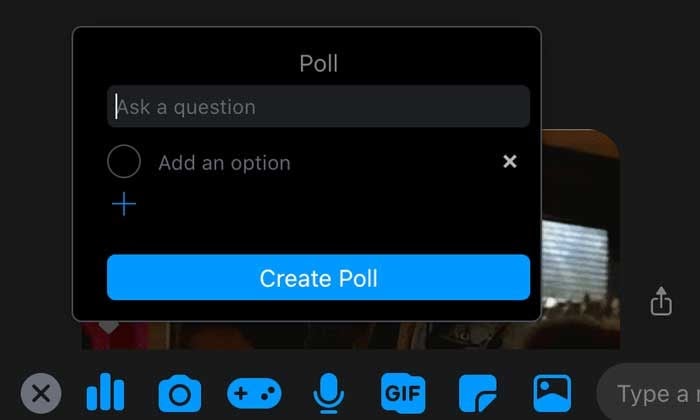
Facebook Polls select poll icon in messenger

Step 4: Add Your Options and Tap “Create a Poll”

Doing this allows you to share it with your group.
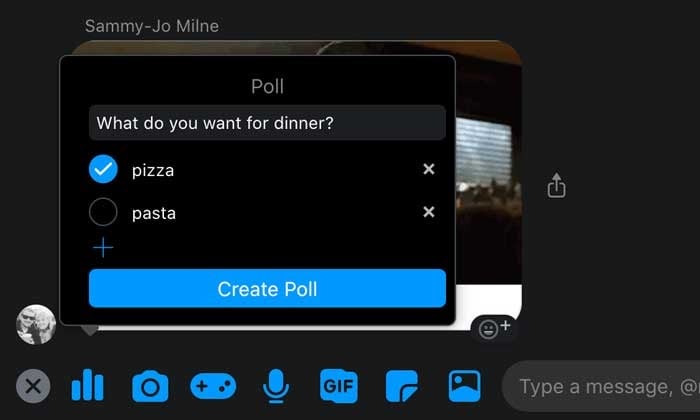
Facebook Polls in Messenger add your options

Event Page Polls

Polls are a powerful feature for brands who host in-person or virtual events.

You can create one to get valuable input on details like:

  • Which location, date, or time suits everyone.
  • Attendees’ opinions on how the event went.
  • How many people want specific catering options.
  • Voting on itinerary options.

Step 1: Go to the Event

Log into your Facebook account and click on “Events” on the left-hand side of the screen. If you don’t see the event icon, click on the expand button and scroll down until you see it.

For events created by a Facebook Business Page, go straight to the events tab on your page.
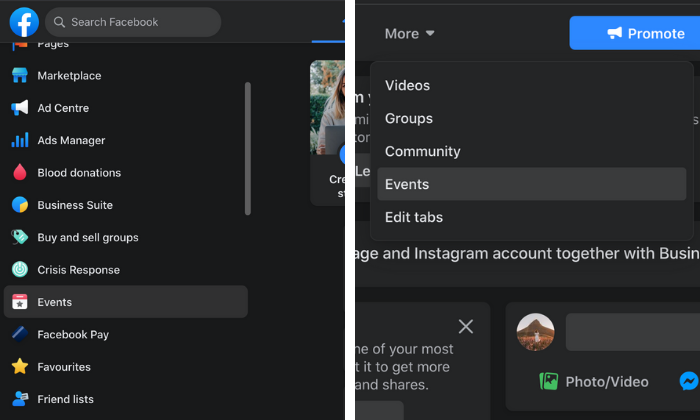
Facebook Polls go to the events tab to create your poll

Step 2: Create a Post

Select the event you want, click on the “Discussion” tab and select “Add a Post.”

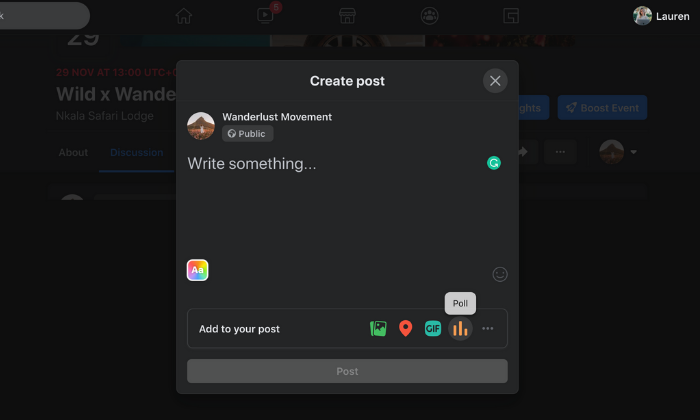
A new window will pop up, and you’ll see the poll icon on the right-hand side of the “Add a Post” section.

If you don’t see it, tap on the three dots to expand the post options.
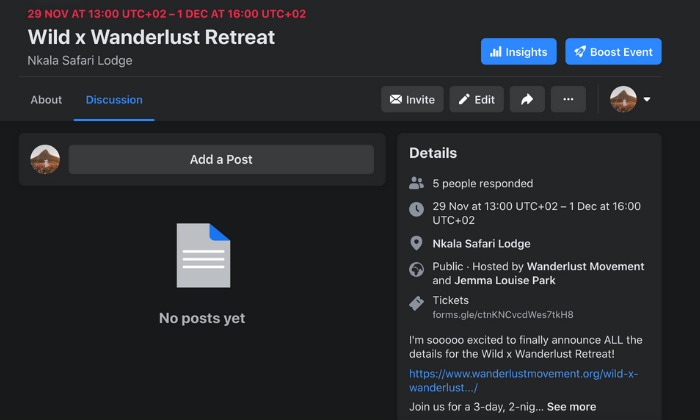
Facebook Polls creating a poll on a facebook event
Facebook Polls creating a poll in events

Step 3: Create a Poll

Click on the poll icon, and you’ll go back to the “create a post” screen where you can add your question and options.

You can add more possible answers by clicking the “+Add Option”. Use “Poll Options” to allow people to add options and enable/disable people from choosing multiple answers.

When you’re ready to post, click on the “Post” button to add it to your event’s page.
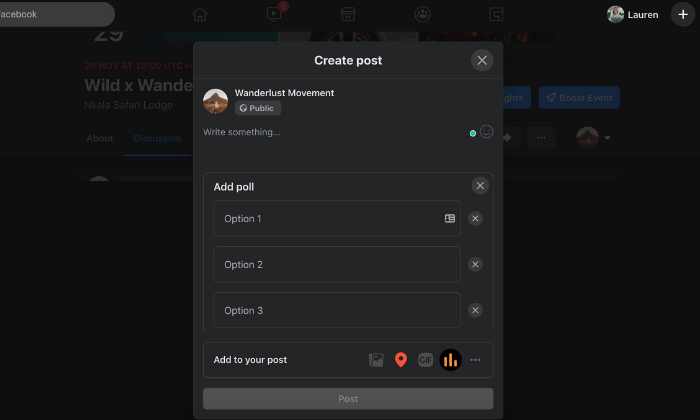
Facebook Polls in Events add your options

Facebook Video Polls

With 500 million people on Facebook watching videos every day, you can’t go wrong with adding video content to your marketing mix.

But how do you get people to ENGAGE with it once it’s posted?

Video polls.

It’s a quick and easy way to personalize a viewer’s watch experience and get them to snap out of passively consuming content.

We tell you how to do it below.

Step 1: Upload a Video to Your Facebook Page

You can also head on over to Creator Studio to edit a video you’ve already posted to your page.
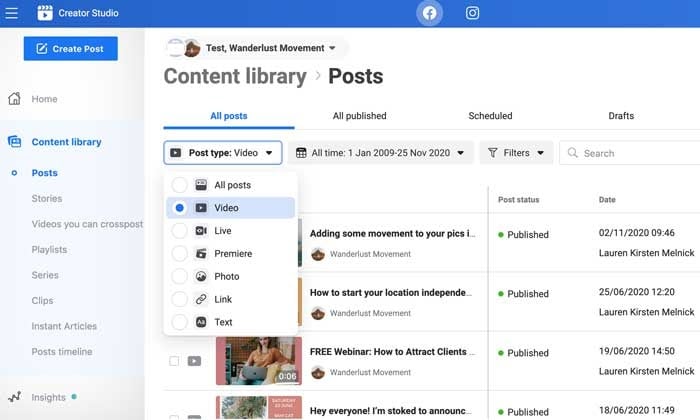
Facebook Polls how to create video polls

Step 2: Click the “Edit Post” Button

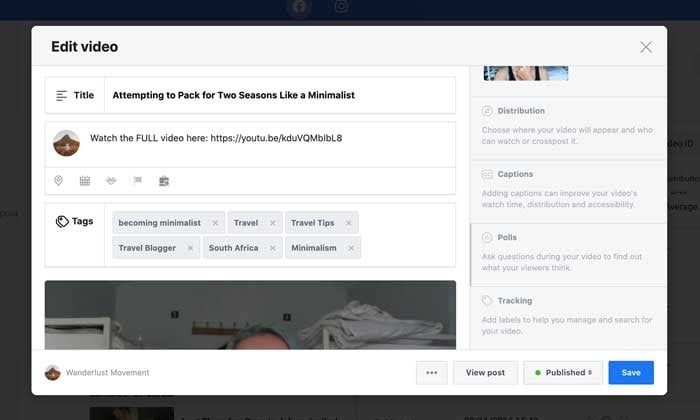
A new window will load where you can edit your video’s title, caption, and tags.
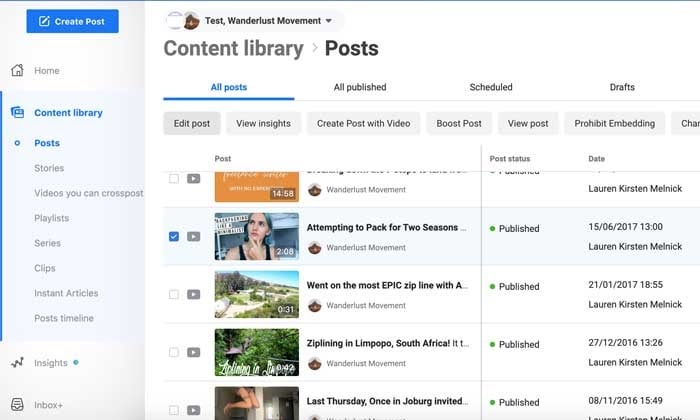
Facebook Polls edit your post to add a video poll
Facebook Polls how to add a video poll

Step 3: Select the “Polls” Option

On the right-hand side of the pop-up, scroll down until you see a greyed out “Poll” section.

Select it and click on the blue “Create Poll” button.
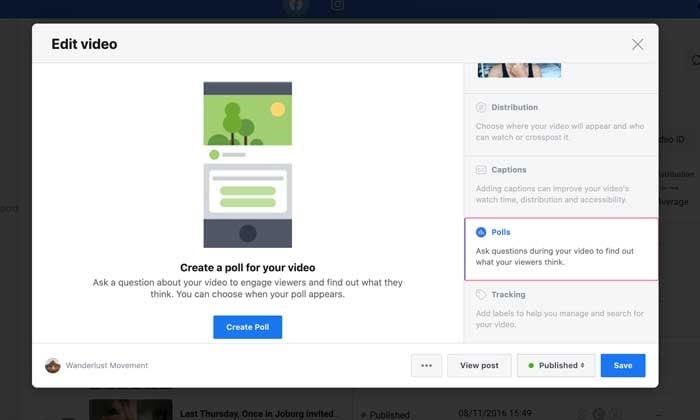
Facebook Polls select the poll option to add one to your video

Step 4: Ask Your Question

On the left-hand side of the pop-up, your video will appear with a slider. You can move it to the section of your video where you want the poll to appear.

On the right-hand side, you can fill in your question and answer options. By default, there are only two options to start with, but you can add up to six by clicking on the “+Add another option” button.
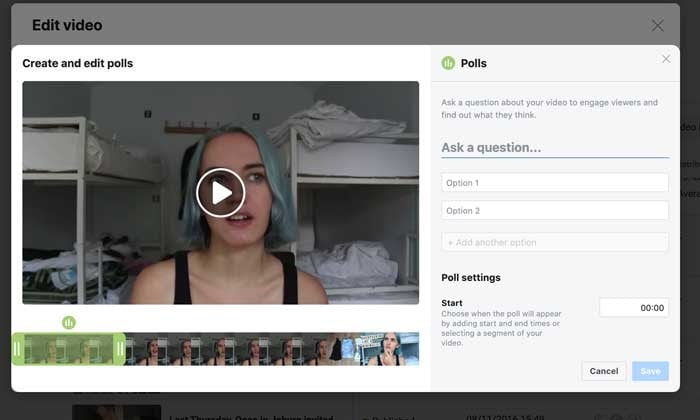
Facebook Polls create a facebook video poll

Step 5: Choose Your Poll Settings

Scroll down further to finalize your poll settings. You can specify when you want the poll to show up, its duration, and when you want to publish the results.

Step 6: Save Your Facebook Video Poll

When you’re happy with your poll, click on the “Save” button to start collecting results!

5 Ways to Use Facebook Polls to Grow Your Business

Here are some of the ways you can take advantage of polling your audience to grow your community and make more sales.

Create Different Types of Facebook Polls

You don’t have to stick to boring ol’ text polls. Facebook lets you spice things up and stop mindless scrolling in its tracks by adding images and GIFs to your polls.

Use the different options to get creative, show off your brand personality, and encourage engagement.

Ask the Right Questions

Polls are an excellent way to start a discussion in your community and conduct valuable market research.

For example, if you create a poll around content marketing, you can ask questions like:

  • “Do you see results from your content marketing?”
  • “What’s your biggest struggle with content marketing?”
  • “Do you struggle to see an ROI from your content marketing?”

You can use the results to plan out your content calendar, brainstorm a new offer, or create a piece of gated content your audience will love.

Collect Feedback From Your Audience

Hosting a free training for your private Facebook Group community? Get feedback on how your audience enjoyed the content with a poll. Instead of guessing if your training resonated with your community, you can ask them directly and use the feedback to fine-tune your content. A quick poll question like “Did you find the training actionable and easy-to-understand?” will do the trick.

Learn About Your Audience

Your Facebook polls don’t need to be strictly business all day every day. You can use the feature to go beyond basic demographics and find out what makes your audience tick.

For example:

  • What colors do they prefer?
  • Who are their favorite influencers?
  • Where do they hang out online and offline?
  • What are their biggest values?
  • What is the big goal they’re working towards?

Polls can collect meaningful information you use to make your brand more relatable and marketable to your audience.

Use a Slight Touch of Controversy

Want to stir up some engagement? Create a poll around two different schools of thought in your industry.

For example, if you work with freelancers you could ask, “Do you find platforms like Upwork and Fiverr valuable for landing clients?”

There are strong opinions about the pros and cons of using content mills, and it’s a hot topic in the freelancing community. Creating a poll around this will spike likes and comments, forcing the algorithm to push it out to more users.

How Facebook Polls Can Help Your Business

Still not convinced of the impact Facebook Polls can have on your business? Here’s how they can boost audience engagement, brand awareness, and help you sell your products before you’re ready to launch.

Boost Your Engagement and Brand Awareness

As AdWeek points out, consumer engagement on Facebook with brands is volatile. Polls are an easy way to encourage your community to engage with your content and build a relationship with your fans.

With multiple ways to interact (liking, commenting, sharing), you can feed the algorithm all the signals it needs to serve your post out to more and more users. For users, polls break up monotonous scrolling and allows them to share their opinion quickly and easily.

Find Out What to Create Next

The key to a successful online business is to create things your audience wants.

While keyword and market research can go a long way to get you there, once you’ve built a community, it’s better to go straight to the source. Use a poll to ask your followers what they want to see next.

For example, you could offer several topic ideas for your next blog post, YouTube video, or online course. Can’t decide what color to use for your new t-shirt designs? Create a poll and give your audience what they want!

Stir Up Interest Before a Launch

Before your next launch, use polls to start teasing your new products or services. For example, if you’re a clothing company, you can post pictures of your soon-to-be-released hoodies and ask people to vote on their favorite style. Not only is it a way for you to see what’s resonating with your audience, it creates anticipation for your launch.

Discover the Opinion of Your Followers

Remember the old days of focus groups as a marketing tactic? You can get the same results for FREE and in a shorter amount of time with polls.

Use Facebook polls to find out:

  • What your followers like about your brand.
  • What they would change.
  • Their overall opinion on your products or services.

Once you know people’s opinions, it’s much easier to speak their “language”, change things up, and align your marketing messaging with your audience’s wants and needs.

Conclusion

Polls are an important tool for any brand. They are an instant connection to how your audience feels about you, their struggles, and how you can best solve their problems.

By asking the right questions, you can adjust your digital marketing strategy to match the needs of your followers and give them that “WOW this was made for me” experience.

How will you use Facebook Polls to serve your customers better?

The post How to Create and Use Facebook Polls appeared first on Neil Patel.

How to Create PPC Campaigns for Real Estate Marketing

Even if you have a smaller real estate business, you don’t have to rely on third-party databases to get traffic to your listings through real estate marketing.

With pay per click (PPC) advertising, you can bring people directly to your real estate website, where you own the medium and are in control of how you present yourself. This means rather than your listing appearing—and perhaps being lost—among a sea of competitors, you can showcase your entire portfolio without viewers being distracted by others’ listings.

PPC campaigns aren’t usually difficult to set up. With a few tweaks, you may reach your target audience more efficiently and bring motivated buyers to your website.

PPC Real Estate Marketing Trends

With six million homes sold in the U.S. in one year, it’s no wonder competition between real estate agents is tough.

As you would expect in such a competitive market, real estate marketing plays a huge role, and the tactics businesses use are always developing.

Today, we see many realtors using trends such as virtual staging, drone photography, inbound marketing, and automation of lead verification. New trends come and go, the need for a good website never changes—and neither does the need to bring traffic to your site.

This is where pay per click (PPC) comes in.

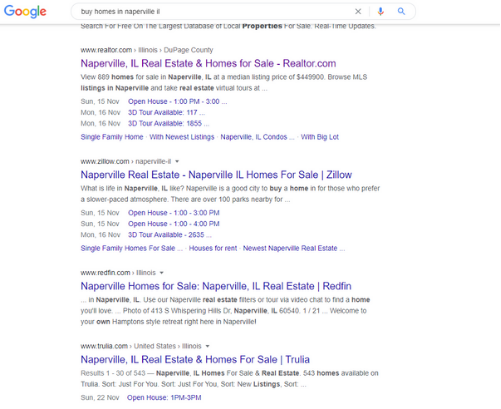
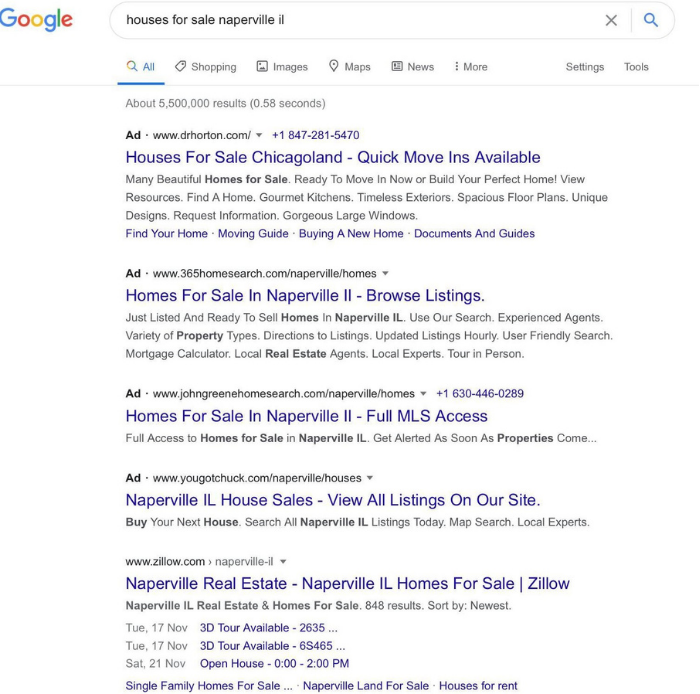
One of the difficulties with bringing traffic to your site is competition from huge online real estate databases like Zillow (236 million monthly users) and Realtor.com. Let’s take a look at a search query for “buy homes in Naperville IL.”

Real Estate Marketing Google search example

As you can see, those large sites are dominating the search engine results pages (SERPS).

However, ranking organically isn’t the only way to get to the top of the SERPs, and PPC may grant you a route to the top of the listings. Through a successful PPC campaign, your website could feature at the top of the page for your chosen keywords, potentially bringing in a large volume of traffic.  

You pay a small fee for each click, but if you’re utilizing the latest real estate marketing trends well, then you could see a solid ROI. PPC allows you to bring traffic to a medium you control, which puts you in control of your marketing.

Selecting Keyword Phrases for Your Real Estate Marketing PPC

PPC could allow your website to appear at the top of the SERPs for virtually any keyword. Your real estate marketing isn’t going to benefit from featuring an irrelevant search term, though. This means you need to find the keywords that work for you and bring in people who convert into leads.

To do this, start by understanding your target audience.

  • What does their customer profile look like?
  • What information are your potential customers looking for?
  • How do they search for that information?

Think about your audience and write out a list of all the ways they might search for your business.

For PPC to work for you, you also need to ensure your landing pages reflect the keywords you’re advertising for. When someone clicks on your ad, the page they land on needs to directly address why they clicked in the first place. Take a look at your current pages and list all the keywords reflecting the content you have on your site.

Once you’ve built up a list of keywords, it’s time to narrow it down so the keywords you bid on are relevant to both your audience and the pages they land on.

Part of succeeding at this is understanding where someone is in the buying cycle. For example, someone searching the keyword “best Chicago suburbs” might be at the beginning of the cycle, where the buyer intent is much lower than later on. Later in the cycle, they may search for “buy houses Naperville IL,” meaning they could quickly become a lead. This distinction should help you understand each keyword’s value and focus your real estate marketing PPC on boosting ROI.

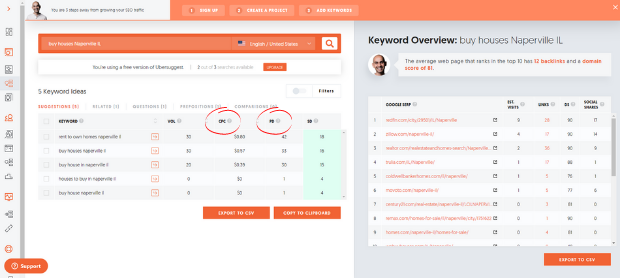
After you’ve narrowed down your list, go to Ubersuggest to find out the cost per click and level of competition for each keyword.

Ubersuggest for real estate marketing

Optimize Your Site for PPC Campaigns that Use Local Keyword Phrases

With all our examples so far, we’ve used what’s known as a “location modifier.” For instance, in “buy houses Naperville IL,” the terms “Naperville” and “IL” allow us to target a specific area. Nothing is stopping you from advertising for “buy houses,” and you’d probably get plenty of traffic—but there’s no point if you’re selling houses in Naperville and the user wants to buy one in Ft. Lauderdale.

Local keyword phrases are vital to real estate agents because they’re selling a product with a fixed location. As location is one of the driving forces behind real estate purchases, many people use these modifiers in their searches.

When you use local keyword phrases, your landing pages must match the search intent. If your advertisement says “houses for sale in Naperville,” then it has to deliver on its promise. Many people will click back to Google if it’s showing houses for rent or homes outside of Naperville.

Setting Max CPC Budgets for Your PPC Campaign

When you set up your real estate marketing campaign, you’re going to be asked to set a budget and decide the maximum you’re willing to pay per click for a specific keyword (max CPC). Remember, you’re not tied into anything—it’s something you can adjust as you go and optimize to get the best results.

To get an idea of your budget, set out the goals you want to achieve with your PPC campaign. For a simplified example, to make $5,000 a month from your advertising and the average value of your houses is $100,000 with a 1% commission, you need to sell five houses a month through your PPC.

The average cost per click for keywords related to real estate is $2.37 with a conversion rate of 2.47%—so, to sell your five houses, you might need just over 200 clicks at the cost of $494. While your numbers might vary from the industry average, you can always adjust your budget based on your average conversion rate and cost per click.

It’s also worth remembering that it’s not all about the price you pay per click, as your advertisement’s quality also plays a part. Google wants to send people to high-quality results, and if your ad achieves this, it’s more likely to be favored by the search engine’s algorithm.

Another way to maximize your budget is by boosting your click-through rate (CTR.) The average CTR for real estate ads is about 3.71%— but if you’re writing excellent ad copy, then you may find even better results. But remember, these are just industry averages, and your experience may vary. An ad budget of hundreds (or even thousands) doesn’t guarantee a sale, but PPC is worth a try for most markets.

Deciding Which Ad Platform is Right for Your Real Estate Marketing

When we think of search engines, our minds are naturally drawn to Google because it’s the biggest, with 3.5 billion searches per day. However, there are lots of different search engines and lots of other ad platforms.

Which ad platform you use should be decided by your business goals and your target audience. For example, if you’re selling sleek condos to millennials, your advertising will look very different than if you’re targeting seniors looking for a second home.

This differentiator is where you could help your real estate marketing campaigns by selecting the right platform.

Social media platforms such as YouTube, Facebook, Instagram, LinkedIn, and Pinterest are vital sources for real estate marketing, and they offer great PPC options. 99% of Millenials and 90% of Baby Boomers begin their real estate searches online, and with billions of people on social media, this could be a perfect way to reach them.

The great thing about PPC on social media is that they are highly visual media. Whereas with Google Ads you might be limited to text, social media allows you to incorporate video, images, and other effects. These tools can help your advertising stand out from the crowd, but you must choose the platform and message that resonates with your audience.

57% of Americans aged 25-30 are on Instagram, compared to 23% of 50- to 64-year-olds. However, the numbers look very different on Facebook, as 68% of 50- to 64-year-olds have accounts. This data shows people search for information differently, and your advertising needs to reflect this. You might find Google is the best way to reach your audience, or you may discover an alternative such as Instagram that offers you the most useful real estate marketing campaign.

Here you can see just how different a promoted post on Instagram could look from the traditional ads you see on Google. These various formats could give you the ability to appeal to particular audience demographics and potentially maximize the effectiveness of your real estate marketing.

Real Estate Marketing which ad platform to use
Real estate marketing SERP

Whichever platform you use, you’ve got to make sure your message suits the medium, and you’re giving people the experience they’re looking for. Various advertising platforms allow you to diversify your marketing, but you’ve got to focus on the techniques that work best for each campaign.

Deciding Which Real Estate Marketing Ad Format is Best

When you come to set up your ads, you’ll find you have lots of format options. The options vary depending on which platform you’re using, but for Google, you’ll have the following choices:

  • Search ads: These are the “traditional” ads at the top of a SERP. These are particularly useful for real estate marketing because they allow you to reach a targeted audience at the precise moment they are looking for your product.
  • Shopping ads: Shopping ads are product-focused advertisements that also allow you to feature at the top of a SERP. However, shopping listings are more commonly used for very specific searches such as “buy Barbie dolls,” where many retailers sell the same products.
  • Display ads: Display ads allow your listing to feature on other people’s websites. While this can be a cost-effective way to reach a broad audience, it’s more difficult to judge where these people are in the buyer cycle because they haven’t made a specific search.
  • Video ads: Video ads play between videos on YouTube and are a great way to incorporate a more interactive aspect to your advertising. Many people use YouTube as a search engine, so it’s another good way to reach motivated buyers.
  • Gmail ads: These advertisements appear at the top of someone’s Gmail inbox and allow you to reach a targeted audience. The difficulty with Gmail ads for real estate marketing is determining buyer-intent. You might be targeting someone because they are interested in real estate, but this does not guarantee they’re looking to buy a house.

The key to these different ad types is finding the ones that best suit your business goals. For many real estate businesses, this is likely to be search ads.

This is because this method may best allow you to understand the searcher’s intent. Someone has put a specific query into Google—“find houses in Naperville”— so you more clearly know what they’re looking for and can judge where they are in the buying cycle.

With options like display ads, you can reach a targeted audience—for example, people looking at a house improvement website—but you don’t have control over searcher intent. As you’re selling something very specific that focuses on location, search ads are a good place to start.

Conclusion 

Pay per click advertising is an essential tool for your real estate marketing. If you’re to take back clicks from online real estate databases like Zillow, then you’ve got to find alternative ways of getting traffic to your website.

PPC is an excellent way to do this, and it could bring large numbers of targeted, highly engaged visitors with a strong buyer intent to your website. From there, you’re in control of the medium and not reliant on a third party who controls your interactions with customers.

If you’re investing in real estate marketing trends like virtual staging and drone photography and you want to maximize their effectiveness, a way you could do this is by getting them in front of a targeted, engaged audience. With good PPC, you could do just that because it may allow you to boost your lead generation significantly—and perhaps sell more houses.

If you do need help with your PPC campaigns, reach out to my team to see how we can help.

Has PPC benefited your real estate business?

The post How to Create PPC Campaigns for Real Estate Marketing appeared first on Neil Patel.

How to Create an E-Commerce Business Plan

If you ever plan on finding investors, partners, or employees for your e-commerce startup, you’ll need to know how to create a business plan. A lot of people make this process out to be more complicated than it needs to be. When you do it right, creating a business plan doesn’t have to be so difficult.

In this guide, I’m breaking down step-by-step everything you need to know about creating a powerful e-commerce business plan.

What is an E-Commerce Business Plan?

Have you ever thought about something you wanted to accomplish in your business? You’d likely jot down a few lines discussing strategies, costs, and methods behind the steps you would take to achieve those goals.

If you’ve ever done that, you’ve created a basic business plan, and there isn’t too much more to it than that. An e-commerce business plan is a strategy for how your business will work, how you’ll fund it, who your audience will be, and how you plan to succeed.

Understanding how to create a business plan is key. It requires research, understanding your audience, budgeting, and more.

The overall key to writing a business plan is to create something comprehensive enough, so you never have to wonder what step is coming next. As you navigate the sometimes challenging process of starting an e-commerce business, don’t leave anything to chance.

When you’re struggling or having a hard time envisioning the next step, you don’t have to worry because your business plan thoroughly outlines everything you’re going to do, when you’ll do it, and how much it’ll cost.

Another aspect of business plan writing is looking for investors or partners. You need to pitch your e-commerce business in a way that is easy to understand. Investors aren’t going to jump aboard something that lacks vision or appears unorganized.

Having a thorough business plan that gets straight to the point will show investors that you know what you’re doing and you have a concrete strategy for success.

How is an E-Commerce Business Plan Different From Other Kinds?

The way e-commerce businesses reach their customers is much different. At a brick and mortar store, for example, foot or vehicle traffic will contribute to a lot of free advertising for the business.

E-commerce stores, on the other hand, can very easily get buried in the SERPs, never to be seen by anyone if you don’t know how to get the word out. You need to keep these types of things in mind when putting together your business plan.

As for research and development of your business plan, standard businesses need to factor in local licenses, ordinances, building codes, and other factors that may influence where and how they can conduct business.

Luckily, e-commerce doesn’t have to worry as much about that, but it doesn’t mean you can ignore it either. It’s your responsibility to understand any restrictions or requirements that may prevent you from sourcing and selling your products.

Why E-Commerce Business Plans Are Important

Understanding how to create a business plan means nothing if you can’t see the importance behind it. While I believe there are more important aspects of starting a successful business, every e-commerce venture should have a stable foundation, beginning with a business plan.

Business Plan = GPS

You’re the driver of this business, but you’ll end up going in circles, wasting time and money, if you don’t know where you’re going. Having a solid business plan guides you through the steps of starting and growing a business. Think of the plan as the GPS of your business. If you ever get lost, you can fall back on your original plan.

It Helps You Generate Ideas

This process is much easier than it seems. It might seem like this looming dark cloud of horror, but once you dive in, the juices will start flowing, and you’ll find out that you probably have a lot of great ideas. This may be the first project of your new venture, so business plan templates and how-to guides can help.

It Can Help You Understand the Market

Getting your audience right is the most important aspect of an e-commerce business. If you’re trying to reach everyone, you’ll reach no one. A big part of your business plan needs to be the development of a customer avatar. This avatar is your perfect customer. They’re the ones that buy everything you sell because they love you and your brand.

It Helps with Funding

Whether you’re looking for funding or business partners, you’ll need a business plan. Having a strong strategy shows investors that you’re confident in what you’re doing, you understand the business, and investing with you is a smart choice for them.

It’s a Great Way to Keep Track of Accomplishments

What better way to look back and see everything you’ve dreamed of come to life? You can map out the next few years in a business plan and look back as everything comes together, and keep track of everything you’ve accomplished. A business plan acts as a “to-do” list for your new venture.

What Does an E-Commerce Business Plan Look Like?

If you’re wondering what a business plan should include, it might look a little different than you originally thought. The days of massive 15-page business plans are over; you don’t need a super complicated plan to find investors and sell your products.

Lean business plans are growing in popularity. This e-commerce business plan involves a one-page “pitch” of your business. You’ll document the problem you’re solving, your unique solution, your market, the competition, your team, and a little information about your company culture.

Part 1: Executive Summary

how to write a business plan executive summary

Think of an Executive Summary as an overview of your company’s goals and objectives. If you had to hand someone a piece of paper explaining as much about your business in 250 words or less, what would you say?

It should include information such as:

  • A description of your products and what you sell
  • Your goals as an e-commerce provider
  • Identifying your target audience
  • Explanation of your competition and how you stack up
  • Overall growth potential
  • Funding requirements

While you’re not going in-depth in any one area here, this is the most important aspect of the business plan because it’s your overview. When people think of your e-commerce brand, this is what they’ll think.

Part 2: Description of the Company

Who are you, what is your experience, and why should you have the right to sell products to other people?

The company’s description is a lot less about what you want it to “be like” and more of what “you’re like.” You’re pitching yourself, your experience, and your ability here.

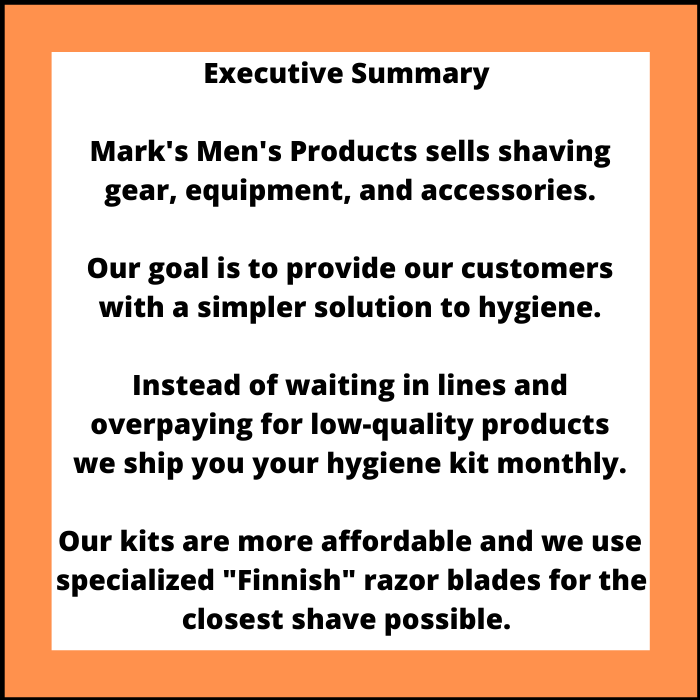
A great business example here might be:

how to write a business plan description

In this description, we covered what we’re selling and provide the credentials of the owner, which will create confidence in potential investors and partners.

Step 3: Market and Industry Research

If you don’t understand your audience or the industry you’re working in, you’re doomed. Researching the market is critical, and there’s a big difference between standard business and e-commerce here.

When you’re researching the market for a retail store, you’re very limited in who your audience is, so it’s a bit more cut and dry.

As for e-commerce, the world is your audience, but you need to narrow it down to a specific demographic to cater to your products and marketing to those people.

Ask questions like:

  • What problems do my customers have?
  • How can I solve these problems?
  • What products solve those problems?
  • When do people shop for these products?
  • How often do they purchase them?

Step 4: Operations Plans

Forget learning how to create a business plan; we all go into business to profit, right? Having an operations plan helps ensure you remain profitable by keeping all your costs in line. This section of the business plan discusses managing, staffing, preparing products, fulfilling orders, inventory management, customer service, and more.

This part is where you get to start outlining what a typical day will look like in your business. How will it run, how will people convert, and how will you fulfill those orders?

Start thinking about things such as:

  • What equipment and supplies do I need?
  • What is the chain of command; who is in charge?
  • Do I need to develop products, or am I reselling others?
  • What are my staffing needs?
  • Will my operations change or remain the same as I grow?

Make sure you keep your industry, market, and target audience in mind as you prepare your operations plan. You don’t want to venture off in the wrong direction as you dive deeper into it.

Step 5: Marketing Plans

It’s a no-brainer that you’ll have to market your business if you want to have success, but you need a plan. In e-commerce, you have a few different options, and the choices you make will determine a lot.

You need to highlight the methods you plan on using so partners and investors can see that you have a clear path to success. Some of your choices may be:

  • PPC (Pay-Per-Click)
  • SEO/Content Marketing
  • Guest Posting
  • Social Media

I recommend using a combination of all of these because they each have upsides and downsides. For example, SEO is a relatively low cost to get started, but it takes time, and if you don’t possess the knowledge yourself, you’ll have to hire an agency to do it for you.

PPC can be costly if you don’t know what you’re doing, but the results can come quickly because you’re leapfrogging over a lot of the competition.

Regardless of what marketing methods you choose for your e-commerce business plan, you need to highlight them and explain how you plan to use them.

Step 6: Costs and Revenue Predictions

Now you need to wrap up your business plan and put a nice bow on top. Based on everything you’ve included so far in your business plan, what are your costs versus your revenue? Keep in mind that first-year revenues aren’t always extravagant, but you need the potential to gain more revenue in the future.

As long as investors and partners see that you have the growth potential, they won’t worry too much about first-year losses. The goal should be to keep your costs as low as possible and your revenue as high as possible (makes sense, right?).

Predict the total cost of operation in your business in the first year or two and include that in the plan. Then, anticipate the revenue prediction as well and include that.

If you’ve followed everything in this guide, there should be a clear path that brings you to those numbers. You should know how much everything will cost to get started and operate the business for a year.

Based on your market and what your competition is doing, that’s where you get your first-year revenue predictions.

Make it transparent and keep it simple.

What Do I Do With an E-Commerce Business Plan?

Now that you know how to create a business plan, what are your next steps? What do you plan to do with the business plan? Most people will use their business plan to find investors, partners, and employees when they’re getting started.

If you’re thinking about pitching to investors, you’ll want to choose carefully because not all investors are the right choice for you. Even if someone is willing to give you what you ask, they might not be the right fit, and taking their money will lead you down the wrong path.

First, you want to look at an investor’s expertise. When they have experience in a certain area, it makes it easier for them to understand your potential, and they can offer guidance to help you succeed.

Second, in what stage is your business? Different investors specialize in different stages. Some invest in pre-seed, while others won’t even hear your pitch until you have revenue.

Third, how much do you think you need? What you think you need and what you need are two different things.

Lastly, how do you plan on involving your investors? Some investors will back you financially and offer nothing more, while others will demand consistent financial updates and reports while offering guidance and assistance. You need to determine how involved you want your investor to be in your operations.

Conclusion

Now that you know how to create a business plan, the rest is up to you. Remember that gathering information and understanding something is important, but it’s nothing if you don’t implement what you learn. Take the steps outlined in this guide and put them to work.

If this seems a little daunting, we have plenty of resources to help you. Your business plan doesn’t need to be this elaborate essay; you can complete it in a day with the right strategy.

What do you think is the most important part of creating a solid business plan?

The post How to Create an E-Commerce Business Plan appeared first on Neil Patel.

How to Create an Editorial Style Guide

As a digital marketer, you know just how important the tone and message of your blog are to the overall success of your business. A cohesive approach to your digital content, especially the content on your blog, is critical to your brand.

The best way to ensure your site is editorially cohesive is with an editorial style guide.

This article will walk you through the basics of an editorial style guide. You’ll learn the steps you need to follow to create your own style guide whether from scratch, with the use of a template, or with help from a freelancer.

What is an Editorial Style Guide?

An editorial style guide is a set of guidelines for the writers and editors on your team. These guidelines will include standards for grammar, spelling, sentence structure, and image use.

The goal of a style guide is to ensure your content stays consistent and high quality no matter who is writing or editing the article.

Why Does Your Website Need an Editorial Style Guide?

More than just a preferred list of grammar rules, an editorial style guide provides your content team with guidelines for the creation of useful, on-brand content. An editorial style guide ensures a standard baseline for quality and consistency. This will become more critical as your in-house editorial team grows.

Perhaps you think your website is too small, or you can always create your content now and flesh out the details later. The truth is, the sooner you can get your editorial style and processes nailed down, the less work for you and your team.

Without clear guidelines in place, your inbox will soon be flooded with questions from your writers and editorial staff. Your editorial staff may think that lack of guidelines gives them free reign over content. This may result in inconsistent and maybe even poor quality work that has your brand name all over it.

Elements of a Style Guide

There are specific elements all style guides should include, such as:

Grammar

Do you expect your writers to use the Oxford comma? Are there instances where you prefer the semicolon over the em-dash? These are the grammatical rules to call out in your style guide.

Other grammatical elements to take a stand on include where punctuation falls in relation to quotation marks (inside or outside), prepositions at the end of a sentence, and starting sentences with conjunctions.

Spelling

A subscription to services like Grammarly takes care of the majority of misspellings. There may be times where a word can be spelled correctly in two or more ways, so which one should your writers choose?

The most common spelling differences are those with American English versus British English variations. Examples include:

  • Center vs. centre
  • Theater vs. theatre
  • Color vs. colour
  • Criticize vs. criticise
  • Program vs. programme

You should consider where the majority of your audience lives when deciding on a spelling “style.” But the most important thing is to choose one style and be consistent.

Voice and Tone

The voice is the overall expression of your brand, while the tone is how that message is delivered. The tone will vary depending on the medium (e.g. social media post, blog post, newsletter, press release), but the overall brand voice will be your writers’ guiding light.

Is your brand voice considerate and simple like Uber or functional and expressive like Starbucks? Once you have found your brand voice’s sweet spot, it’s time to determine what your tone is and when that may change depending on the medium or circumstances. Perhaps your tone is casual and conversational in blog posts, but witty in social media posts.

You’ll want to include relevant examples here as Uber does in the Applications section of their style guide. These will help to solidify your stance while also giving your writers a handy guide to refer to should they need it.

Sentence and Paragraph Length

From witty one-liners to groupings of five to six sentences, there are many valid ways to form a paragraph. Here you want to outline your general preference and when exceptions should be made.

On academic websites, for example, longer sentences and paragraphs are the norm. This is because there is a lot of high-level information that needs to be delivered at once. On recipe or hobby blogs, however, shorter sentences and paragraphs can help to drive a point home.

Links

This section of your style guide should discuss how links on your blog should be formatted, but also how often to use links and to where (e.g. external versus internal content).

If you’re a medical or academic marketer, for example, you may require that links to outside sources meet a minimum quality standard. If that’s the case, you should provide explicit examples of websites and sources that you trust.

Resources

Your editorial style guide should be in-depth, but if it’s too long it can be difficult for your writers and editors to use effectively. One way to reduce your style guide’s length without compromising content is with resources.

The resource section of your style guide should include links to guides that you have properly vetted. These may include:

  • Academic style guides (e.g. APA or MLA)
  • Grammatical rules and guidelines
  • How-to guides and documentation for platforms your writers and editors will use
  • Database links

You want to set up your writers to be self-sufficient. An expansive resource section within your editorial style guide is a great place to start.

Images and Other Media in an Editorial Style Guide

If you encourage the use of images and other media in your website content, you’ll need to be explicit about formatting, attribution, content, and more. What do these elements cover?

  • Formatting: Specify minimum and maximum dimensions, image size requirements, and placement within an article
  • Attribution: Outline your expectations for how your writers should attribute content to the creator. This will vary depending on the copyright license, but compliance with copyright laws is a must.
  • Content: You should call out any limitations or restrictions you have on certain activities within imagery, such as drinking alcohol. Or maybe you have a style preference for feature images, such as overlay shots. This information is useful for your writers and editors.

There are very real potential consequences to improperly attributed imagery, so this part of your style guide should be very specific. It’s best to provide examples and even templates for your writers and editors to use.

Creating Your Editorial Style Guide

Now you’re ready to create your own style guide. Where should you begin?

Before you become overwhelmed with the process, let’s discuss three ways you can go about creating your own style guide.

Hiring a Freelancer to Create Your Editorial Style Guide

You can hire a freelancer for just about any blog or website-related task, so why not consider hiring a freelancer to create your style guide? Freelancers with experience in writing industry-specific content, including style guides, do exist. If you can find a freelancer with experience creating a style guide in your field, then even better!

There are various freelance recruitment platforms, such as Freelancer and Upwork. You can also reach out to your personal and professional network for recommendations.

An experienced freelancer can walk you through the process of editorial style guide creation. You should come to the table with some information prepared, though. For example:

  • Brand voice and tone (Casual? Authoritative? Academic?)
  • Your preference for tense and point of view
  • Any strong preferences you have (e.g. oxford comma, text formatting, image formatting)
  • Industry or company requirements

You hired the freelancer for their knowledge and expertise, so don’t forget to utilize it. If your freelancer has created an editorial style guide in your niche, then ask them for recommendations based on their previous work.

You may be surprised at the sections you didn’t even think to add, and others that you can cut. Using this previous experience can boost the quality of your style guide and prevent issues caused by ambiguity.

Creating an Editorial Style Guide From a Template

If a freelancer isn’t in your budget, you don’t have to go it alone. There are many style guide templates available for you to work with.

The best place to look for such templates is on marketing, branding, and design blogs.

TechWhirl offers a Word document template for download, and Lucidpress has its own template you can customize using their online editor. You may also have luck with template repositories like this one from Microsoft.

The important thing to remember is a template is a guide, not a rule book. You don’t need to include all of its sections, and you’re free to add any sections you feel necessary.

Creating Your Own Editorial Style Guide

If you prefer to create your own style guide from scratch, then consider the step-by-step process outlined below.

Start With a Solid Base

At this stage, it’s time to choose an established style guide as your base.

There are plenty of options as described below, including APA and MLA. By choosing one of these guides as your baseline, you make it easy to create the foundation of your style guide.

These established guides already include rules on grammar, structure, and formatting. You can then build upon those rules to create a robust editorial style guide for your website.

Establish Brand Voice and Set the Tone

Two critical elements of marketing content are often overlooked: brand voice, and tone. The reason these are so often overlooked isn’t because they’re unimportant, but because they can be difficult to distinguish.

The voice is your brand’s personality. This remains the same throughout the life of your brand.

Skittles, for example, has a playful and upbeat voice. Their marketing campaigns are slightly fantastical with an eye towards bright colors, loud sounds, and catchy quips.

Skittles marketing campaigns as a proof of their use of an editorial style guide

The tone is the inflection on your brand voice that will change depending on the situation. Even if you have an army of writers, you can ensure your blog stays cohesive by setting a tone for your writers and editors to abide by.

Remember the Big Three: Tense, Voice, and Point of View

Now you know the tone of your content, it’s time to outline the “how-to.” How do you intend for your writers to speak to your audience? The answer will depend on the tense, voice, and point of view you prefer.

Writing tense refers to the three tenses: past, present, and future.

There may be reasons all three tenses are used on your website or blog. You should still pick a dominant tense for your writers to defer to in most circumstances.

Voice refers to active voice versus passive voice. That means putting the subject first (active) or putting the object first (passive). Active voice is the standard for most bloggers and marketers. It offers a more conversational tone readers find compelling.

Point of view refers to the perspective of the writer: first, second, or third person.

Bloggers and marketers will typically utilize first person (“I” statements) or second person (“You” statements). The point of view you choose will depend largely on your content niche and your overall tone.

It’s best to have a default recommendation for all three of the above. You may include exceptions to the rule, but be sure to provide specific examples if you do so.

Establish Standard Formatting

The way your content flows is largely dependent on its formatting. Some basic formatting guidelines to consider are headers and subheaders, bold and italic text, and hyperlinking text.

You may want to consider your content management system and any potential limitations when it comes to header tag guidelines.

If you are heavily relying on a style guide such as the APA, you can utilize their recommendations for text formatting. For example, italicizing terms that have a technical or special meaning.

Define Image Requirements

There are many good reasons to include imagery on your website. However, images can take up precious space, and they come with their own copyright risks. This is why you must define image requirements within your style guide.

On the technical side, you should define minimum and maximum image size. This will largely depend on your content platform, and it may vary by image type (featured image versus in-content image). With copyright infringement always being a risk, you also want to provide strict requirements when it comes to including images in content.

If you use a premium image repository, like Shutterstock, you may include account login details in this part of your style guide. You can also link to free image repositories such as Unsplash or Pexels.

Beyond that, you should clearly outline (with examples) the desired format for image references. What should be included, and how should it be formatted? Again, it may be helpful to fall back on your chosen style guide’s standard.

Incorporate Standards of Performance

How will your writers know when they hit the nail on the head or, conversely, miss the mark? This is where standards of performance come in handy.

Standards of performance are guidelines that your writers and editors can refer to when evaluating their content piece. The more objective your standards of performance, the better.

When it comes to establishing standards of performance, it helps to think of a grading rubric. For each standard, it’s possible to score anywhere from one to five points. What standards can you choose that will be easy to evaluate on a five-point scale? A few examples include:

The standards of performance will be beneficial to your writers, as well as your editorial staff.

Picking a Preexisting Editorial Style Guide as a Base

The likelihood is something will inadvertently be left out of your editorial style guide. This is why having a default style guide for your writers and editors to refer to is crucial.

These style guides have typical use cases, though they can be adapted for uses beyond the norm. Let’s look at the four most common style guides.

Associated Press (AP)

The Associated Press (AP) style guide is most commonly used by journalists. Its focus is on disseminating information clearly with simple formatting.

American Psychological Association (APA)

The American Psychological Association (APA) style guide is most commonly used in college in science and social science courses. It has a slightly more formal bent than the MLA, though not so formal as the Chicago Manual of Style.

This style guide is ideal for academic writing, including blogs or websites dedicated to discussing academic subjects.

Modern Language Association (MLA)

The Modern Language Association (MLA) style guide is most commonly used in college-level English courses, and it’s also the default for many bloggers, marketers, and content writers. This guide offers a more laid-back approach desirable to writers, editors, and readers alike.

Chicago Manual of Style

The Chicago Manual of Style is the most rigorous of the style guides. This style guide isn’t a popular choice for most bloggers due to its meticulous nature.

The key differences between the four style guides are largely related to formatting, though there are some grammatical and structural variations as well. There isn’t one style guide better than the other as they all have their strengths and weaknesses. The guide you choose will depend largely on preference, ease of use, and familiarity.

Picking a Platform to Host Your Editorial Style Guide

You’re ready to create your style guide, but where should you host it? You have a few options, and they each have their pros and cons.

Microsoft Word

A word document is perhaps the simplest option. The most obvious limitation of word documents is the inability to automatically update the guidelines. You would need to send the updated document out to all writers and editors as additions or changes are made.

Google Docs

If you like the idea of a simple document, then consider Google Docs. You will still have access to the basic content tools offered by a word document, but updates will be reflected live. You can also collaborate with members of your editorial team.

Sharepoint

Perhaps you want a more secure platform than Google. If that’s the case, then Sharepoint may be for you. Sharepoint is compatible with the Microsoft Suite, including Word. Using Sharepoint, you can upload an already existing Word document or create your own within the platform.

Just like Google Docs, your changes are reflected immediately and you can collaborate with as many team members as needed.

Confluence

If more robust collaboration is needed, especially when you’re just beginning to create your editorial style guide, you may prefer a platform like Confluence. This is a wiki-style platform that enables you to create your style guide with your team.

Resources to Create a Quality Editorial Style Guide

As you create your style guide, you’ll find yourself going down many rabbit holes. With this in mind, we’ve compiled a list of helpful resources to get you started on your research.

To familiarize yourself with institutional style guides, check out these resources on the AP, APA, MLA, and Chicago Manual of Style style guides.

Are you finding yourself needing some inspiration? Take a look at the style guides created by institutions like Princeton and Rutgers. Your favorite companies and brands may also have their style guides publicly available, including Mailchimp, Google, and Atlassian

Mailchimps Editorial Style Guide

Conclusion

An editorial style guide ensures there is no ambiguity in your requirements. When utilized correctly, this style guide will help you to maintain a high standard of quality for your site and consistency across your written content.

It can also clear up any confusion or questions from your team and contractors, to cut down on the back and forth questions.

What unique elements will you be sure to include in your editorial style guide?

The post How to Create an Editorial Style Guide appeared first on Neil Patel.
How to Create a Customer Journey Map (Even if You Have No Idea Who Your Customers Really Are)

Creating a customer journey map is enough to make even the best marketer freeze in their tracks and realize how little they really know about their prospects.

If this sounds like you, don’t worry.

Even if you’ve never created a buyer persona before, I’ll help you make sense of the process by giving you a sort of “map” to help you better understand who your customers are and what they want.

Let’s take a closer look.

Starting Fresh: The Basics of the Customer Journey Map 

A customer journey map is a diagram that illustrates each step in the buyer journey, including who the customer is, what their needs are, and what objections they face.

This map makes it easier for sales, marketing, and executives to make more informed decisions and humanize your audience.

The very first step in a customer journey map is the core demographic information about your customers, such as:

  • Gender
  • Age range
  • Job title
  • Job responsibilities
  • Salary
  • Region
  • Company size

You’ll likely find most of this data in your CRM. If not, a survey can give you a clear picture of who your audience is and what they do.

I also recommend “humanizing” the persona by giving them a name and image. This brings out more of our emotional, empathetic side, versus looking at the potential customer as a number to slot somewhere in a sales funnel like a puzzle piece.

Now that you have the basics let’s look at an example of a customer journey.

A Customer Journey Map Example 

For our example here, we’ve chosen to work with Lucy, a marketing director in her late 40s.

Her job primarily entails lead generation, sales management, and gathering competitive intelligence.

She organizes and prioritizes campaigns. She’s a pro at gathering competitive intelligence and uses it wisely to reinforce the brand while cementing customer loyalty in a very competitive marketplace.

Because of the huge growth in social media, Lucy’s looking to streamline the interaction process on social media without losing the “personability” of the brand.

She’s in the market for a solution and wants to make a confident decision quickly.

So with this in mind, our persona map is going to look something like this so far:

customer journey map

To stick with the map concept, this is our starting point. Next, it’s time to look at the journey.

Our first stop along the map is the buyer’s needs.

She has the basic research to know what’s out there. If we were looking at this from a traditional sales funnel point of view, she’s at the “comparison shopping” stage.

She’ll be looking to make a decision soon.

Understanding the Buyer’s Needs

Buyers are eager to tell you what they need. All you have to do is ask.

Basic lead follow-up and nurturing questions can reveal quite a bit. Simple polls and surveys can often reveal a great deal about where the buyer actually is in the process (and whether they have an urgent need for your product or service versus basic curiosity).

Even if we don’t know specifically what they need, we can make a few general statements that apply them to our persona.

What would someone in this job typically need from our solution?

For starters, the buyer likely needs the product to be well documented. She’ll be managing dozens, perhaps hundreds of staff members – some of whom (based on age) may be more technically savvy than she is.

Some of the staff may pick it up quickly; others may need more time.  We’ll add the needs and the persona’s place in the decision-making process (one persona can have multiple roles in the decision process — they can be a user and initiator, for example)

customer journey map example lucy

There’s also the fact that whatever solution needs to be adaptive and flexible to accommodate existing platforms and tools.

The company likely has certain procedures and requirements that will be added to the mix, like cloud-based access and specific security protocols.

These factors can influence and even conflict with what the primary buyer wants. The committee often makes decisions like these, which lengthens the time needed and the requested features.

Dealing with Common Objections in Customer Journey Maps 

Like all maps, there will be roadblocks that prevent your customer from taking action. You’ll want to outline those in your customer journey map.

There are constraints and concerns, frustrations, and issues that will affect their decision. You can brainstorm these obstacles and add them to your customer journey map to ensure that sales know how to address the most common objections before becoming major pain points.

You also have to decide where this buyer falls on the scale of decision-making.

Will they be using the product? Influencing the decision-maker? Initiating contact with the company? A mix of all of these?

Make a note of these objections and the buyer persona’s place in the decision-making cycle on your map.

Following our example, we end up with something like this:

customer journey map example

Here, we’ve managed to discover (and brainstorm) the buyer’s potential:

  • Needs
  • Concerns
  • Frustrations
  • Urgency/Timeframe to Buy
  • Place in the buying cycle
  • Requirements

All the kinds of sales-propelling information needed to acknowledge objections, concerns, and frustrations while concentrating on needs, requirements, and urgency.

We’ve learned core demographics about our buyer and key information that may be preventing them from taking action or details that could move a sale into the next stage.

Our customer journey map is less of a neatly-organized, bulleted list, and more like a mind-map that’s always being adjusted and revised. It may not be as tidy, but our customer journey map is closer to the actual customer experience — and therefore far more useful.

Think about the last time your company made a major purchase. It’s seldom a “beginning to end” one-time shot, right?

There are many details to hammer out, presentations to sit through, and suggestions and sign-offs to gather.

It’s a big process, and a fancy list of bullets just doesn’t cut it anymore – not in today’s two-way communication world.

Create a Customer Journey Map for Each Type of Customer 

Now, you need to go through this entire process with every type of buyer your company encounters. Each type of customer will have a different buyer path, objections, and challenges.

For example, if retail, you’ve got suppliers, wholesalers, resellers, and a whole avalanche of personas out there. Each buyer you have must be addressed individually.

Conclusion 

Don’t panic, prioritize. Focus on your most profitable customers first and find the unifying threads that tie them together, then build on that persona. Once you have those down, start working down the list until you have all your customer journies mapped.

And remember that buyers are multi-faceted human beings.

Sometimes they make decisions that go against the grain of even the most well-developed persona. It happens.

Remember, the journey is just as important as the destination, and the easier you make that journey, the more receptive the buyer will be to taking the action you want them to take.

Are you planning to create a customer journey map? What is holding you back? 

The post How to Create a Customer Journey Map (Even if You Have No Idea Who Your Customers Really Are) appeared first on Neil Patel.

Welcome (YC W20) is hiring engineers to create jaw-dropping experiences

Article URL: https://jobs.lever.co/welcome?location=U.S.%20Remote&team=Engineering

Comments URL: https://news.ycombinator.com/item?id=24941312

Points: 1

# Comments: 0

The post Welcome (YC W20) is hiring engineers to create jaw-dropping experiences appeared first on ROI Credit Builders.

The post Welcome (YC W20) is hiring engineers to create jaw-dropping experiences appeared first on Get Funding For Your Business And Ventures.

The post Welcome (YC W20) is hiring engineers to create jaw-dropping experiences appeared first on Buy It At A Bargain – Deals And Reviews.

How to Create Your First Website Like a Pro

Disclosure: This content is reader-supported, which means if you click on some of our links that we may earn a commission.

You’ve decided to create your first website—great! I’m going to teach you to set up your site like you’ve done this thousands of times before.

What You Should Know About Starting a Website

In order to get your website online, you will need a domain name and a web host

  • A domain name is where people access your website. For QuickSprout, that would be www.quicksprout.com (also called a URL, the technical component of a domain name).
  • A web host is a business that you pay to provide storage for all of your crucial website data.

Bluehost allows you to buy and register both a domain name and hosting plan. 

What If I Want a Free Website?

You can start for free at WordPress.com.

To use the free plan, you will not need to register a domain name or choose a web hosting provider since your website will automatically be generated as a sub-domain of WordPress.com. For example, if you wanted to start a blog about vintage teacups, your URL could be www.vintageteacups.wordpress.com.

If you’re in this for the long haul, keep in mind that your audience will be much more likely to trust your brand if you own your domain name (i.e. www.vintageteacups.com). Investing in domain registration and hosting is the first step towards growing an independent business.

A Step-by-Step Guide to Creating Your First Website

Ready to get started? These 8 steps will walk you seamlessly through the process from sign-up to beginner content building so you won’t have to worry you’ve left anything out.

Step 1: Consider your website goals 

Do you intend your website to be a portfolio of your work? A niche blog? An eCommerce site? You can do all of this and more via WordPress, which opens up the world wide web of possibility with its full-powered CMS.

How do you want to be known by your audience? That’s your business name. 

And how do you want them to reach you? That’s your domain name. 

Since your domain name will be a major face of your business, you’ll want to put some good thought into it. 

A strong domain name serves your business goals by referencing your product or service. It should be catchy, memorable, and easy to type. Try for shorter rather than longer names where possible.

How can you come up with the right name?

Let’s take the two businesses we’re working with in this guide as an example. 

WordPress is short, iconic, and evokes images of text (“word”) and potentially a printing press (“press”). It’s clear that their business model is based on sharing content. 

Similarly, Bluehost includes the word “host,” suggesting they are a web host provider. The combination of “blue” and “host” is simple and catchy. 

Both names are highly brandable and easy to remember.

Step 2: Choose your Bluehost plan

The benefit of hosting on Bluehost rather than just WordPress.com is that Bluehost takes care of your site’s security, speed, performance, and updates for you.

We recommend shared WordPress hosting, which gives you access to a server specifically attuned to the WordPress software package. This means that safety, security, and speed are all built in—put another way, managed for you. 

To choose a plan, go to Bluehost’s pricing page. You’ll see this:

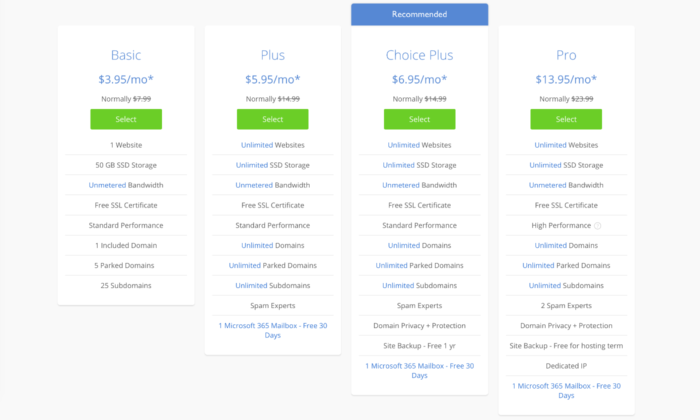
Bluehost offers four hosting plans: Basic, Plus, Choice Plus, and Pro. At every tier, the plans include a free SSL certificate (adding an extra layer of security to your site), unlimited bandwidth, and plenty of storage. For most sites, the performance of the hosting will be more than good enough. 

Select the plan and that’s right for your budget. You can always upgrade later.

Step 3: Register your domain name

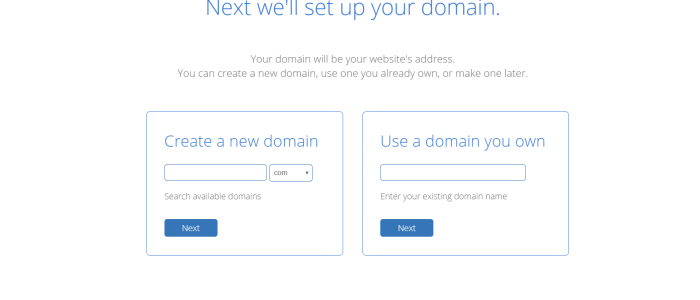
After selecting a plan, you’ll be prompted to register your domain name. 

If you already own a domain name, enter it on the right. You may need to change your DNS records to make sure your domain name servers point to Bluehost, allowing people to access your website. 

If you are registering your domain name with Bluehost, enter it on the left. Domain registration is free for one year with a managed WordPress hosting account. Always be sure to note when your domain must be renewed so it doesn’t expire without your notice, leaving your website inaccessible. 

You’ll be asked to fill in personal information before finalizing your purchase. 

Be sure to choose a strong password for your Bluehost account (preferably not the same one you use to log into any other site). You’ll then be ready to install WordPress.

Step 4: Install WordPress with one click

Connecting Bluehost with WordPress is incredibly easy. In your Bluehost account control panel, navigate to “MOJO Marketplace” and choose “One-Click Installs.” 

This will bring you to the Scripts and Platforms page. After you click the WordPress icon—found under “Blogs” at the top of the page—an installation window will open. Click “Start” to begin installation.

  • Choose the domain name on your account where you want to install.
  • In “Check Domain,” you’ll make sure your domain name is pointing to your account. This is especially important if you bought your domain name before signing up for Bluehost. If you get a warning that you are overwriting files, you can check the box without worry—since this is your first website, there’s nothing to overwrite. 
  • In “Show Advanced Options,” you can choose your WordPress username along with a strong password—or log in if you already have a WordPress account. Check “Automatically create a new database for this installation.” 
  • Read the terms and conditions and check the box.
  • Almost there! Click “Install Now.”

You’ll now be taken to the progress page. After installation is complete, you will see your site URL, admin login URL, your username and password. Print and store this master list in a safe place.

Time to log in to WordPress! Log in at your admin URL and you’ll find yourself at the Dashboard, where you can begin on the visual design for your site.

Step 5: Try on some themes for size

Also called “skins,” your site theme is like an outfit for your website. The theme you choose will affect your site visuals, content layout, and some of the customizable design features you have access to. 

WordPress has a number of both free and premium (paid) themes.

When choosing a theme, pay special attention to:

  • Good design: Is the design clean and organized? Is it responsive to optimize for the roughly 50% of people who prefer mobile viewing? How easy is it to navigate?
  • Compatibility: Is the theme compatible with the latest version of WordPress and with popular plugins?
  • Back-end: Is there active development on the design? How easy is it to access support and documentation? 

Most themes allow you to try a Live Demo so you can see how it will look and compare its appearance to your design and content goals for the site.

When you’re ready, click “Activate theme” to install. You can always add plugins for additional functionalities or switch themes when you are better accustomed to WordPress.

Step 6: Add some helpful plugins

If your website theme is like a “skin” or outfit that gives the website substance, design, and form, your plugins are the accessories that pull the outfit together. 

Plugins work alongside your theme to provide desirable functionalities, like a comment filter, contact form, or search engine optimization (SEO) toolbox, and are built to work seamlessly with WordPress’s back-end operations. While some are best-suited to a particular type of site, like eCommerce or blog, many are all-purpose. Plugins can be free or paid.

In most cases, you will need a WordPress Business plan or higher to use plugins. Aspects of Jetpack and Akismet (see below) are included with your blog.

Popular plugins:

  • Jetpack: This integral plugin enhances your site security, performance, marketing, and design capacity. Site speed, image serving, and SEO are just a few things it can help you with. 
  • Akismet:  A “spam-fighting service” that protects your posts, trackbacks, and messages from spam.
  • All-in-One SEO pack or Yoast SEO: These SEO plugins help you optimize your site to be found organically in search results when people search for similar products, services, or content.
  • WP Forms or Ninja Forms: You can use either of these plugins to build professional contact forms within minutes, without any coding experience required. 

Be sure to vet your plugins before installing: A large number of positive user reviews alongside information about the developer, functionalities, and latest release date can all help you make the best decisions for your site. 

Step 7: Begin building your site content

On WordPress, there are two meaningful distinctions when it comes to organizing your site content, pages and posts.

  • Pages make up the main framework of your website, and generally appear in the navigation bar for easy access. There are a number of essential pages you’ll want to add, including your Homepage, About page, and Contact page.
  • Posts are individual pieces of content, each with a unique URL, that make up a blog. Many people choose to make their blog a central focus of their website, but you don’t have to. Many businesses keep blogs as a tool in their content marketing toolbox, and WordPress makes it possible to designate as a secondary page (see Step 8).

When you start adding content to your website, it may be helpful to get inspiration from existing websites, both those where you spend a lot of time and sites that have a similar function to yours. Ask yourself:

  • How is the content of these websites organized? 
  • What are the major pages? 
  • How prominent is the blog? 
  • Does the site include subpages, and what are they? 
  • Where is the contact form located? 
  • How do they use media to create an engaging experience?

Here’s how to create your first page (ideally, the homepage):

After creating the essential pages, consider your website’s functionality from the point of view of your future site visitors. Although it may be tough in the beginning to put yourself in their shoes, successful site content is laser-focused on the audience. Ask yourself: 

  • What will my visitors want to do on my site? What will be less useful to them?
  • How can I structure my pages, content, and media to create a positive User Experience (UX)?
  • How can I set up site navigation so that important information and features are easy to find?
  • What information do my visitors need to understand my offering?
  • What information do my visitors need to trust me? 

Don’t feel pressure to include all possible content at once; less is often more for a new website. Your site will likely change over time based on your evolving business model as well as the needs of your audience. You can always add more content as you go. 

Additional pages

On the one hand, the beauty of website creation is that your site design is completely up to you. Depending on the purpose of your website, however, you may be required by law to include certain content, like:

  • Contact details
  • Cookie handling
  • eCommerce: terms of service, refund policy, privacy policy

Be sure to check the relevant law in your area and update your website regularly.

Step 8: Finalize your homepage and navigation

Do you want your homepage to appear as a traditional homepage or a blog?

WordPress allows you to choose whether you want a static (unchanging) or dynamic homepage (shows your ten latest blogs). The dynamic version is the default.

To designate a static homepage, find the “Site” category in the left-hand sidebar and click “Pages,” then “Add new page.” You can choose a premade layout or click “Use Blank Layout,” as in the photo just above. Then name your page and click “Publish.” For example:

Now, navigate to the “Design” category in the left-hand sidebar of your Dashboard and click “Customize.” 

There are many things for you to play around with here, including adding your Site Title, Tagline, and Icon, adding a header or footer, and changing the site colors. For now, click on “Homepage Settings” and toggle the option for “A static page.” Beneath, you can choose the page you just created.

It’s time to start adding content to your homepage!

Once you add more pages, like About or Contact, they will show up as part of a navigation bar that is designated by your theme. In “Customize,” click on “Menus” to change the page order and location. 

What’s Next?

You’ve just created your first website. Congratulations on this exciting new step!

Now you can start familiarizing yourself with the WordPress interface. While creating Pages and Posts, you’ll be using the Block Editor, which uses Gutenberg blocks to help you add content and make your site engaging and interactive.

Since your website is a representation of your brand, I recommend building your content with a critical eye. At the same time, learning as you go is part of the experience. You can always delete or click the back button—no change is permanent, so feel free to play around.

The post How to Create Your First Website Like a Pro appeared first on Neil Patel.

How To Create A Marketing Calendar That Will Streamline Your Campaigns

If you’ve ever led a marketing team, you know it’s easy to get overwhelmed by tasks and plans. Numerous blog posts, social media marketing campaigns, and emails crowd your pipeline. But distractions and urgent issues get in the way, and when you check the clock, several hours have passed. It happens all the time: you miss …

The post How To Create A Marketing Calendar That Will Streamline Your Campaigns first appeared on Online Web Store Site.