How to Create Unique Gift Guides for E-Commerce Content

Whether it’s for a loved one or a colleague at work, getting a gift for someone is never easy. 

One reason is there are billions of options to choose from. The other reason is most people don’t have the time to look through millions of catalogs to pick one.

That’s why if you run an e-commerce store, you should make it easy for your customers to select one of your products as a gift.

To do that, you must equip your customers with a gift guide to help make the selection process easier.

Why Should You Create Gift Guides for Your E-Commerce Site?

Besides making it easier for your customers to decide which of your products to buy as a gift, gift guides serve many other purposes. Here are a few more reasons why you should create a gift guide for your e-commerce site:

Gift Guides Boost Brand Awareness

One of the most significant reasons to create a gift guide is to help boost brand awareness. Particularly during holiday seasons, holiday gift guides are a popular form of content. Because they’re helpful in inspiring purchases, consumers are likely to share them with their networks. As a result, you’ll enjoy a boost in brand awareness.

Gift Guides Can Increase Sales

Every business-related activity you undertake must ultimately have an impact on your bottom line. That’s exactly why you must invest in a gift guide for your e-commerce store. A well-designed gift guide is an effective tool in helping you increase sales on your e-commerce store.

Gift Guides Provide Blog and Social Media Content

Another reason to invest in creating a gift guide for your e-commerce site is gift guides provide you with engaging content for your blog. They also make for excellent social media posts. As a result, you’ll be able to maintain high engagement rates with your target audience.

Gift guides are also able to help you achieve many of your marketing and sales goals.

How to Create Unique Gift Guides for Your E-Commerce Business

Now that you know what a gift guide is and why having one on your e-commerce is essential let’s dive into how you can create one.

1. Identify Your Audience

Audience research is one of the most critical steps in creating a gift guide. That’s because knowing your audience is key to developing accurate buyer personas.
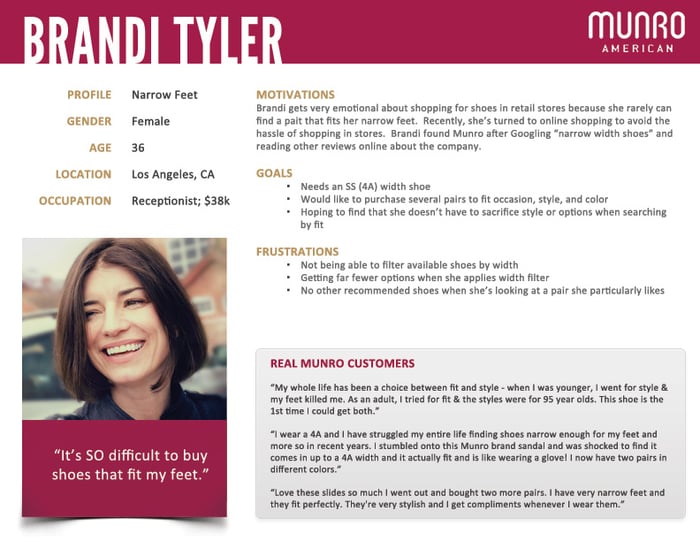
Audience research plays a critical role in developing effective gift guides.

For your gift guide to be appealing, you must understand your target audience enough to create personalized recommendations.

Here are a few tips:

Collect Demographic Data

Demographic data refers to your target audience’s physical attributes. Examples include:

  • age
  • gender
  • marital status
  • occupation
  • geographic location

Understand Your Audience’s Psychographic Data

Psychographic data is information about your target audience’s:

  • values
  • attitudes
  • interests
  • personality traits
  • beliefs

Both demographic and psychographic data are essential to understanding your customers’ needs, pain points, and aspirations. As a result, you can tailor a gift guide that will be relevant by offering personalized product recommendations.

2. Choose Items to Include in Your Gift Guides

Once you understand your audience, the next step of creating your gift guide becomes easier: choosing the products to include in your gift guide.

Though you may be armed with rich customer data, choosing the right products to include in your gift guide can be a daunting task. A few tips to guide you in choosing unique gift ideas include:

Look at Your Sales Data

The most effective way to choose items is to look at your sales data. Your data will give you insight into:

  • buying trends and habits
  • popular products
  • unique segments

Besides your own sales data, you can also leverage tools like Google Trends to identify emerging opportunities in your niche.

Ask Your Customers

Another effective way of figuring out what to include in your gift guide is to ask your customers. The best way to do this is to leverage interactive content like surveys, polls, and quizzes. These will give you insight into your audience’s preferences. To leverage interactive content, you can invest in an interactive content tool. Alternatively, you can create polls on your favorite social media channels.

Consider Creating Gift Bundles

Not sure what to include and exclude in your gift guide?

Then consider creating gift bundles.

Gift bundles are an excellent way of showcasing your product range. For your bundles to be effective, you must get the right mix. Tips for getting the right mix include bundling:

  • complementary products from your product range
  • products you’ve succeeded in cross-selling
  • fast-selling products with slow movers

You can also consider collaborating with other brands that target a similar audience to yours but don’t sell the same products you do.

Consult Your Suppliers

Your suppliers are another avenue you can leverage to know which products to include in your gift guide. Ask them which products are moving fast in their inventory or those they anticipate to be buzzworthy.

The success of your gift guide lies in knowing which products are relevant to the season. Invest time in ensuring the products you include will resonate with your target audience.

3. Craft Headlines for Your Gift Guides That Evoke Emotions and Inspire Action

Like all other types of content, your gift guide depends on a powerful headline for success. Take your time to craft one that:

Evokes the Readers Emotions

Gift buying is usually an emotion-driven endeavor. When your customers shop around for a gift, they do so (in most cases) for someone they have an emotional connection with. Hence, they want a gift that will have an emotional impact.

That’s why your gift guide headline must evoke your target audience’s emotions.

To craft such a headline, use personalization. Speak directly to your customer by using the word “you.” You can also create emotion-evoking headlines by using words that trigger an emotional response in your readers.

Inspires Readers to Take Action

Your gift guide headline must also inspire readers to take action, preferably purchasing one of your products. To do this:

  • use active voice and avoid passive voice
  • use power words
  • paint a picture of the benefits of reading your gift guide

A well-written headline is essential to hooking your target audience and getting them to browse for the perfect gift for their loved one or colleague.

4. Find Quality Product Images

Once your customers click through into your gift guide, you must immediately grab their attention. The best way to do that is to use high-quality product images. Here’s an excellent example from Brightland’s gift guide:

Gift Guides - Find Quality Product Images

Besides attention-grabbing, images also help:

  • Give instant information: Human beings are visual creatures and process images faster than text.
  • Make your gift guide easy to scan: Images are an excellent way of helping your readers scan your gift guide.
  • Images encourage sharing: People love sharing helpful stuff they find on the internet. Those who love your gift guide are more likely to share it if you use high-quality images.

Getting the images to use in your gift guide is quite easy. Your first port of call would be to get your manufacturer’s product images. However, a better option would be to hire a professional photographer and take your own images. Doing so allows you to place your products in a setting of your choice, resulting in personalized images.

5. Determine the Format of Your Gift Guides

Gift guides come in all shapes, sizes, and styles. As you plan on creating your own, you must determine which is the best format for your guide. Examples of the gift guide formats include:

  • blog post
  • slideshow
  • infographic
  • video
  • social media post (like Instagram posts)

How do you know which content format to use?

There are a couple of factors you can use to guide you on the best format for your gift guide:

Your Audience

When deciding which content format to use, the first port of call must always be your audience. Check your blog and social media analytics to see which content types perform well with your audience.

The Platforms You’ll Market Your Gift Guide On

The platforms you use to market your gift guide are another factor determining the format of your guides.

Your Niche

Finally, another essential factor that impacts the format you should use for your gift guide is your niche. If you’re in a visual niche, your gift guide may not need as much text as one in a niche where info plays a bigger role in driving conversions.

6. Market Your Gift Guides

With your gift guide ready, it’s time to show it to the world.

How do you get eyeballs on your gift guide?

Here are a few tips to help you market your gift guide to the right audience.

Share It on Social Media

One of the best marketing channels for your gift guide is social media.
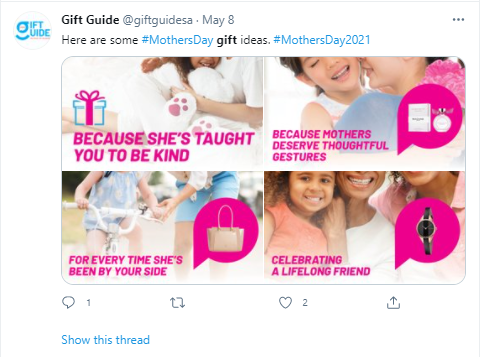
Market your gift guides on social media to get it in front of more people.

With over 3.6 billion monthly active users, social media gives you access to over half of the world’s population.

That’s not the best part.

Particularly when you run paid ads, you can hyper-target your campaigns to reach people who match your ideal customer profile (ICP).

Send It to Your Email List

Another excellent marketing channel for your gift guide is email. Although it’s one of the oldest and most basic digital marketing channels, email is still one of the best when it comes to marketing your gift guide.

One of the best advantages of email marketing is most of the people on your list are already interested in what you have to offer. The chances of them knowing other people interested in being gifted with your product are also high.

Another advantage of email is you can segment your email list, enabling you to create personalized messaging. You can also consider making a personalized gift guide for each segment, increasing the chances of conversion.

Leverage SEO

Search engine optimization (SEO) is still applicable to marketing your gift guide. While basic, it’s easy to forget to implement best practices like:

  • keyword research
  • adding tags to your images
  • strategic linking
  • focusing on user experience (UX)

Make it easy for your customers to find your gift guide when they’re looking for gift ideas. Having an effective SEO strategy is exactly what you need to do that.

Creating your gift guide is only half the battle. Getting it in front of the right people’s eyes is the other half. With your well-designed gift guide and these three gift guide marketing tips, chances of your gift guide succeeding in driving sales.

FAQ: Gift Guides Best Practices

Shopping for gifts is never easy. It becomes a more difficult task if you have a long recipient list. That’s why your customers appreciate a helpful gift guide. While we’ve covered how you can create a unique gift guide for your e-commerce site, you probably have a few questions regarding gift guide best practices. Let’s quickly answer a few before we wrap up.

Do Gift Guides Really Help Boost Sales?

There are two main reasons gift guides work so well. The first is people don’t have time for gift shopping—yet they have to. The second is there are just too many products to choose from. Gift guides solve both problems by helping your customers find and decide on what to gift their friends and loved ones.

How Do I Improve the Chances of My Gift Guide Converting?

One word: data.

Before getting started with your gift guide, you must gather all the data you can about your target audience and market. Scour your sales records, and use competitor analysis tools and any other data collection tool you can get your hands on. Use these to mine every piece of data that will help inform the design and creation of your gift guide. Doing it this way will ensure you create a hyper-targeted gift guide.

Conclusion

Creating a gift guide is a must if you run an e-commerce business. They don’t just boost your sales during holiday seasons; gift guides also help raise your brand awareness.

Gift guides are the perfect marketing tool as they attract high-intent shoppers.

That’s why you must include them in your marketing strategy. However, for them to work, you must ensure yours is unique and well-crafted. Use the tips above to create your first (or next) gift guide for the next holiday season.

Have you ever used gift guides to boost sales on your e-commerce store?

How to Create the Most Effective Facebook Business Page

With 1.82 billion daily active users, Facebook is one of the most powerful social media outlets in the world. 

Seventeen percent of Facebook users say following brands or businesses is their main reason for using the app, and 78 percent of Americans say they’ve discovered products on Facebook.

Facebook offers businesses new ways to connect with their audience, promote and sell products, and improve online visibility for their brand. The addition of shopping features such as Facebook Marketplace can also be leveraged by businesses to improve online conversions.

With over 140 million business accounts on Facebook, you may think competition is high. However, the right tactics and execution can help you create a Facebook Business Page that drives new revenue for your business.

Let’s review how to create Facebook business pages that increase your engagement, clicks, and revenue.

What Is a Facebook Business Page?
A Facebook Business Page is a stand-alone page that allows you to promote your business on one of the world’s biggest social platforms.

Facebook Business Pages are different from personal pages because they represent a business or brand, rather than an individual. This means the content on your Facebook Business Page needs to be brand-focused and professional.

A Facebook Business Page will let you share content, respond to customers, have conversations with your followers, and promote products within your feed.

You can also invite other people to manage your Facebook Business Page including any partners or outside agencies you may be working with.

Facebook Business Pages can also run paid Facebook ads to further promote your brand and products.

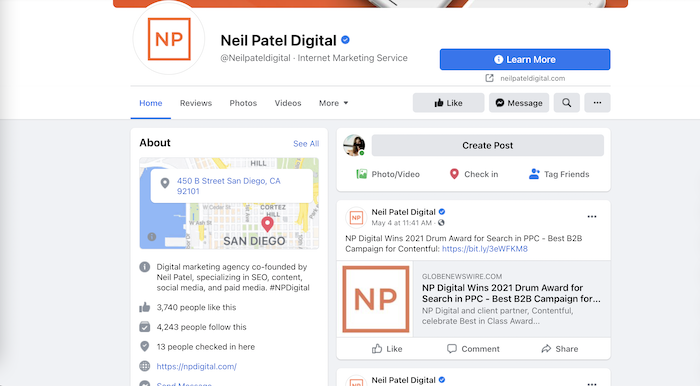
Here is a peek at our Facebook Business Page.

create a facebook business page - neil patel business page example

As you can see, it includes features a personal page doesn’t have, such as a “learn more” button, map, and a Like button.

Why Should You Create a Facebook Business Page?

When you create a Facebook Business Page you are helping people find your business and learn more about what you offer.

Your business page also helps you build an online community and better service your customers. Once you’re set up, your followers can interact with you and ask questions about your products and services in real-time, which is a great way to improve your brand integrity.

Once you create a Facebook Business Page, you’ll be able to get started with Facebook Advertising, which can help you reach 2.14 billion potential customers.

Facebook business tools such as Page Insights and analytics can help you better understand your audience needs and create better customer experiences.

You can also create events, book appointments, hire staff, and sell products directly through your Facebook Business Page.

Facebook Business Pages are free to set up, meaning there is no upfront investment to get your business listed.

With 74 percent of Facebook users visiting the site at least once daily and spending an average of 38 minutes per day, creating a Facebook Business Page can be a great way to improve your organic reach online.

Steps to Create a Great Facebook Business Page

To create a great Facebook Business Page, you need to analyze everything, from your profile picture and cover photos to Facebook ads, target audience, and media planning (types of posts and when it’s time to post).

Here is a six-step guide to creating your Facebook Business Page.

1. Login or Sign-up to Facebook

First, you need to log in or join Facebook. You can create your Facebook page from your personal page if you prefer, or you can create an entirely new account for your Facebook business page.

Once you’re logged in, go to facebook.com/pages/create.

Select the type of page you want to create, either a business/brand or community/public figure, and then click Get Started.

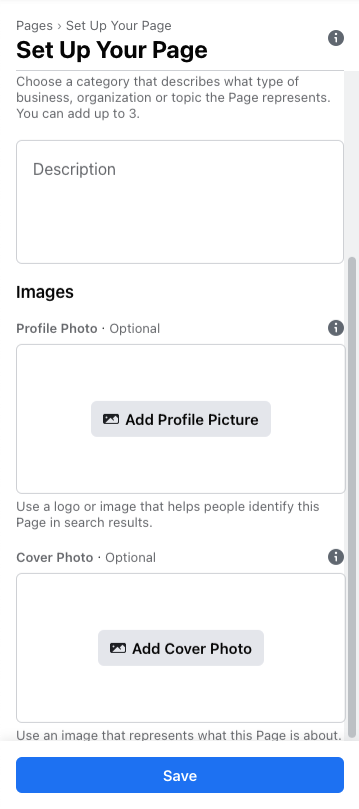
Here, you’ll be asked to supply some basic information.

The basic information you can add includes:

  • Page name: Which should be your business or brand name.
  • Business category: One or two words to describe your business. Facebook will give you options once you start typing. If your business falls under more than one category, try to pick the one your customers will associate with your business.
  • Description: A brief description of what you do, services you offer, and the purpose of your Facebook Business Page.

From there, click Continue. Moving forward indicates you have accepted Facebook’s Pages, Groups and Events Policies so familiarize yourself with these if you haven’t already.

2. Upload Cover Photo and Profile Picture

Your cover photo and profile picture are the main visual assets of your Facebook Business Page.

Many businesses use their logo for their profile picture, but you can choose any photo that represents your business and branding.

When choosing a profile picture, be sure to adhere to Facebook’s sizing guidelines to ensure your photo does not get cropped.

You’ll also want to add a cover photo when you create your Facebook Business Page. Your cover photo should be visually exciting and representative of your business and branding. Refer to the sizing guidelines for cover photo sizing.

Once you complete this step, your page will be automatically published.

How to Create a Facebook Business Page

3. Enter Your Business Information

Now that you have the skeleton of your page setup, it’s time to start adding content.

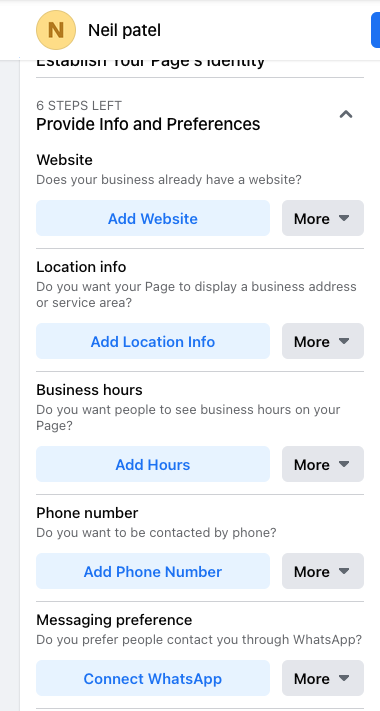
Your Facebook Business Page contains basic information about your business that you’ll need to fill in. This includes:

  • Description (About): Your About description should be designed to drive leads. Keep it short and use four to five sentences about your business that engage audiences as soon as they hit your page.
  • Contact: Share how your followers can contact your business if they have questions or concerns. This can include your phone number or email.
  • Location: Where you are located. If you don’t have a physical storefront, you can simply input your city and state.
  • Hours of operation: The hours you are open for business or available for customer communications.
  • Username: This is a unique username used in your Facebook interactions. This should be @ followed by your business name. Don’t get too creative here or it can make it difficult for your customers to find your business.
How to Create a Facebook Business Page - Enter Your Business Information

4. Add a CTA Button to Your Page

Now that you have all of your general business information set up, it’s time to build your conversion funnels.

A CTA button is featured at the top right-hand of every Facebook Business Page, just below the cover photo.

It’s important to choose a relevant CTA to ensure you are directing your audience to the most pertinent actions.

For example, if you are a physiotherapy clinic looking to book more clients, your CTA button may say Book Now.

If you are an e-commerce business looking to sell products, then you may want to choose a CTA button that says Shop Now.

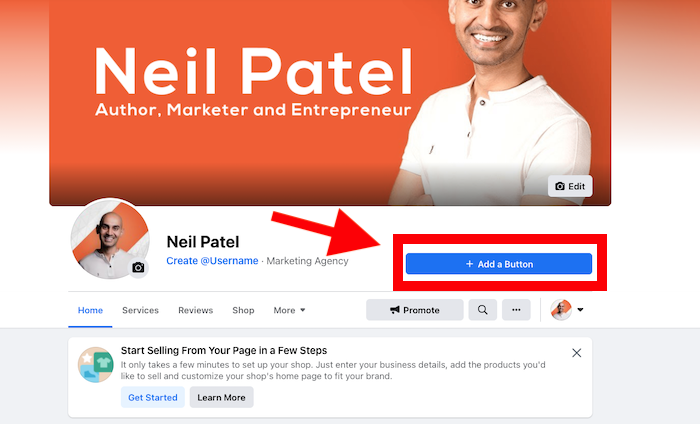
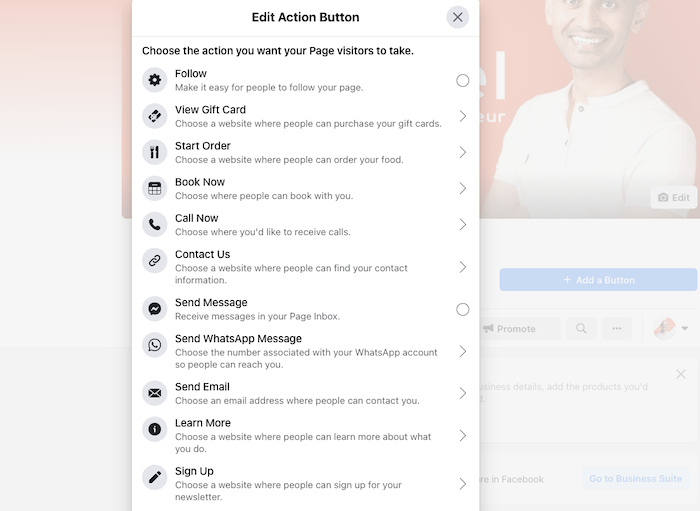
To edit your CTA button, click “+ Add a Button.”

How to Create a Facebook Business Page - Add a CTA Button to Your Page

From there, Facebook will give you a list of actions that your CTA could encourage. These include Start an Order, Book Now, Contact Us, and more. Choose your action and follow the steps given to complete your CTA button.

How to Create a Facebook Business Page - Choose CTA Button

If you don’t choose a custom CTA here, Facebook will automatically create a Contact Us button for your page.

5. Publish Your First Post

Before you invite people to your Facebook Business Page, you should make a post so there is content for them to view.

Your first post can be a welcome post that explains who you are and what you do, or it can be something aimed at user-generated content (UGC) to get visitors engaged with your Facebook Business Page right away.

For example, a contest or giveaway can be a great way to drive immediate traffic. You can also promote sales or discounts to encourage your audience to browse and purchase your products.

Whatever you post, be sure to get creative and focus on maximizing audience engagement.

6. Invite Your Audience

Your Facebook Business Page is now ready to get traffic, so you can start inviting your audience to follow your page.

If you used your personal Facebook account to set up your page, you will be prompted to invite your Facebook friends. This group is usually a good base for your Facebook Business Page, so invite as many of your personal friends as you feel appropriate.

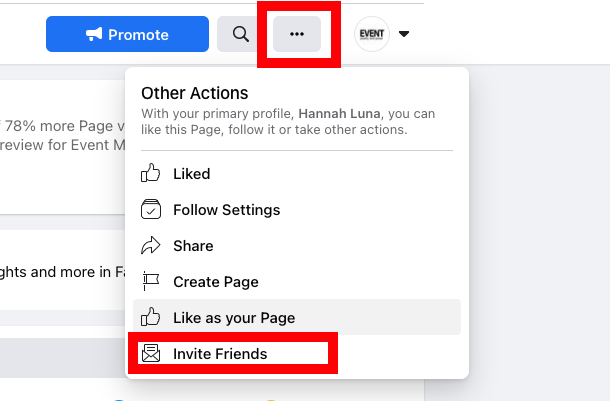
You can invite followers by clicking on the three dots “…” below your CTA button and clicking Invite Friends.

How to Create a Facebook Business Page - Invite Your Audience

You can also use other channels to drive traffic to your Facebook Business page, such as your website, social media accounts, email marketing, and paid advertising campaigns.

How to Track the Success of Your FB Business Page

Now that you’ve created your Facebook Business Page, you’ll want to know how it performs and continuously optimize it to get better results.

There are many ways to track the success of your Facebook Business Page. Here are a few metrics you can track with Facebook Insights.

  1. Engagement: Facebook uses an algorithm to show posts in your followers’ News Feeds. Posts that have higher engagement are seen as more popular and relevant, so they are more likely to show up. This means you want more likes, comments, and engagements on your posts to increase your reach. Pay attention to posts that perform well and find ways to mimic that engagement to ensure your Facebook Business Page is successful.
  2. Reach: Reach refers to the number of people who see your content on Facebook. To see this, click on the Reach tab on your Facebook Insights page. Track and analyze your Reach regularly to learn what your audience likes and doesn’t like to better inform your post decisions.
  3. Impressions: Impressions measure the number of times your post was seen, even if it was seen multiple times by a single user. You can find this in Facebook Insights by switching Reach to Impressions. Impressions can show you how viral your posts are and how likely they are to continuously impact your customers. Remember, it often takes a customer hearing about your brand seven times before they’ll convert to a customer.
  4. Page likes and follows: Page Likes refer to the number of people that follow your Facebook Business Page. You can see this number on your Business Page homepage or through Facebook Insights under the Likes tab. While Page Likes are often considered a vanity metric, they are important to track the growth of your audience. If you find your page is plateauing and your Likes are not growing, it may be time to reevaluate your digital marketing strategy.

How to Create a Facebook Business Page

Summary of How to Create a Facebook Business Page

  1. Log in or sign-up to Facebook

    You can use a personal account or set up a new one for your business.

  2. Upload a cover photo and profile picture

    These should represent your branding and adhere to Facebook’s sizing guidelines.

  3. Enter your business information

    This includes opening hours, contact information, location, your About section, and more.

  4. Add a CTA button to your page

    Use a CTA to drive the most conversions for your business.

  5. Publish your first post

    This should be engaging and immediately draw users into your business.

  6. Invite your audience

    Start with your personal friends’ list and then use your other digital channels to grow your audience.

Conclusion

Creating a Facebook Business Page is a great way to improve your revenue and grow your business online.

Once you’ve got everything set up, consider Facebook advertising campaigns alongside your organic content to boost audience engagement.

From there, it’s all about nurturing your audience, delivering relevant, engaging content, and staying true to your brand.

How have you found success when growing your Facebook Business Page?

How to Create Your Personal Brand’s Visual Identity

Visual branding is the most effective way to create a powerful online presence. If you don’t believe me, check out this article on why visuals are important in marketing: When half of the human brain … The post How to Create Your Personal Brand’s Visual Identity appeared first on Paper.li blog.

The post How to Create Your Personal Brand’s Visual Identity first appeared on Online Web Store Site.

How to Create The Perfect Call-to-Action

Sign up. Buy now. Learn more. None of these common call-to-action triggers will probably get you the desired result, because your target audience is more knowledgeable than ever before. If you want to learn how to write the perfect call-to-action that’ll captivate your target audience, educate them and increase your conversions, this in-depth article was written with …

The post How to Create The Perfect Call-to-Action first appeared on Online Web Store Site.

Marketing Funnel: What They Are, Why They Matter, and How to Create One

If you’ve spent any time learning about marketing analytics, you’ve probably come across the term “funnels.” What exactly are marketing funnels and why do they matter? Marketing funnels are a useful tool to help you visualize the path customers take from first finding out about your brand to converting. Understanding them provides useful insight into …

The post Marketing Funnel: What They Are, Why They Matter, and How to Create One first appeared on Online Web Store Site.

Marketing Funnel: What They Are, Why They Matter, and How to Create One

What is a marketing funnel and why does it matter

If you’ve spent any time learning about marketing analytics, you’ve probably come across the term “funnels.” What exactly are marketing funnels and why do they matter?

Marketing funnels are a useful tool to help you visualize the path customers take from first finding out about your brand to converting. Understanding them provides useful insight into why some customers convert — and some don’t.

What Are Marketing Funnels?

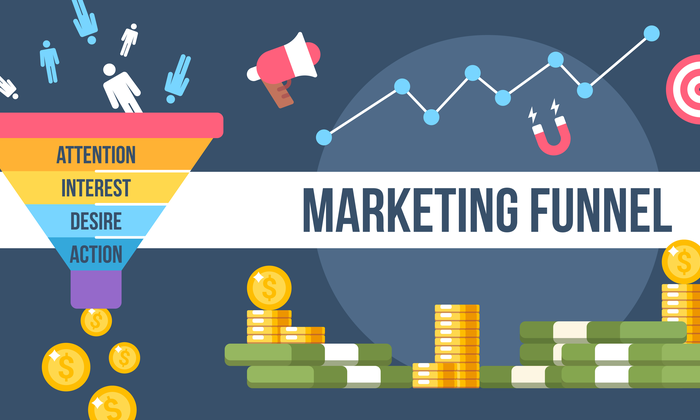
A marketing funnel is a visual representation of the steps a visitor takes from first finding out about your brand until they convert. The most common type of marketing funnel is four steps:

  1. Attention: A prospective customer sees your ad, social media post, or hear about you from a friend.
  2. Interest: They think you can solve a problem and wants to learn more.
  3. Desire: The prospect has done their research and wants to convert.
  4. Action: The prospect takes action — they buy your item, schedule a demo, or take whatever other action you want them to take.

The action can vary based on customer and industry — maybe you want them to make a purchase, sign up, or fill out a form. When someone does something you want them to do, it’s known as a conversion. The visitor converts from browsing to taking the action you want them to take.

Think about the Amazon purchase funnel. There are several steps a visitor has to go through before they can purchase a product. Here’s how it looks:

  • They visit Amazon.com
  • They view a product
  • They decide to add a product to the cart
  • They complete the purchase

There are additional steps/actions that can be taken in between each of these steps, but they don’t matter in the marketing funnel unless they contribute to the final action. For example, a visitor may view Amazon’s Careers page, but we don’t need to count these in the funnel because they aren’t necessary steps.

Why is the set of steps to conversion called a “funnel”? Because at the beginning of the process, there are a lot of people who take the first step.

As the people continue along and take the next steps, some of them drop out, and the size of the crowd thins or narrows. (Even further along in the process, your sales team gets involved to help close the deal.)

Losing customers might sound like a bad thing — but it’s not. The truth is, not everyone in your funnel will convert. The top of the funnel is where everyone goes in (visiting your site or viewing a marketing campaign). Only the most interested buyers will move further down your funnel.

So when you hear people say “widen the funnel,” you now know what they are referring to.

They want to cast a larger net by advertising to new audiences, increasing their brand awareness, or adding inbound marketing to drive more people to their site, thus widening their funnel. The more people there are in a funnel, the wider it is.

What Are the Different Types of Funnels?

In this article, we’re focusing on marketing funnels, that is funnels that start with some sort of marketing campaign. That might be a PPC ad, content marketing campaign, white paper download, video ad, social media ad, or even an IRL ad. The point is the first step in the funnel is a marketing campaign of some sort.

Other types of funnels you might hear about include:

  • Sales funnels
  • Webinar funnels
  • Email funnels
  • Video marketing funnels
  • Lead magnet funnels
  • Home page funnels

Despite the different names, these all track the same exact thing — the steps a prospective customer takes to conversion. (Sometimes they are even called conversion funnels!)

What Can You Use a Marketing Funnel For?

You aren’t limited to using a marketing funnel strictly for signing up and/or purchasing. You can put funnels all over your website to see how visitors move through a specific website flow.

You may want to track newsletter signup (Viewing newsletter signup form > Submitting form > Confirming email) or a simple page conversion (Viewing a signup page > Submitting signup).

Figure out what your goals are and what you want visitors to do on your site, and you can create a funnel for it.

Once you have the data, you’ll be able to see where roadblocks are and optimize your funnel. Let’s dig a little deeper into that.

Why Are Marketing Funnels Are Beneficial?

Marketing funnels provide access to data, called a marketing funnel report, which lets you can see where you are losing customers. This is sometimes called a “leaky” funnel because it allows customers you want to keep to escape the funnel.

Let’s take your average SaaS business as an example. Here’s how a funnel may look for them:

  • Visited site
  • Signed up for a trial
  • Used product
  • Upgraded to paying

Do people have to use the product before paying? They don’t, but it’s a good idea to track it so you can see if it’s a roadblock.

For example, if you are losing a lot of conversions after the trial stage, you might need to update your onboarding process so people understand how to use the tool or even adjust the top of your funnel so you aren’t attracting people outside of your target audience.

A Real-Life Marketing Funnel Example

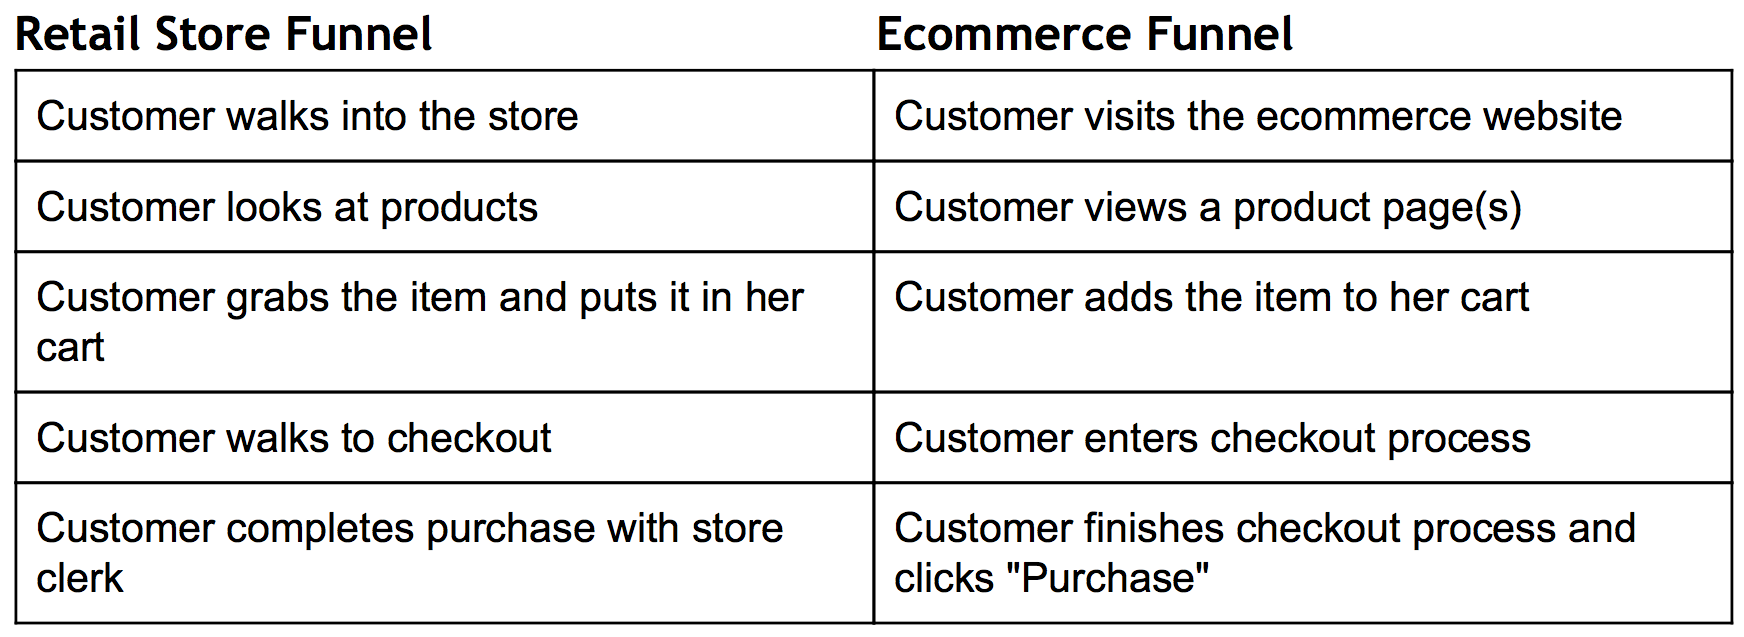
Let’s look at a funnel process for a retail store and see the corresponding steps in an e-commerce store. We’ll be tracking a purchase funnel.

marketing funnel comparison-retail-store-ecommerce

The e-commerce store has the fortune of being able to see a funnel because they can track clicks, time on page, and other metrics. Their marketing would look something like this:

ecommerce marketing funnel

Okay, so now we have an understanding of what a funnel is and why it helps. Let’s take a look at a product that offers funnels – Google Analytics.

How Google Analytics Marketing Funnels Work

Google Analytics offers funnels, and I’ve written extensively about it in the past. This is an incredibly simple way to track the path prospects take before they convert. Sign in, then head to Admin > Goals > +New Goal > Choose a Goal to create a Google Analytics goal.

Here are a couple of things you’ll need to know when creating funnels in Google Analytics:

  • It’s a pretty basic funnel: If you don’t want to dive deep into the data and optimize, you can go with this.
  • You cannot go back and retroactively view data: Once you create your funnel, you’ll only be able to the funnel going forward as the data comes in.

Overall, if you are just getting started with marketing funnels, Google Analytics is a solid place to start. Learn how to set up a conversion funnel in Google Analytics.

What is a marketing funnel?

A marketing funnel is a visual representation of the steps a visitor takes from first finding out about your brand until they convert.

What are the different types of marketing funnels?

Sales funnels
Webinar funnels
Email funnels
Video marketing funnels
Lead magnet funnels
Home page funnels

Why do marketing funnels matter?

Marketing funnels provide access to data, called a marketing funnel report, which lets you can see where you are losing customers.

What is an example of a marketing funnel?

Visited site > Signed up for a trial > Used product > Upgraded to paying customers

How to use Google Analytics to create a funnel

Sign in, then head to Admin > Goals > +New Goal > Choose a Goal to create a Google Analytics goal.

Conclusion

We’ve covered just about everything you need to know about marketing funnels. Here’s a quick recap:

  • When someone on your website does something you want them to do (i.e., sign up, make a purchase, fill out a form, etc.), it is known as a conversion.
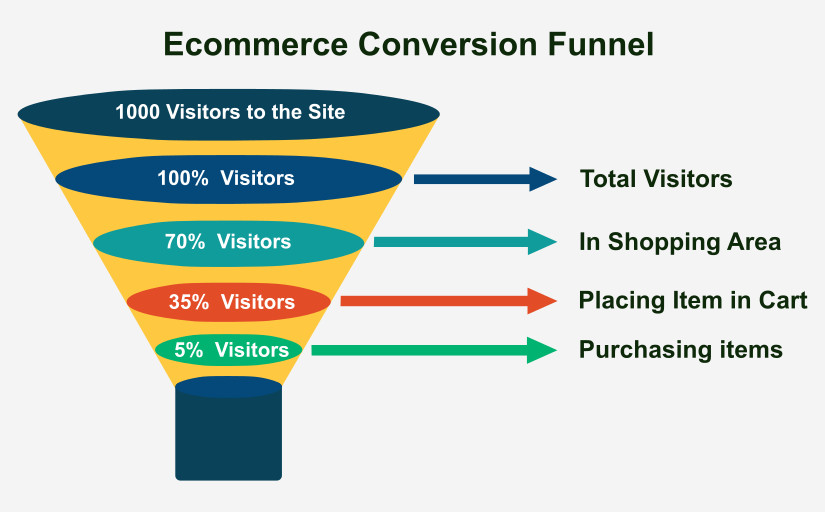
  • A funnel tracks the steps that lead up to that conversion. For example, e-commerce companies want people to purchase products on their website. Their funnel may have these steps: visited site > viewed product > placed product in cart > purchased.
  • A funnel report shows you where people are dropping off in the path to conversion so you can optimize your conversion path and drive revenue.
  • Google Analytics provides funnels as part of the free Google Analytics software. It’s a simple and free way to get started with marketing funnels.

Have you created a marketing funnel in Google Analytics? What did you learn?

How to Create the Perfect H1 Tag for SEO

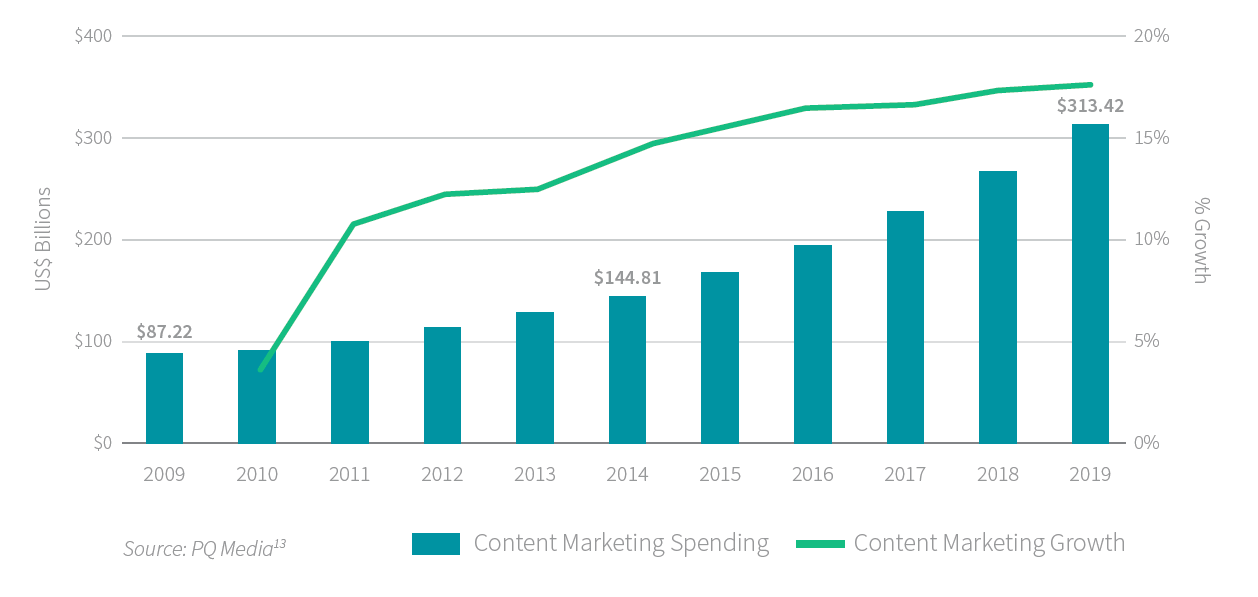
It doesn’t matter if you run a tiny mom-and-pop shop or a mega-billion dollar corporation; content marketing works.

Just look at the way the content marketing industry has exploded in recent years.

h1 tag - importance of content

In this article, I’m not just going to sing the praises of content marketing. Instead, I’m going to take a deep dive into something that most people don’t talk about: a tiny slice of content marketing called H1 tags.

Truth be told, most SEOs, content marketers, web developers, and marketers know a little bit about H1s. That can be a problem though; we’re so used to hearing about H1s, using H1s, and talking about H1s, that we don’t stop and think about how to write them in a way that appeals to users and search engines.

You’re different though. You’re reading this article, and are going to learn the exact method for producing great H1s that will take your content marketing to the next level.

What Is an H1?

The H1 is an HTML tag that indicates a heading on a website.

Let me unpack that.

  • HTML: This stands for Hypertext Markup Language. Most websites use this language to create web pages.
  • Tag: An HTML tag is a snippet of code that tells your web browser how to display the content.
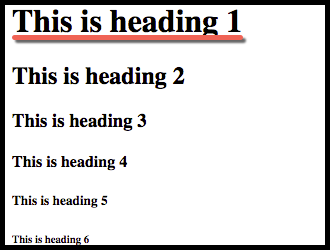
  • Heading: HTML has six different heading tags: H1, H2, and so on. The H1 is considered the most important tag, and the H6 is the least important. The tags are often formatted from large (or most important) to smallest (or least important).
h1 tag - tag levels

If you were to create an H1 in HTML, it would look like this:

<h1> Hi, My Name is Header One! </h1>

You can take a look at this yourself. Open up any web page (preferably a good quality blog) and follow these instructions.

First, make sure you’re on a web page.

h1 tag - example blog post to find h1 tag in source code

Next, view the source code.

To do this, I use a keyboard shortcut for Chrome (Mac): command + Option + u (do not press the plus sign, you just hold command, option, and u at the same time).

The commands you use to open source code will vary depending on the browser and processor you use.

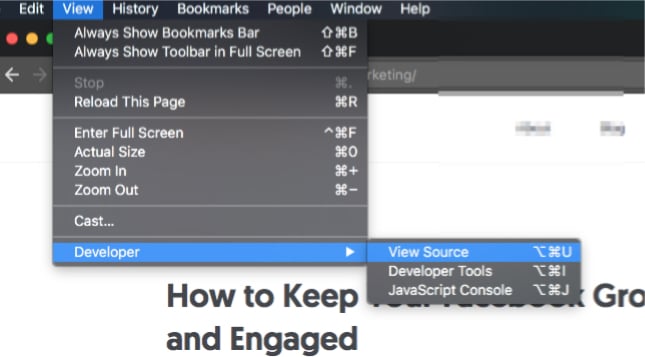
You can also click View → Developer → View Source (in Chrome):

h1 tag - how to view source code the long way

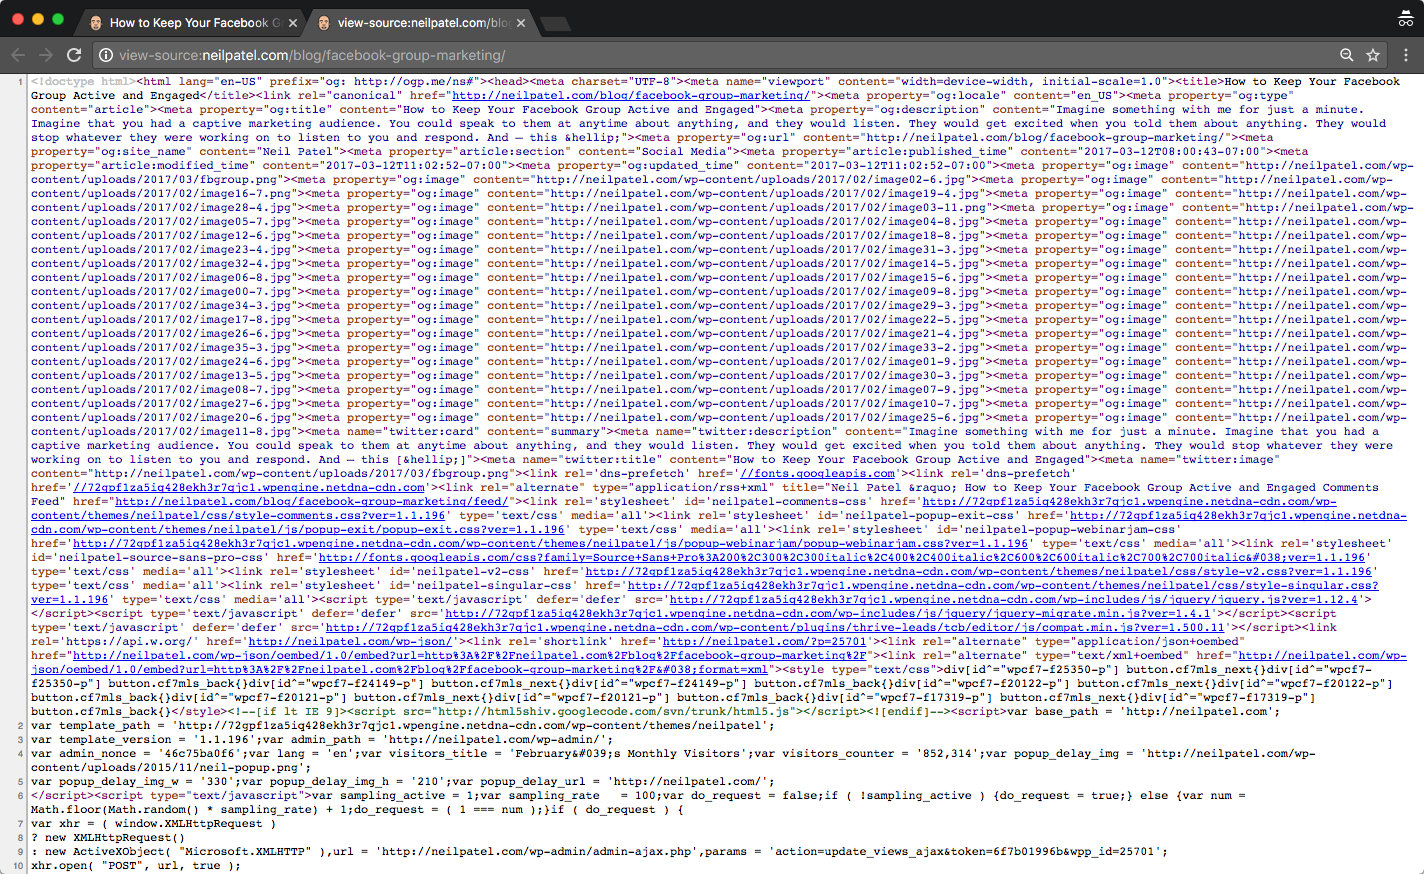
This is what you’ll see when you view the source code:

h1 tag - view source code

Next, search for the h1 tag.

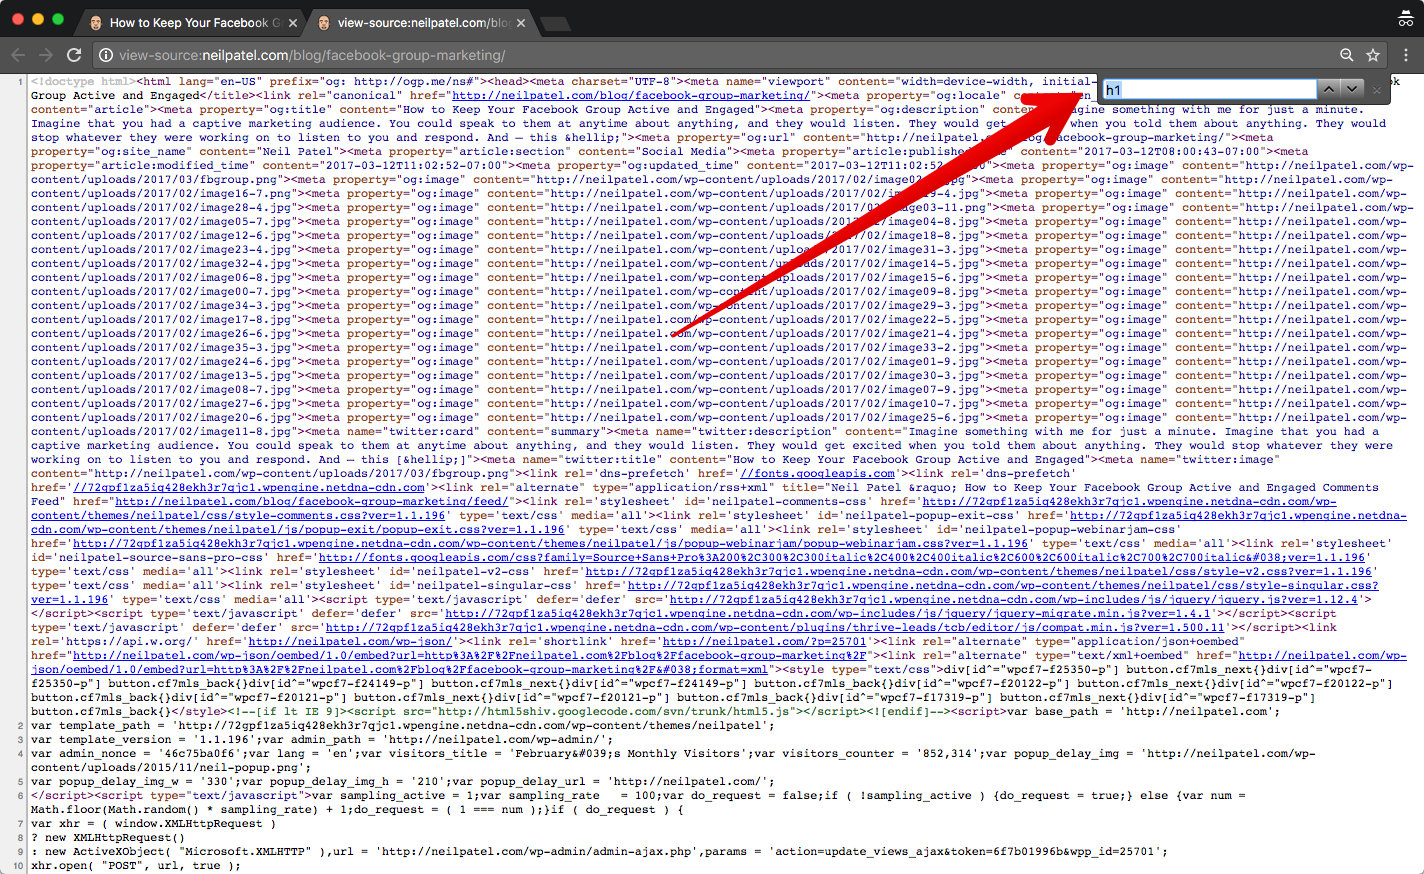
Press CTRL + F to open the search feature on your browser. Again, I’m using Chrome, but most browsers use this function.

When I press CTRL + F, I see a small search bar in the upper-right corner of the browser window.

Type “h1.”

H1 tag - entering it into search box in source code

Then, press Enter.

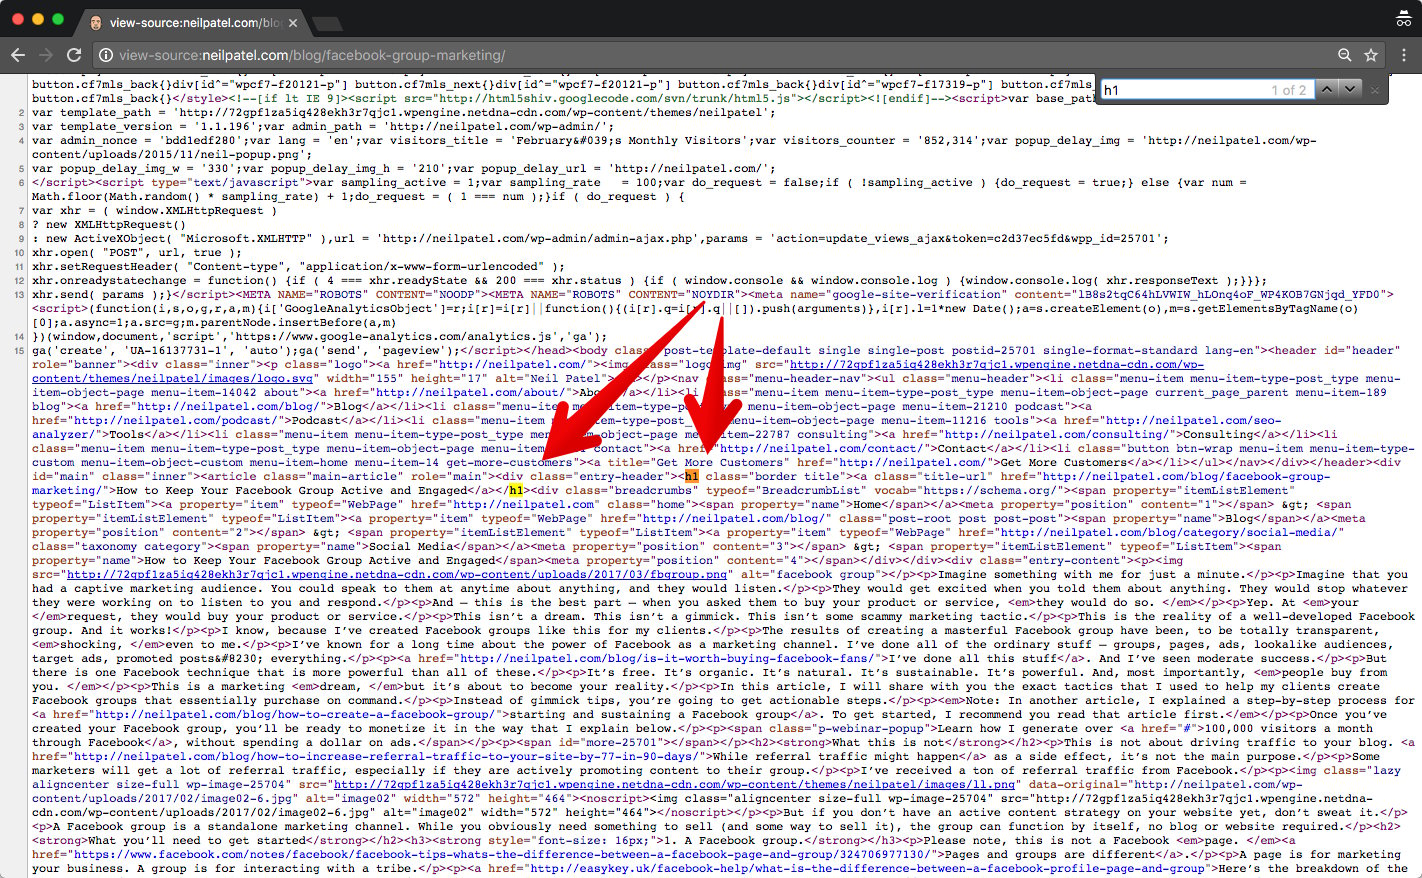
Chrome highlights the h1 on this page.

H1 tag - finding in source code

There’s a bit of intervening code between the start tag and the end tag, but the tag is there.

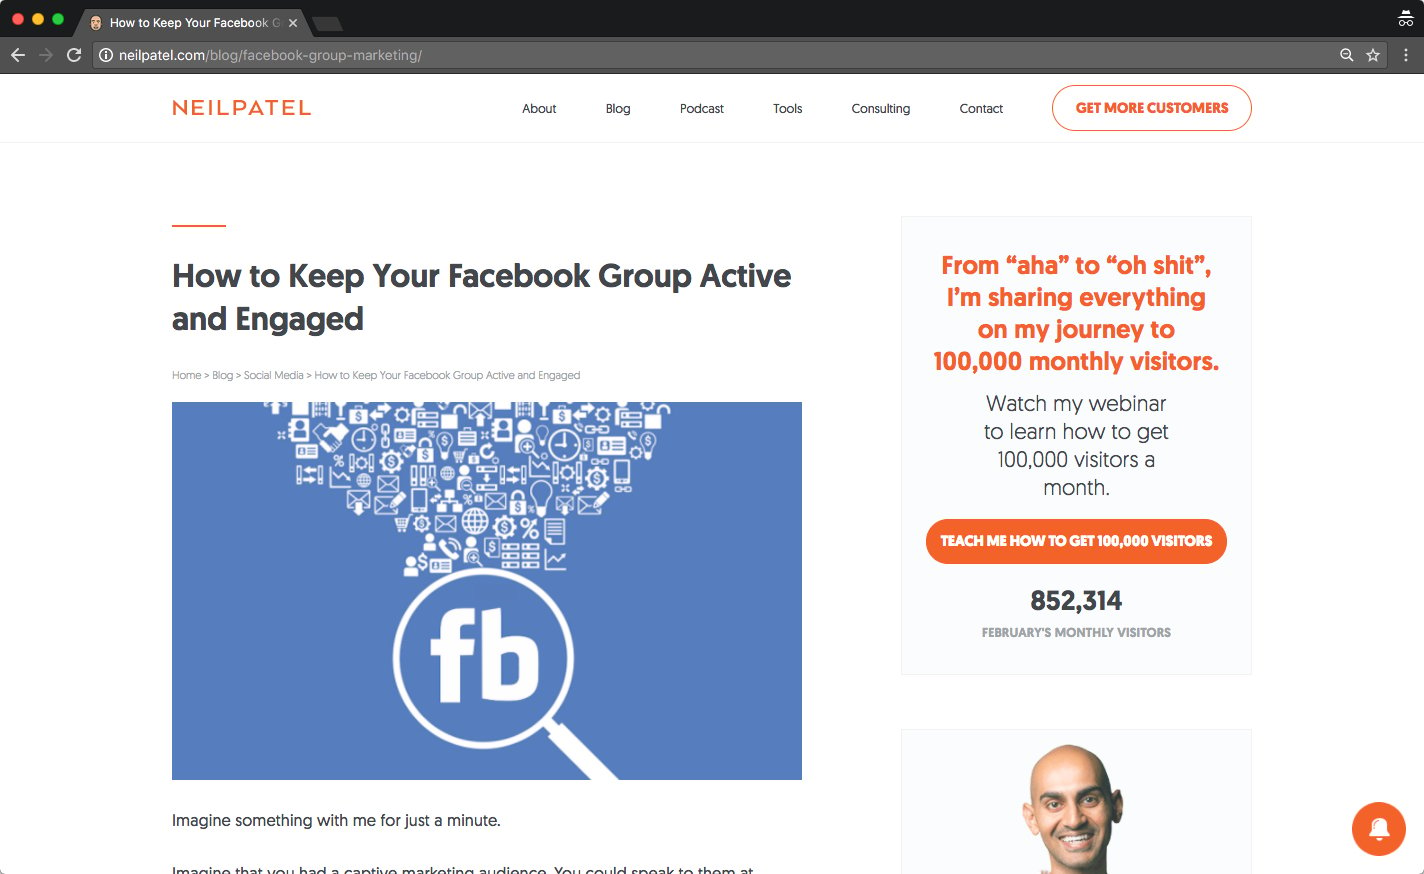
The copy within the h1 tag is “How to Keep Your Facebook Group Active and Engaged.”

That’s it. It seems pretty simple, but the h1 has a big impact, as you’ll find out in the next section.

Why Are H1s so Important?

First, I’ll tell you a story. A little while back, business was humming along as usual. I was doing my thing, running my blog, and writing my articles.

My blog traffic had been pretty good overall, but I decided to get another set of eyeballs on it to help identify improvements. One of these improvements was to update an H1 on one of my articles. Within three days, the page had 85% more organic traffic. Plus, it had gone from page 3 of the SERPs to page 1, position eight!

All because I changed the H1.

I’m not the only one who’s experienced such a dramatic change. In fact, my bump in search traffic is nothing compared to a local car parts store in Houston, TX, who changed their page titles and H1s. The result?

The chart tells it all:

H1 tag - how it changed search results for local car parts store

I don’t want to sound like a snake-oil salesman with a bunch of anecdotes, so let me give you the cold, hard facts about h1s and SEO.

H1s have always been a major ranking factor.

There have been plenty of trends in SEO that have come and gone, but H1s have never lost their significance.

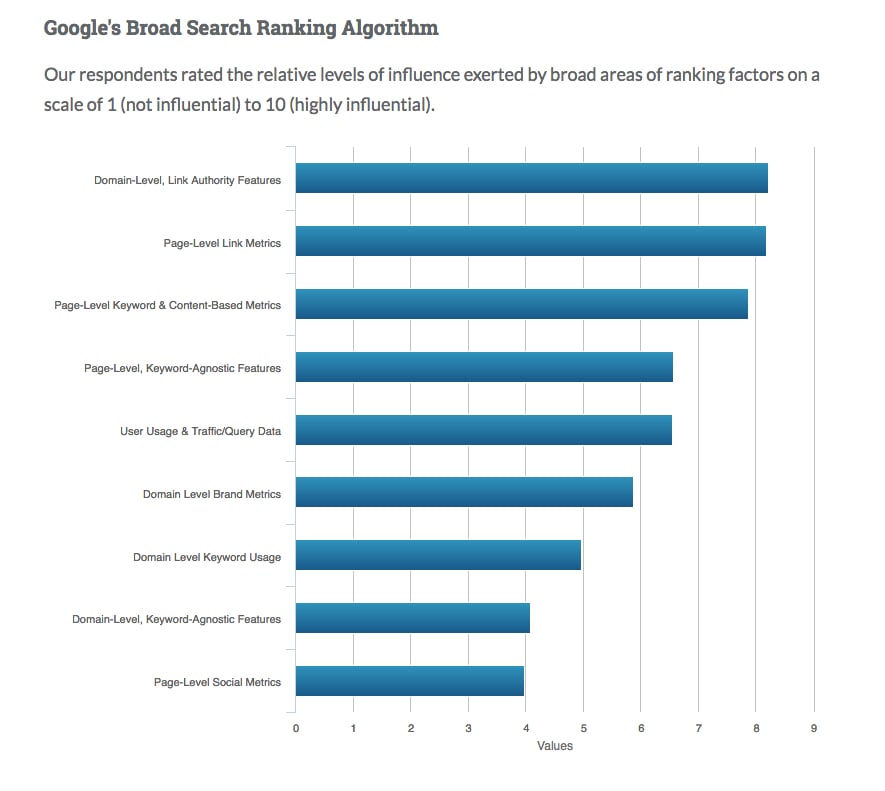
In Moz’s most recent search ranking factors survey, title tags are listed as the second most important ranking factor. Although it’s not always the case, many use the same title tag. and H1.

H1 tag - google's broad search ranking algorithm

H1s are usually the most visually notable content on the page and are probably the most important SEO feature.

And at first, it might not seem like H1s are an “SEO” feature at all, because it’s more about the user than about the technical optimization of the page, right?

Right! That’s the direction that SEO has taken in recent years. SEO is more about user optimization than it is about search engine optimization.

Don’t skip over this idea of users noticing the H1. It matters.

H1s are one of the most potent on-page SEO and UX elements that you have in your arsenal.

Now, let’s figure out how to use them.

How Do I Create Killer H1s?

H1s aren’t a big secret. The fact is, just about anyone who knows anything about SEO or HTML uses them.

So why did I even write this article? It’s because most people use them incorrectly.

Until recently, even I didn’t realize just how wrong I had been when I was writing H1s. After turning the corner and making a discovery, my knowledge of H1s hit the roof, and my website traffic changed as a result.

Here are the rules of H1 creation.

1. Use Only One H1

Every page needs only one H1 tag. There is no reason to use more than a single H1 tag.

Why not? If one is good, wouldn’t two or sixteen be even better?

Search engines will crawl multiple H1s on a page, sure, but the logical priority of an H1 semantic tag means that you’re focusing your SEO efforts on one keyword phrase or sentence, as opposed to many.

The presence of more than one H1 won’t necessarily confuse the search engine, but it could dilute the SEO power of a single H1.

Google may also consider your page over-optimized if you use more than one H1, and may penalize you as a result.

2. Your H1 Should Describe the Topic of Your Page

At the most basic level, the H1 should describe what the content is all about.

  1. Often, the H1 tag will be similar or the same as your title tag.
  2. Usually, the H1 tag will be the title of your blog post or article.
  3. Normally, the H1 tag gives the reader a strong sense of what he or she is going to read.

3. The H1 Should Be Between 20 and 70 Characters

If your H1 is too short, you’re wasting valuable space; if it’s too long, you’re diluting the power of the tag.

However, if you’re using the same H1 and title tag for a page, you should pay more attention. Best practices say titles should be between 40 to 60 characters so you can fit in the most keywords. However, when you start to reach the 50-60 keyword range, your click-through rate can start to decrease. As a result, try to stick to the 30-40 character range.

4. Make Your H1 Tag Stand Out

Your H1 should be the most important visual element on the page.

  1. it should be big
  2. it should be strong
  3. it should be noticeable
  4. you should use whatever visual, formatting, and style elements are necessary to make that thing stand out

Why is this important?

Keep in mind that an H1 is a semantic element, not a visual element, and it’s important to keep this distinction. Web designers don’t need to add style elements by using semantic tags such as the H1, H2, etc.

However, in the real world, style and semantic elements do mix. Following design and development best practice mean the most significant semantic tags are also the most important visual elements.

Size matters in web design, and semantic tags matter in web development. Conjoining them in SEO makes sense.

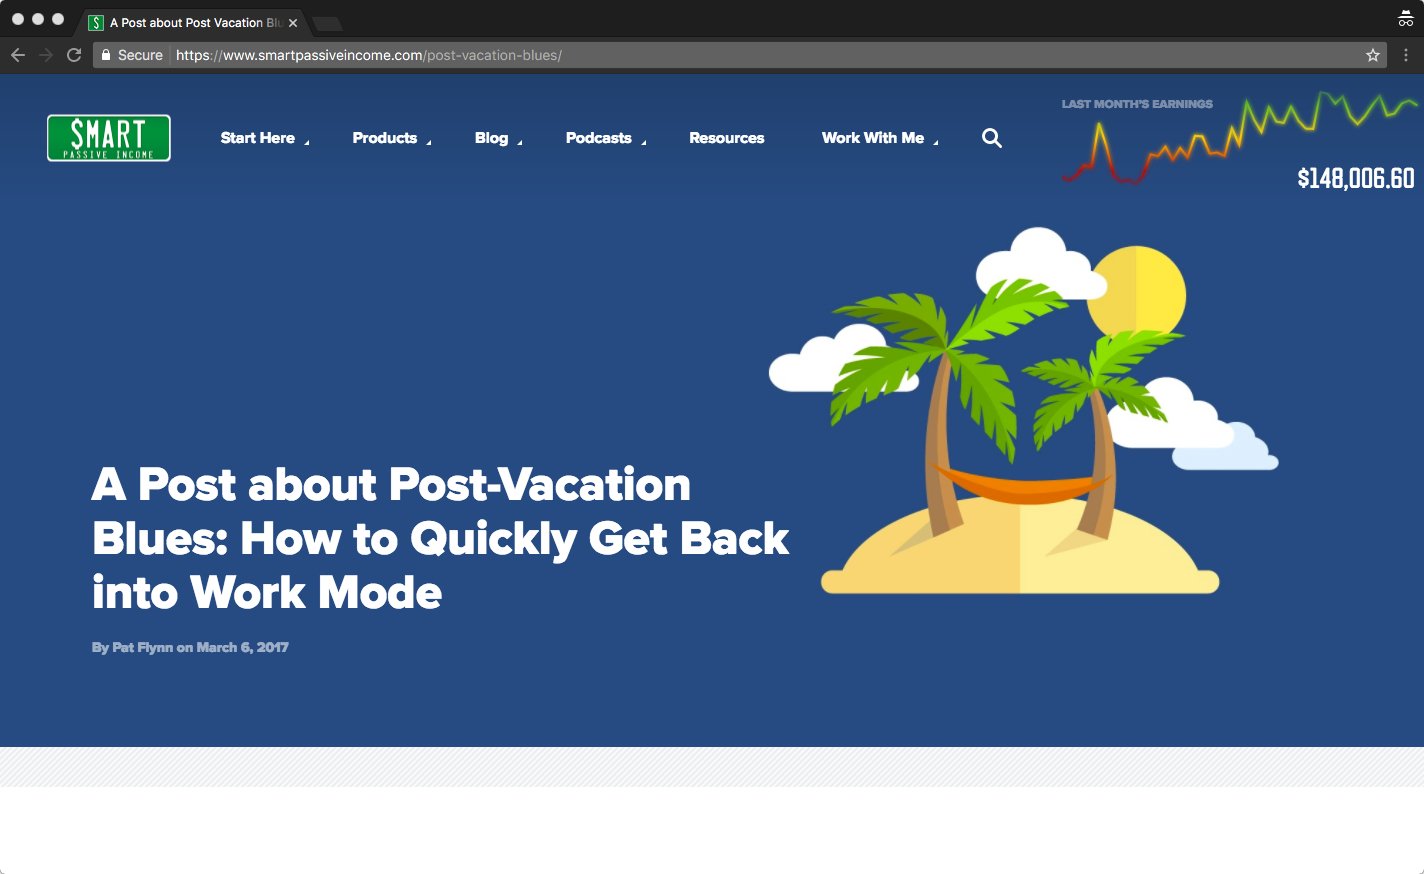
For a good example of this formatting, check out the blog at Smart Passive Income. Pat Flynn’s H1 is definitely strong.

example of strong H1 tag - Smart Passive Income

When I check out the source code, this is what I see:

code for H1 tag for Smart Passive Income blog

Here’s another good example from Ramit Sethi.

Can you guess what his H1 is?

H1 tag - Ramit Sethi example

The H1 is “Do you know your earning potential.”

H1 tag - example within source code for Ramit Sethi

5. Create H1s That Provide a Good User Experience

SEO changed massively over the past few years. The biggest change by far has been the influence of user experience (or UX) on SEO.

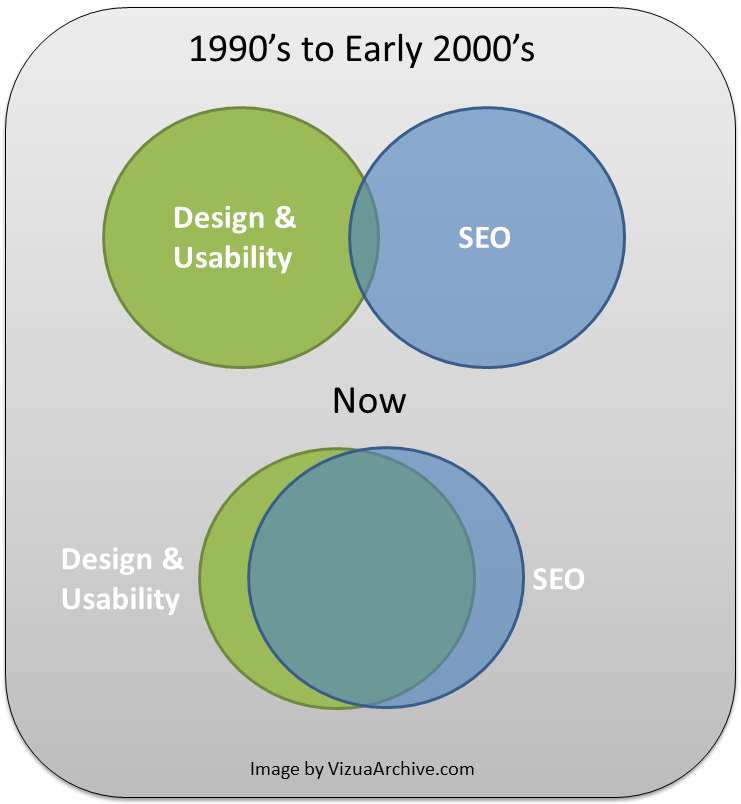
The best way to consider SEO and UX is with this Venn diagram (to access link, you must download a chrome extension).

H1 tag - SE) venn diagram comparing early 2000s SEO to today's SEO

That diagram was published in 2012.

Nearly a decade later, the SEO circle would be a smaller circle within an even bigger Design & Usability circle.

Part of the reason for this is search engines have evolved to such a high degree they can intuit what users want, even as users are searching and browsing.

Keep in mind that due to machine learning, search engines are constantly changing. There are no longer massive SERP upsets due to algorithm shifts.

Instead, there is the continual nuanced adjustment of search ranking factors based on the search and browsing habits of the search engine’s millions of users. In other words, how users interact with your page has a lot to do with how your page will rank; and the H1 is one of the most important elements on your page that influences their interaction.

This is because it’s noticeable. It sends a message. It communicates a sentiment. It makes a promise.

Your H1 should speak to the user in an overt way. It should be formatted and placed carefully so your user understands that it is the title of the page, and explains what the page is about.

6. Use a Focused Long-Tail Keyword in Your H1

Believe it or not, some SEOs used to not recommend using keywords in your H1s. They thought it could be considered keyword stuffing, which Google penalized a long time ago.

Luckily, there’s nothing keyword-stuffing at all about using a keyword in an H1. On the contrary, Google wants you to use a keyword in the H1. It helps their crawlers better understand what your page is all about.

If you don’t use a strong keyword in your H1 tag, then Google can still find out what the page is about, index it appropriately, and give you a nice rank. Why leave out the opportunity to give Google all of the information it needs and wants right in your website source code, though?

It’s better to use a keyword; sometimes a long-tail keyword specifically.

Let me show you a clear example of how this works using a simple keyword, “bandit testing.”

Even though this keyword is not technically long tail, it works well for our purposes, because it’s clear, concise, noticeable, and easy to use in an H1 tag.

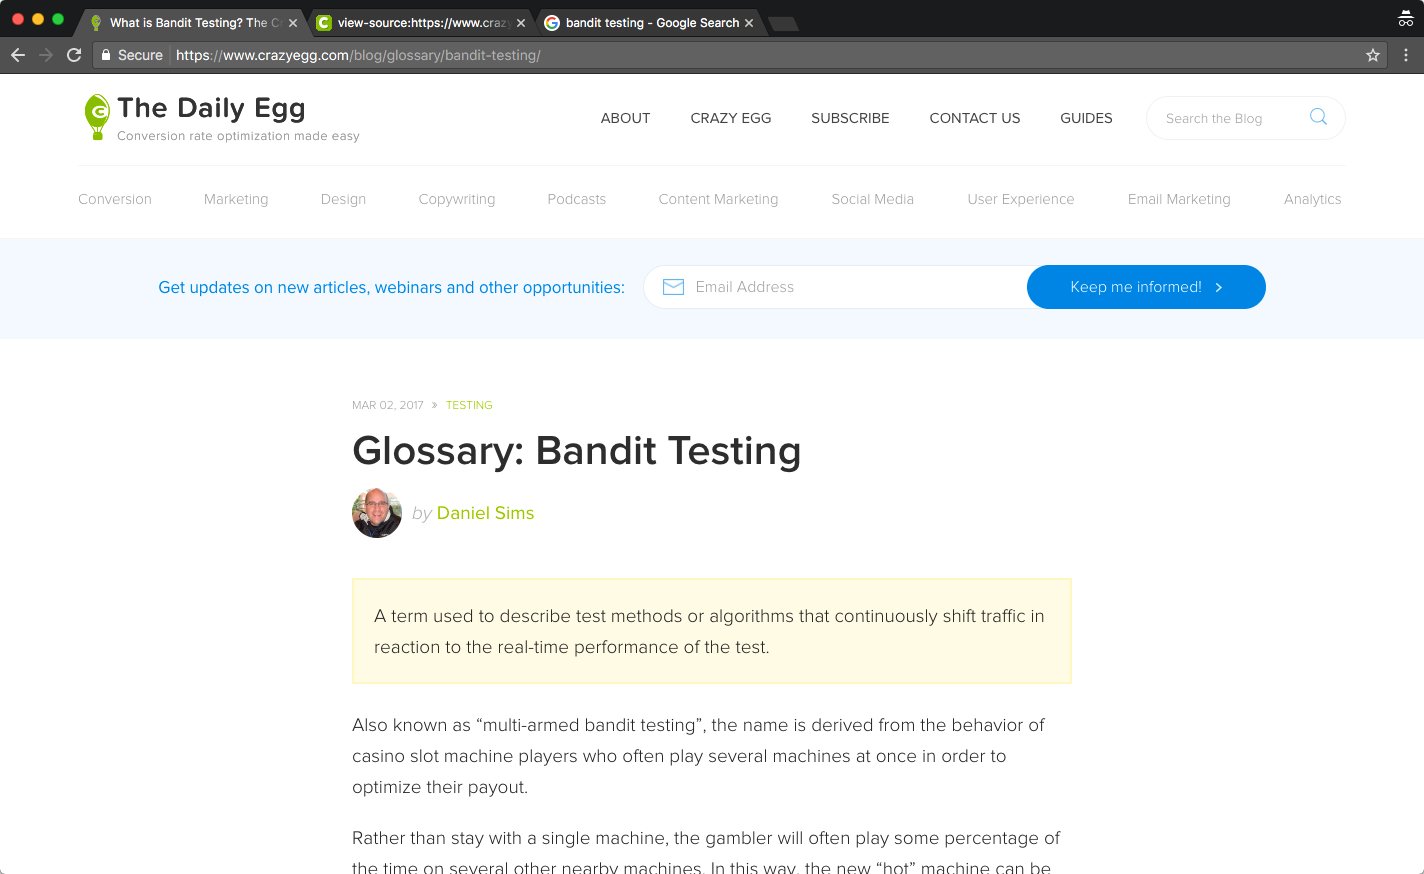
This is a page from the Crazy Egg blog.

The article is about bandit testing.

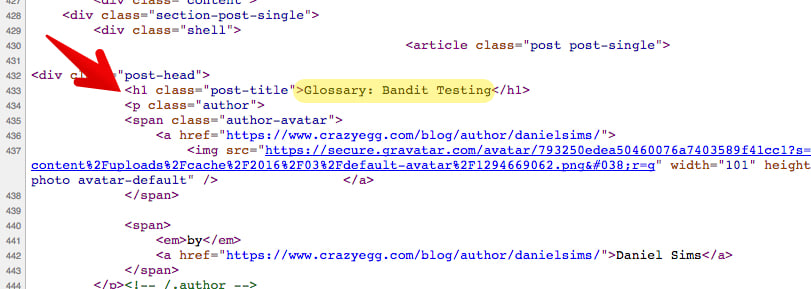
H1 tag - bandit texting long tail keyword example

The most noticeable visual element on the page is “Glossary: Bandit Testing.” That’s also the h1.

H1 tag - "glossary: bandit testing" example

Here are the facts about this page:

  • The title: What is Bandit Testing? The Crazy Egg Glossary
  • The H1: Glossary: Bandit Testing
  • The keyword: bandit testing

Their rank at the time this page was originally published (it has subsequently been updated)? Google page 1, position five! That position was earned only two weeks after publishing the article.

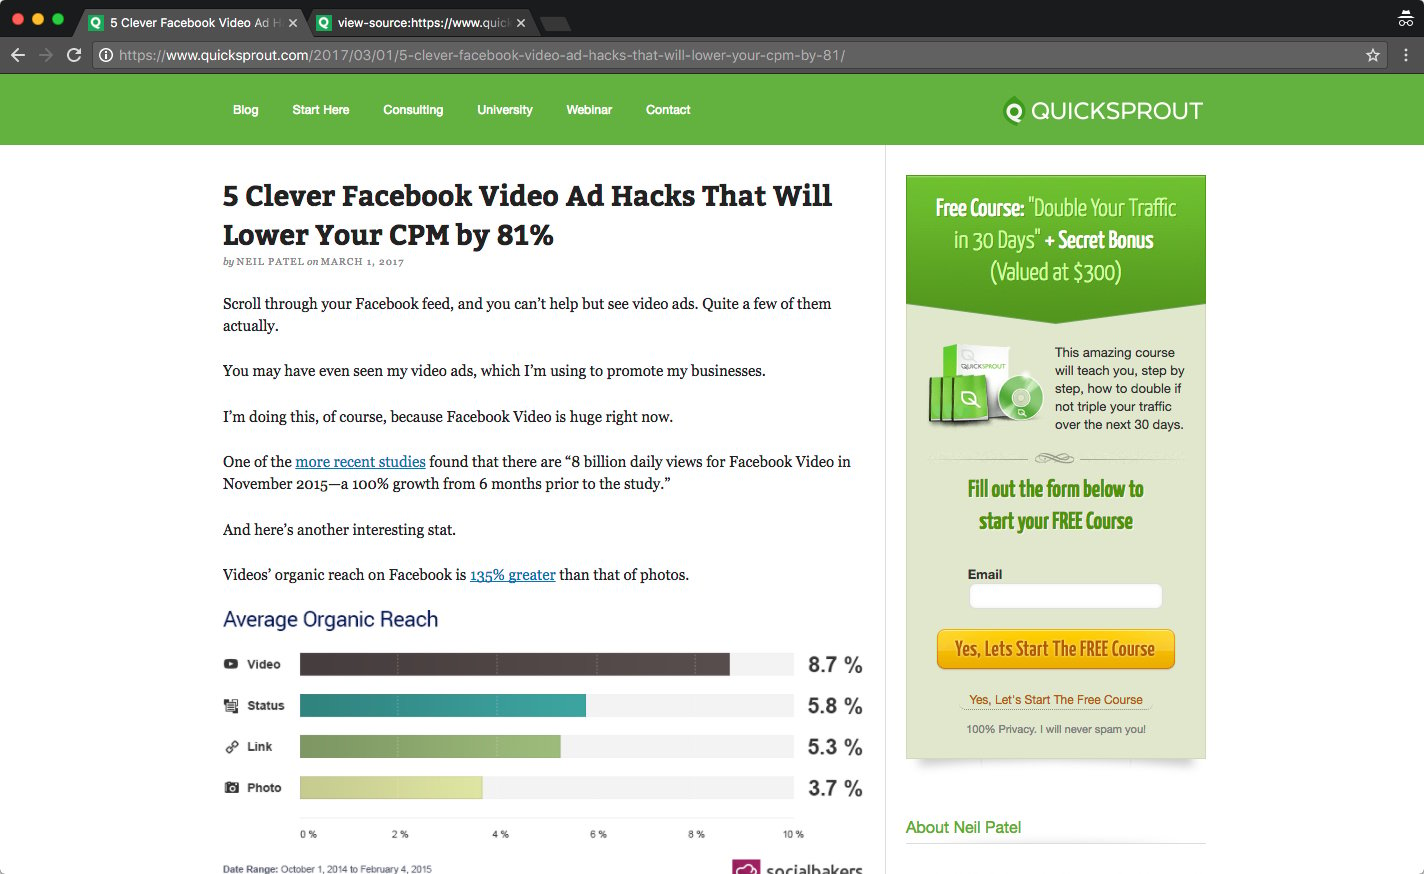
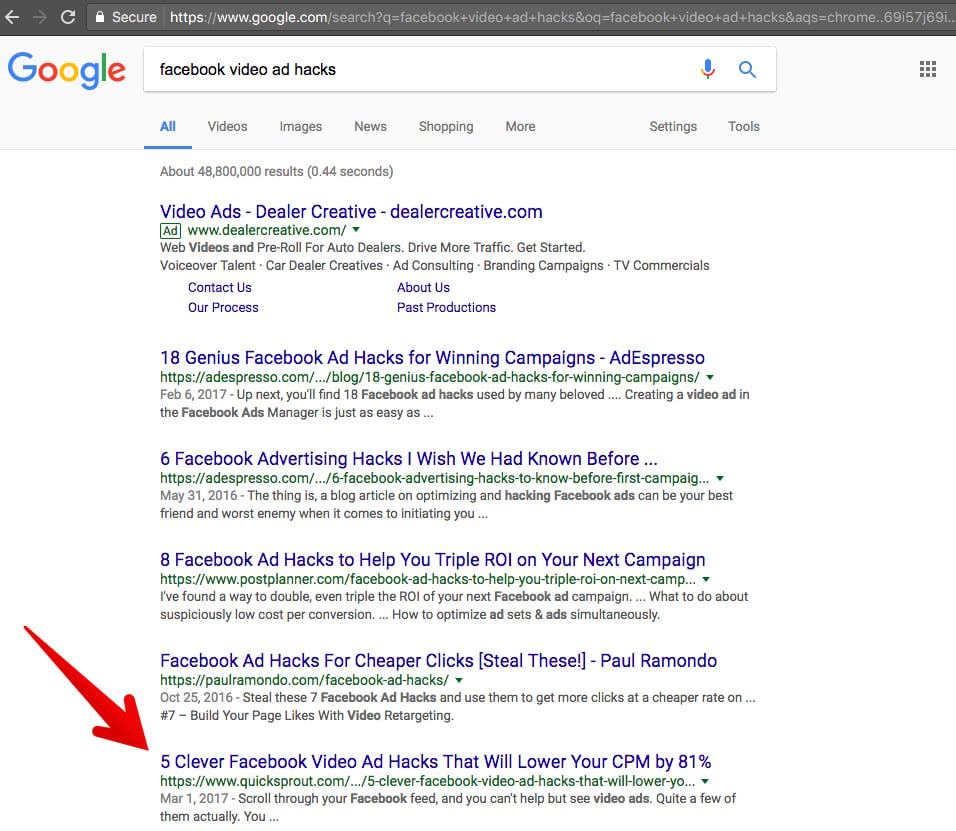
This article takes a more long-tail approach. The keyword in this scenario is “Facebook Video Ad Hacks.”

H1 tag - facebook video hacks example

That keyword is included in the blog title, and it is also the H1 tag.

H1 tag - "facebook video hacks" in source code and title

Just two weeks after publishing, the article was on page one, position 5 of Google.

H1 tag - example of earning great place in SERPs through long tail keywords

To summarize: yes, I’m recommending that you use a long-tail keyword in your H1 tag.

Follow a few simple rules though:

  • don’t force it
  • make it natural
  • don’t keyword stuff!

7. Answer User Intent With Your H1

The phrase “user intent” seems to confuse some people, but it’s really quite simple.

Whenever you write a piece of content, you want to be asking questions like:

What does the user want when they open my article?

What’s their intent?

Your H1 should satisfy that intent.

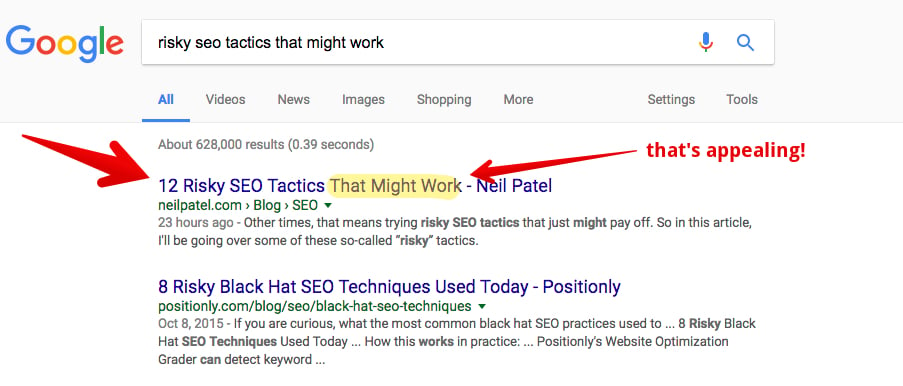
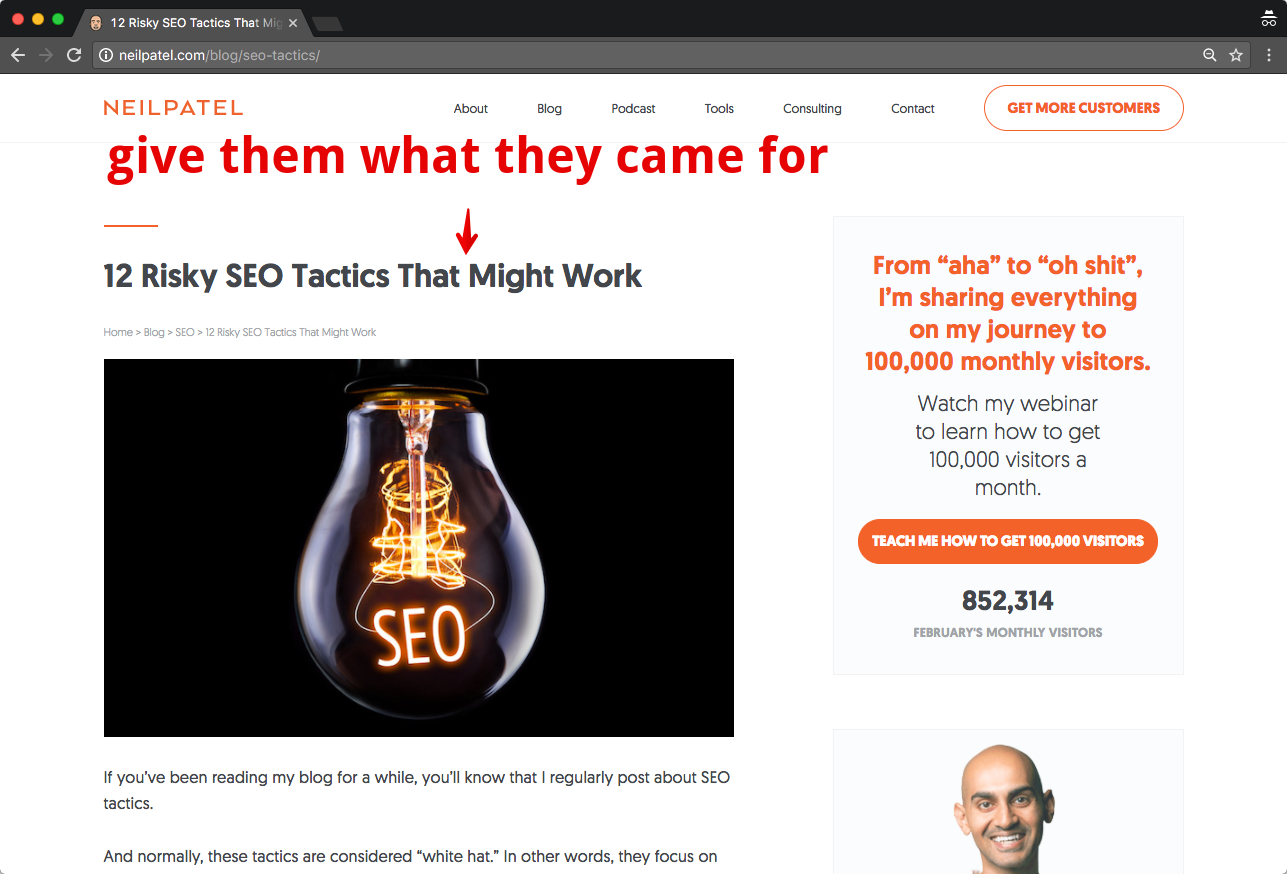
If someone is googling “risky SEO tactics,” I can probably assume that they are looking for some quick search engine optimization techniques that will boost their rankings.

If I were to write an article on that topic (oh wait, I did!) then I want to answer their intent with my H1.

Here’s how the journey of intent works.

First, the user gets an idea. Then, they search Google for it.

H1 tag - user intent demonstration, step 1

They see this promising result in the SERP.

H1 tag - user intent journey, step 2

If they click it, they see my blog article on the topic.

h1 tag - user intent journey, step 3 (seeing search results they came for)

My goal with that H1 tag is to promise them what they came looking for: some straightforward but risky SEO tactics that could boost their traffic.

This is how Marc Purtell explains it in SEJ:

In order to have some great, Hummingbird-optimized h1 tags, try to understand what a user may be asking when they are searching for a keyword the page is targeting and format that question on the page with h1 tags.

Let me summarize the rules for creating amazing h1s.

  1. Use only one h1
  2. Your h1 should describe the topic of your page
  3. Make your h1 stand out
  4. Create h1s that provide a good user experience
  5. Use a focused long-tail keyword in your h1
  6. Answer user intent with your h1

Transform Your Website in 1 Week with an H1 Tag Audit

As a bonus, I want to give you an actionable way to put these lessons into practice. I’m going to give you a homework assignment that may boost your organic traffic by 50%. Most can carry out this task in a few days.

I see a lot of people waste a lot of time doing “content audits” on their websites. I’m not against content audits; but instead of doing a full-fledged content audit on your website, I suggest that you do an H1 tag audit first.

H1 audits are quick and easy and have the potential to produce successful results in record times.

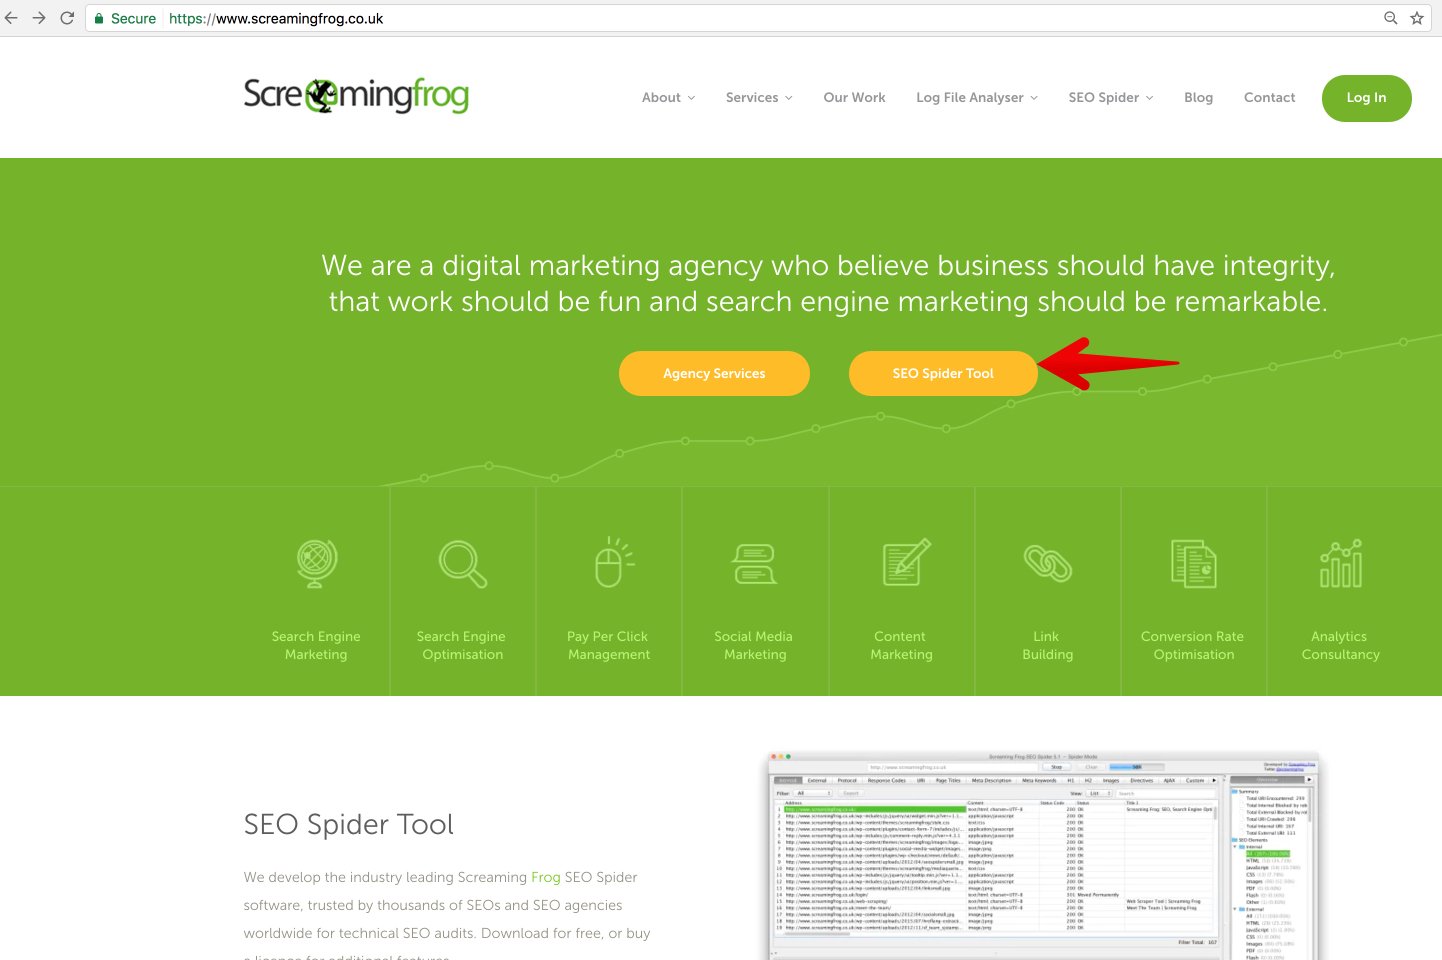
1. Download Screaming Frog

You can do this from the Screaming Frog website.

Click “SEO Spider Tool.”

H1 tag - H1 audit using screaming from (step one, log in)

Then click “Download.”

You do not need to purchase a license to use the software. If your website is more than 500 pages, however, it’s a good idea to purchase a license.

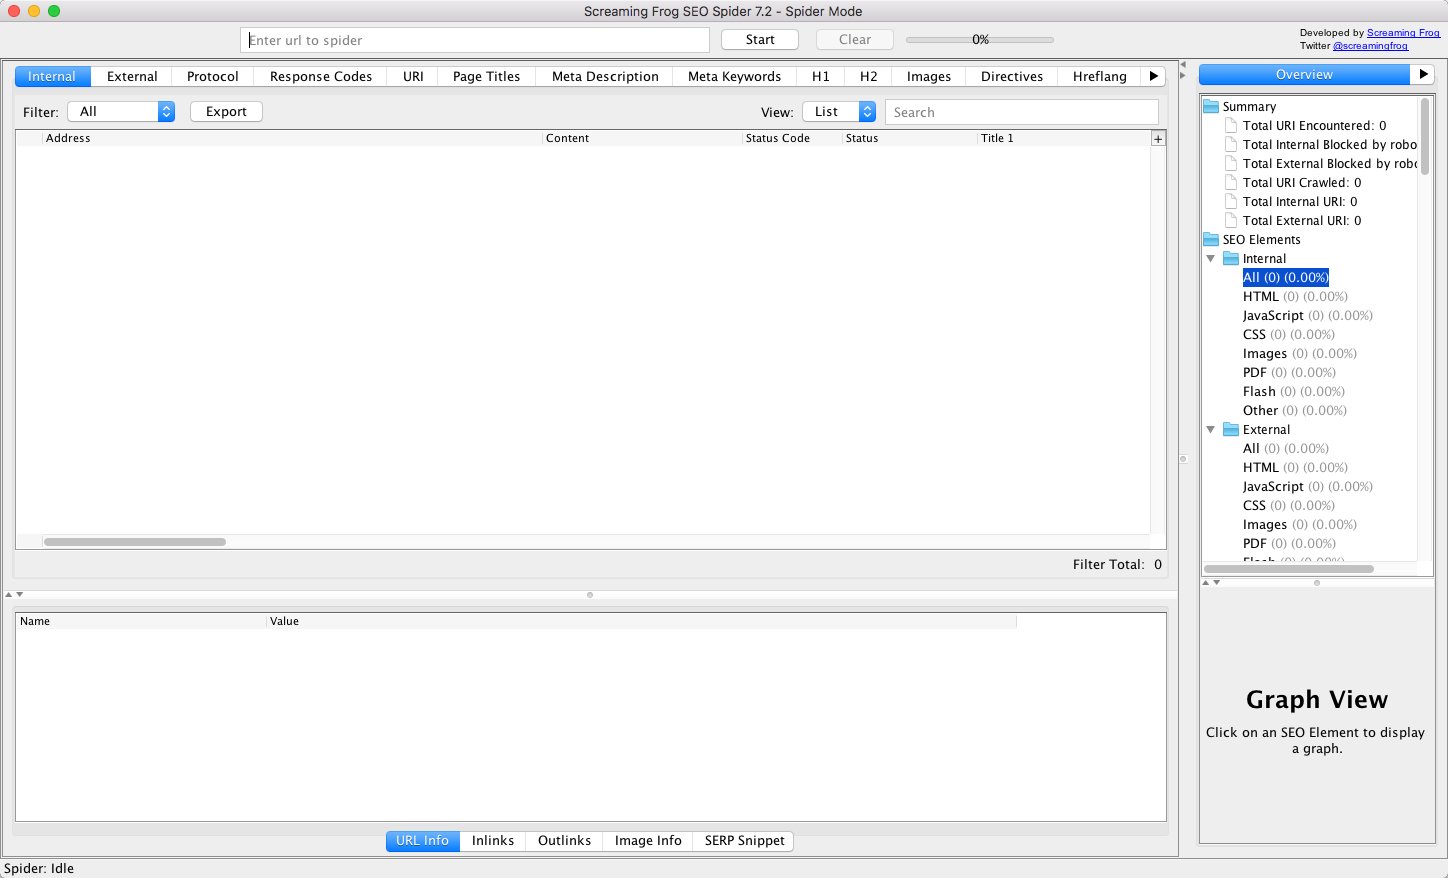
2. Open Screaming Frog

When you’ve successfully downloaded Screaming Frog, go ahead and open it.

h1 tag - h1 audit using screaming frog; open screaming frog

3. Type in Your URL

h1 tag - h1 audit with screaming frog, type in URL

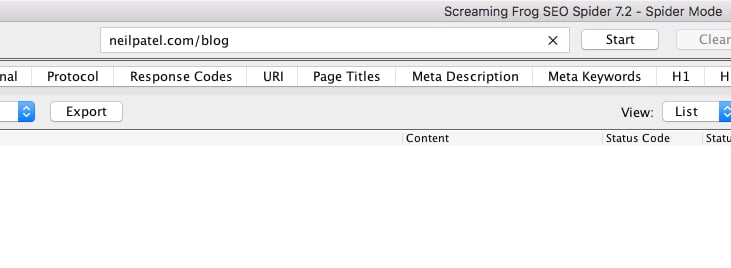
4. Click Start, and Wait for the Crawl Process to Complete

Depending on the size of your site, this could take a couple minutes or a few hours.

H1 tag - h1 audit using screaming frog, run crawl process

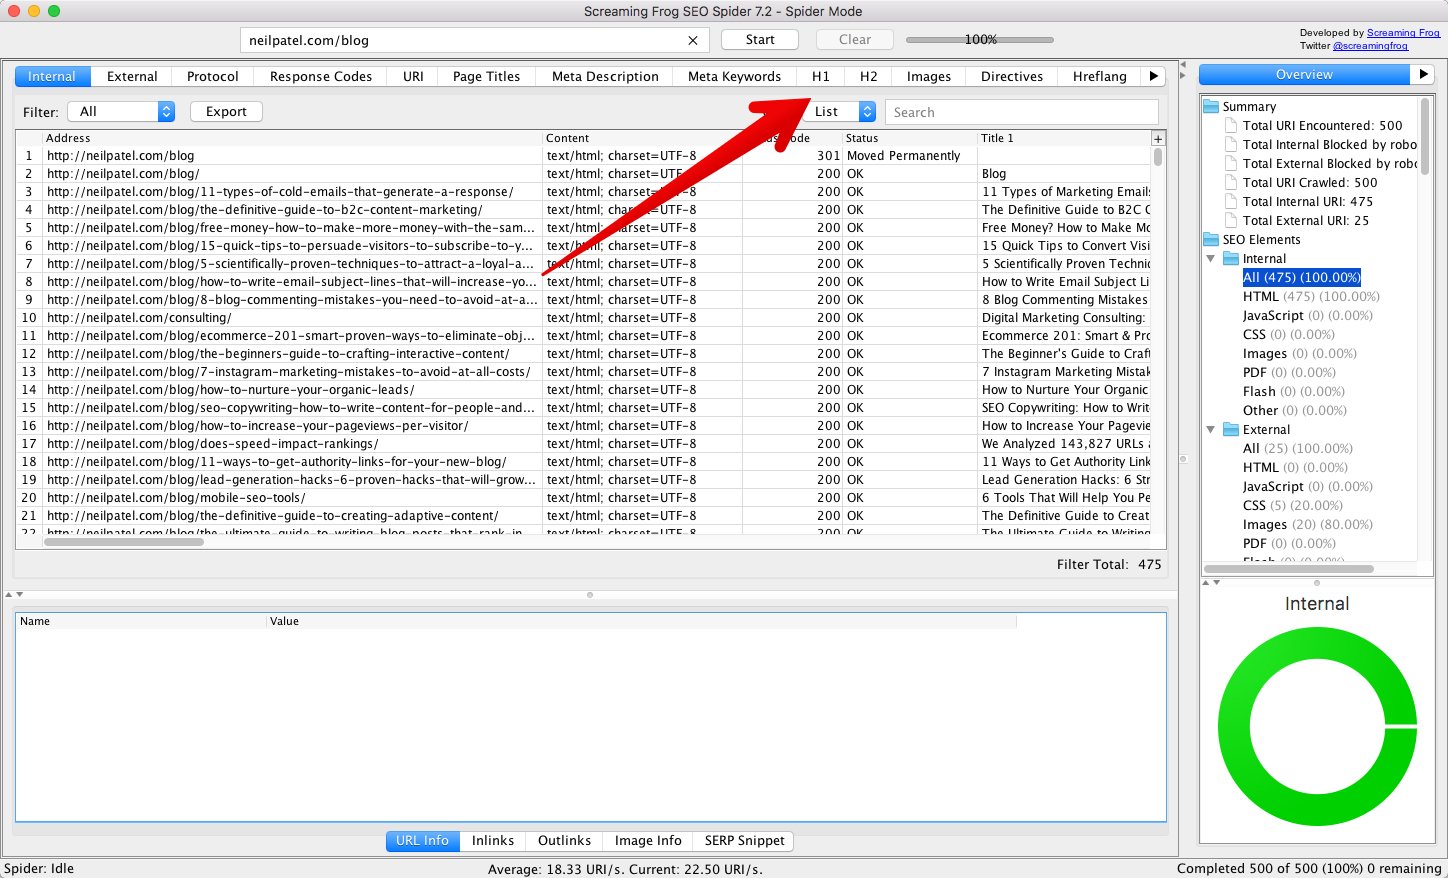
It usually takes less than a minute for Screaming Frog to crawl 500 pages.

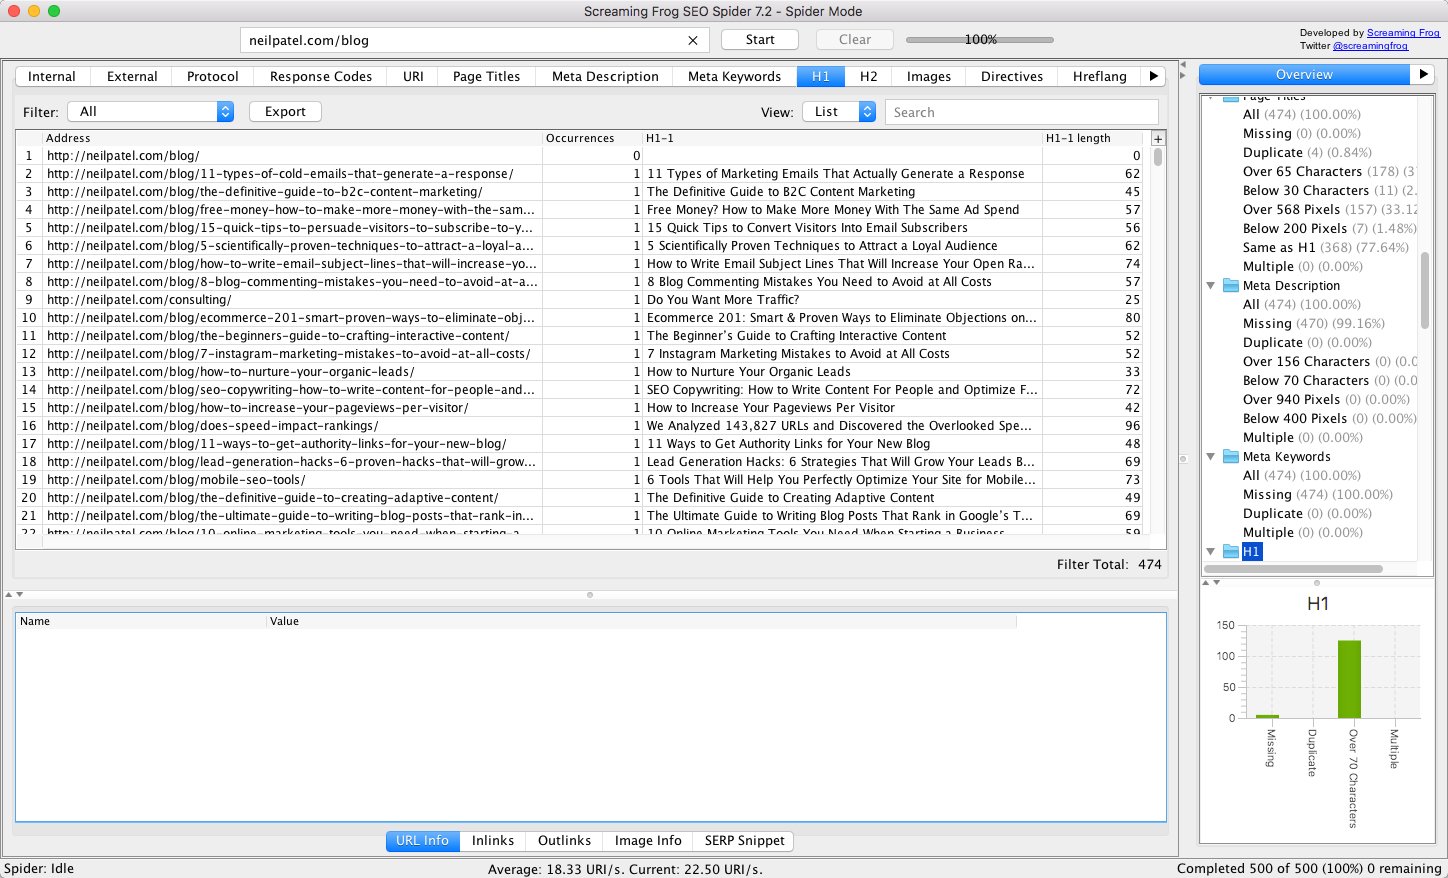
5. Click H1 in the Menu Bar

h1 tag - h1 audit using screaming frog, click H1 in menu bar after crawling site

Here, you’ll see a list of all the H1 tags on your website.

h1 tag - h1 audit. list of h1 tags on your website after screaming frog crawl

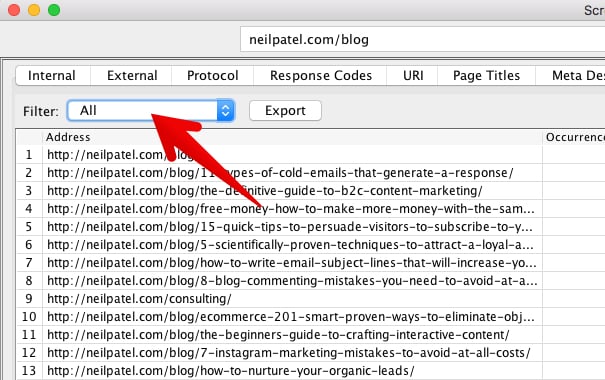
6. Check H1 Tags

Click the filter menu.

h1 tag - h1 audit using screaming frog, filtered for all h1 tags

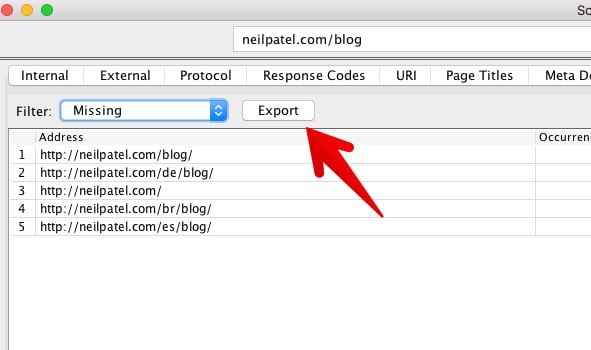
First, search for H1s that are missing by simply selecting “Missing” in the filter field.

You’ll see a list of all the pages on your site that lack an h1 tag.

H1 tag - list of pages that are missing h1 tags (from screaming frog report)

Your first task is to create an h1 for each of these pages.

(Unless, of course, you have a reason not to. My /blog page is a menu page to select the articles that I’m regularly adding and updating there, so I’ve chosen not to include an h1).

Click “Export.”

H1 tag - h1 audit using screaming frog (create a list of missing H1 tags)

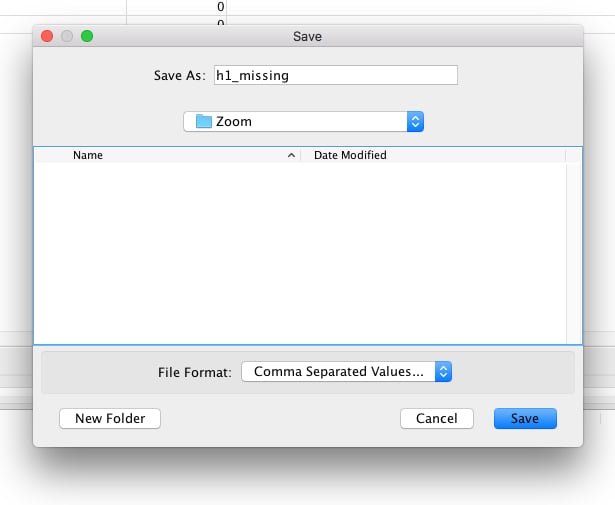
Find a good place to save the file.

h1 tag - save file of missing H1s from screaming frog report

It’s a CSV, so you can open it up in Excel.

Next, filter all the “duplicate” h1s. You can do this by clicking “duplicate” on the filter menu. Again, save this list in a CSV for future reference.

Finally, add a filter all the “multiple” h1s. Again, save the list

Now, go back to the filter menu, and select “All.” Export the list. At this point, you should have four CSV files.

7. Create New H1 Tags

Your task now is to create new h1 tags for each of the categories. Start with the missing ones, move on to duplicate, next multiple, and finally rework all h1s.

If your website is tens of thousands of pages, you may only be able to work on the highest-priority h1 tag project: the missing ones.

However, if you have the time, update all of your h1s to align with the rules that I provided above.

I think you’ll see a big difference in your traffic, your rankings, and your overall site performance.

Conclusion

If you’ve read this article, you know more about h1 tags than most people. More importantly, you know exactly how to use h1s for maximum SEO impact.

If you want help creating better H1s, title tags, content, or even SEO in general, reach out to our agency so we can help.

What are some of your h1 best practice tips?

How to Create Evergreen Content Right From the Start

Evergreen content engages and educates readers for longer without a huge amount of effort. Once you master the art of writing “timeless” content, you can ensure your articles, e-books, and tutorials stay relevant for years to come.  Below, I’m going to show you exactly why evergreen content should be part of every marketer’s content strategy, …

The post How to Create Evergreen Content Right From the Start first appeared on Online Web Store Site.

The post How to Create Evergreen Content Right From the Start appeared first on Buy It At A Bargain – Deals And Reviews.