How to Create, Optimize, and Test Meta Ads (Formerly Facebook Ads)

As a savvy internet user, you might think no one clicks on Facebook and Instagram ads.

You’d be wrong.

In 2021, Meta made over $114 billion in revenue from advertising.

Someone’s clicking.

But who, and how do you get them to click on your ads? I’ll show you.

Many marketers who tried Facebook ads, especially in their early days, decided Facebook advertising didn’t work.

Don’t believe them.

I will share everything you need to know about how to create Facebook ads, now known as Meta for Businesses.

If you’re totally new to Facebook, you’ll need to set up Meta Business Suite, then come back to this post for a deep dive into Meta advertising best practices.

In this advanced Meta advertising guide, you’ll learn which businesses are the best fit for the platform and how to run successful campaigns.

We’ll cover the most common mistakes marketers make and the biggest factor in your ads’ success.

How Do Meta Ads Work?

Meta ads work by allowing advertisers to reach users on Facebook and Instagram from one platform.

We can’t talk about Meta ads without also mentioning Facebook ads. In October 2021, Facebook renamed itself Meta. They are working to become a social technology company, not just a social media giant.

When you create ads in Meta Business Suite, you can advertise to both Facebook and Instagram users through boosted posts, videos, photos, Stories, messenger, carousel, slideshows, playable ads, and instant experiences.

Meta ads target users based on their location, demographic, and profile information.

Many of these options are only available from Meta. After creating an ad, you set a budget and bid for each click or thousand impressions that your ad will receive.

If that sounds overwhelming, don’t worry. I’ll explain what all that means.

Who Should Advertise on Facebook (now Meta)?

Many businesses fail at Meta advertising because it’s not a good fit for their audience. So before investing time and money on Meta ads, consider whether your business model is a good fit for Facebook or Instagram.

In the past, Meta ads were more like display ads than search ads — though new versions of ads, like product ads, allow advertisers to sell products directly to users.

Here are a few types of businesses that are likely to succeed with advertising through Meta..

How To Create Meta Ads For Businesses with Low-Friction Conversions

The businesses that are most likely to succeed with Meta ads ask users to sign up, not to buy. You must use a low-friction conversion to be successful.

A visitor to your website wasn’t looking for your product. They clicked your ad on a whim. You will fail if you rely on them to immediately buy something to make your ad ROI positive.

Meta users are fickle and likely to click back to Facebook or Instagram if you ask for a big commitment (purchase) upfront. Instead, stick to simple conversions like signing up for your service, filling out a short lead form, submitting an email address, or converting inside the platform using Instagram shopping or similar.

Even if you sell products, not services, you should consider focusing on an intermediate conversion like a newsletter signup. Then you can upsell later through email marketing or retargeting ads.

Daily deal sites like Groupon, AppSumo, and Fab are good examples of businesses that can succeed with Facebook advertising. After you click one of their ads, they just ask for your email address. They’ll sell you on a deal later.

Business Model with Long Sales Cycle or Small Purchases

Even if you only ask for an email address initially, you’ll need to eventually make money from these users to be profitable.

The best business model that fits Facebook ads earn revenue from its users over time, not all at once. A user may have given you their email, but you’ll need to build more trust before they are likely to buy anything.

You shouldn’t depend on one big purchase. Several smaller purchases are ideal.

Daily deals and subscription sites are great examples of business models that can thrive on Meta. Both have customers whose lifetime value is spread out over six months or more.

At Udemy, they focus on getting users to sign up on their first visit. By aiming to be profitable on ad spend in six months (not one day), they turn Facebook users into long-term customers.

They target a 20 percent payback on ad spend on day one and 100 percent payback in six months. These numbers can serve as a rough guide for your business.

Businesses in fashion, books, and other small purchases also do well on Meta, especially Instagram.

How to Target Meta Ads

The number one mistake most marketers make with Facebook ads is not targeting them correctly.

Facebook’s ad targeting options are unparalleled. You can target by demographics and create custom or lookalike audiences to target users similar to your best customers. You can also use retargeting ads to target users who have interacted with your page, or visited your website.

On Meta, you can directly target users by:

  • location
  • age
  • gender
  • interests
  • connections
  • relationship status
  • languages
  • education
  • workplaces

Each option can be useful, depending on your audience. Most marketers should focus on location, age, gender, and interests.

Location allows you to target users in the country, state, city, or zip code that you service.

Age and gender targeting should be based on your existing customers. If women 25-44 are the bulk of your customers, start targeting them. If they prove to be profitable, you can then expand your targeting.

Interest targeting is the most powerful but misused feature of Facebook ads. When creating an ad, you have two options: broad categories or detailed interests.

Maximizing Investment with Broad Category Targeting

Broad categories include topics like Gardening, Horror Movies, and Consumer Electronics.

Meta also added targets like Engaged (1 year), Expecting Parents, Away from Hometown, and Has Birthday in 1 Week.

Broad interests may seem like an efficient way to reach a large audience. However, these users often cost more and spend less. You’ll also need to install the Meta pixel.

This used to be an ineffective way to reach audiences because it targeted too large of an audience; however, adding the Meta pixel and dynamic ads makes this far more effective.

It is worth testing, but detailed interest targeting is often more effective.

Detailed Targeting: A Powerful Meta Ad Targeting Strategy

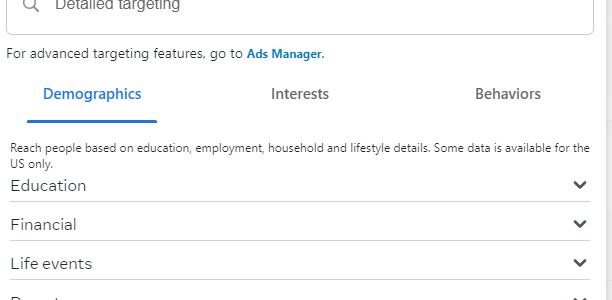
Detailed targeting allows you to target Meta users based on more detailed interests and onsite behaviors.

For example, you can target users based on the following:

  • Ads they’ve clicked on.
  • Facebook or Instagram pages they interact with.
  • Activities across Meta, including things like which device they use or travel preferences.
  • More detailed demographics.
  • Speed of their internet connection.

Detailed targeting also allows Meta advertisers to include or exclude specific people using the “or”/”and” targeting.

For example, if you can target users who “are ” college graduates, you can then focus on those that “are ” interested in travel “or” interested in food. This lets you get a lot more detailed about your target audience.

Meta Ads Lookalike Audiences

In addition to targeting users directly, Meta allows you to target a group called Lookalike Audiences.

What are Meta Lookalike Audiences? These are Meta users that are similar to your current users. You’ll need to have Meta Pixel or other custom audience data, like an email list. Then, you can ask Facebook to find similar users.

They are highly customizable — for example, you could create a “new customer” ad, then exclude current customers from seeing your ads.

This page on Meta walks you through how to create Lookalike audiences.

Retargeting with Facebook Ads

Retargeting ads allow you to reach customers already familiar with your brand. You can double down by creating dynamic ads that show people items they are likely to be interested in.

For example, you could retarget users who have visited your site, left items in their cart, or clicked on an ad.

To create a retargeting ad, the first step is to install the Meta Pixel. Follow this guide in Meta’s Business Help Center to get started.

Images for Meta Ads

The most important part of your Meta ad is the image. You can write the most brilliant copy in the world, but if your image doesn’t catch a user’s eye, you won’t get any clicks.

Don’t use:

low-quality images

generic stock photography

any images you don’t have the rights to use

Also, don’t steal anything from Google Images. Unless you’re a famous brand, don’t use your logo.

Now that we have the no’s out of the way, how should advertisers find images to use? Buy them, create them yourself, or use ones with a Creative Commons license.

Below you’ll learn which types of images work best and where specifically to find them.

Use Images of People on Your Ads

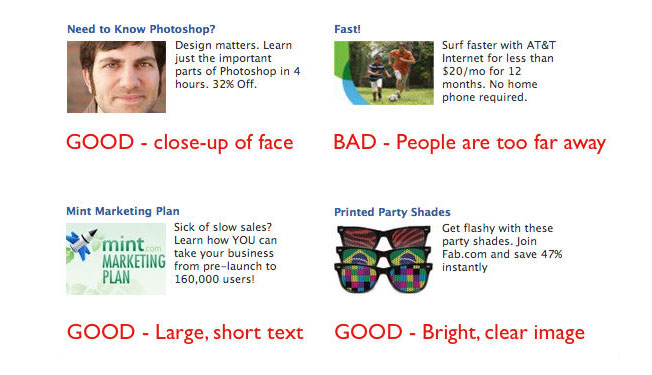
Images of people work best, preferably their faces. Use close-ups of attractive faces that resemble your target audience.

Younger isn’t always better. If you’re targeting retirees, test pictures of people over 60. Using a 25-year-old woman wouldn’t make sense.

Facebook sidebar ad images are small (254 by 133 pixels), while Instagram feed ads should be no wider than 500 pixels. You can check out the specs for other Meta ads here.

Make sure to focus on a person’s face and crop it if necessary. Don’t use a blurry or dark picture.

Use this ad image guide on Facebook to see the size requirements for other ads, like a desktop news feed, a mobile news feed, instant articles, stories, etc.

Advanced tip: Use images of people facing to the right. Users will follow the subject’s line of sight and be more likely to read your ad text.

Aside from models, you can also feature the people behind your business and showcase some of your customers (with their permission, of course.)

The Importance of Typography in Advertising

Clear, readable type can also attract clicks. Bright colors will help your ad stand out.

Just like with text copy, use a question or express a benefit to the user. Treat the text in the image as an extension of your copy.

You can also combine text and images, like this ad for a podcast about Nashville:

A screenshot of an ad by The Nashville Retrospect, a podcast about Nashville.

Add Humor and Fun Into Your Ads

Crazy or funny pictures definitely attract clicks. See I Can Has Cheezburger, 9GAG, or any popular meme page.

Unfortunately, even with descriptive ad text, these ads don’t always convert well. If you use this type of ad, set a low budget and track the performance closely. You’ll often attract lots of curiosity clicks that won’t convert.
An example of advertisement humor and fun.

How to Create Images for Meta Ads

You have three options for images to use in your Meta ads: buy them, find ones that are already licensed, or create them yourself.

You can buy stock photography at many sites, including iStockPhoto. There are also sites with free stock photos like Pixabay. Don’t use stock photos that look like stock photos. No generic businessmen or stark white backgrounds, please.

Users recognize stock photos and will ignore them. Instead, find unique photos and give them personality by cropping or editing them and applying filters. You can use Pixlr, an online image editor, for both.

If you don’t have the money to buy photos, search for Creative Commons licensed images using Google Images:

A screenshot of the Google search bar that has "business woman" typed in.

The third option is to create the images yourself. If you’re a graphic designer, this is easy. If you aren’t, you can still create typographic images or use basic image editing to create something original from existing pictures.

Rotate Ads

Each campaign should have at least three ads with the same interest targets. Using a small number of ads will allow you to gather data on each one. For a given campaign, only one to two ads will get a lot of impressions, so don’t bother running too many at once.

After a few days, delete the ads with the lowest click-through rates (CTRs) and keep iterating on the winners to continually increase your CTR.

Aim for 0.1% as a benchmark. You’ll likely start out closer to the average of 0.04%.

Writing Successful Facebook (Now Meta) Ad Copy

After seeing your image, users will (hopefully) read your ad text. Here you can sell them on your product or service and earn their click.

Despite the 40-character headline and 125-character body text limits, we can still use the famous copywriting formula AIDA.

  • (A)ttention: Draw users into the ad with an attention-grabbing headline.
  • (I)nterest: Get the user interested in your product by briefly describing the most important benefit of using it.
  • (D)esire: Create immediate desire for your product with a discount, free trial, or limited-time offer.
  • (A)ction: End the ad with a call to action.

AIDA is a lot to fit into 165 characters, but it can be done. Write five or ten ads until you’re able to fit a succinct sales pitch into the ad.

Here’s an example for an online programming course:

Become a Web Developer

Learn everything you need to become a web developer from scratch.

Save 65%. Enroll now!

This tells users what they’ll get, why it matters, and why they should care in just a few lines.

Bidding on Meta Ads

Like on any ad network, strategic bidding can mean the difference between profit and a failed test on Meta.

After you create your ad, Meta provides a suggested bid range. When you’re just starting out, set your bid near the low end of this range, so you don’t waste ad spend on an untested ad.

Your CTR will quickly start to dictate the price you’ll need to pay for traffic. If your CTR is high, your suggested bids will decrease.

You’ll need to bid more for each click if your CTR is low. Optimize your ads and targets to continually increase your CTR.

In addition to click volume, your bid will also dictate how much of your target audience you can reach.

Meta provides a great chart for every campaign showing the size of your target audience and how much of that audience you’ve reached.
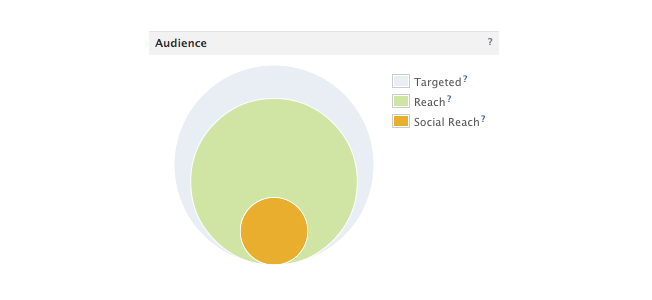
An audience chart that showcases percentage targeted, reached, and social reached.

Increasing your bid will help your ad reach more of your target audience. If your ad is performing well but reaches less than 75 percent of your target audience, you can increase your bid to get more clicks.

If your audience penetration is high, increasing your budget will increase your ad’s frequency: how many times a targeted user will see it.

Meta also offers automated bidding that uses AI to determine what bids to make. If you use this strategy, make sure to keep a close eye on your budget so you don’t overspend.

Landing Pages for Meta Ads

Getting a click on your Meta ad is only the beginning. You still need the visitor to convert.

Make sure to send traffic to a targeted, high-converting landing page. You know their age, gender, and interests, so deliver a page that solves their problems.

The landing page should also contain the registration form or email submit box that you’ll track as a conversion.

Focus the landing page on this action, not the later sale. If you want visitors to sign up for your newsletter, show them the benefits or offer a free gift for their email.

How to Track Meta Ad Performance

Like PPC ads, you’ll want to track your meta ad performance. The exact metrics that are important to you will vary by goal. For example, ad impressions and clicks are important if your goal is to increase brand awareness. If your goal is to increase your email list, then you’d want more actual form fills.

Here are a few things to keep in mind when tracking Meta ad performance.

Conversion Tracking

To track conversions, you’ll need to install Meta’s pixel. Make sure to track conversions for both specific ads and ad campaigns to get a deeper understanding of what ads are converting. Pay attention to both your ads and your audience—targeting the right audience often makes all the difference.

Performance Tracking

You also need to monitor your performance within Meta Business Suite. The most important metric to track is the click-through rate. Your CTR affects both the number of clicks you’ll receive and the amount you will pay per click.

Ads with a low CTR will stop serving or become more expensive. Ads with a high CTR will generate as many clicks as will fit within your budget. They will also cost less. Keep a close eye on CTR by interests and ads to learn which audiences work best and which ads resonate with them.

Keep in mind: Even the best ad’s performance will decline over time. The smaller your target audience is, the faster this will happen. Usually, you’ll see your traffic start to drop off in 3-10 days.

When this happens, refresh the ads with new images and copy. Duplicate your existing ads, then change the image and ad text.

Do not edit the existing ad. Delete any existing ads not getting clicks. You’ll see the new ads accruing impressions and clicks the next day.

Monitor the images’ performance over time to see which generates the best CTR and maintains their traffic the longest. You can rotate high-performing images back every few weeks until they stop getting clicked at all.

Use A/B Testing in Meta

A/B testing allows you to change variables in your ads, such as the ad copy, images, or audience, to see which strategy performs best. Meta allows you to create A/B tests in Ads Manager, so you won’t even need to use a third-party tool.

Meta Ads FAQs

Does Facebook still have ads since becoming Meta?

Yes, Facebook ads still exist. Using Meta Business Suite (formerly Facebook Business Suite), you can create ads for just Facebook or Facebook and Instagram.

How does Meta (formerly Facebook) target ads?

Meta allows advertisers to target ads based on demographic information, interests, location, and past behaviors. This makes it an ideal platform for advertisers, whether they want to reach very niche audiences or very broad audiences.

What is the Meta Ads Manager?

Meta Ads Manager is a stripped-down version of Meta Business Suite that allows you to create new ads fast. It doesn’t offer as many features, but it may be easier for some users to navigate.

What is the difference between Facebook and Meta ads?

Facebook ads are only on Facebook, while Meta Ads can currently appear on Facebook or Instagram. In 2021, Facebook changed its parent company name to Meta, and changed Facebook Business Suite to Meta Business Suite, where advertisers can manage ads on both platforms.

What are some of the available Meta Ad options?

Posts, images, carousels, boosted posts, Reels, Stories, and more.

{
“@context”: “https://schema.org”,
“@type”: “FAQPage”,
“mainEntity”: [
{
“@type”: “Question”,
“name”: “Does Facebook still have ads since becoming Meta? “,
“acceptedAnswer”: {
“@type”: “Answer”,
“text”: ”

Yes, Facebook ads still exist. Using Meta Business Suite (formerly Facebook Business Suite), you can create ads for just Facebook or Facebook and Instagram.


}
}
, {
“@type”: “Question”,
“name”: “How does Meta (formerly Facebook) target ads?”,
“acceptedAnswer”: {
“@type”: “Answer”,
“text”: ”

Meta allows advertisers to target ads based on demographic information, interests, location, and past behaviors. This makes it an ideal platform for advertisers, whether they want to reach very niche audiences or very broad audiences.


}
}
, {
“@type”: “Question”,
“name”: “What is the Meta Ads Manager?”,
“acceptedAnswer”: {
“@type”: “Answer”,
“text”: ”

Meta Ads Manager is a stripped-down version of Meta Business Suite that allows you to create new ads fast. It doesn’t offer as many features, but it may be easier for some users to navigate.


}
}
, {
“@type”: “Question”,
“name”: “What is the difference between Facebook and Meta ads?”,
“acceptedAnswer”: {
“@type”: “Answer”,
“text”: ”

Facebook ads are only on Facebook, while Meta Ads can currently appear on Facebook or Instagram. In 2021, Facebook changed its parent company name to Meta, and changed Facebook Business Suite to Meta Business Suite, where advertisers can manage ads on both platforms.


}
}
, {
“@type”: “Question”,
“name”: “What are some of the available Meta Ad options?”,
“acceptedAnswer”: {
“@type”: “Answer”,
“text”: ”

Posts, images, carousels, boosted posts, Reels, Stories, and more.


}
}
]
}

Conclusion

Despite the learning curve, Meta advertising can be a great marketing channel for the right business. The most important things to remember are: target specific interests, use eye-catching images, give users a low-friction conversion, and track everything.

After a week or two of learning what works for your business, you’ll be able to generate a steady source of Meta conversions.

What are your best Meta advertising tips? Share them in the comments.

12 Essential Open Graph Meta Tags for Facebook and Twitter

Every marketer knows the phrase ‘content is king’, but that content is nothing without readers and followers.

These days, there’s one sure-fire way to get your content out to a broader audience and share your awesome new blog post: social media.

With a ready audience of millions, sites like Facebook and Twitter are some of the best ways of getting the word out. However, if you want to optimize that outreach potential, there’s a super-easy way to do it: open graph tags (OPGs).

Not heard of the open graph protocol behind OPGs? Then let me explain what are they, why do they matter, and — most importantly — how do you use them?

What Is Open Graph and Why Was It Created?

Facebook introduced Open Graph in 2010 to promote integration between Facebook and other websites by allowing posts to become rich objects with the same functionality as other Facebook objects.

Put simply, it helps optimize Facebook posts by providing more control over how information travels from a third-party website to Facebook when a page is shared (or liked, etc.).

To make this possible, information is sent via Open Graph tags in the <head> part of the website’s code.

Other social media sites are also taking advantage of social meta tags. For instance, Twitter and Linkedin recognize Open Graph tags; Twitter has its own meta tags for Twitter Cards, but if Twitter robots cannot find any, it uses OGP tags instead.

Neil Patel looking at the camera.

See How My Agency Can Drive Massive Amounts of Traffic to Your Website

  • SEO – unlock massive amounts of SEO traffic. See real results.
  • Content Marketing – our team creates epic content that will get shared, get links, and attract traffic.
  • Paid media – effective paid strategies with clear ROI.

BOOK A CALL

Why Marketers Should Care About OGP Tags

OGP tags are vital for marketers because they help ensure that when a user shares a link to your content on social media, the correct information is automatically populated. This can help increase engagement and help potential customers learn more about your brand or product.

Additionally, marketers should care about OPG tags because social media sites are the primary drivers of most web traffic. Consequently, the ability to harness the power of social meta tags is a vital skill for today’s marketers.

Also, using OGP tags can help you track how your content is performing on social media, enabling you to adapt your sharing strategy.

However, most notably: open graph tags can have a massive impact on conversions and click-through rates by solving common issues.

For instance, have you ever shared a link on Facebook only to find the thumbnail was missing, or there was a different picture than you expected?

Knowing just a little about OGP tags can help you tackle these problems and improve your social media marketing.

There’s one thing they won’t do, though, and that’s influence your on-page SEO. However, the boost you can get from the extra reach on social media means it’s worth looking into.

Now, let’s look at the most essential OGP tags for Facebook and how to optimize them for better sharing.

Understanding Facebook OGP Tags

As explained in the intro, OGP tags are crucial because they allow you to control how your content appears when it’s shared on sites like Facebook. The open graph tags let you control the title, description, and image in the post; it’s a great way to ensure your content looks amazing when you share it.

In addition:

  • Adding OGP tags ensures that you use the correct image and description, which can help improve click-through rate, while enabling you to add specific details such as whether it’s a movie, book, or product.
  • Using OGP tags allows you to track how your content is performing on Facebook. When someone shares one of your articles on the site, the OG tags send traffic data back to Facebook. This data then lets you see which articles are getting the most engagement, and which need improvement.
  • Including OGP tags ensures you use the correct image and description when sharing your links on Facebook, which can help improve click-through rates.
  • Adding OGP tags is easy, and most content management systems have plugins or extensions to simplify the process.

Facebook has several open graph tag types. You can use OGP tags to specify things like the site’s name, the image used as the thumbnail on Facebook, and the description that will appear when someone shares your page.

In this section, I cover the different types, and then explain how to use them.

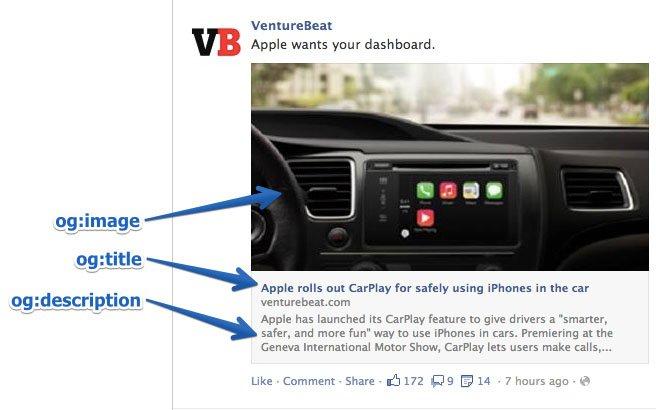
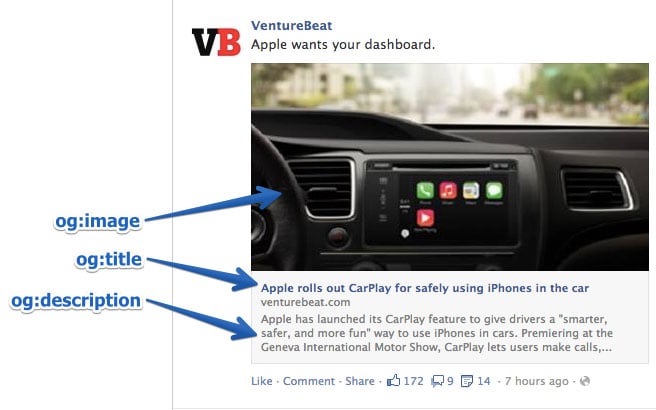
An image of the inside of a car with arrows pointing to different types of ogp tags.
An example of various OGP tags being used in a post from VentureBeat.

og:title

The og: title is how you define your content’s title. It serves a similar purpose as the traditional meta title tag in your code. In fact, if Facebook doesn’t find the og:title tag on your page, it uses the open graph tag title instead.

As Facebook explains, most content is shared as a URL. If you want control over the way your content looks on its site, you must add OGP tags.

In Facebook’s own words,

“Without these Open Graph tags, the Facebook Crawler uses internal heuristics to make a best guess about the title, description, and preview image for your content. Designate this info explicitly with Open Graph tags to ensure the highest quality posts on Facebook.”

To get the best from OGP, you also want to think about the way your text appears and its length.

Keep in mind that the text shown on a Facebook feed is bold and extremely eye-catching. It must be compelling, just like a good post title.

There is no limit on the number of characters, but it’s best to stay between 60 and 90. If your title is longer than 100 characters, Facebook will truncate it to only 88!

Example:

<meta property=”og:title” content=”Your eye-catching title here” />

og:url

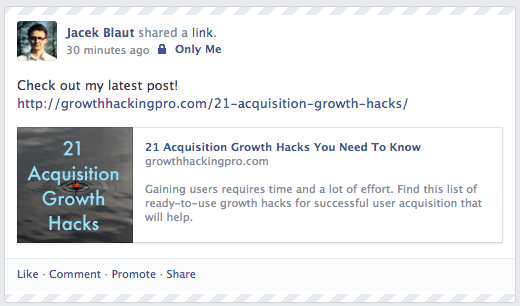
When you share a link on Facebook, you can add Open Graph tags. These tags help Facebook display rich information about the link, such as an image, title, and description.

This is how you set the canonical URL for the page you are sharing. This means that you define one page to which all your shares go. It’s helpful if you have more than one URL for the same content (for example, using parameters). Important note: URL provided is not shown on the Facebook newsfeed, only the domain is visible.

Example:

<meta property=”og:url” content=”http://www.yourdomain.com” />

og:type

This is how you describe the kind of object you share: blog post, video, picture, or whatever. The list to choose from is long. Here are some examples:

Web-based:

  • website
  • article
  • blog

Entertainment:

  • book
  • game
  • movie
  • food

Place:

  • city
  • country

People:

  • actor
  • author
  • politician

Business:

  • company
  • hotel
  • restaurant

You can see the complete list of types here.

This tag is important if your page has a “Like” button and represents a real-life object (like a book or a movie). It determines if your content appears in a user’s interest section of her profile in the event they “Like” it.

In most cases, you will use the “website” value since what you are sharing is a link to a website. In fact, if you don’t define a type, Facebook will read it as “website” by default.

Example:

<meta property=”og:type” content=”website” />

og:description

This metadata descriptor is very similar to the meta description tag in HTML. This is where you describe your content, but instead of it showing on a search engine results page, it shows below the link title on Facebook.

However, unlike a regular meta description tag, it won’t affect your SEO, but it’s still a good idea to make it compelling to get people to click on it.

Og: description tags don’t limit you to a character count, but it’s best to use around 200 letters. In some cases, depending on a link/title/domain, Facebook can display up to 300 characters, but I suggest treating anything above 200 as something extra.

Example:

<meta property=” og:description” content=” Your entertaining and descriptive copy here, if your meta description is good, use it.”/>

og:image

This is the most interesting OGP tag for many marketers because a picture always helps content stand out. This is how you ensure that Facebook shows a particular thumbnail when you share your page, and it can be beneficial for your conversion rates.

Make sure you set the og:image you choose, otherwise, Facebook shows something stupid like an unwanted ad banner scraped from the page or nothing. You definitely don’t want that!

Here’s a few more pointers:

  • It’s important to remember that if your page is static and you don’t use any sort of content management system (CMS) (like WordPress), you need to change the og:image manually for each of your pages.
  • If you control your website with a CMS and you install the relevant plugin, the og:image tags are assigned automatically for each page. Look for the list of plugins further down.
  • The most frequently recommended resolution for an OG image is 1200 pixels x 627 pixels (1.91/1 ratio). At this size, your thumbnail will be big and stand out from the crowd. Just don’t exceed the 5MB size limit.
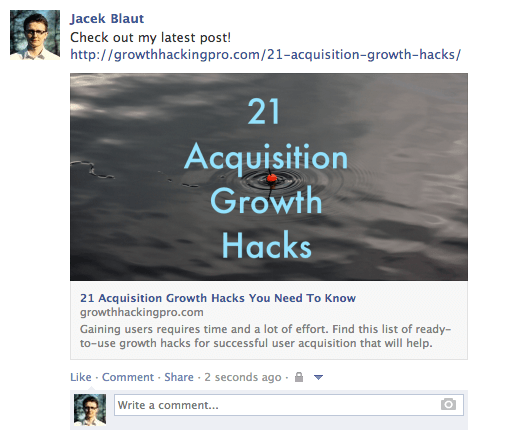
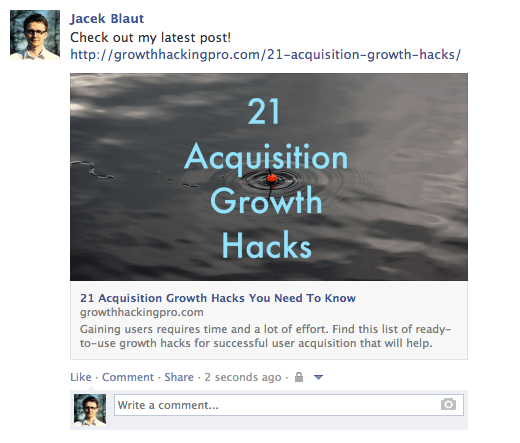
An example Facebook post used to represent og:image tags.
An example of the og:image OGP tag with the image rendered at full size.

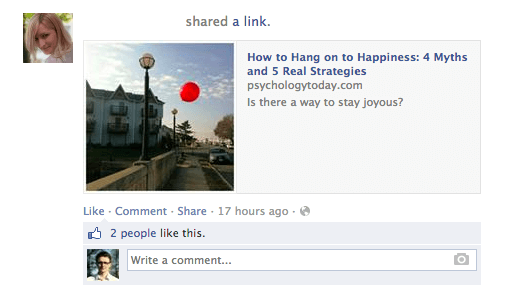
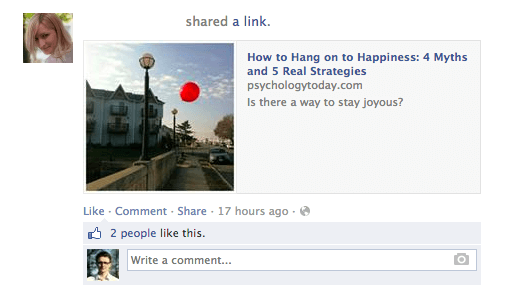
If you use an image that is smaller than 400 pixels x 209 pixels, it will render as a much smaller thumbnail. It’s nowhere nearly as eye-catching.

An example facebook post showcasing a smaller thumbnail image as an example of thumbnail size.
An example of the og:image OGP tag with the image rendered at a smaller size.

Keep in mind that the picture you use as an Open Graph image can be different from what you have on your page.

Why wouldn’t you leverage that opportunity to stand out even more?

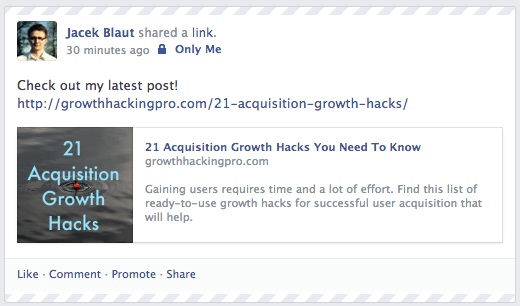
For example, if your title is good, but the picture you are using is not very exciting (not an infographic or a good-looking person, etc.), consider using an image with a good line or two of copy instead (see example below).

One thing you need to remember if you do this: place your text, or the most significant part of it, in the middle of the image. This matters because Facebook trims the sides of thumbnails.

An example facebook post showing where to use text in thumbnails.
An example of putting text in the most effective part of a thumbnail.

Example:

<meta property=”og:image” content=”http://www.yourdomain.com/image-name.jpg” />

For an easy way to add OPGs, there’s an online generator.

Advanced Facebook Open Graph Tags

The Open Graph tags above are the ones you need to know. However, you can use other, more advanced tags to provide even more in-depth specifications.

For example

  • og:locale – defines the language; American English is the default
  • og:site_name – if the page (object) you are sharing is part of a larger network
  • og:audio or og:video – to add additional audio or video files to your object
  • fb:app_id – for linking to a Facebook application (e.g., FB Comments) with the object

Check Your OGP Tags

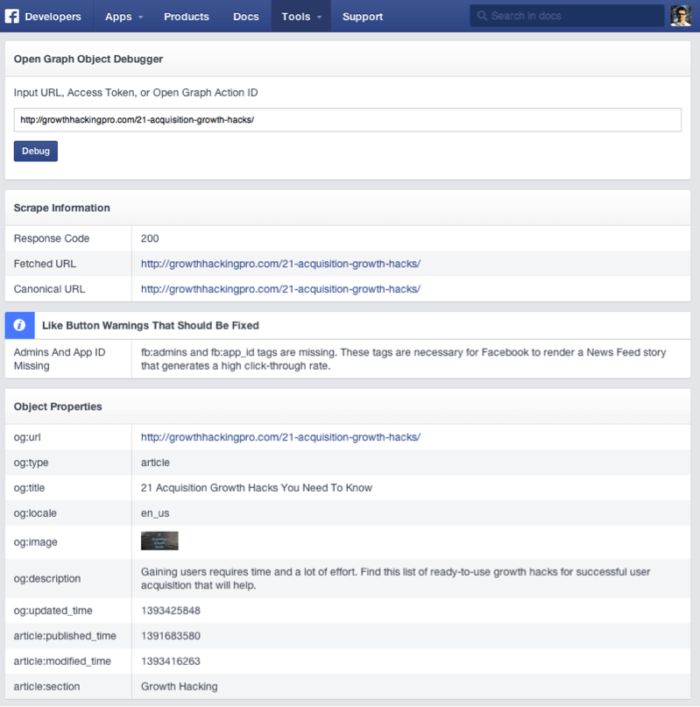
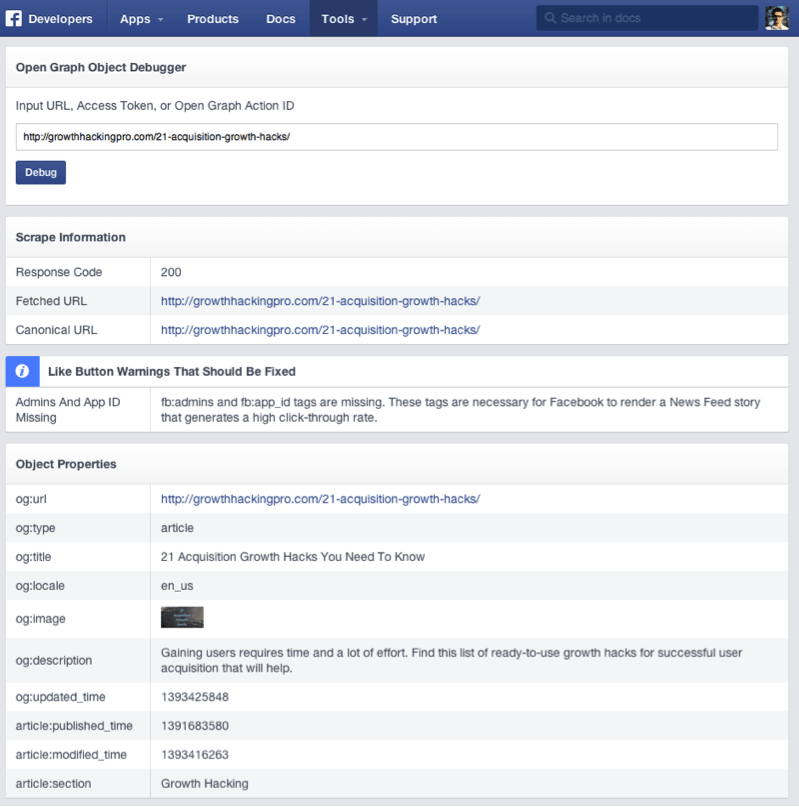
Once you’ve set up your open graph tags, you need to check they’re working okay. To do this, you can use the Sharing Debugger to see how the information displays when you share your website content on Facebook, Messenger, and other places. Also, the Batch Invalidator will let you refresh this information for multiple URLs at the same time.

To use it, simply enter the URL of the page you’re having problems with and click Debug.

Facebook’s debugging tool has two beneficial functionalities.

First, when you type in the link you want to check, it returns any errors and suggestions for OG tags, if there are any. You can also check what the og:image looks like, your description, and so on.

Second, it clears the Facebook cache. Imagine this: you post a link to Facebook, but then you see a mistake in the thumbnail, so you go back to your site and adjust the OGP tags, and you post it again on Facebook.

Probably, nothing will happen. The thumbnail will stay the same. This is because of the cache. The Facebook Sharing Debugger will refresh the cache on your links after any adjustments, so remember to use it each time.

A screenshot of the backend of facebook's debugging tool.
The Facebook Debugging Tool.

Open Graph Tags for Twitter: Twitter Cards

If you’re not familiar with Twitter’s cards, they allow you to attach media files and add extra information to your tweets. This can be useful for increasing the visibility of your tweets and providing additional context for users who click through.

Although they’re not the same thing, Twitter’s cards use the same open graph protocol and it looks similar to OGP tags. Implementing these tags makes it much easier to create Twitter cards without duplication issues.

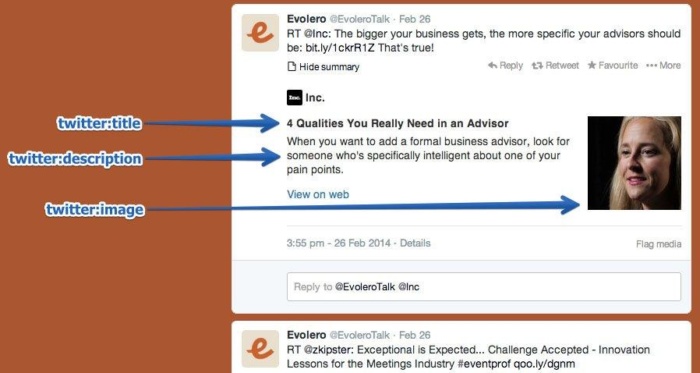
Like Facebook’s Open Graph tags, Twitter Cards let you stand out from the crowd of tweets. In short, they allow you to generate some additional content from your 140-character tweet.

This doesn’t show up on people’s feeds automatically, but it adds a little “View summary” button below the tweet.

You can use open graph tags to specify your content’s title, description, and image, and to determine your page’s content type and the audience you want to reach.

A screenshot of a tweet with the "view summary" button highlighted.
An example of open graph tags for Twitter.

When you click it:

In example of the different tpyes of open graph tags for twitter and what they look like.
An example of how title, description, and image tags are used on Twitter.

The Twitter card is tempting to click and provides a handy summary of the shared page. However, surprisingly, not many sites take advantage of these tags, giving you a great opportunity to make your tweets stand out from other feeds.

Installing these cards isn’t difficult, and there’s a quick workaround, even if you’re not tech-savvy. Just install a WordPress plugin.

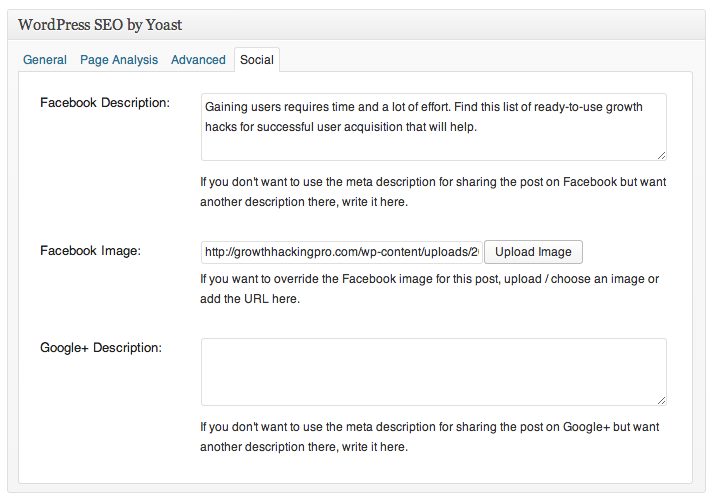
WordPress SEO by Yoast does the job perfectly well.

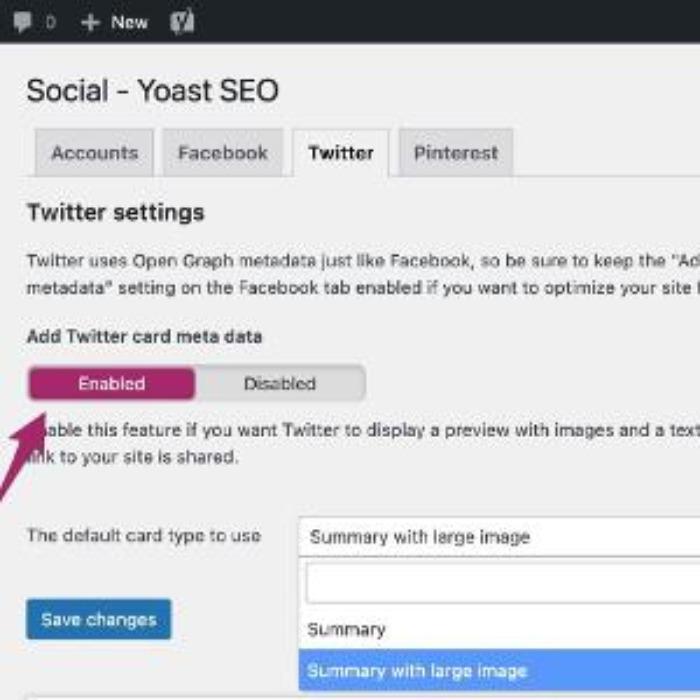
To activate Twitter cards in Yoast:

A screenshot of WordPress SEO by Yoast.
Showcasing how to activate Twitter cards in Yoast.
  • Log into WordPress
  • Go to your dashboard,
  • Choose the ‘SEO’ option from the list.
  • Click on SEO and choose social. Click.
  • Go to accounts and click on your Twitter username
  • Select the ‘Twitter’ tab by clicking
  • Scroll down to ‘Add Twitter Card Meta Data’
  • Click ‘enabled’
  • Finally, save any changes.

If the above method isn’t an option, ask your web developer and give them the ready-to-implement Twitter Card tags. Here’s how you’ll make them.

twitter: card

This required tag works in a similar way to og:type. It describes the type of content you are sharing. There are seven options: summary, photo, video, product, app, gallery, and “large version” summary.

Depending on the type of content you choose, the link at the bottom of your tweet changes. You can get “View summary” for summaries, “View photo” for photos, etc. If this tag is not set, Twitter reads your link as a “Summary” by default.

Example:

<meta name=”twitter:card” content=”summary” />

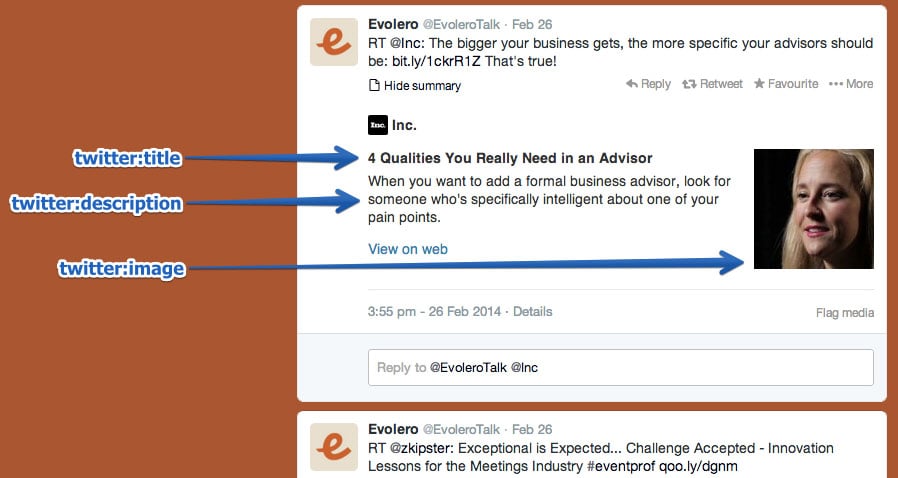
twitter:title

This basically does the same thing as its OG counterpart. You specify the title for your article that will show up in bold. It’s smart to avoid repeating the same text you have in your tweet. Make the most of the space provided and let the two pieces of copy play on each other to reinforce the message. Use up to 70 characters.

Example:

<meta name=”twitter:title” content=”Your title here” />

twitter:description

Use this tag to write a descriptive lead to the page you are sharing. As with Open Graph tags, don’t focus on keywords because they won’t matter for your SEO. Create compelling copy that nicely complements your tweet and the title. Twitter limits this part to 200 characters.

Example:

<meta name=”twitter:description” content=”Your 200-character description here” />

twitter:url

This sets the canonical URL for the content you are sharing. (For more information, review the description for the equivalent Facebook Open Graph tag above.)

Example:

<meta name=”twitter:url” content=”http://www.yourdomain.com” />

twitter:image

Yes, you guessed it. This is how you set the picture to go with your tweet. Twitter allows two options, a card with a smaller or a larger image.

You decide which one you want in the type tag. If you go for the large option, make sure it has a resolution of at least 280x150px and that the file size is not more than 1MB. You can consider using the same trick as the Facebook thumbnail: add some text to the image to boost the message.

Example:

<meta name=”twitter:image” content=”http://www.yourdomain.com /image-name.jpg” />

Request Approval from Twitter

Adding cards to your tweets is easy – all you need to do is include some extra code to the end of your tweet. The code tells Twitter which card type you want to use and how you wish the content to look.

There are several types of Twitter Cards, so you can choose the one that best suits your needs.

However, keep in mind that, before you can fully benefit from Twitter Cards, you need to request approval for your page from Twitter.

Fortunately, this only takes about 15 minutes and can be done easily using their Card Validator.

To get started,

  • Select the type of card you wish to use.
  • Add your meta tags
  • Check the URL with Twitter’s validator tool.
  • Test in the validator or get approval for your card, then tweet the URL to see your card displayed. https://developer.twitter.com/en/docs/twitter-for-websites/cards/overview/abouts-cards

Once you get approval, Card Validator serves the same purpose as the Facebook Sharing Debugger, allowing you to check your links before committing.

Twitter Card Plugins

Like with Facebook, plenty of plugins are available for implementing Twitter Cards. Here are a few:

How to Implement Open Graph Tags?

How do you implement OGP tags? Basically, they belong to the <head> part of your page’s HTML. If you don’t manage the code, you’ll need to ask your web developer for help. You can prepare the whole package yourself using the tips above to save their valuable time.

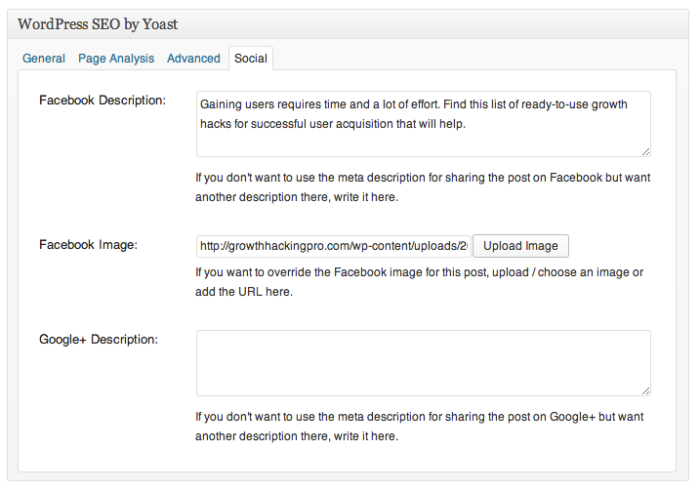
If you are using WordPress, just install one of the plugins that neatly implements the code for you. As I’ve explained, I like to use WordPress SEO by Yoast, but there are some other free tools you can use, including:

A screenshot of Yoast's social tab.
How to implement open graph tags through Yoast.

Here are other OG plugins/extensions/add-ons for:

Like Facebook. Twitter offers a tool to validate your OGP tags, Twitter Card Validator is a tool that allows you to test and preview how your tweets will appear when they are shared on other websites. To use the validator, enter the URL of the website on which you want to share your tweet and click “validate.”

The validator will show you a preview of how your tweet will appear on the website, and display the title, description, and image.

FAQs

What Is Open Graph, and why was it created?

Open Graph Protocol (OGP) is a set of tags used on websites to define the structure of a web page so that it can be more easily shared on social media platforms. OGP tags allow web admins to control how their content appears when it is shared on social media sites like Facebook and LinkedIn.

How do you find Open Graph tags?

You find open graph in the webpage’s <Head> section.

What is SEO OGP?

This is a type of metadata which Facebook introduced back in 2010. It allows semantic integration into Facebook’s HTML, allowing website owners to show Facebook how they would like Facebook to index their sites. https://www.oreilly.com/library/view/facebook-application-development/9780470768730/ch006-sec012.html

How do you check OGP tags?

There are free tools available to check your OGP Tags. Sites like Facebook also offer a validator so that you can check your tags for errors.

Conclusion

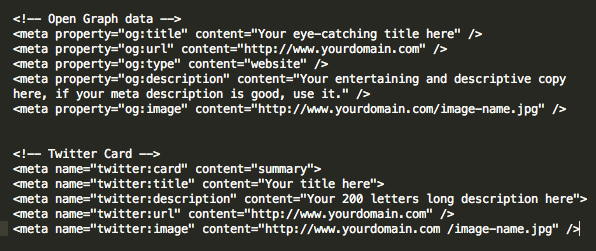
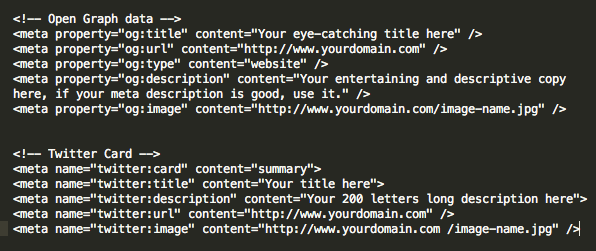
The final code for both Facebook and Twitter should look more-or-less like this:

A line of code showing what optimized Twitter and Facebook posts should look like.
Optimized code for both Facebook and Twitter posts.

It might seem a bit confusing, but luckily several tools make the process easier — you don’t need to know how to code.

There are three main types of Open Graph meta tags: og:title, og:image, and og:description, and taking the effort to implement them has distinct advantages, including better click-throughs and engagement, which can all lead to added conversions. The additional measures of adding Open graph also increase visibility.

However, despite these advantages, it’s surprising how few people optimize these tags. It’s worth doing because it helps you stand out and draw more clicks and views, and it can even help improve your SEO —all things that lead to more profit.

Have you implemented open graph meta tags? How has it impacted your site?

How to Use Meta Business Suite (Formerly Facebook Business Suite)

Businesses spend nearly 115 billion total on advertising across the Meta (formerly Facebook) platforms. Why? It works! And not only that; Meta has great tools that allow you to easily manage and track your business accounts.

Are you struggling to keep up with your Instagram and Facebook marketing?

DMs and comments falling through the cracks?

Do the multiple tabs for all your accounts and features like the Ad Manager drive you nuts?

Then you’re going to fall head over heels with Meta Business Suite, called Facebook Business Suite before Facebook changed its name to Meta.

It’s the platform’s newest creation, designed to iron out the time-sucking road bumps in social media management and make it easier for businesses to manage their Instagram and Facebook profiles.

Below, I’m breaking down everything you need to know about Meta Business Suite. We’ll unpack what it is, everything you can do with the tool, how it can benefit your business and a quick walkthrough on how to set up your account.

What Is Facebook Business Suite (now Meta Business Suite) and How Does It Work?

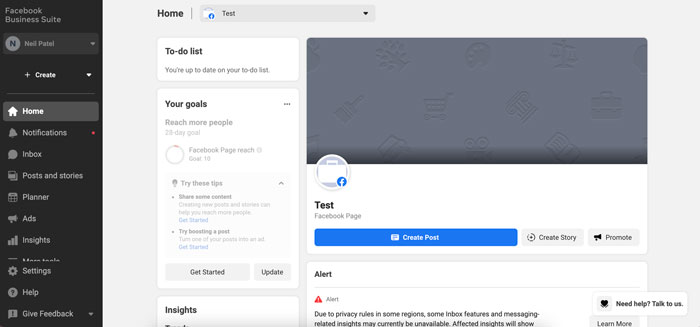
Meta Business Suite streamlines your Facebook and Instagram accounts into one easy-to-use dashboard.

Through the platform, you can manage all accounts you own or administrate with various tools to make controlling your business’s social media presence much easier.

The best part? It’s free and available on mobile and desktop.

All you need to do is link up your accounts, and you’ll instantly have access to an overview dashboard of your Facebook Pages and Instagram accounts.

You’ll be able to:

  • create a to-do list of notifications to manage
  • check insights on your performance and audience growth
  • create or see recent posts or stories
  • create or manage recent ads
  • see content calendar
  • view content inspiration
  • communicate with an inbox for Facebook and Instagram DMs and comments
  • access the Commerce Manager
  • check Business Suite updates

That’s only the tip of the iceberg.

There’s an entire “more tools” section with 12 other features to play around with, including:

  • appointments
  • ad manager
  • events manager
  • instant forms
  • media library

Facebook (Meta) Business Suite vs. Facebook Business Manager

Before Facebook became Meta, they offered both Facebook Business Suite and Facebook Business Manager. Both options are still offered under Meta.

The Business Manager is a backend tool used to share or limit access to your business accounts by assigning one of six different “roles” to those with access to your accounts.

The Business Suite offers front-end management, like merging notifications, scheduling posts, and managing your inbox.

Facebook (Meta) Business Suite allows you to combine and streamline your activity across the Meta social media and messenger platforms.

Leveraging Meta Business Suite Insights

Meta Business Suite makes it easy to track your business accounts and campaigns across the Meta social and messenger platforms.

Here are some of the insights Meta Business Suite provides and how you can use them:

  • Ad spend: You can track your ad spend across all Meta platforms. Based on how well you’re performing, you can adjust your spend accordingly. For example, if you’re spending a lot on Instagram ads but see via other insights that the ads aren’t performing well, you can redirect your budget towards the Meta platforms you’re more successful on.
  • Engagement: Meta (Facebook) Business Suite allows you to see engagement with your organic and boosted content. You can see what content performs best and use that to inform your future strategies and the content you publish on social.
  • Audience demographics: With Business Suite, you can see data about the users who interact with your profile and content. For example, you can see where they’re from, their other interests, their age, and more. You can use this information to continue creating content that targets your existing users, or adjust your strategies if your content isn’t reaching the right audience.

Using the Meta Business Suite App

The Meta (Facebook) Business Suite mobile app allows you to manage your business accounts from your mobile device.

Everything you can do on desktop, you can also do on mobile. You can monitor your account activity, manage your inbox, and even get audience insights.

How to Use Meta Business Suite

Before you can start streamlining your social media management with Facebook (now Meta) Business Suite, you’ll need to follow a simple setup process.

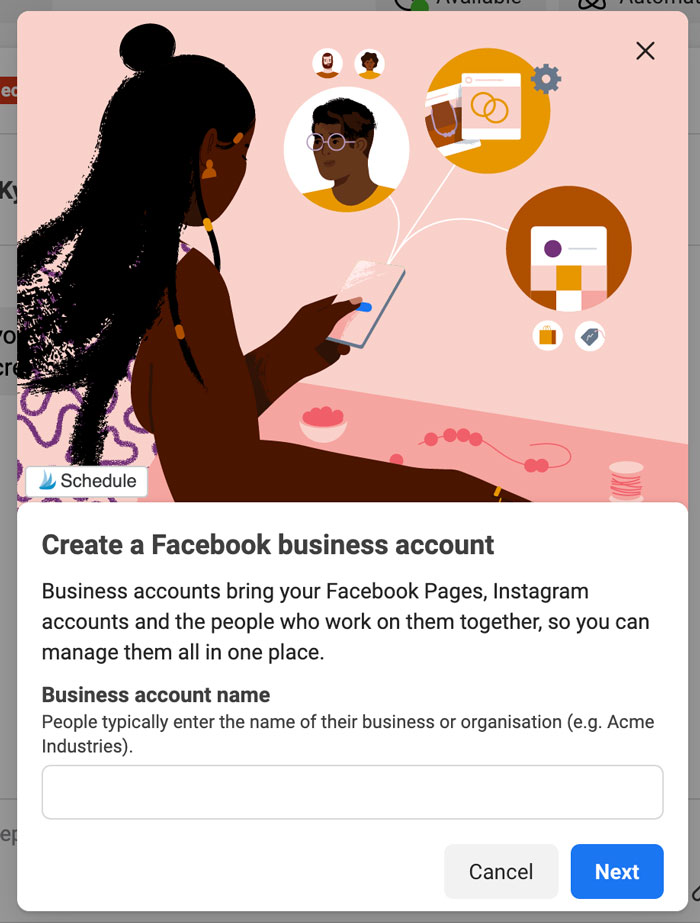
Step 1: Create a Facebook Business Account

Go to https://business.facebook.com/ and select “Create a Facebook Business Account.” Enter your business account name and select “Next” when you’re done.

Create a Facebook Business Account in Facebook Business Suite

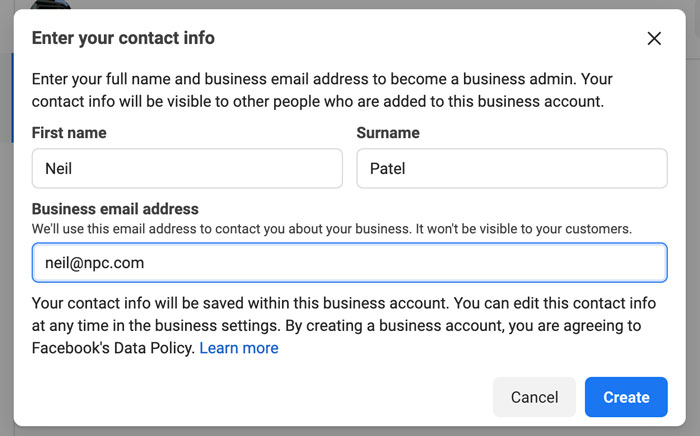
Step 2: Fill in Your Contact Information

Enter your full name and business email address. This information won’t be shared with your followers. Facebook will only use it to contact you.

Contact information form in Facebook Business Suit

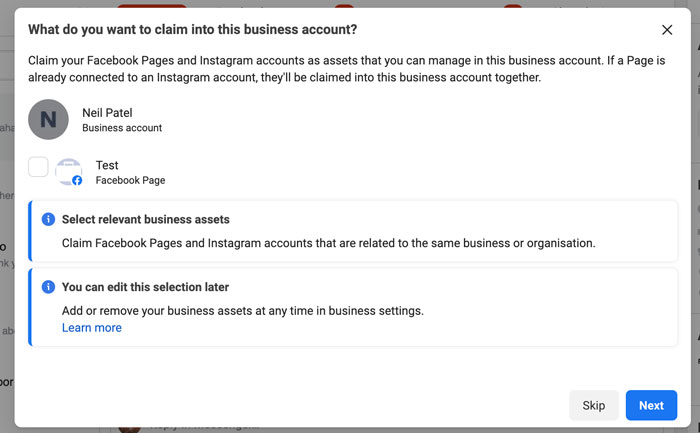
Step 3: Select Your Facebook and Instagram Accounts

The Facebook and Instagram accounts you own are available for you to claim. If you’re managing an account someone else owns, you won’t be able to select it.

In order to select an Instagram account, it needs to be converted to a business or creator account. If you try to select a personal account, Facebook will ask you to switch before continuing the setup process.

Select your facebook and Instagram accounts in Facebook Business Suite

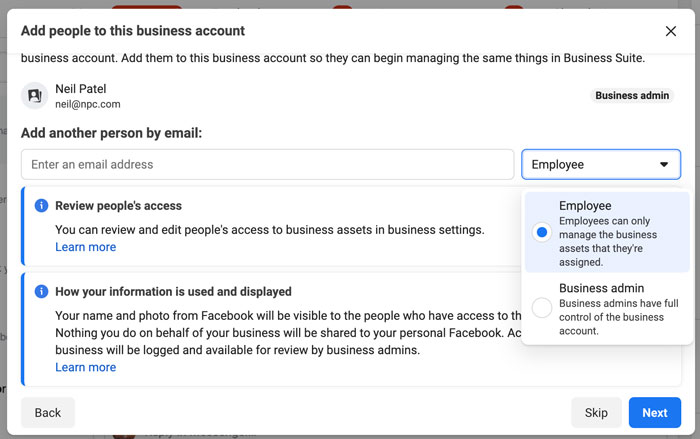
Step 4: Add People to Your Business Account

Here, you can select your page admins. Enter their email address and assign each contact as an employee (limited access) or business admin (full access).

If you’re running your accounts solo, you can skip this step.

In Facebook Business Suite, add people to you business account

Step 5: Review Your Business Account

When you’re happy with your selection and who has access to your Business Suite, click on “Confirm.” Facebook will then take you to your dashboard overview, and you can start using all the tools inside the platform.

In Facebook Business Suit, review your business account

Tools to Use in Meta Business Suite

Curious about the tools inside Facebook Business Suite? Let’s take a deep dive and look at what you can do with the platform and how it can benefit your business.

Monitor Your Inbox

Are comments one of your biggest time suckers? Do you constantly find yourself hopping between apps on your phone or getting inundated with notifications on your desktop?

With the inbox tool in Business Suite, you can see all your Instagram and Facebook comments in one place.

Pop the kettle on, make some coffee, block out 30-minutes in your calendar and respond to everything at once.

  • What about direct messages (DMs)? You’ll find that here too.
  • Got the Facebook chat plugin on your website? You can manage all your messages here as well.
  • Sick of replying to the same question every single day? Business Suite lets you create automated replies for your frequently asked questions.

How’s that for efficiency?

Explore Insights

There are tons of free and paid tools that show you Facebook and Instagram analytics, but few compare the platform’s built-in option.

With Business Suite, you can see your latest statistics for all your accounts.

Gone are the days of toggling between the different apps or going in and out of individual posts.

On the Insights dashboard, you can see an overview of how your content is performing over a specific time period, and sort your posts by:

  • reach
  • likes and reactions
  • comments
  • shares
  • results
  • cost per result
  • link clicks
  • recent content

One of the most interesting features of Insights is the Audience section. It breaks down your current audience for both platforms, and you can see at a glance:

  • age and gender
  • towns and cities
  • top countries

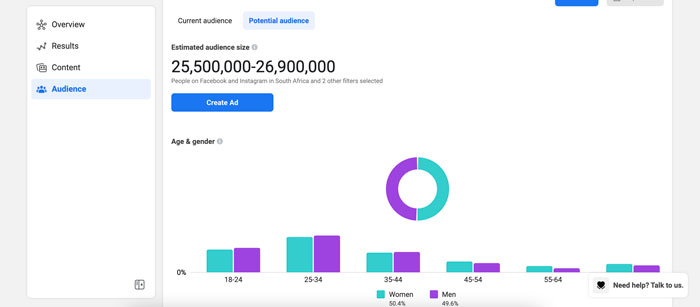
There’s also a potential audience tab. It details your estimated audience size if you run an ad, as well as the top pages liked by your potential audience.

Facebook Business Suite estimated audience size

Not liking what you’re seeing? You can create a custom audience by clicking on the “filter” button and refining the results based on:

  • location
  • age
  • gender
  • interests
  • language
Facebook Business Suite custom audience

Create Posts and Stories

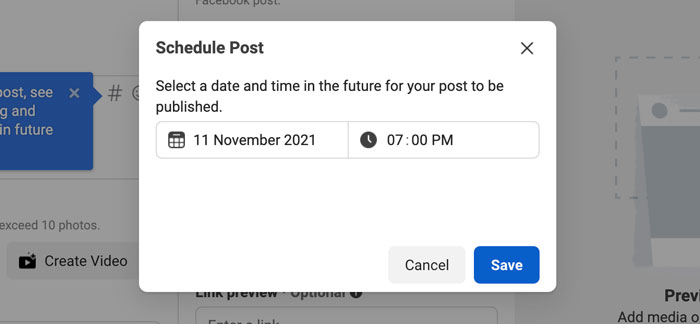
Are you using post-creation apps like Later or Planoly? Business Suite sets itself up as a rival by giving you the ability to create your posts and stories in one place and schedule each one out.

That’s not all.

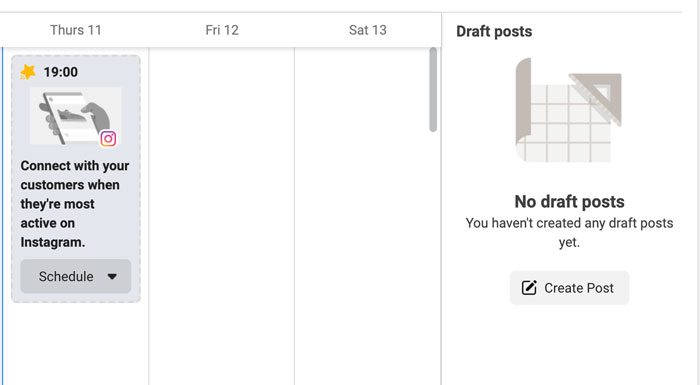
If you go to the Planner section on your dashboard, you’ll see a calendar view of your past and upcoming posts.

Facebook Business Suite planner section on your dashboard

Facebook also recommends a timeslot of when your audience is most online. Click on it, and you can start creating a new post or story.

Facebook Business Suite recommended time slot for publishing

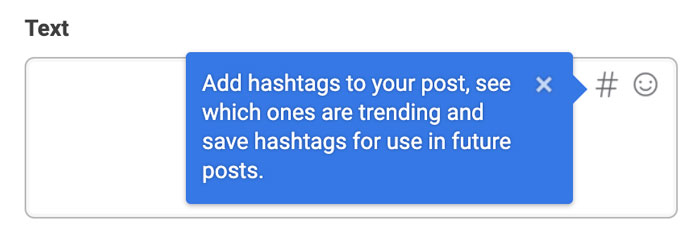
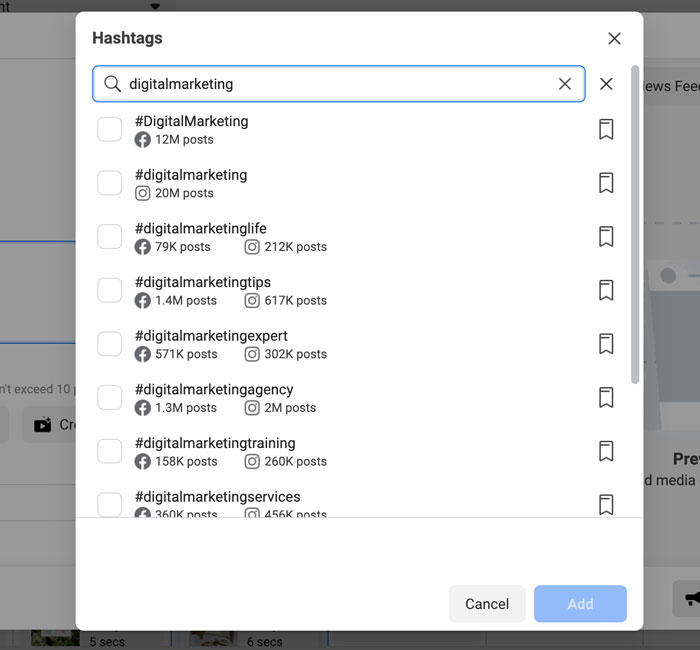
One of my favorite features in the “New Post” box is the hashtag tool. It shows you which hashtags are trending, the number of posts using a tag, and lets you save your favorites for later.

Facebook Business Suite hashtag tool

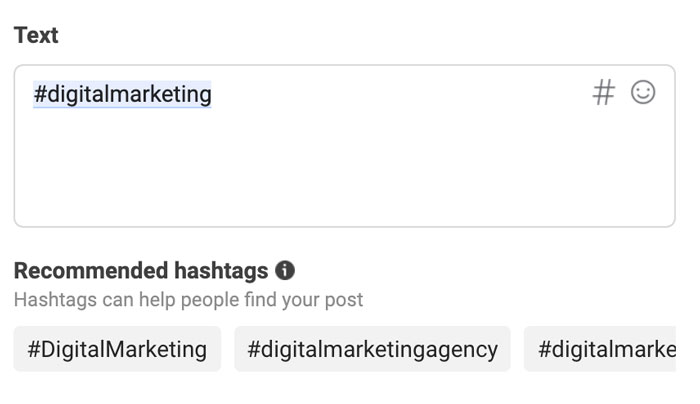
Plus, it shows you hashtag results for each platform and gives you recommendations based on what you’ve already selected.

Facebook Business Suite hashtag recommendations based on your previous selections
Facebook Business Suite recommended hastags

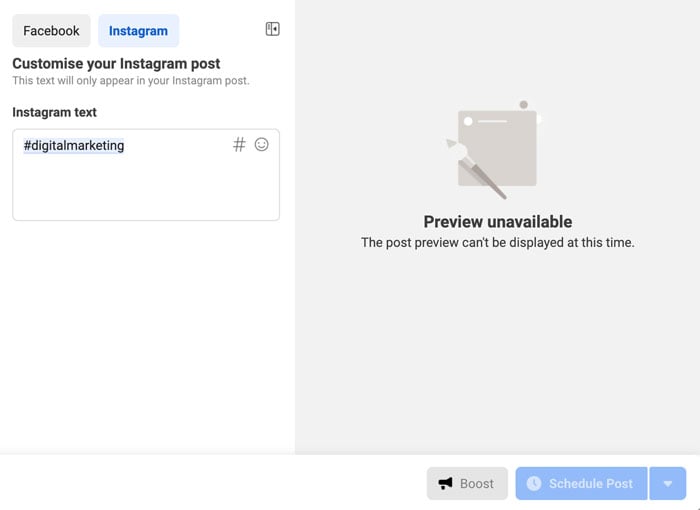
While in create mode, you can put together your Instagram and Facebook posts at the same time. Switch between the different tabs, and you can see exactly how your post will look on the two platforms.

Creating Facebook and Instagram posts in Facebook Business Suite

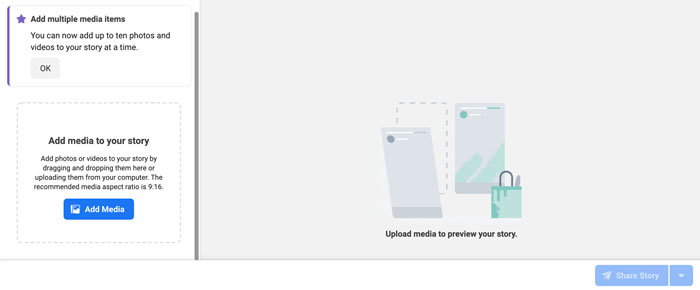
For Stories, it works the same. Upload up to 10 photos or videos at once and schedule each one out when you’re done.

creating stories in Facebook Business Suite

Create Ads

Don’t want to have another tab open for Facebook Ad Manager? You can keep track of your ad performance and create ads from the Business Suite.

It’s another time-saver and allows you to see how you’re tracking towards goals.

On the dashboard, you can see:

  • reach
  • post engagement
  • link clicks
  • page likes

Switch between the different filter views to see your results over the last 90, 60, 30, and 7 days.

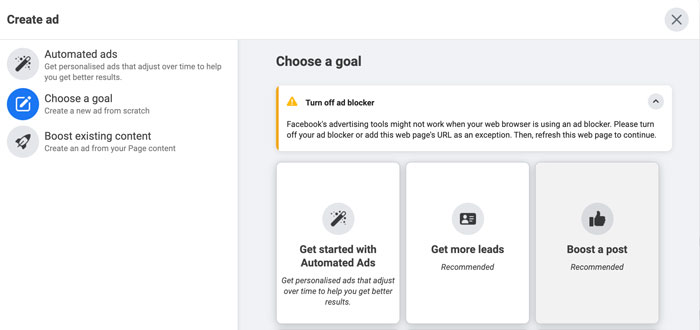
Click on the blue “Create Ad” button in the top right-hand corner to create an ad. A pop-up will load and take you through a step-by-step process for setting up a creative that converts.

First, you’ll select your ad goal. You can choose from:

  • automated ads
  • get more leads
  • boost a post
  • boost an Instagram post
  • promote a page
  • get more website visitors
  • get more messages
create an ad on Facebook Business Suite

Next, start designing your ad creative. You’ll see a live preview as you adjust your text and media.

Turn on automatic adjustments if you want Facebook to tweak your ad for each viewer. For example, the platform might adjust the brightness or show the original aspect ratio if it thinks the ad will perform better.

Scroll down to select your audience or create a new one, placements, and set your campaign budget and duration.

When you’re done, click on “Promote Now” for your ad to go into review.

Create Appointments for Your Business

Remember those extra options I spoke about earlier?

One of the most important features of an online business is the appointments scheduler.

If you’re running a service-based business, take advantage of Facebook’s capabilities and empower your audience to book directly through the platform.

When people don’t need to log onto another site to complete the process, you’re removing an extra step and making it that much easier to close a sale.

The result? A boost in your bottom line!

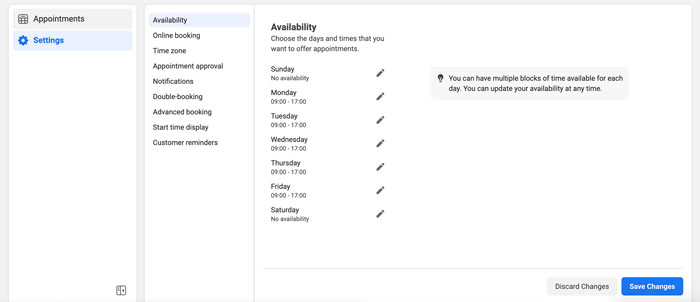
Inside Business Suite, you can manage your appointments, view requests, and adjust the settings to suit your schedule.

Manage appointments with Facebook Business Suite

Generate Leads With Instant Forms

Does your business rely heavily on lead gen? Start using Facebook’s Instant Forms.

What are Instant Forms? Think of it as a mini CRM system. When you create an ad and set your objective to find leads, you can create custom forms users can fill out without leaving the platform.

Again, you’re removing the obstacle of trying to get them to go from one website to another. Thus, improving your chances of someone filling out the form and requesting a callback.

With Business Suite, you can manage your forms and set up the CRM system.

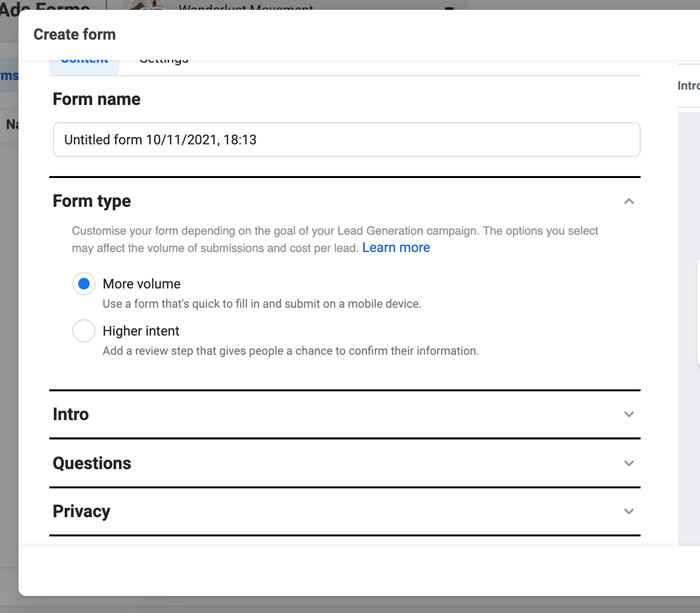
When you create a form, Facebook offers different options depending on your lead generation goal.

For example, you can create a “more volume” form (a quick option) or a “higher intent” (adds an extra step for users to review their information before submitting).

lead forms in facebook business suite

Frequently Asked Questions About Meta Business Suite

What is Meta Business Suite (formerly Facebook Business Suite) used for?

The Meta Business Suite is used for managing your Facebook Pages and Instagram accounts in one dashboard. You can reply to comments, create posts, schedule stories, run ads, and more.

How do you qualify for Meta Business Suite?

You need to have a Facebook page. If you have an Instagram account, you’ll need to convert it to a business account if you want to sync it to your Business Suite.

Is Business Suite on Facebook free?

Yes, Business Suite is free on Facebook to set up and use. All you need is a Facebook account and a Facebook Page to get started on the platform.

Is Facebook Business Suite the same as Meta Business Suite?

Yes, Facebook Business Suite is the same as Meta Business Suite. It was renamed “Meta Business Suite” when Facebook rebranded to Meta.

{
“@context”: “https://schema.org”,
“@type”: “FAQPage”,
“mainEntity”: [
{
“@type”: “Question”,
“name”: “What is Meta Business Suite (formerly Facebook Business Suite) used for?”,
“acceptedAnswer”: {
“@type”: “Answer”,
“text”: ”

The Meta Business Suite is used for managing your Facebook Pages and Instagram accounts in one dashboard. You can reply to comments, create posts, schedule stories, run ads, and more.


}
}
, {
“@type”: “Question”,
“name”: “How do you qualify for Meta Business Suite? “,
“acceptedAnswer”: {
“@type”: “Answer”,
“text”: ”

You need to have a Facebook page. If you have an Instagram account, you’ll need to convert it to a business account if you want to sync it to your Business Suite.


}
}
, {
“@type”: “Question”,
“name”: “Is Business Suite on Facebook free?”,
“acceptedAnswer”: {
“@type”: “Answer”,
“text”: ”

Yes, Business Suite is free on Facebook to set up and use. All you need is a Facebook account and a Facebook Page to get started on the platform.


}
}
, {
“@type”: “Question”,
“name”: “Is Facebook Business Suite the same as Meta Business Suite?”,
“acceptedAnswer”: {
“@type”: “Answer”,
“text”: ”

Yes, Facebook Business Suite is the same as Meta Business Suite. It was renamed \”Meta Business Suite\” when Facebook rebranded to Meta.


}
}
]
}

Conclusion: Meta Business Suite (Formerly Facebook Business Suite)

Meta Business Suite is perfect for creators, personal brands, and businesses to streamline their social media management across Facebook and Instagram.

It gives you everything you need to monitor your growth, stay on top of comments and DMs from your audience, schedule your content, create ads, and so much more.

If you’re only using these two platforms to run your business and you’re using other social media management tools, it’s worthwhile to take a peek inside Business Suite. You might find it’s a more robust tool, and you can nip another business expense from your monthly budget.

What are your thoughts on Meta (Facebook) Business Suite? Are you going to make the switch and use it to manage your Facebook and Instagram accounts?

How to Write Compelling Meta Descriptions That’ll Boost Your Rankings

If you’re looking to increase your organic SEO rankings, meta descriptions might be the answer. 

That is, if they are written well! 

A great meta description should compel users to click on your page in the search results to learn more. 

It should also contain keywords to boost your SEO.

Below, we’ll explain the best practices for creating meta descriptions to help you dominate Google search results.

What Are Meta Descriptions?

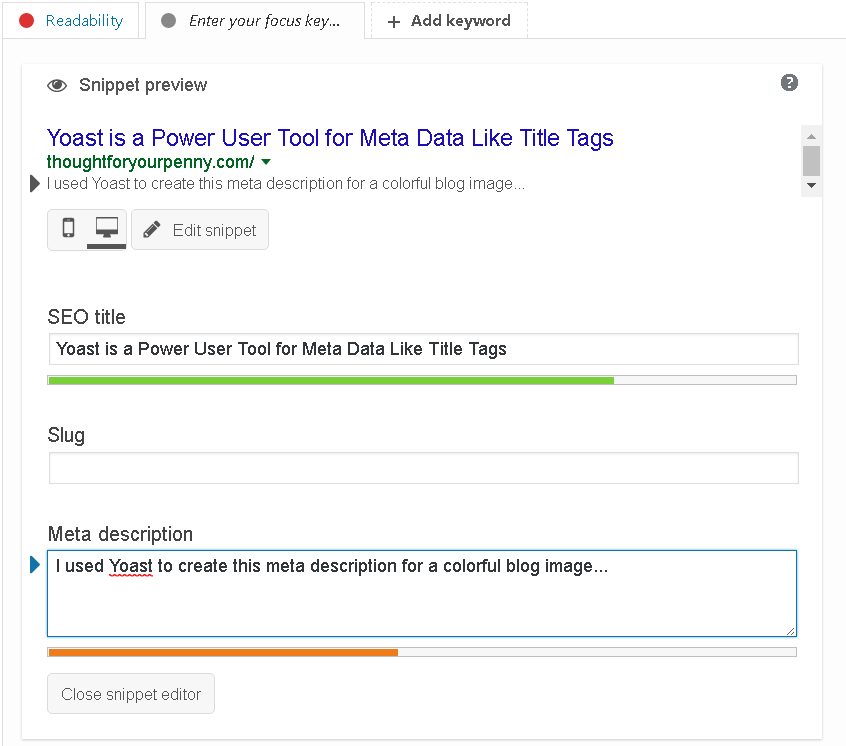
Meta descriptions are 160-character snippets used to summarize a web page’s content. Search engines display these snippets in search results to let visitors know what a page is about before clicking on it. 

Meta descriptions help users decide if they want to click on your website in a search result. They are also an important factor in where your website ranks in the search results. 

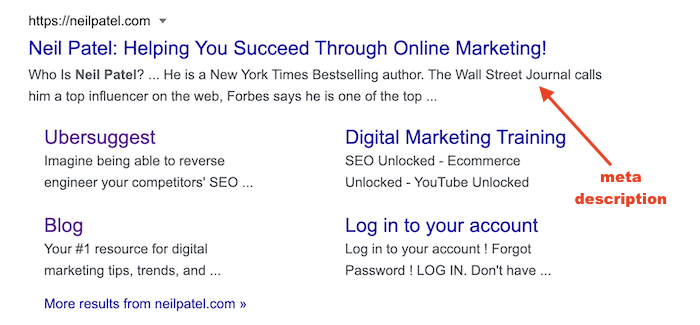
Below, you can see a quick example of a meta description on our site.

How to Write Meta Descriptions - Neil Patel example

Why Are Meta Descriptions Important?

Meta descriptions are important because meta tags (including meta descriptions) are used by the Google algorithm, which helps determine what pages should rank well for certain keywords. 

If you’re using meta descriptions properly, you have an opportunity to add a meta tag that isn’t in your content. This could be the difference between ranking on page four for “best shoes,” or on page one.

Meta descriptions help:

  • Increase click-through rates, which in turn will boost your conversions and sales.
  • Improve indexing so you rank higher on search engine results pages (SERPs).
  • Make it easier for visitors to find the content they’re looking for without scanning page titles or meta tags. 

Pages with meta descriptions see an average of 5.8 percent more clicks than pages without.

Even search engine giant Google recommends writing meta descriptions on your site.

On the user-experience side, meta descriptions show searchers what your website is all about and what information they can expect to find if they click. 

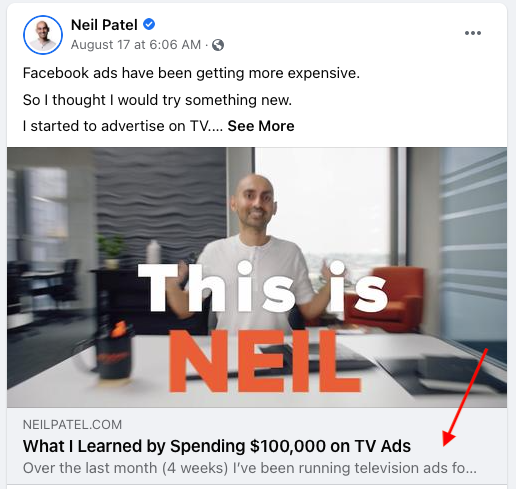
Meta descriptions can also show up on social media sites when a link is shared.

How to Write Meta Descriptions - Neil Patel Facebook Video with Meta Description

If a meta description is not present, or if you have written it outside of best practices, a search engine may create one for you. The problem is, it might not be as accurate or compelling as the one you write yourself. 

That’s why it’s crucial to write your own meta descriptions. 

Tips for Writing Great Meta Descriptions

Meta descriptions are a great way to engage users on the SERP and improve your organic traffic.

How do you write meta descriptions that drive clicks and improve your ranking? Here are eight tips to help you create more compelling meta descriptions.

1. Include a CTA in Your Meta Descriptions

Using a call-to-action (CTA) in your meta descriptions is a great way to compel people to click on your website. You can use phrases like “Learn More” or “Click Here” or “Shop Now,” when they see it come up in SERPs.

CTAs help readers understand what the page offers and what they can expect if they click. They can also give users an incentive for clicking through and engaging with your site. 

CTAs can be used to sell a product, offer an email sign-up, or direct readers to your social media pages.

This example from Automattic on LinkedIn asks users to join LinkedIn to apply for their positions.

Tips for Writing Great Meta Descriptions - Include a CTA

2. Focus on Value Your Meta Description

Adding words that describe the value you offer is a great way to entice people to click. 

When someone reads a meta description, they should be able to understand what is on offer and whether it is worth their time.

Include words like “learn,” “see,” or “watch” when appropriate to interact with your content. 

Other words, such as “best,” “deal,” “new” or “popular,” can also make your meta descriptions more compelling.

3. A/B Test Your Meta Descriptions

A meta description is a great place to experiment with different keywords, phrases, or CTAs.

This will help you determine what drives more engagement without doing anything permanent or drastic in your site’s design itself.

You can A/B test your meta descriptions by making two meta descriptions for each page.

One meta description could use one variation of a keyword, phrase, or CTA. The second meta description could be your current meta or focus on a different offer or term. 

Run each meta for a few weeks, then check your Google Analytics to see which version earns more clicks. Then, use that information when crafting new meta descriptions.

(If clicks are close, consider looking at other metrics, such as bounce rate, time on page, or conversions. Traffic isn’t the only thing meta descriptions can impact!) 

4. Experiment With Character Length

Meta descriptions are limited to 150 characters. Going over this length will result in your meta being truncated in the search results, which means users won’t see any content after the cut-off.

Here’s an example of a truncated meta. Notice the ellipses:  

Tips for Writing Great Meta Descriptions - Experiment With Character Length

Even though you can’t go over the limit, you can experiment with your description to see what works best for each page. For example, in-depth guides may actually get more clicks with the truncated results because users want to learn more. 

You may find shorter meta descriptions work best on your home page, while blogs perform better with a higher word count. Or, you may find meta descriptions with a higher word count work best for your recommended products page.

Try not to exceed the recommended character length, as it can negatively affect your rankings

5. Make Your Meta Descriptions Unique and Interesting

Meta descriptions provide an overview of what content is contained on a page, so they’re important for attracting readers’ attention. 

Try different approaches to grab user attention, such as using a clickbait title or asking a question users want answered. 

Try using eye-catching words or phrases that will grab a user’s attention such as “shocking,” “hilarious” or “life-changing.” Just be careful not to overpromise and under-deliver. 

Tips for Writing Great Meta Descriptions - Make Them Unique and Interesting

As you can see in the example above, they use a very active voice that provides a momentous push for the reader.

You’re told what you can expect but without any unnecessary details. If you’re looking for a simple way to help your SEO, you would most likely click on this link. 

You’ll also notice the example above is very specific and doesn’t contain any fluff.

This is especially important if you want to rank high in the SERPs.

Most importantly, make sure the description matches the content of the page.

6. Include Keywords in Your Meta Descriptions

It’s important to include keywords in meta descriptions for two reasons: 

  1. It helps search engines understand the page and better rank your content. 
  2. It reassures users that the page covers the topic they are interested in. 

Use a tool like Ubersuggest to find the best keywords for your site. Then, add them to your meta descriptions to improve your ranking.

Note: Each page should use different keywords in the meta descriptions to ensure your page shows up in all relevant searches.

Keep in mind, Google does not use keyword meta tags directly in its rankings. That doesn’t mean they aren’t valuable for users. 

Also, avoid keyword stuffing in your meta descriptions or you risk a search engine penalty. Each meta description should contain one or two keywords per phrase and they should be relevant to the page. 

7. Implement Structured Data 

Structured data meta tags are HTML tags you can add to your website to provide additional context for search engines and social media platforms. 

The most common types of structured data meta tags used by marketers are the business name, address, phone number, email address, a product description with price points (if applicable), an image URL and a Twitter handle.

There are plenty of ways you can start implementing structured data.

One of the most popular ways you may have seen is when websites implement reviews in their meta description:

Tips for Writing Great Meta Descriptions - Implement Structured Data

This provides an immediate signal to your viewer that they can find something of value on the site.

Since social proof is such a powerful way to sell and grow your brand, this is a fairly easy hack that lets you start capitalizing on user behavior with ease.

​​Structured data can help you build a more powerful meta description that will help you rank higher in search results. They can also help you snag Google snippets.  

8. Do Not Duplicate Meta Descriptions

A meta description is crucial to ranking, so make sure to write unique meta descriptions for each page. Unique meta descriptions increase the probability that search engines and other browsers can understand what content is on a page and how it compares to other pages. 

For example, if a user sees duplicate meta descriptions on every page of your website, they won’t know what kind of content is on what page. 

This is especially important for e-commerce sites, which may have several pages with similar content. Even if the products are similar, the metas should be unique. 

Duplicate meta descriptions can have negative effects on your website as they make it difficult for meta description crawlers to crawl your site. You may also face indexing penalties because crawlers are not able to determine which page is original.

Examples of Great Meta Descriptions

The best examples of meta descriptions come from search engines themselves. Let’s look at Google’s own meta description for starters.

Here’s the coding for Google’s own meta description: 

<meta name=”description” content=”Search the world’s information, including web pages, images, videos and more. Google has many special features to help you find exactly what you’re looking for.“>

It is exactly 159 characters, including spaces. Google’s meta description is displayed as follows in the top three search engines.

In Google: 

Examples of Great Meta Descriptions - Google

In Yahoo: 

Examples of Great Meta Descriptions - Google Meta Description on Yaho

In Bing: 

Examples of Great Meta Descriptions - Google Meta Description on Bing

Here are a few branded meta descriptions that do well: 

Tesla

Examples of Great Meta Descriptions - Tesla

Tesla’s meta description quickly and efficiently tells you everything you need to know about the company and its values. The meta description fits perfectly within the SERP and none of the words are cut off.

Lonely Planet

Examples of Great Meta Descriptions - Lonely Planet

Lonely Planet starts with a question to draw readers in and encourage clicks. From there, they explain their unique value propositions and get you excited about traveling the world!

Meta Descriptions Frequently Asked Questions

How many characters should a meta description be?

A meta description should be approximately 160 characters in length, including spaces, and include a concise but compelling description of the content on that page. 

Where does my meta description appear?

Your meta description appears on the search engine page when a user searches for your site’s keyword. It is directly under your meta title.

Do meta descriptions affect SEO?

Yes, meta descriptions affect SEO as they provide search engines with information about your page and impact user experience. 

Should my meta description be the same as my page's title or H1?

No. Use unique meta descriptions and meta titles for each page of your website. Remember, the meta description is right under the title, which is generally your H1. Don’t waste that space! 

{
“@context”: “https://schema.org”,
“@type”: “FAQPage”,
“mainEntity”: [
{
“@type”: “Question”,
“name”: “How many characters should a meta description be?”,
“acceptedAnswer”: {
“@type”: “Answer”,
“text”: ”

A meta description should be approximately 160 characters in length, including spaces, and include a concise but compelling description of the content on that page. 


}
}
, {
“@type”: “Question”,
“name”: “Where does my meta description appear? “,
“acceptedAnswer”: {
“@type”: “Answer”,
“text”: ”

Your meta description appears on the search engine page when a user searches for your site’s keyword. It is directly under your meta title.


}
}
, {
“@type”: “Question”,
“name”: “Do meta descriptions affect SEO? “,
“acceptedAnswer”: {
“@type”: “Answer”,
“text”: ”

Yes, meta descriptions affect SEO as they provide search engines with information about your page and impact user experience. 


}
}
, {
“@type”: “Question”,
“name”: “Should my meta description be the same as my page's title or H1? “,
“acceptedAnswer”: {
“@type”: “Answer”,
“text”: ”

No. Use unique meta descriptions and meta titles for each page of your website. Remember, the meta description is right under the title, which is generally your H1. Don’t waste that space! 


}
}
]
}

How to Write Meta Descriptions: Conclusion

Meta descriptions are an important part of your onsite SEO. They should be compelling, descriptive, and unique to each page. 

Meta descriptions may be short, but they can help you rank higher in search engine results pages (SERPs) by helping search engines and users better understand what your page is about. 

Remember to include meta descriptions on every page of your site, including blog posts and product pages. 

What tips do you have for creating great meta descriptions?

12 Useful Open Graph Meta Tag Types for Facebook and Twitter

What You Need to Know About Open Graph Meta Tags for Total Facebook and Twitter Mastery

Marketers create a lot of content. Yes, content is king, but that king is powerless without followers.

So, what’s the first thing that comes to mind when you want to reach a broader audience with your awesome new blog post?

Sharing on social media, of course. The massive audiences of sites like Facebook and Twitter make them some of the best sharing, but do you know how to optimize that outreach potential?

Open graph meta tags were designed to do just that. But what are they, why do they matter, and — most importantly — how do you use them?

What Is Open Graph and Why Was It Created?

Facebook introduced Open Graph in 2010 to promote integration between Facebook and other websites by allowing posts to become rich objects with the same functionality as other Facebook objects.

Put simply, it helps optimize Facebook posts by providing more control over how information travels from a third-party website to Facebook when a page is shared (or liked, etc.).

To make this possible, information is sent via Open Graph meta tags in the <head> part of the website’s code.

Now, other social media sites also are taking advantage of social meta tags.

Several other major platforms, including Twitter and LinkedIn, recognize Open Graph tags. Twitter actually has its own meta tags for Twitter Cards, but if Twitter robots cannot find any, Twitter uses Open Graph tags instead.

Why Marketers Should Care About Open Graph

Social media sites are the major drivers of most of the web’s traffic. Consequently, the ability to harness the power of social meta tags is a vital skill for today’s marketers.

Most importantly: open graph meta tags can have a massive impact on conversions and click-through rates.

Have you ever shared a link on Facebook only to find that the thumbnail was missing, or there was a totally different picture than you expected?

Knowing just a little about Open Graph tags can help you tackle these problems and improve your social media marketing.

Adding Open Graph tags to your website won’t directly affect your on-page SEO, but it will influence the performance of your links on social media, so that means it’s worth looking into. Let’s take a look at the most important meta tags for Facebook and how to optimize them for better sharing.

Understanding Facebook Open Graph Meta Tags

Facebook has several open graph meta tag types. Let’s cover the different types, then I’ll cover how to use them.

Facebook HTML Tags open graph meta tags guide

og:title

As you might guess, this is how you define your content’s title. It serves a similar purpose as the traditional meta title tag in your code. In fact, if Facebook doesn’t find the og:title tag on your page, it uses the meta title instead.

Keep in mind that the text shown on a Facebook feed is in bold and extremely eye-catching. It must be compelling, just like a good post title.

There is no limit on the number of characters, but it’s best to stay between 60 and 90. If your title is longer than 100 characters, Facebook will truncate it to only 88!

Example:

<meta property=”og:title” content=”Your eye-catching title here” />

og:url

This is how you set the canonical URL for the page you are sharing. What this means is that you define one page that all your shares will go to. It’s useful if you happen to have more than one URL for the same content (for example, using parameters). Important note: URL provided is not shown on Facebook newsfeed, only domain is visible.

Example:

<meta property=”og:url” content=”http://www.yourdomain.com” />

og:type

This is how you describe the kind of object you are sharing: blog post, video, picture, or whatever. The list to choose from is long. Here are some examples:

Web based:

  • website
  • article
  • blog

Entertainment:

  • book
  • game
  • movie
  • food

Place:

  • city
  • country

People:

  • actor
  • author
  • politician

Business:

  • company
  • hotel
  • restaurant

You can see the full list of types here.

This tag is important if your page has a “Like” button and represents a real-life object (like a book or a movie). It determines if your content will appear in a user’s interest section of her profile in the event she “Likes” it.

In most cases, you will use the “website” value, since what you are sharing is a link to a website. In fact, if you don’t define a type, Facebook will read it as “website” by default.

Example:

<meta property=”og:type” content=”website” />

og:description

This meta data descriptor is very similar to the meta description tag in HTML. This is where you describe your content, but instead of it showing on a search engine results page, it shows below the link title on Facebook.

Unlike a regular meta description tag, it won’t affect your SEO. (So, don’t spend too much time figuring out how to sneak in keywords.) However, it’s a good idea to make it compelling because you want people to click on it.

You are not limited to a character count, but it’s best to use around 200 letters. In some cases, depending on a link/title/domain, Facebook can display up to 300 characters, but I suggest treating anything above 200 as something extra.

Example:

<meta property=”og:description” content=”Your entertaining and descriptive copy here, if your meta description is good, use it.” />

og:image

This is the most interesting Open Graph tag for many marketers because a picture always helps content stand out. This is how you ensure that a particular thumbnail will be shown when your page is shared. It can be very helpful for your conversion rates.

Make sure you set the og:image you choose, otherwise Facebook will show something stupid like an unwanted ad banner scraped from the page, or nothing at all (as below). We definitely don’t want that!

FB no thumbnail open graph meta tags

It’s important to remember that if your page is static and you don’t use any sort of content management system (CMS) (like WordPress), you need to change the og:image manually for each of your pages.

If your website is controlled with a CMS and you installed the relevant plugin, the og:image tags are assigned automatically for each page. Look for the list of plugins further down.

The most frequently recommended resolution for an OG image is 1200 pixels x 627 pixels (1.91/1 ratio). At this size, your thumbnail will be big and stand out from the crowd. Just don’t exceed the 5MB size limit.

FB my full open graph meta tag example

If you use an image that is smaller than 400 pixels x 209 pixels, it will render as a much smaller thumbnail. It’s nowhere nearly as eye-catching.

FB little thumbnail for open graph meta tags

Keep in mind that the picture you use as an Open Graph image can be different from what you have on your page.

Why wouldn’t you leverage that opportunity to stand out even more?

For example, if your title is good, but the picture you are using is not very exciting (not an infographic or a good-looking person, etc.), consider using an image with a good line or two of copy instead (see example below).

One thing you need to remember if you do this: lace your text, or the most significant part of it, in the middle of the image. This matters because Facebook trims the sides of thumbnails.

FB thumbnail centred with text open graph meta tag

Example:

<meta property=”og:image” content=”http://www.yourdomain.com/image-name.jpg” />

Advanced Facebook Open Graph Tags

The Open Graph tags above are the ones you really need to know (og:description not so much, but it is useful). There are other, more advanced, tags you can use to provide even more in-depth specifications.

  • og:locale – defines the language, American English is the default
  • og:site_name – if the page (object) you are sharing is part of a larger network
  • og:audio or og:video – to add additional audio or video files to your object
  • fb:app_id – for linking to a Facebook application (e.g., FB Comments) with the object

Check Your Open Graph Tags

To make life easier, Facebook has created a tool called Sharing Debugger. It has two very helpful functionalities.

First, when you type in the link you want to check, it returns any errors and suggestions for OG tags, if there are any. You also can check what the og:image looks like, what your description is, and so on.

Second, it clears the Facebook cache. Imagine this: you post a link to Facebook, but then you see a mistake in the thumbnail, so you go back to your site and adjust the OG tags, and you post it again on Facebook.

Probably, nothing will happen. The thumbnail will stay the same. This is because of the cache. The Facebook Sharing Debugger will refresh the cache on your links after any adjustments, so remember to use it each time.

Facebook Object Debugger open graph meta tags

Open Graph Meta Tags for Twitter: Twitter Cards

Like Facebook’s Open Graph tags, Twitter Cards let you stand out from the crowd of tweets. They allow some additional content to be generated from your 140-character tweet.

This doesn’t show up on people’s feeds automatically, but it adds a little “View summary” button below the tweet.

Evolero 2 twitter open graph meta tag examples

When you click it:

Twitter Card Tags open graph meta tags example

It’s a tempting thing to click and provides a handy summary of the shared page—the Twitter Card. Surprisingly, not many sites take advantage of these tags. This is a big opportunity to make your tweets stand out in crowded Twitter feeds.

The best way to get them is to install one of the WordPress plugins. WordPress SEO by Yoast, mentioned above, does the job. If that’s not an option, ask your web developer and give him the ready-to-implement Twitter Card tags. Here’s how you’ll make them.

twitter:card

This required tag works in a similar way to og:type. It describes the type of content you are sharing. There are 7 options to choose from: summary, photo, video, product, app, gallery, and “large version” summary.

Depending on the type of content you choose, the link at the bottom of your tweet changes. You can get “View summary” for summaries, “View photo” for photos, etc. If this tag is not set, Twitter reads your link as a “Summary” by default.

Example:

<meta name=”twitter:card” content=”summary” />

twitter:title

This basically does the same thing as its OG counterpart. You specify the title for your article that will show up in bold. It’s smart to avoid repeating the same text you have in your tweet. Make the most of the space provided and let the two pieces of copy play on each other to reinforce the message. Use up to 70 characters.

Example:

<meta name=”twitter:title” content=”Your title here” />

twitter:description

Use this tag to write a descriptive lead to the page you are sharing. As with Open Graph tags, don’t focus on keywords because they won’t matter for your SEO. Create compelling copy that nicely complements your tweet and the title. Twitter limits this part to 200 characters.

Example:

<meta name=”twitter:description” content=”Your 200-character description here” />

twitter:url

This sets the canonical URL for the content you are sharing. (For more information, review the description for the equivalent Facebook Open Graph tag above.)

Example:

<meta name=”twitter:url” content=”http://www.yourdomain.com” />

twitter:image

Yes, you guessed it. This is how you set the picture to go with your tweet. Twitter allows two options, a card with a smaller or a larger picture.

You decide which one you want in the type tag. If you go for the large option, make sure it has a resolution of at least 280x150px and that the file size is not more than 1MB. You can consider using the same trick as with the Facebook thumbnail: add some text to the image to boost the message.

Example:

<meta name=”twitter:image” content=”http://www.yourdomain.com /image-name.jpg” />

Request Approval from Twitter

Keep in mind that, before you can fully benefit from Twitter Cards, you need to request approval for your page from Twitter. Fortunately, this doesn’t take much time and can be done easily using their Card Validator. Once you get approval, Card Validator serves exactly the same purpose as the Facebook Sharing Debugger, allowing you to check your links before you commit.

Twitter Card Plugins

Just like with Facebook, there are plenty of plugins available for implementing Twitter Cards. Here are a few:

How to Implement Open Graph Meta Tags

How do you implement OG tags? Basically, they belong to the <head> part of your page’s HTML. If you don’t manage the code, you’ll need to ask your web developer for help. You can prepare the whole package yourself using the tips above to save his valuable time.

If you are using WordPress, just install one of the plugins that neatly implements the code for you. I like to use WordPress SEO by Yoast, but there is an official Facebook Plugin and others to choose from.

Wordpress SEO by Yoast for open graph meta tags

Here are other OG plugins/extensions/add-ons for:

Open Graph Meta Tags Conclusion

The final code for both Facebook and Twitter should look more-or-less like this:

final code screen open graph meta tags conclusion

It might seem a bit confusing, but luckily there are several tools that make the process easier — you don’t need to know how to code.

It’s surprising how few people optimize these tags. It’s worth doing because it helps you stand out and draw more clicks and views, and it can even help improve your SEO —all things that lead to more profit.

Have you implemented open graph meta tags? How has it impacted your site?

What Are Meta Tags?

Let’s talk about meta tags — what they are, why they matter, and how to do them better.

First things first — what made you click on this article to read it?

Maybe the title caught your eye, or perhaps it was the short blurb you saw.

You might have clicked simply because this article comes from a source you trust.

If you found this article via a search engine, though, there’s a good chance you found and clicked this article because of meta tags.

Meta tags are the foundation of SEO, and the first thing you’ll find yourself setting up when building a web page.

Without meta tags, you can’t reach readers organically.

It doesn’t take much time to generate meta tags, but it’s more important than you might think.

That’s because 93% of all online experiences begin with a search engine.

Search Engine Optimization statistics for 2017 why meta tags matter

This is why so many online marketers are so focused on getting SEO right.

Organic search traffic is the holy grail of SEO, so it can’t be ignored.

What Are Meta Tags?

Your content needs to be readable and appealing to users on search engines.

There’s a very specific syntax needed.

It’s similar to how bookstores and libraries organize their archives of books — and that’s what meta tags are, essentially.

What are Meta Tags? 

Meta tags are a type of HTML tag that provides search engines with information about a website page.

Let’s take a look at the basic elements.

Neil Patel Digital Marketing

The title and description tags make up almost the entire entry.

If not for these meta tags, all you’d see in Google SERPs would be my URL.

Neil Patel Digital Marketing Tags

Title and description tags are the two most-used tags for SEO purposes, but SEO isn’t the only part of digital marketing.

Advanced digital marketing requires the use of even more tags that improve page rank and overall user experience.

Just like this search result, you’ll soon find out that these tags control how your entire digital presence is viewed and navigated.

Machines can read URLs just fine. If I wrote for machines, my website would look like this:

Neil Patel Source Code 1 | What Are Meta Tags?

Google prioritizes certain tags because they provide context for people.

I built my website for people as well, so it looks like this:

Neil Patel Website what are meta tags and why do they matter

This polish is what marketing is all about.

In this blog post, we will explore meta tags and see how they affect your overall digital marketing efforts.

While simple, the devil is in the details, and every detail counts.

How Meta Tags Affect Brand Image and Click-Through Rates

You absolutely can judge a book by its cover. It’s what covers are designed for.

Your title and meta description tag create the cover for your web page. They’re your first impression on most visitors.

It’s not just about search engines, but how we view the Internet.

Reddit is a basic link-aggregation site that takes away all the bells and whistles.

Reddit depends on the title and image to entice conversations and clicks.

Reddit | What Are Meta Tags?

Using meta tags correctly is like using the correct format for a business email.

Sure, you can put whatever you like out there, but there’s a level of professionalism that’s expected at some point.

Even Amazon will only give you a picture, title, and short description to make your point.

amazon meta tag example

Think of these tags as your elevator pitch.

You’re given about as much space as a Tweet to sell your entire brand and product.

Which means you need to nail it.

You can’t just call in this detail and polish everything else. If you do, nobody will ever see the rest of what you polished.

We already know how meta tags affect SEO, but that’s not the only element.

Meta tags will make your email marketing and marketing automation efforts easier by providing information for emailed links.

Tags are a crucial element that determines what my automated social media posts look like.

Neil Patel Twitter 2 meta tags exxample

When other bloggers, YouTubers, and social media influencers (and micro-influencers) share your content, tags make it easier.

Think of meta tags as the packaging for your product.

If your packaging isn’t spot-on, nobody will ever buy your product, no matter how great it is!

So what are some best practices to implement for tags?

Meta Tag Best Practices

There are a TON of different HTML tags that can be used on a web page. We’re only going to focus on a handful of significant tags.

We’ll start with the one that might have brought you here today.

1. Title Tags

It’s not technically a meta tag, but it shows up in the header and is used as one.

As of July 2017, the character limits for title tags in Google search results are 78 on mobile devices and 70 on a desktop.

However, that doesn’t necessarily mean you should use all those characters, and 60 is the generally recommended limit.

Long-tail keywords make a difference.

Here are the top meta titles in the SERPs for “How to make content marketing effective.”

Content Marketing meta tag examples

By adding the year, we get an entirely new set of results for “how to make content marketing effective 2017.”

Some users will want basic information, while others will want the most current.

Content Marketing meta tag titles examples

By adjusting our title tag, we can affect which of these searches we rank for.

Ultimately, the goal is to hit both, but that’s not always feasible.

Make sure your keyword is in your title, or you’ll find your articles buried in search results.

For example, when I search for the “best tacos in Tucson,” some restaurants are on page 10 below, even Del Taco.

That’s a wasted opportunity for that taco capital of the country!

Tucson Tacos meta tags title examples

These small businesses could greatly improve their search results, sales, and ROI by simply adding “best tacos in Tucson” to their title tags.

Here’s a sample of the HTML required for a title tag located in your header.

<head>

<title>The Best Title Example I Could Come Up With</title>

</head>

In WordPress, it’s as easy as giving your page a title.

You really can’t miss it.

Wordpress meta tag Title

That’s all there is to it!

2. Image Tags

Like title tags, Image tags aren’t labeled “meta.”

But they’re clearly used by search engines, link aggregators, and other sites to identify your site.

There are two image descriptions actually crammed into one tag.

Here’s what the HTML code looks like.

<img src=“image.jpg” alt=“image description” title=“image tooltip”>

Both the alt and title tags should be defined for the best experience.

The title displays on your screen when you hover your cursor over it.

The alt text displays when the image can’t be rendered (or is spoken to the blind and visually impaired).

When uploading an image to WordPress, you’ll be prompted to enter the title, caption, alt text, and description.

Wordpress Image meta tags

The more fields you fill out (even if you use the same information), the more searchable your images become.

Anywhere from 20-60% of all Google traffic goes to sites with well-optimized graphics.

Why wouldn’t you want to be included?

It’s also a matter of ADA website compliance. 

There are approximately 58,200 people with some level of visual impairment per million in the U.S. alone.

why meta tages matter number of people with blindness chart

That’s a huge segment of the population that wouldn’t have a great user experience without alt image tags.

Optimize your images for search engines and users.

3. Description Meta Tags

A meta description tag gives you a chance to provide an overview of the page’s content.

They’re limited to around 160 characters and aren’t directly tied to Google’s search algorithms at all!

Once again, the reason you need description tags is to improve the user experience.

Description tags encourage click-throughs.

Here’s what the HTML looks like:

<head>
<meta name=”description” content=”This is an example of the text that will show up in search results. Read on to learn more about description tags.”>
</head>

Without a meta description, Google will default to whatever preview sentence it feels best encompasses the content.

This isn’t necessarily a bad thing.

This post doesn’t have a meta description (I rarely use them), and it ranks well.

Neil Patel Social Media Marketing meta tag example

Of course, my blogs are filled with relevant content in short, sweet sentences. Most of them would work as descriptions on their own.

Still, there’s no harm in adding additional information to make your content more searchable.

4.  Robots Noindex and Nofollow Meta Tags

Robot meta tags aren’t always necessary.

By default, all of the pages and links you create on your website are indexed as ‘follow’ by search bots and web crawlers.

Whenever you want to redirect them, you’ll need a robot meta tag.

Here’s the noindex HTML code:

<html><head>
<meta name=”robots” content=”noindex” />
(…)
</head>

This would be within the header and indicate this page doesn’t need to be indexed.

It’s useful for syndicated and duplicate content that your customers/readers could use, but you don’t want credit in search indexes.

Here’s the HTML for a robot nofollow.

<meta name=”robots” content=”nofollow”>

This is used for links you don’t necessarily want to endorse.

For example, readers leaving links in my comments aren’t exactly endorsed by me, so a nofollow tag above the comments section keeps my site clean for bots.

Here’s a great infographic on when and how to use nofollow tags.

no follow meta tags infographic

Now we get to one of the most controversial meta tags.

5. Keyword Meta Tags

Keyword tags aren’t used by search algorithms to determine search ranking.

Here’s what the HTML looks like:

<meta name=”keywords” content=”HTML, CSS, XML, JavaScript”>

I coach my SEO clients to ignore keyword tags because they don’t affect SEO.

That doesn’t necessarily make them useless, however. They’re especially useful in WordPress.

Keyword tags and categories can help Google determine which page on your site should rank for a search.

They also create a page in WordPress that provides one more indexed page.

Wordpress category page meta tags

This means that, while your blog posts are focused on long-tail keywords, your tag and category pages have feeds covering the shorter keywords.

Categories can be used for the URL format, providing one more keyword to the page address.

This is accomplished under Settings – Permalinks in WordPress.

category urls permalinks meta tags

Adding this format provides context to your content.

Google loves context for search results!

Keywords also provide a big-picture overview of how many pages you have for each keyword.

You can use them to help plan your editorial calendar.

6. Viewport tags

You don’t spend much time thinking about viewports, but they’re especially important in today’s mobile-first world of search.

On mobile devices, pages are shown in a popup window called a viewport that extends past the device’s border.

Here’s an illustration of what I’m talking about.

Understanding viewport meta tag width device width

Developers can set the viewport size to increase mobile usability.

WordPress users can check this tag to learn this information for their templates.

But you probably didn’t know that unless you’re already a web developer.

Since Google increasingly focuses on mobile-friendly websites, this meta tag could mean the difference between success and mobile failure.

Now that you have a basic understanding of meta tags and why they’re important, I’ll show you some of my favorite tools for manipulating them.

Free Tools to Add and Check Your Meta Tags

Don’t worry if this all sounds overwhelming — there are tons of tools to make it easy to get meta tags right. Here are two of my favorites.

Yoast SEO Plugin for WordPress

Yoast is a powerful SEO plugin for WordPress and one of the most-downloaded SEO and meta tags tools.

With Yoast, all of the pages and posts you publish have back-end options to increase social sharing, optimize SEO, update tags, and other metadata.

Yoast SEO WordPress | What Are Meta Tags?

With Yoast installed on your WordPress site, a few clicks and a few seconds of your time are all it takes to add meta-tagging to your process.

Yoast also allows you to enter a focus keyword that doesn’t get added to the meta tags, allowing the back-end program to analyze your post.

BuzzStream Meta Tag Extractor

If you need a quick chart of the metadata that’s being used by your competition, BuzzStream’s Meta Tag Extractor is a sleek and simple solution.

Copy and paste a list of URLs, and you’ll be presented with the meta tag information.

Tag Extractor meta tag tool

There’s even an option to download as a CSV file so that you can scrape large lists quickly.

It’s a quick and easy way to organize this data when you need it.

This free online tool does its job without all the bells and whistles.

Less Popular (But Still Useful!) Meta Tags  

So to be fully transparent, here’s a chart of HTML meta tags.

Meta Tags chart

An author meta tag can be used to tell search engines who wrote a piece of content.

Authors have been used in the past for search results, but it’s not a factor anymore. However, you might use author tags if you run a multi-author blog.

WordPress does add this information to blogs when multiple users are contributing content.

It’s more a badge of honor for bloggers than anything else.

Most of the rest define parameters that should already be controlled on a server level.

While I ignored these meta tags, it doesn’t mean you have to. Feel free to add whatever information you’d like.

It doesn’t help search rankings, but it doesn’t hurt them, either.

Conclusion

Meta tags are a basic part of HTML — and can impact SEO.

Back in the early days of the internet, they were a signaling factor for search engines to understand what content is on a page.

The internet (and our relationship with it) has evolved exponentially since then.

Contextual search, AI digital assistants, and mobile devices are changing the way we view content.

Search engines are incentivized to provide the best search results possible, so meta tags are less important.

However, some, such as the titles and meta descriptions, are more important than ever before.

While less metadata is used, it’s still the first impression you’ll make on both robots and people.

What do your website’s meta tags say about you?

The post What Are Meta Tags? appeared first on Neil Patel.