Occasionally, Google rolls out their spam update which just ensures that the results on Google aren’t filled with spam.
Because if a user clicks on a spammy result, and if this continually happens, it creates a terrible experience and people would stop using Google.
They don’t give much detail on the spam update on their website, but luckily for you, we have two things that help us determine what the changes were.
The first thing we have is we track over 900 million domains on the web, so this allows us to see patterns.
The second, which is more relevant for this update is at our agency, NP Digital, we have 100 experimental sites that use AI-written content. The purpose of those sites isn’t to “game” Google, they are more so to figure out how Google perceives AI-written content. And I will go into more detail on what happened with those sites later in this post as the results were interesting.
This update didn’t specify if it was link spam-related or just overall spam.
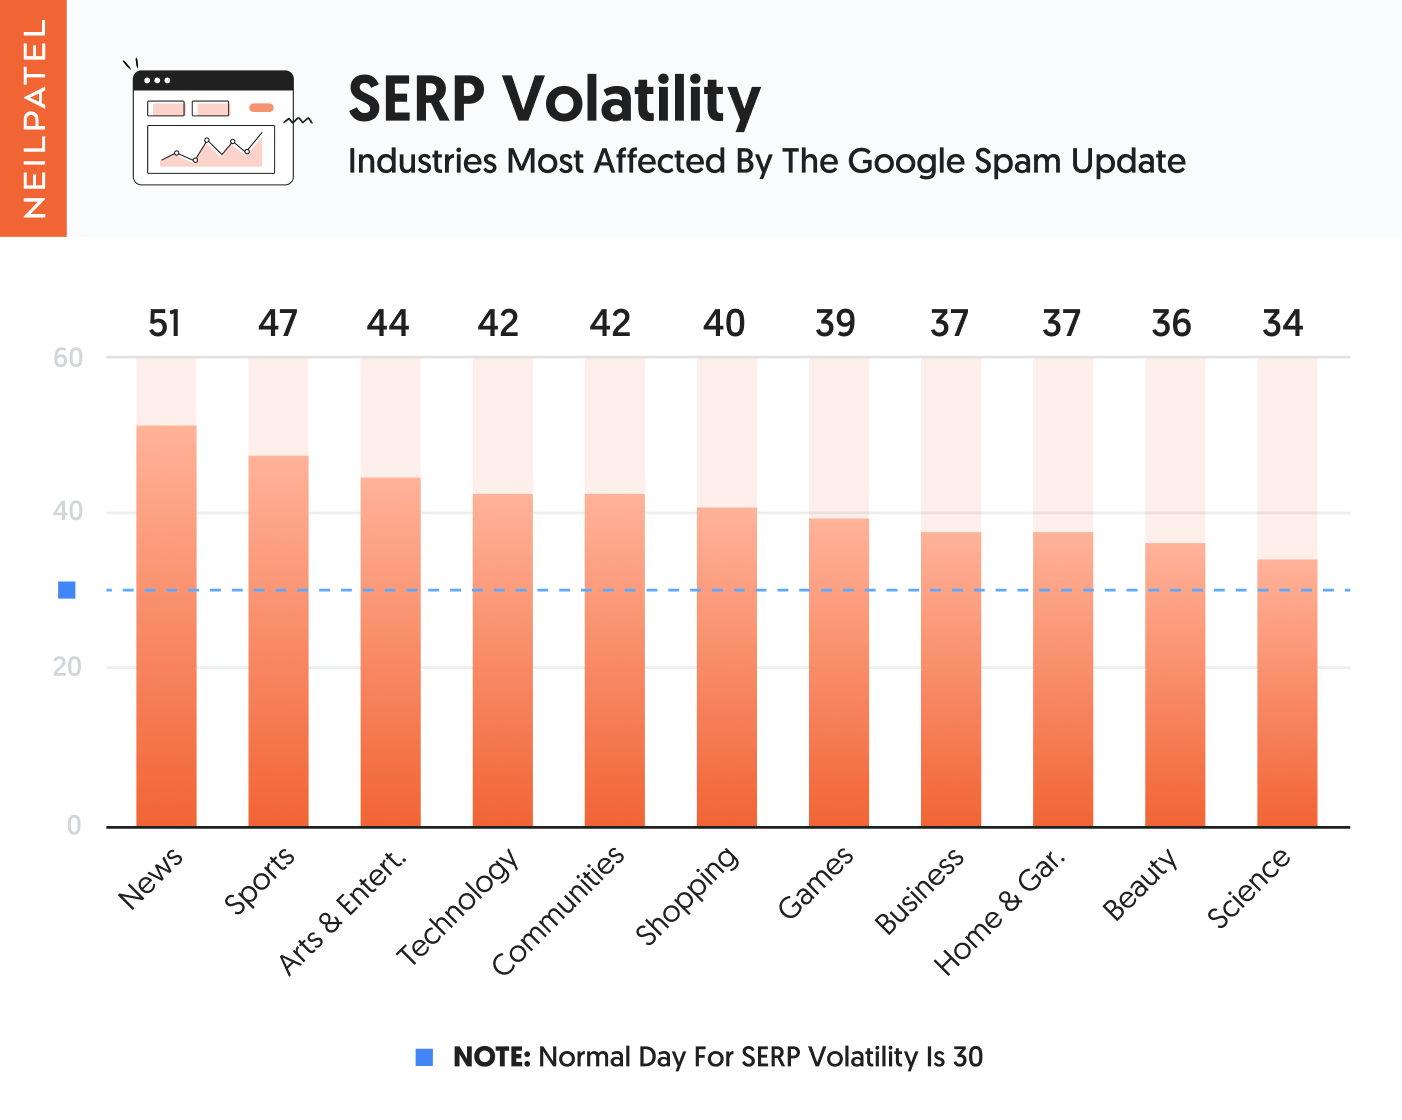
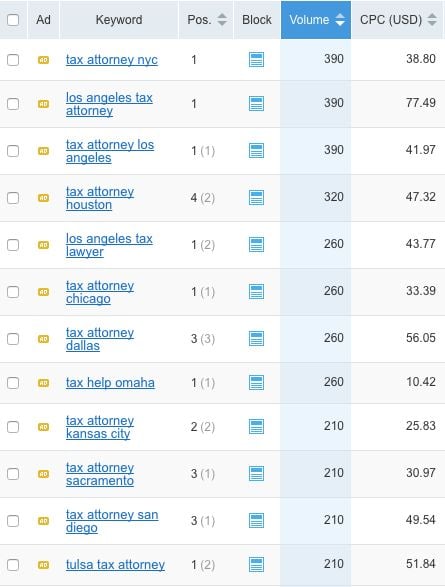
But when we look at the 900 million plus domains we track, here are the categories that got affected the most in a negative way globally.
As you can see from the chart above, news and sports sites got affected the most. Followed closely by arts and entertainment and technology and community sites.
Most of these sites are heavy content-based and not product oriented.
When we looked at the sites affected here’s what we found:
Thin content – most of them didn’t have amazing content… a lot of them had thin content. And to clarify that, by thin content, I don’t mean low word count, I mean content that really didn’t provide much value. In essence, the content was surface level and once you finished reading it you didn’t get many insights or any actionable points or value.
Poorly created meta tags – a lot of the websites affected had pages with duplicate meta tags or ones that were obviously written for search engines and not humans.
Keyword stuffing – shocking people are still keyword stuffing. Of the affected sites most of them didn’t keyword stuff, but roughly 3.89% of them did. Whether it was in their content on meta tags, they were using keywords in an excessive way that made the reading experience not ideal.
As you know there are many other factors in SEO. We just couldn’t find any other major patterns. From a surface level, some of the things they looked at seem kind of similar to the helpful content update.
We also looked at the backlinks of the sites that lost the most traffic we couldn’t find any patterns. Now, this doesn’t mean Google did or didn’t look at links as a factor of spam in this update, more so we just didn’t see any patterns.
Now here is where it gets interesting…
AI-generated content
Remember how I mentioned that we have 100 AI-generated websites? They are in a variety of industries, and they all have over 60 pages of content if not more that are all AI-generated, and of course, we manually built links (didn’t buy them, and you shouldn’t ever buy links) so that it would help the sites rank.
And in reality, we actually have over 681 AI-generated sites, but most of them don’t get enough SEO traffic. For example, when a site only gets 1,000 visitors a month from Google it is too hard to see patterns as visitor counts drastically change from day to day.
But 100 of the AI-driven sites generate at least 3,000 visitors a month from Google.
None of the sites sell anything or collect leads, they are just informational sites in different industries.
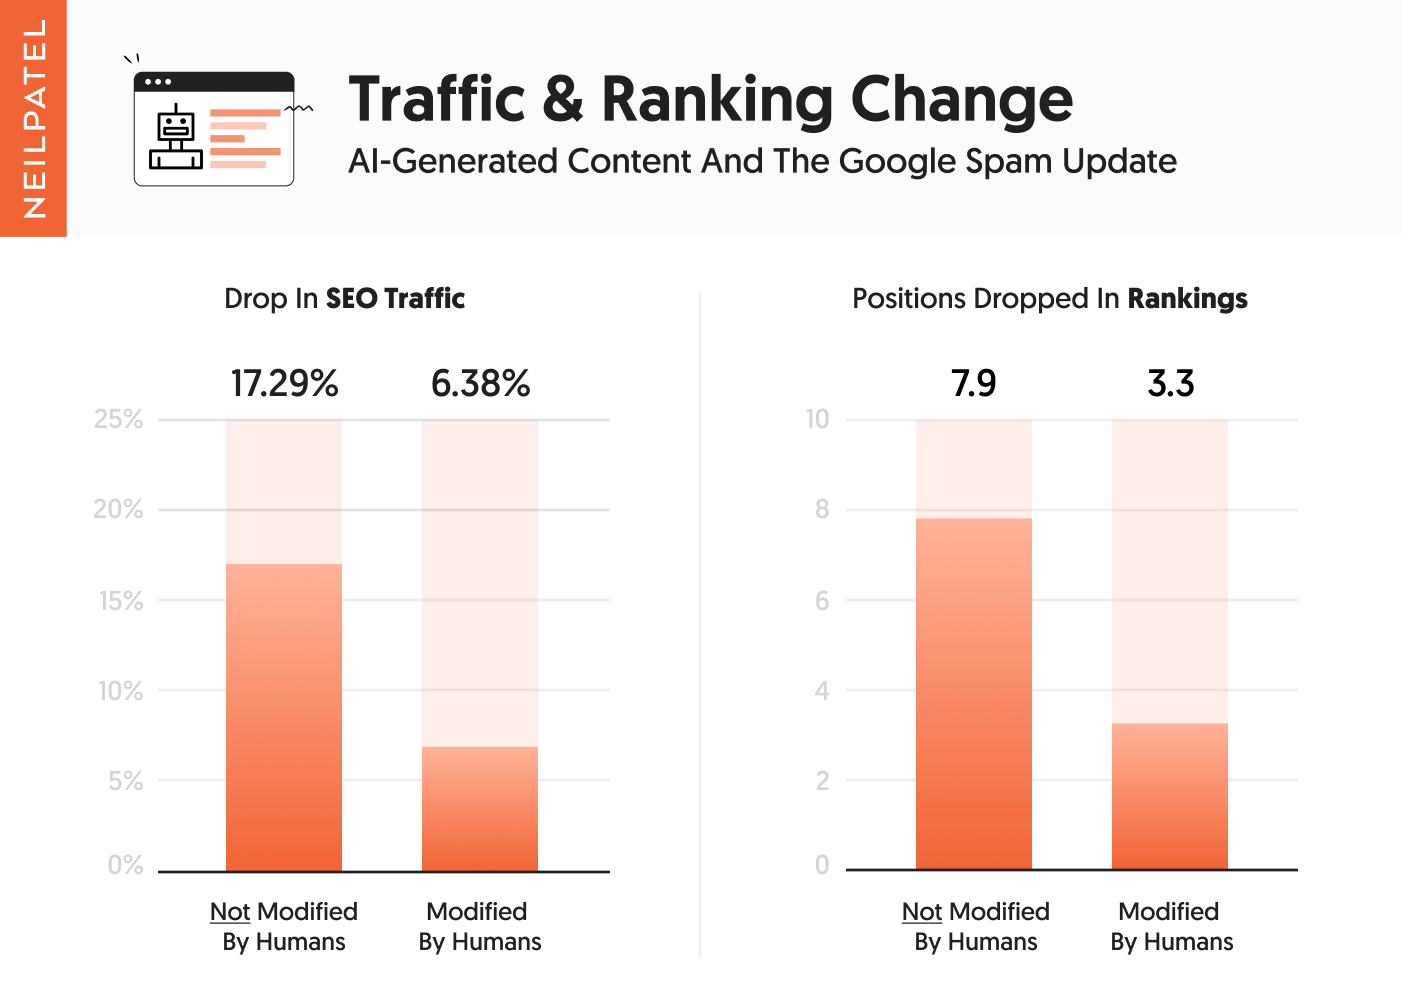
Now of the 100 AI content-generated sites, 53 have their content created purely through AI. And they also have their meta tags and even the headings within the article all created by AI.
Those pages don’t link out to other sites or even internal pages as AI content generation tools don’t really add links.
One thing to note is that most of the AI tools don’t really create content over 500 words unless you start adjusting the content or have the AI writer create content a paragraph at a time.
But for the first batch of AI sites (53 of them), we didn’t have humans modify or change up any of the content. We purely used the content that was created by AI in the form it was created including the meta tags the AI writer created.
Now in the second batch, we had 47 sites, on these sites we used AI to create the content, but then we had a human modify the content to ensure it was better and provided more value. Humans also added internal and external links, they modified the meta tags to be more user-friendly, and they added images and embed videos within the article when it made sense.
The one thing we didn’t do was increase the length much. Because from what we see from our Ubersuggest AI Writer most people just use AI-written content and don’t modify it much. When they do modify it, it tends to be slightly, and people really aren’t adding much in word count.
With our sites, we wanted to replicate what most marketers are doing with AI to get a sense of what Google is trying to solve.
Can you guess what happened to those sites?
The first group of AI-written content, which had no human intervention when it comes to modifying the content didn’t perform as well as the ones that had human intervention.
In essence, they saw on average a 17.29% drop in traffic and their keyword rankings dropped on average by 7.9 positions. Keep in mind that may seem like a lot but none of them really had number 1 rankings for any popular term.
The second group saw a 6.38% drop in traffic and on average a drop in ranking position by 3.3 positions.
But then when we dug deeper because I was curious to see the results for each site, we noticed that not all the sites were hit by the update.
Of the first group of 53 sites, in which the content was NOT adjusted by humans, 14 of them were hit by the update and saw traffic dips between 31.44% and 73.18%. On average the 14 sites lost 51.65% of their traffic.
From the second group, which had humans slightly modify the content, 8 sites were hit. They lost between 29.52% and 81.43% of their traffic. On average those 8 sites saw a 42.17% drop in traffic.
Now what’s funny is some of the other sites in both buckets saw smaller traffic drops such as a few percentage points and a few even saw slight traffic increase from SEO traffic by up to 4% when you compare pre-update and post-update traffic as it took 48 hours for the update to roll out.
But here is where it gets interesting, in the first group of the 14 sites that were affected, 13 of them also saw traffic drops from the helpful content update. And from the second group, all 8 of the sites were hit by the helpful content update.
One thing to note is that there weren’t tons of days of data post update from when Google finished rolling things out to when I released this blog post. And I didn’t want to compare Sunday traffic with Wednesday traffic. As you need to look at Sunday versus last Sunday to remove biasedness. Nonetheless, the above stats are what we saw and the ranking drops also confirm that these sites were hit by the update.
Conclusion
From what we are seeing, the majority of this update focused on content, meta tags, and keyword stuffing. It doesn’t mean Google didn’t look at other factors such as links or duplicative content, but we saw the biggest patterns related to the factors I mentioned above and AI-generated content.
If you want to do well in the long run focus on the user, it really is the way to win. In the short run, you may not come ahead but in the long run, you will.
Just ask yourself questions like is this piece of content going to be helpful to users? Is using the same meta tags on all pages helpful? Is my website providing enough value that people will want to link to me?
In essence, you are just spot-checking yourself and doing what’s best for users.
Have you lost track of all the content you’ve created? It’s easy to do.
If you’re anything like me, you’re so focused on coming up with ideas and creating new articles that you might lose track of what you’ve already created.
But the truth is the content you’ve already created is just as valuable as anything you’re yet to create, possibly more so. Optimizing it just a little bit could result in thousands of dollars more in revenue.
That’s why you need a content audit of existing pages. In this article, I’ll cover:
What a content audit is
Why you need an audit
Content audit tools at your disposal
How to run a content audit step by step
Ready to create an inventory of your assets? Then let’s begin.
What is a Content Audit?
A content audit is the process of creating an inventory of your website’s content assets and analyzing them against a set of criteria.
It’s a way of keeping track of the content you have created, seeing which assets need improving, and identifying which topics to tackle next.
A content audit can be as brief or as detailed as you want. You can audit your entire site, just your blog, or even just a category of your blog. They can all offer value and insight. I recommend doing a comprehensive audit, though. The time you spend on your audit now will pay off later.
Why Does My Website Need a Content Audit?
You should carve out the time to do a content audit to see where the gaps are and to start creating better content.
Why should you do a content audit? There are a number of reasons a content audit can help your website perform better.
A content audit offers a heap of benefits. These include:
Analyzing the performance of your content to help you make data-backed decisions about which pages to improve.
Highlighting pages on your site that aren’t optimized for SEO. Some pages may be missing metadata or have a poor heading structure, for instance.
Identifying SEO opportunities and content gaps that you can fill with new content.
Improving the quality of content on your site to upgrade the reader experience.
Identifying content you can repurpose.
Creating a complete inventory of content that makes managing your content strategy easier in the future.
Improving your content’s accessibility and inclusivity.
Whether or not you see value in running a content audit, there are certain points in the life of your website when running a content audit becomes essential. Consider running a content audit if:
Your website is a few years old and you’ve never run an audit.
There’s no clear strategy or you’ve inherited a content marketing strategy from another team.
You’re redesigning your website.
You think you’ve created content on every possible topic in your niche.
Determine Your Content Audit’s Purpose
How you approach a content audit will depend on your goals. While you can create a content audit that achieves all of the benefits I listed above, it will be much more effective if you pick one or two goals to focus on.
For instance, if you want to use a content audit to improve your SEO, then you’ll want to focus on identifying content gaps and pages with missing metadata. That means paying particular attention to the technical SEO of each page.
Given you are reading a digital marketing blog, I’m going to write the rest of this guide as if you were running an SEO-driven content audit. You can still use this guide if you’re looking to improve your reader’s experience or make your content more inclusive and accessible, but just know some of the more technical aspects may not be relevant.
Content Audit Tools
Software tools are an essential part of the content audit process. Rather than go through your website manually, noting each issue in turn, you can use the following tools to automate much of the process.
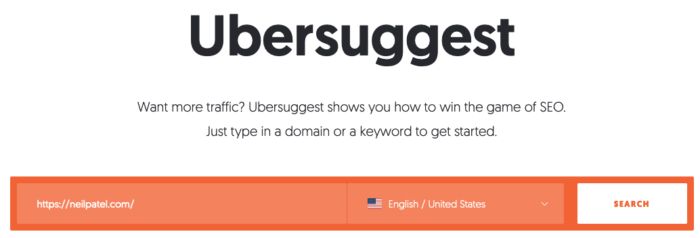
Ubersuggest
If you’re running a content audit to improve your SEO, Ubersuggest is essential. Running a site audit is easy. Just enter your URL, click “Search,” and click “Site Audit” on the left. Think of this as a quick, free overall look at how your website is doing.
You’ll also get a snapshot of which SEO issues are most prevalent on your site and how critical they are.
Google Analytics
Do you want to compare the performance of your pages? Then use Google Analytics to find traffic data for each page.
Note: Be aware that Google is sunsetting Universal Analytics on July 1, 2023, in favor of Google Analytics 4. If you haven’t already, you should make the switch to GA4 before completing your content audit. The faster you switch, the more historical data you’ll have and the easier it will be to reuse your content audit in the future.
You could manually pull each content link associated with your website, but that could take far too long and you could risk overlooking some things. Instead, you may want to try a content inventory tool like Screaming Frog or DynoMapper.
Website Content Audit Steps
It may seem like there’s a lot of work involved with creating a content audit. But it’s easy when you break it down into manageable steps.
#1: Create a List of Your Content Assets
The first step of a website content audit is to make an inventory of your assets. Seeing all of them in one location makes it much easier to analyze content performance, highlight areas to improve, and update each asset methodically.
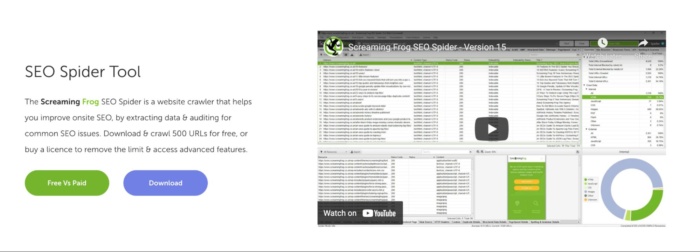
Screaming Frog’s SEO Spider Tool is the best way to extract content assets from your site. It’s free to use if your site has less than 500 pages. But you can also use any of the other content extractors I mentioned above.
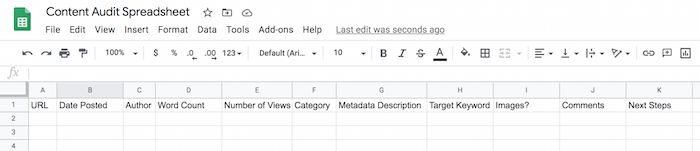
Whichever tool you use, export your data into a spreadsheet, making sure relevant data points (word count, meta description, target keyword, no. of images, etc.) are included. You may also want to add traffic data from Google Analytics to each page so you can analyze content performance alongside technical SEO metrics.
Content Audit Templates
As I explained above, you will want to build a content audit spreadsheet so you can keep all the data in one place. You can build one from scratch, download one of the following templates, or use these as a launching point and customize your spreadsheet.
Keep in mind the goals we discussed earlier. There are lots of stats or data points you could pull alongside each content. However, some data is going to be more relevant to you than others.
If you are using this audit to improve your content marketing engagement, you will want to check information about clickthroughs, social media engagement, comments, and so on.
If your goal is associated with SEO, you may want to include warnings and recommendations you gather from Ubersuggest.
#2: Create a List of Content Issues to Identify
Now you have all your content assets in one place; it’s time to analyze them. Go through each piece of content one at a time to see how it’s performing, whether it’s missing metadata or there are any obvious ways it can be improved.
Here are a few things to look for, in particular:
Duplicate Content: Search engines prioritize fresh content. If you have a lot of duplicate content living on different pages or posts, you’ll want to remove or rewrite those pages.
Outdated Content: People don’t want to read outdated content, and search engines overlook it too. Update it wherever possible.
Content Gaps: What’s missing in your content? Are there topics you haven’t addressed yet? Target markets you haven’t spoken to? Being able to look at everything at once can help you find the gaps and fill them in.
Target Keyword: Does the content asset target a particular keyword and include it in the copy?
Metadata: Have you written metadata descriptions for all pages? This spreadsheet is going to help you see which ones need to be written and which ones are repetitive and should be updated.
Image Data: Does every image have a descriptive title and alt tag? This will ensure your images are SEO-optimized and accessibility-friendly.
Word Count: Do your pages and posts have enough words to optimize for SEO? Or are they too short? Check that word count to see if pages need to be updated or edited down.
Keep track of everything by creating a note next to each asset about why it needs improving. You can also color-code your spreadsheet based on the type of optimization required, but this can quickly become complicated if a single asset has multiple issues.
#3: Address Content Issues
You can’t do everything at once, so now it’s time to prioritize your content issues. One strategy is to work through each asset numerically, starting with those at the top of the spreadsheet. Another is to group each optimization issue together and tackle them in bulk. For instance, you could update the meta data on every page, then move on to fixing image issues and so on.
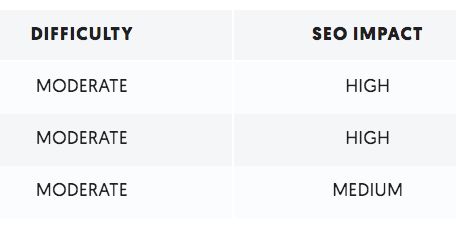
Alternatively, use Ubersuggest to prioritize content issues for you. When you run an SEO audit on Ubersuggest, you’ll receive recommendations based on an issue’s difficulty and SEO impact.
Focusing on tasks with a high SEO impact and low difficulty will give you a series of quick wins. But you could also prioritize all of the easy tasks to get the ball rolling if you’re not that confident.
Content audits work best when they are tackled by several people, so don’t be afraid to ask for help and split up the work. Maybe you can take care of on-page issues while a colleague addresses the content gaps your audit has highlighted.
FAQs
What is a Content Audit?
A content audit is the process of creating an inventory of your website’s pages and analyzing their performance.
Why Do I Need To Do a Content Audit on My Website?
Content audits help you identify topic gaps, problems, and areas for improvement on your website. Good content helps you rank better in Google and can earn you more traffic, conversions, and revenue.
What Are Some Tools I Can Use for Content Audits?
You can use tools like Ubersuggest, SEMrush, and Ahrefs to run a content audit.
Where Do I Start With a Content Audit?
You should start your content by compiling a list of all of your content assets. You can do this by pulling a report through tools like Screaming Frog and then analyzing the results in a spreadsheet.
Conclusion
A content audit may feel overwhelming at first glance. But don’t let that stop you.
Starting a website content audit is one of the best steps you can take to improve your content marketing strategy. Compiling all of your assets in one place makes it much easier to see what needs improving and which assets are missing. It also makes it easier to prioritize and fix issues.
Once you’ve run a content audit once, managing your assets in the future becomes a breeze. You’ll have no problem taking your content marketing efforts to the next level.
Have you lost track of all the content you’ve created? It’s easy to do.
If you’re anything like me, you’re so focused on coming up with ideas and creating new articles that you might lose track of what you’ve already created.
But the truth is the content you’ve already created is just as valuable as anything you’re yet to create, possibly more so. Optimizing it just a little bit could result in thousands of dollars more in revenue.
That’s why you need a content audit of existing pages. In this article, I’ll cover:
What a content audit is
Why you need an audit
Content audit tools at your disposal
How to run a content audit step by step
Ready to create an inventory of your assets? Then let’s begin.
What is a Content Audit?
A content audit is the process of creating an inventory of your website’s content assets and analyzing them against a set of criteria.
It’s a way of keeping track of the content you have created, seeing which assets need improving, and identifying which topics to tackle next.
A content audit can be as brief or as detailed as you want. You can audit your entire site, just your blog, or even just a category of your blog. They can all offer value and insight. I recommend doing a comprehensive audit, though. The time you spend on your audit now will pay off later.
Why Does My Website Need a Content Audit?
You should carve out the time to do a content audit to see where the gaps are and to start creating better content.
Why should you do a content audit? There are a number of reasons a content audit can help your website perform better.
A content audit offers a heap of benefits. These include:
Analyzing the performance of your content to help you make data-backed decisions about which pages to improve.
Highlighting pages on your site that aren’t optimized for SEO. Some pages may be missing metadata or have a poor heading structure, for instance.
Identifying SEO opportunities and content gaps that you can fill with new content.
Improving the quality of content on your site to upgrade the reader experience.
Identifying content you can repurpose.
Creating a complete inventory of content that makes managing your content strategy easier in the future.
Improving your content’s accessibility and inclusivity.
Whether or not you see value in running a content audit, there are certain points in the life of your website when running a content audit becomes essential. Consider running a content audit if:
Your website is a few years old and you’ve never run an audit.
There’s no clear strategy or you’ve inherited a content marketing strategy from another team.
You’re redesigning your website.
You think you’ve created content on every possible topic in your niche.
Determine Your Content Audit’s Purpose
How you approach a content audit will depend on your goals. While you can create a content audit that achieves all of the benefits I listed above, it will be much more effective if you pick one or two goals to focus on.
For instance, if you want to use a content audit to improve your SEO, then you’ll want to focus on identifying content gaps and pages with missing metadata. That means paying particular attention to the technical SEO of each page.
Given you are reading a digital marketing blog, I’m going to write the rest of this guide as if you were running an SEO-driven content audit. You can still use this guide if you’re looking to improve your reader’s experience or make your content more inclusive and accessible, but just know some of the more technical aspects may not be relevant.
Content Audit Tools
Software tools are an essential part of the content audit process. Rather than go through your website manually, noting each issue in turn, you can use the following tools to automate much of the process.
Ubersuggest
If you’re running a content audit to improve your SEO, Ubersuggest is essential. Running a site audit is easy. Just enter your URL, click “Search,” and click “Site Audit” on the left. Think of this as a quick, free overall look at how your website is doing.
You’ll also get a snapshot of which SEO issues are most prevalent on your site and how critical they are.
Google Analytics
Do you want to compare the performance of your pages? Then use Google Analytics to find traffic data for each page.
Note: Be aware that Google is sunsetting Universal Analytics on July 1, 2023, in favor of Google Analytics 4. If you haven’t already, you should make the switch to GA4 before completing your content audit. The faster you switch, the more historical data you’ll have and the easier it will be to reuse your content audit in the future.
You could manually pull each content link associated with your website, but that could take far too long and you could risk overlooking some things. Instead, you may want to try a content inventory tool like Screaming Frog or DynoMapper.
Website Content Audit Steps
It may seem like there’s a lot of work involved with creating a content audit. But it’s easy when you break it down into manageable steps.
#1: Create a List of Your Content Assets
The first step of a website content audit is to make an inventory of your assets. Seeing all of them in one location makes it much easier to analyze content performance, highlight areas to improve, and update each asset methodically.
Screaming Frog’s SEO Spider Tool is the best way to extract content assets from your site. It’s free to use if your site has less than 500 pages. But you can also use any of the other content extractors I mentioned above.
Whichever tool you use, export your data into a spreadsheet, making sure relevant data points (word count, meta description, target keyword, no. of images, etc.) are included. You may also want to add traffic data from Google Analytics to each page so you can analyze content performance alongside technical SEO metrics.
Content Audit Templates
As I explained above, you will want to build a content audit spreadsheet so you can keep all the data in one place. You can build one from scratch, download one of the following templates, or use these as a launching point and customize your spreadsheet.
Keep in mind the goals we discussed earlier. There are lots of stats or data points you could pull alongside each content. However, some data is going to be more relevant to you than others.
If you are using this audit to improve your content marketing engagement, you will want to check information about clickthroughs, social media engagement, comments, and so on.
If your goal is associated with SEO, you may want to include warnings and recommendations you gather from Ubersuggest.
#2: Create a List of Content Issues to Identify
Now you have all your content assets in one place; it’s time to analyze them. Go through each piece of content one at a time to see how it’s performing, whether it’s missing metadata or there are any obvious ways it can be improved.
Here are a few things to look for, in particular:
Duplicate Content: Search engines prioritize fresh content. If you have a lot of duplicate content living on different pages or posts, you’ll want to remove or rewrite those pages.
Outdated Content: People don’t want to read outdated content, and search engines overlook it too. Update it wherever possible.
Content Gaps: What’s missing in your content? Are there topics you haven’t addressed yet? Target markets you haven’t spoken to? Being able to look at everything at once can help you find the gaps and fill them in.
Target Keyword: Does the content asset target a particular keyword and include it in the copy?
Metadata: Have you written metadata descriptions for all pages? This spreadsheet is going to help you see which ones need to be written and which ones are repetitive and should be updated.
Image Data: Does every image have a descriptive title and alt tag? This will ensure your images are SEO-optimized and accessibility-friendly.
Word Count: Do your pages and posts have enough words to optimize for SEO? Or are they too short? Check that word count to see if pages need to be updated or edited down.
Keep track of everything by creating a note next to each asset about why it needs improving. You can also color-code your spreadsheet based on the type of optimization required, but this can quickly become complicated if a single asset has multiple issues.
#3: Address Content Issues
You can’t do everything at once, so now it’s time to prioritize your content issues. One strategy is to work through each asset numerically, starting with those at the top of the spreadsheet. Another is to group each optimization issue together and tackle them in bulk. For instance, you could update the meta data on every page, then move on to fixing image issues and so on.
Alternatively, use Ubersuggest to prioritize content issues for you. When you run an SEO audit on Ubersuggest, you’ll receive recommendations based on an issue’s difficulty and SEO impact.
Focusing on tasks with a high SEO impact and low difficulty will give you a series of quick wins. But you could also prioritize all of the easy tasks to get the ball rolling if you’re not that confident.
Content audits work best when they are tackled by several people, so don’t be afraid to ask for help and split up the work. Maybe you can take care of on-page issues while a colleague addresses the content gaps your audit has highlighted.
FAQs
What is a Content Audit?
A content audit is the process of creating an inventory of your website’s pages and analyzing their performance.
Why Do I Need To Do a Content Audit on My Website?
Content audits help you identify topic gaps, problems, and areas for improvement on your website. Good content helps you rank better in Google and can earn you more traffic, conversions, and revenue.
What Are Some Tools I Can Use for Content Audits?
You can use tools like Ubersuggest, SEMrush, and Ahrefs to run a content audit.
Where Do I Start With a Content Audit?
You should start your content by compiling a list of all of your content assets. You can do this by pulling a report through tools like Screaming Frog and then analyzing the results in a spreadsheet.
Conclusion
A content audit may feel overwhelming at first glance. But don’t let that stop you.
Starting a website content audit is one of the best steps you can take to improve your content marketing strategy. Compiling all of your assets in one place makes it much easier to see what needs improving and which assets are missing. It also makes it easier to prioritize and fix issues.
Once you’ve run a content audit once, managing your assets in the future becomes a breeze. You’ll have no problem taking your content marketing efforts to the next level.
I don’t get it. I have a ton of friends who own companies. As soon as they start making some money, they start talking to me about all kinds of investments.
“Real estate’s supposed to be good.”
“I wanna be an angel investor, any tips?”
My usual response?
“Google Ads, dude!”
They run these big companies, selling great products, and what do they do? Run off and try to put their money in anything, EXCEPT their own business.
Why not just sell more of their products? Double down on what’s already working, instead of starting to play in a field you know nothing about?
In my experience, Google Ads is usually the easiest way to do it. If my friend wants to increase his investment money, say $50,000, he can spend 1000 hours trying to become good at angel investing, learn everything about it, and hopefully land an investment in the next Facebook. A friend of mine could do the same for real estate, trying to snag a cheap apartment or condo, and flip it (easier, but still hard).
Instead, you can spend 100 hours learning Google Ads (or just hire someone who knows it) and invest $50,000 in Google Ads campaigns to make $500,000 in sales. Which one do you think is the most likely to pan out?
In my opinion, option three is a no-brainer.
In light of that, today, I want to open a black box most people are unfamiliar with: Google Ads.
Google Ads is a way to get your money’s worth, often boasting an ROI in the hundreds of percentage points. However, the steps I cover here ensure you’re depositing more money into your own bank account rather than just funding Google’s empire.
Now, let’s get down to it. Tie on your Google Ads apron, grab a pen to write down the key steps of a successful campaign, and follow along as I walk you through how to create a profitable Google Ads campaign from scratch.
See How My Agency Can Drive Massive Amounts of Traffic to Your Website
SEO – unlock massive amounts of SEO traffic. See real results.
Content Marketing – our team creates epic content that will get shared, get links, and attract traffic.
Paid Media – effective paid strategies with clear ROI.
If your customers are not searching for your product or service online, then obviously, Google Ads won’t work for you.
With that in mind, before you get too excited about creating your first Google Ads campaign, you need to verify there is a search volume for what you’re offering.
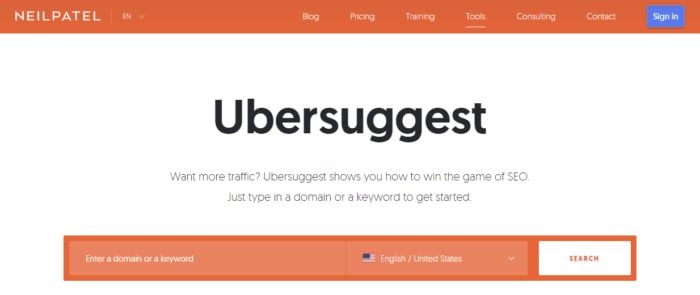
I recommend using Ubersuggest, which is my free keyword research tool. The keyword tool acts much like a thesaurus. You enter in phrases you think your prospects are searching for, and it tells you other similar, relevant phrases.
Additionally, Ubersuggest tells you how:
often people search these phrases.
competitive the keywords are.
much it costs to advertise on each keyword.
When put together, all this information helps you determine which keywords to use in your first Google Ads campaign.
I also recommend you use the keyword “Suggestions” provided under the main chart. This gives you an idea of related keywords and how much search volume those keywords have.
In addition, you can use Google’s Keyword Planner tool to help you find the best keywords to target. It provides you with bid estimates and total searches, so you can make a plan.
Next, there are three questions to ask to determine whether to advertise on a particular keyword:
Are people looking for the keyword on Google? If there is no search volume, then that tells you no one is typing that phrase into Google.
Is the person searching this keyword likely to buy my product or service? Or is the person more likely just doing research with no intention of buying? In other words, what is the intent of the keyword? When starting out, you need to build your advertising around “buying intent” keywords where the person is clearly looking to buy.
Finally, ask yourself, can I afford to advertise on the keyword? This question is important, but it requires a bit of math to calculate. Let’s take a look at that now.
Google Ads Step #2: Can You Afford to Advertise on Top Keywords?
Before finalizing your keyword list, you must ensure it makes sense to target that term. This prevents you from going after unprofitable keywords. I find it’s better to run these numbers before you start sinking time and money into a campaign destined to fail.
To answer the question “Can I afford to advertise on this keyword?” you need to calculate your maximum cost per click (Max CPC). To do this, you compare your business’s Max CPC to the estimated keyword CPC in the Keyword Tool to see if you can afford to advertise.
For example, if your Max CPC is $5 and the estimated CPC is $4, then you know there’s a good chance you can profitably advertise on that particular keyword.
You determine your Max CPC by your website’s conversion rate, profit per customer, and target advertising profit margin. If you don’t know these numbers, you need to guesstimate or set up tracking to calculate them more accurately.
Use the formula below to calculate your Max CPC and then compare it to the estimated CPC you found above:
Max CPC = (profit per customer) x (1 – profit margin) x (website conversion rate)
For example, let’s say your average profit per customer is $500, and out of 1,000 website visitors, you convert 10 into customers. That means you have a 1 percent website conversion rate.
If you are comfortable with a 30 percent profit margin, then here’s how you would calculate your Max CPC:
Max CPC = $500 x (1 – 0.30) x 1% = $3.50
Again, your Max CPC must be in the neighborhood of the estimated CPC in Google’s Keyword Planner tool, or else you’re in trouble.
Suppose your Max CPC is $3.50 and the estimated CPC for a keyword is $10. In that case, you need to first increase either your profit per customer or your conversion rate before you can profitably advertise on that particular keyword.
Google Ads Step #3: Perform Competitor Analysis
At this point, you now have a list of “buying intent” keywords that you’re confident you can afford. The next step is to reduce your risk by leveraging competitor intelligence.
In most industries, you find competitors who know far more than you do about optimizing and testing their Google Ads campaigns. That means they understand which keywords, ads, and landing pages work in your niche. Peeking into your competitor’s business helps you to determine if it’s easy to outrank a competitor.
Here’s how to get started.
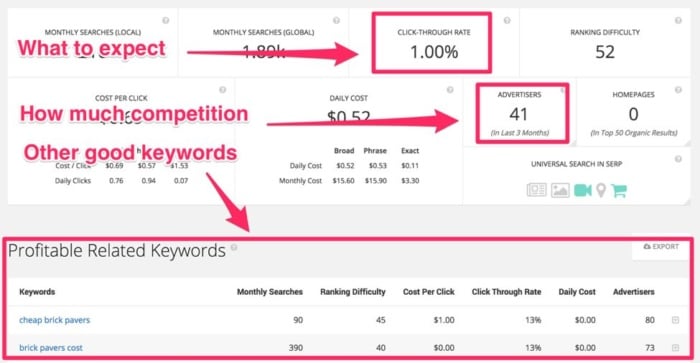
Go to Spyfu.com and enter your keyword. In this case, it’s “cheap bricks.”
It shows you the average CTR and the number of companies that have advertised for this keyword in the past three months.
In this case, there are just 41, which is nothing, considering there are over 1 million companies advertising on Google Ads.
It also shows you other keywords that are performing well on Google Ads.
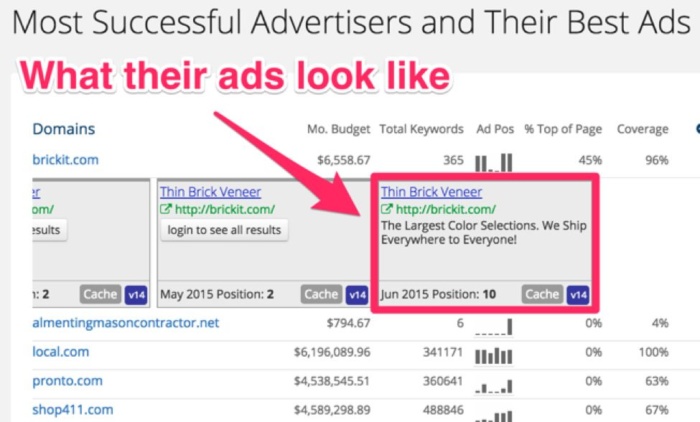
If you click on “Advertiser history,” you even see the actual ads that your competitors use.
Pro tip: One determinant of relevancy, for Google’s quality score, is whether the keyword shows up in your actual ad.
In this case, Brickit doesn’t even mention bricks in its ad. That means they shouldn’t be too hard to beat.
However, here’s an even better tip.
You can look up an individual competitor. Maybe start with the 800-pound gorilla who’s dominating the SERPs.
Then you can go in and look up all the keywords they’re currently bidding on (along with their estimated volume and costs, of course).
See, combining these approaches helps you uncover your competition’s entire PPC playbook, and then you can reverse engineer it to outperform them.
Sneaky, right?!
Don’t compete. Dominate.
Google Ads Step #4: Leverage a Powerful USP
Your USP, or unique selling proposition, differentiates your business from your competitors and gives your prospects a compelling reason to choose you.
In other words, your USP answers the question, “Why should I, your prospect, choose to do business with you, versus every other option.”
When it comes to Google Ads, there are three important reasons to create a powerful USP. It:
generates more traffic from qualified prospects (encourage clicks on your ads) and repels unwanted leads (prevent clicks on your ads).=
skyrockets your sales conversion rates. Not only do you generate more traffic because you get more clicks on your ads, but you also convert more of your traffic into paying customers.=
reduces price comparison shopping. This can be a game-changer because buyers don’t view you as a commodity. If you give your prospects a compelling reason to do business with you, then price becomes a secondary issue
OK, a USP is a key ingredient. Makes sense, but how do you create one?
Well, first, you focus on your core strengths. What are you better at than your competitors?
Second, talk to your customers, and more importantly, listen to them. The best companies built their USP on customer insight, so ask your customers why they do business with you.
Also, ask questions to determine what your customers dislike about your industry and what your customers wish you could provide in addition to your core products or services.
Third, analyze your competitors, and look for an opening. The most important word in unique selling proposition is unique.
To create a solid USP, you need to study your competitors’ ads, websites, and marketing materials, and find your opportunity to stand out. To find the commonalities in your competitors’ ads and websites, I recommend you use a spreadsheet. As you’re doing this, look for an opening to say something unique and superior.
For example, remember the old Domino’s slogan?
“You get fresh, hot pizza, delivered to you in under 30 minutes – or it’s free!”
What more could you want when ordering pizza? Fast delivery and it’s still hot when you get it.
Domino’s Pizza doesn’t claim to be all things to everybody, though. In fact, it doesn’t even mention quality ingredients, price, or taste. It focuses its entire business on the one thing its customers care about most – fast, on-time delivery.
Picture some college students late Saturday night, and you’re looking at Domino’s Pizza’s ideal customer profile!
Now, spend some time thinking about how you’re different from everyone else. What can you bring to the table that your competitors don’t?
Capitalize on that.
Google Ad Step #5: Have an Irresistible Offer
What can you offer in your Google Ads campaign that is so compelling your prospect would be a fool to not take action? How can you stand out from the other ads your prospect sees in the search results?
Your product or service must be more valuable than the price. That’s marketing 101. This doesn’t mean your offer has to be cheap. You just need to clearly define all the value your product or service provides to your customer and ensure it outweighs your price tag.
2. Believable
When you make an offer that appears to be too good to be true, then your prospect may be a little skeptical. That’s why you must provide a believable reason for your offer.
For example, if you’re running a special sale, explain why you’re offering such a steep discount. The reason could be anything: clearing out inventory, end-of-the-year sale, celebrating an anniversary, opening a new store, your birthday, and so on.
3. Reduce or Reverse Risk
Everyone is scared of getting ripped off online. One of the best tactics to minimize the risk to your customer is with a money-back guarantee. A money-back guarantee puts the risk on your business to deliver excellent service, or else you have to give the money back to the customer.
Whenever possible, I always recommend you include some kind of guarantee in your offer. It improves your response rates, and it’s a great way to differentiate yourself from your competitors.
4. Call to Action
One of my elementary school art teachers once gave me fantastic advice when he was teaching a class. He told me to always “Use the KISS method… Keep it simple, stupid.” I didn’t realize it at the time, but those truly are words to live by, especially when you’re creating an irresistible offer.
If you want your prospect to call you, then make it crystal clear and simple to pick up the phone. Don’t expect your prospect to connect the dots or search around your website to figure out the next step. Use a strong call to action and keep it simple.
At this point, you’re probably wondering when you actually create your Google Ads campaign. After all, we’re already halfway through the steps, and you don’t have any ads to show for it!
Trust me, the first five steps are absolutely critical, and you’ll thank me later once your ads are live and you’re generating profit.
However, since you’re so keen, let’s dive in and talk about creating your ads.
Google Ads Step #6: Create Compelling Ads
With a Google Ads campaign, you pay only when people click on your ads. Therefore, your ads have two crucial jobs:
Attract qualified prospects so they click on your ad instead of competitors’ ads.
Repel unqualified prospects so they do not click and waste your Google Ads budget.
That means more traffic, more sales, and less wasted money on unqualified leads, which all leads to higher profits for you.
Don’t forget that your ads directly affect how much you pay per click for each keyword. Great Google Ads lower your costs, while lousy ones raise your costs.
Do you see why step #6 is so important? This is also why you must complete the previous steps, because we use them all to make the ads more compelling.
There are four key components to your Google Ads text ads:
Headline
Description line 1
Description line 2
Display URL
Headline
The headline is the most critical component because it’s the first thing your prospect will read. Try to include your keyword in your ads’ headline because Google will bold the text, which makes it stand out from other ads.
This also is the easiest way to ensure your ad is 100 percent relevant for the prospect that is searching.
Another great strategy is to ask a question in the headline. For example, if the keyword is “new york city dentist,” a compelling headline is “Need a New York Dentist?”
Not only is part of the keyword in the headline, but the question will get the prospect nodding their head yes. As all great salespeople know, just one yes is sometimes all it takes to start a chain reaction leading to the sale.
In your two description lines, reiterate the benefits of your service, state your USP, provide social proof, and/or describe your offer. And, of course, include your call to action. Google’s description fields allow 90 words each.
Display URL
The display URL is an easily overlooked area of your ads. Don’t just copy and paste your domain name. Instead, use your display URL to include your offer, your call to action, your USP, or anything else that makes your ads stand out.
Here are three examples for a dentist to give you an idea of what you can do:
www.domain.com/Whiter_Smile
www.domain.com/NYC_Dentist
www.domain.com/Free_Whitening
Before we move on, I want to show you an example of a good ad and a bad ad, so you can see the difference.
Example of a Good Ad for the Keyword “appliance repair”:
Same Day Sub-Zero Repair
24 Hour Service…Within 1 Hour
$25 Off Coupon. Call Us Now.
As you can see, the advertiser is clearly targeting a specific niche – people with Sub-Zero appliances. They offer compelling benefits, including same-day 24-hour service within one hour. They have an offer of a $25-off coupon. And they have a clear call to action to call now.
Note that I would try to improve this ad by including the keyword in the title to make it more relevant to the search phrase.
Example of a Weak Ad for the Keyword “appliance repair”:
[Name of Company]
family-owned since 1939 for all
your appliance needs call now
The headline of this ad was the name of the company, which is not relevant to the keyword “appliance repair.” Unless you’re a big-name brand, no one will recognize or even care about your name. It’s not compelling and there’s no congruence from the keyword to the ad.
Also, “family-owned since 1939” is not a specific benefit. There’s implied benefit if the prospect puts two and two together and believes longevity equals good service. However, that’s a lot to ask and clearly does not follow the KISS principle. Stick to explicit benefits rather than implied benefits in your ads.
Finally, the phrase “for all your appliance needs,” is too vague. This is an example of trying to be all things to all people, rather than solving a very specific problem for a very specific target customer.
Google Ads Step #7: Use Relevant Landing Pages
At this point, your prospect is actively searching for your product or service. They found your ad to be compelling versus all of the other options, clicked to learn more, and landed on your website.
Now what?
Well, if you’re like a lot of first-time advertisers, then your prospect is now on your homepage scratching their head trying to figure out what just happened. The ad made a promise the homepage couldn’t keep.
That’s because your homepage is not an advertising landing page!
Homepages explain everything your business does, all of your products and services, and all the different customers you serve. In other words, your homepage is not 100 percent relevant to the keyword searched and the ad clicked. Do not make this mistake.
Instead, create a dedicated landing page that matches the keyword and the ad. The goal is to make the entire sales process congruent so your prospect is continually reassured they are going down the right path.
The most important component on your landing page is your headline, which is the first thing your prospect will read. Your headline must grab attention, reiterate the offer made in the ad, and compel your prospect to keep reading the rest of the page.
Ensure the copy of high-converting landing pages is relevant both to the keyword searched and the ad clicked on. In addition, include:
We’re almost ready to set up your campaign in Google Ads, but there is one final ingredient: conversion tracking.
If you skip this step, you never know which keywords and ads generate sales and which are losing money. In other words, you can’t optimize your Google Ads campaign once it’s up and running.
Conversion tracking measures the sales generated by your Google Ads campaign. More specifically, you want to know which keywords and which ads are generating sales.
If some or all of your sales occur online with an e-commerce shopping cart, then conversion tracking is pretty straightforward. Just use the built-in Google Ads conversion tracking.
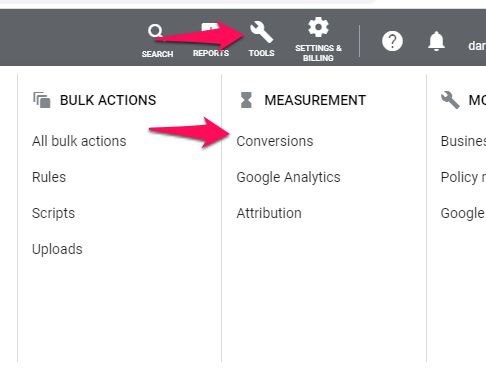
The Google Ads conversion tracking code can be found in your Google Ads account under the tool icon, then “Measurements > Conversions.”
To create a new conversion, simply click on the [+ Conversion] button and follow the steps to define your conversion. Then add the small snippet of code to your order form’s thank-you page or receipt page.
This code is similar to Google Analytics code, if you have that installed on your website, but it should be on only the final page after a customer completes their order.
Then, when a customer lands on your receipt page or thank you page, Google tracks the conversions in your Google Ads account automatically. That’s really all there is to it, and there’s no reason not to install this before you turn on your ads.
Google can also track app installs, web conversions, phone calls, and offline conversions.
What if you generate leads online, but you ultimately close the sale “offline” – over the phone or in-person – rather than online? Clearly, you can’t add a conversion code to your cash register, so what can you do?
The three tactics I recommend for tracking offline sales are:
Create a conversion page in your sales process. For example, send all of your customers to a special page to get their receipt, create an account online, or download an important document. Think of a way to get your customers to that webpage and add the Google Ads code to that page. Now you can track the sales.
Use unique coupon codes in your ads and landing pages. If you use unique coupon codes in your ads and landing pages, then you can match the codes back to the ad and keyword that generated the sale.
Use tracking phone numbers in your ads and landing pages. If you use unique tracking phone numbers, you can match the calls and subsequent sales to the ads and keywords that generated the sale.
Once conversion tracking is in place, then the time has finally come to log into Google Ads and set up your first campaign.
The Google Ads interface makes campaign setup a breeze, but don’t blindly accept the default settings as one of them can get you into trouble.
Google Ads Step #9: Settings for Success
As I mentioned, Google Ads does a great job of making it fairly easy to set up your Google Ads campaign. Simply click on the blue plus symbol, then the New Campaign button, as shown below, and follow the steps to add in your ads and keywords.
The process is pretty simple; however, many of the default settings are not in your best interest. That’s why step #9 is to use the correct Ads settings for success.
Here are the most important settings to watch out for:
Search vs. Display
Device Bids
Keyword Match Types
Negative Keywords
Search vs. Display
Select Search Network Only for your campaign type, so you’re targeting only the Google Search Network and not the Display Network.
The display network is a completely different animal than search advertising and it requires a different set of keywords, ads, and landing pages. So always set up separate campaigns to target each network.
Keyword Match Types
Many first-time advertisers have no idea there are different match types. As a result, they waste money on irrelevant search phrases that are not part of the keywords listed in the account.
There are three main keyword match types:
broad
phrase
exact
Broad match, as you now know, is the default match type. If you leave your keywords as a Broad match, then Google will show your ads to any search phrase Google thinks is relevant to your keyword.
This means your ads will get more impressions, but you’ll likely show ads to irrelevant search phrases that will just waste your budget. So I do not recommend Broad match.
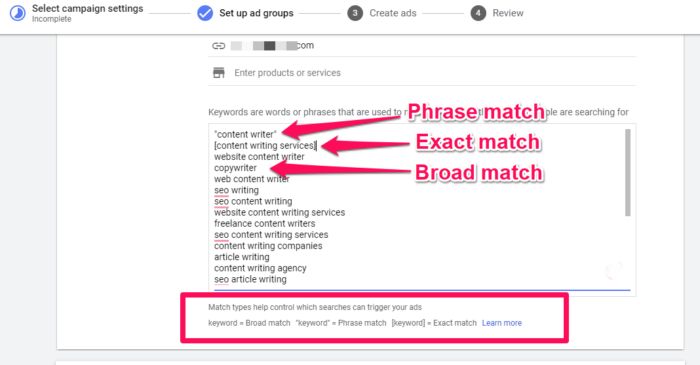
Phrase match keywords will trigger ads when the exact phrase is part of the keyword typed into Google. For example, if your Phrase match keyword is “office space,” then your ad will display for “New York office space” and “office space in New York.” However, your ad would not display for “office in space” because the phrase “office space” is broken up by the word “in.”
Phrase match gives you much more control over your ads than Broad match. To change your keyword to Phrase match, simply add quotes around the keyword (see image below).
Exact match simply tells Google to display your ad only when the exact keyword is typed into Google. You get the most control with Exact match, but you limit your exposure. To set your match type to Exact match, add square brackets around your keywords (see image below).
I recommend starting with Phrase match because you get the best of both worlds with regard to targeting and reach. However, when you use Phrase match, you need to make sure you include negative keywords.
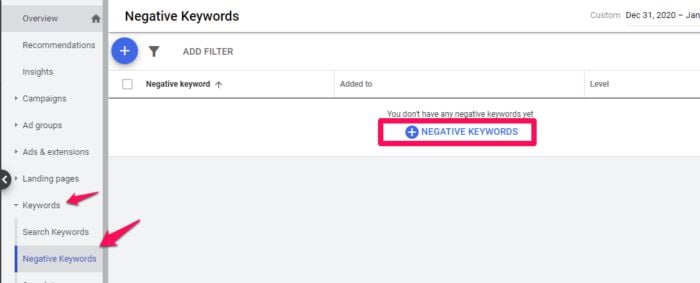
Negative Keywords
Negative keywords give you the ability to block phrases from triggering your ads. For example, if you’re an office space rental company advertising on the Phrase match keyword, “office space,” then you will want to block the keyword “movie.”
That way, Google won’t display your ads for an office space rental for folks searching for the Office Space movie.
To add negative keywords, go to the Keywords tab in your account, scroll down, and click on the Negative keyword link (see image below).
Next, click the Add button to add in the keywords you want to block.
Once you’ve completed the setup process, then you’re ready to enable the ads and start optimizing your campaign!
Google Ads Step #10: Optimization
As soon as you set your bidding, enable your campaign, and Google approves your ads, you can take a nice deep breath. Congratulations, your ads are live!
Unfortunately, you can’t relax yet. Most campaigns are not profitable from the start and they always require continual optimization to stay profitable.
There are three main areas to improve your Google Ads campaign performance:
Your keyword bids. For getting started, I recommend using Smart Bidding but once you start to generate clicks and sales, you might want to adjust your bids accordingly. If your keywords are generating sales profitably and you’re not ranked #1, then continue to raise your bids. If your keywords are not generating sales profitably, then obviously, you need to lower your bids or pause the keyword entirely.
Your ad click-through rate (CTR). As I mentioned earlier, your ad CTR directly affects your quality score, which in turn determines how much you pay per click. To optimize your CTR, A/B test different ads to see which version gets the most clicks.
Your landing page conversion rate. The final area to optimize is your landing page. There are many tools to help you test different landing page versions, but if you’re just starting out, I recommend you use Google Optimize. It’s easy and free to get started. Create an experiment to test two different versions of your landing page and measure to see which one generates the most conversions.
Conclusion
You’ve set up your Google Ads. What do you do now? Don’t sit back and wait. I’m serious.
Turn on your second ad and once everything is running, do something else.
Don’t sit at the computer waiting for things to happen.
Remember the third promise that you made before we began? Google Ads takes patience.
Google provides a free tool called Google Search Console that offers a ton of detailed information about your site’s performance, security issues, errors, and more.
How does it work? That’s what we’re going to cover today.
What is Google Search Console?
Google Search Console is a suite of tools from Google that helps you track your site’s performance, find issues, and help your site rank higher in Google. It is a powerful, but complex, tool.
Back in 2010, we wrote a thorough beginner’s guide to Google Webmaster Tools. Since then, there have been significant changes to Google Webmaster Tools, including a rebranding as Google Search Console.
We’ve updated this guide to include how to use Google Search Console, what data you’ll find about your website, important data you might have forgotten about, and how to continually monitor for any issues that might affect your search engine rankings.
How to Set Up Google Search Console
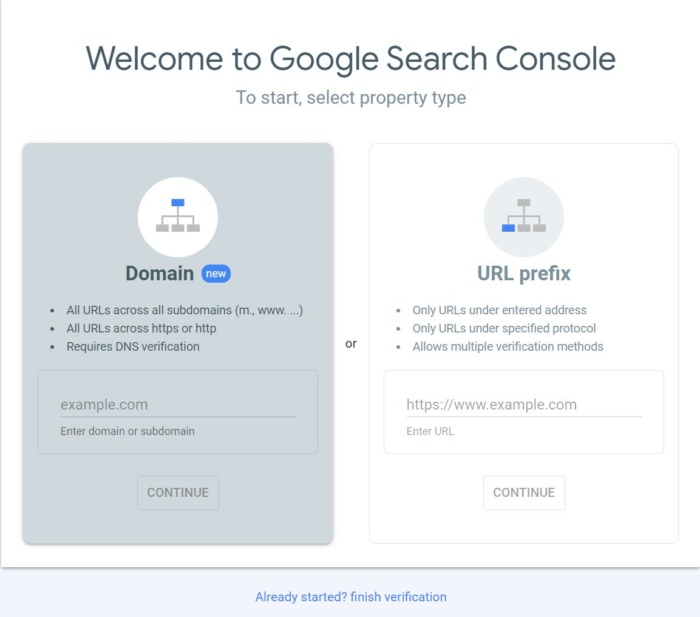
If you haven’t already, the first thing you will need to do is set up your website with Google Search Console.
To do this, visit the Search Console website, sign in with your Google Account, preferably the one you are already using for Google Analytics.
Click the Start Now button to the lower left-side of the screen, and you’ll see this dialogue box:
Select the URL prefix, as it gives you more options for verification.
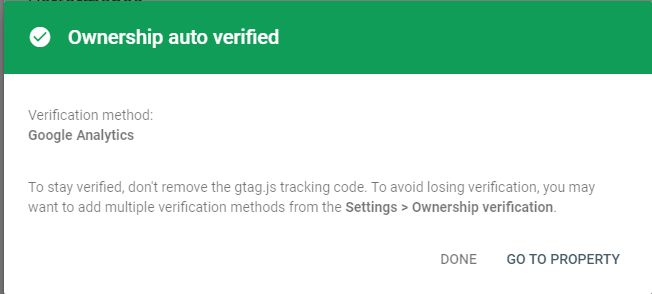
Next, you will have to verify this site as yours.
Previously, this involved embedding code into your website header or upload an HTML file to your web server.
Now, if you already have Google Analytics, it automatically verifies your site for you and you will see this:
One of the newest verification options, DNS CNAME verification, is actually something that was in the old Google Webmaster Tools, but has been brought back for Google Search Console.
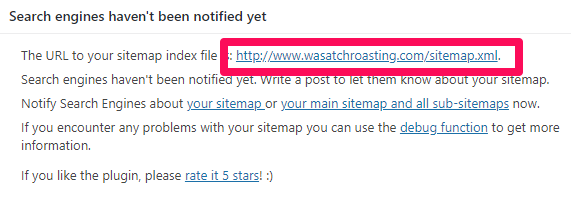
Once your site is verified, you will want to submit a sitemap if you have one available.
This is a simple XML file that will tell Google Search Console what pages you have on your website.
If you have one already, you can usually find it by typing in http://yourdomain.com/sitemap.xml to see it in your browser.
If you are running a website on your own domain using WordPress, you can install the Google XML Sitemaps plugin.
Once you have activated the plugin, look under your Settings in the WordPress dashboard and click on XML-Sitemap.
The plugin should have already generated your sitemap, so there’s nothing else you have to do.
You’ll find your URL at the very top of the page:
Copy the link address and head back over to Google Search Console, then paste it under “Add a new site map” in GSC.
It may take a few days for Search Console to start pulling information about your website.
Be sure to wait a bit, then keep reading to find out what else you can learn from Google Search Console!
What Data Can You Pull From Google Search Console?
Once you’ve added and verified your website, you’ll be able to see tons of information about your site performance in GSC.
Remember, this is a powerful tool; these are only the highlights of new types of data and the important data you should remember to check on occasionally.
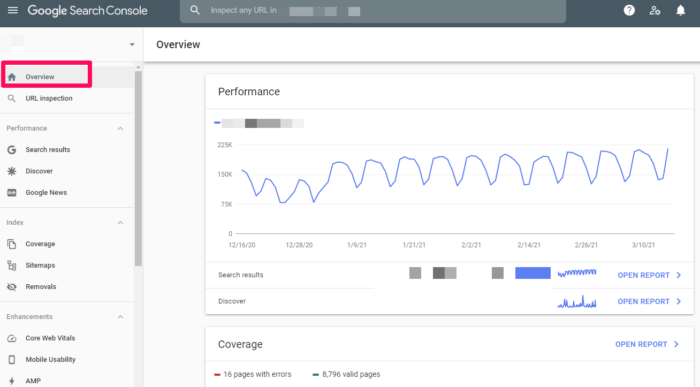
Google Search Console Overview
When you visit your website in GSC, you will first see your Overview.
This is an overview of the important data within Google Search Console. You can visit specific areas such as your Crawl Errors, Search Analytics, and Sitemaps from this screen by clicking on the applicable links.
You can also navigate to these areas using the menu in the left sidebar.
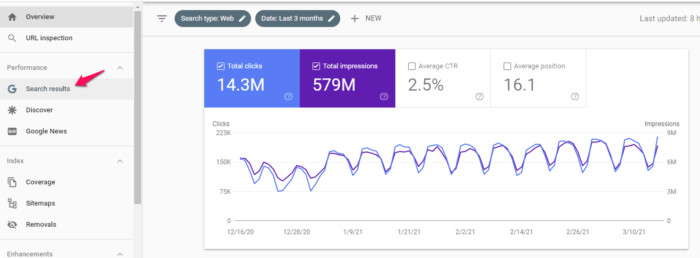
Search Results
In the left sidebar, you’ll see Search Results.
This section gives you an overview of how your site appears in the Search Engine Results Page, including total clicks, impressions, position, click-through rate, and what queries your site shows up for.
The filters at the top allow you to sort data based on location, date, type of search, and much more. This data is crucial to understanding the impact of your SEO efforts.
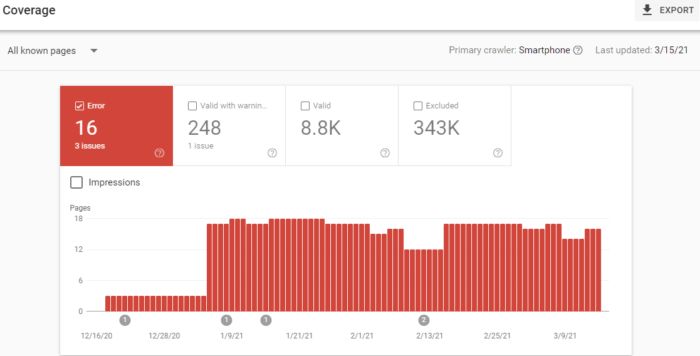
Index Coverage Report
This report gives you data about the URLs Google has tried to index on your selected property and any problems Google has had.
As Googlebot crawls the internet, it processes each page it comes across to compile an index of every word it sees on every page.
It also looks at content tags and attributes like your titles or alt texts.
This graph shows a breakdown of the URLs on your site that have been indexed by Google and can thus appear in search results.
As you add and remove pages, this graph will change with you.
Don’t worry too much if you have a smaller number of indexed pages than you think you should. Googlebot filters out the URLs it sees as a duplicate, non-canonical, or those with a no index meta tag.
You’ll also notice a number of URLs your robots.txt file has disallowed from crawling.
And you can also check how many URLs you’ve removed with the Removal Tool. This will most likely always be a low value.
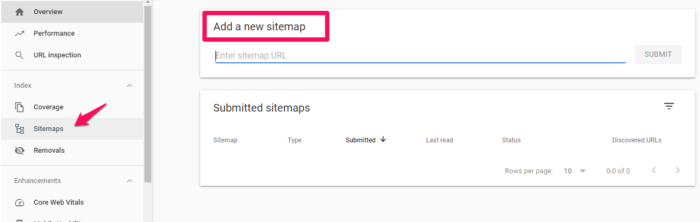
Sitemaps
I mentioned sitemaps earlier, so I’ll cover this again in brief.
In GSC under Sitemaps, you will see information about your sitemap, including whether you have one and when it was last updated.
If you notice the last date your sitemap was downloaded is not recent, you might want to submit your sitemap to refresh the number of URLs submitted.
Otherwise, this helps you keep track of how Google is reading your sitemap and whether all your pages are viewed as you want them to be.
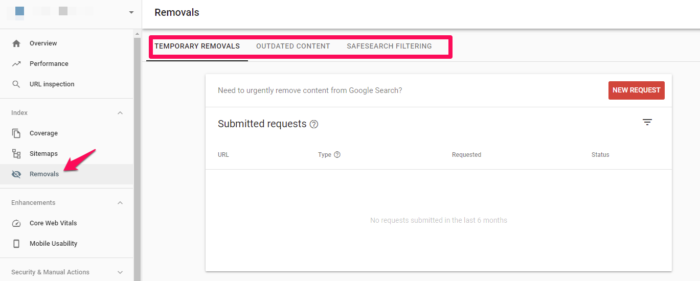
Removals
If for some reason you need to temporarily block a page from Google’s search results, head to Removals.
You can hide a page for approximately 90 days before this wears off.
If you want to permanently remove a page from Google’s crawling, you’ll have to do it on your actual website.
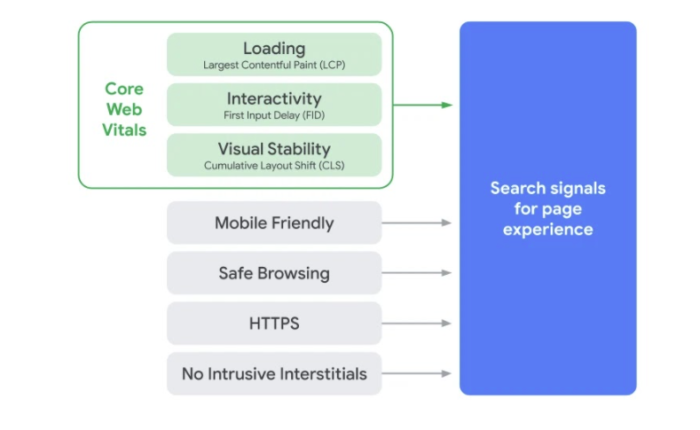
Core Web Vitals
Core Web Vitals are a set of metrics that impact your search ranking. They include speed, usability, and visual stability. These are now ranking signals, so you’ll want to pay attention to them.
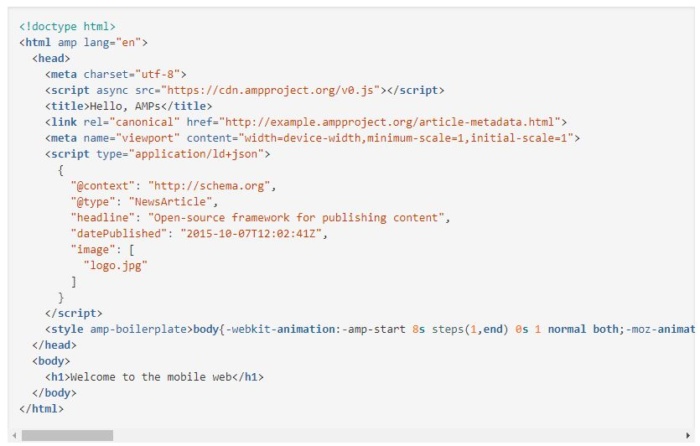
Accelerated Mobile Pages(AMP)
Accelerated Mobile Pages is an open-source initiative designed to provide fast-loading mobile websites that work with slow connection speeds.
You’ll get a boilerplate piece of code you can customize to your site.
To view pages in GSC, head to Enhancements > AMP.
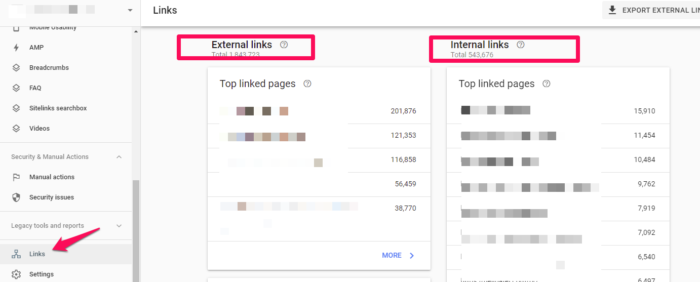
Links to Your Site
Curious about your backlinks?
GSC shows you the domains that link to you the most as well as the pages on your website with the most links. Scroll down in the left side bar until you see Links. Click and you’ll see a full report of links to your site:
This is probably the most comprehensive listing of your backlinks (and internal links!) you will find, for free at least.
It’s a powerful tool to know where your content is being leveraged around the web, and what performs best in Google’s eyes.
Manual Actions
The Manual Actions tab is where you can find out if any of your pages are not compliant with Google’s webmaster quality guidelines.
It’s one of the ways that Google has taken action against web spamming.
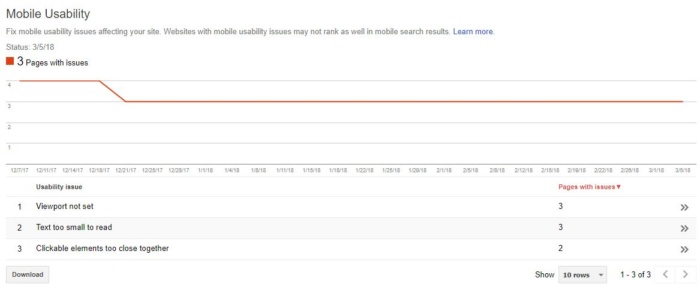
Mobile Usability
On the Mobile Usability tab, you can make sure all your website’s pages are aligned with what Google considers best practice.
As you can see, you can have issues with text size, viewport settings, or even the proximity of your clickable elements.
Any of these problems, as well as other errors, can negatively affect your mobile site’s rankings and push you lower on the results page. Finding and fixing these errors will help your user experience and results.
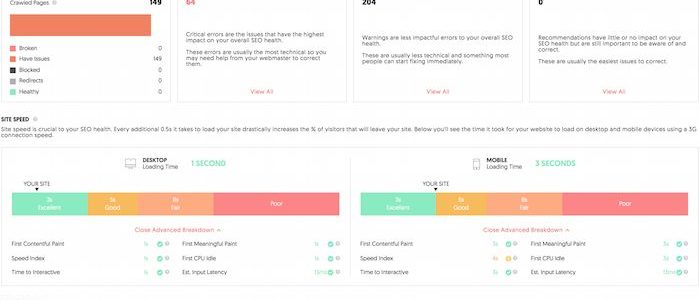
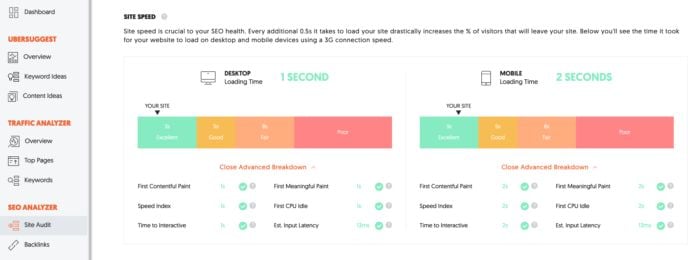
While reviewing this information, I suggest that you also check your site’s mobile speed. I use Ubersuggest to do so.
The first thing you want to do is type your URL into the search box and click Search.
After clicking the Search button, click Site Audit in the left sidebar and then scroll down the page until you seed Site Speed.
You’ll see the site speed for both desktop and mobile devices. For the sake of this exercise, we’re more interested in mobile loading time. My site loads on mobile devices in two seconds, which scores in the excellent range.
In addition to overall site speed, there’s also an advanced breakdown for:
If you see any issues here, fix them immediately, and then re-test your site. It may be enough to improve your loading time.
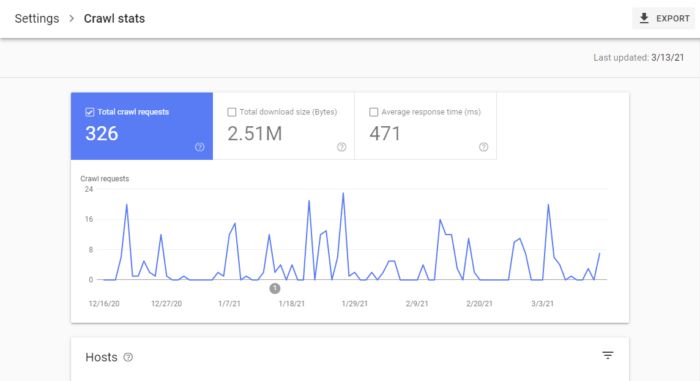
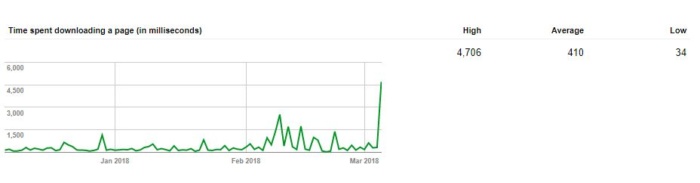
Crawl Stats
For a more in-depth analysis of how often Googlebot is looking at your site, you can use the Crawl Stats report under Settings > Crawl stats.
Here, you’ll see how often your site’s pages are crawled, how many kilobytes are downloaded per day, and your site’s download times.
According to Google, there is no “good” crawl number, but they do have advice for any sudden spikes or drops in your crawl rates.
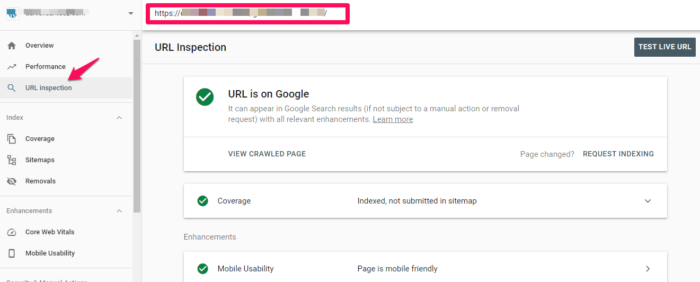
Fetch as Google (Now Called URL Inspection)
This tool is helpful as it lets you actually do a test run of how Google crawls and renders a specific URL on your site.
It’s a helpful way to make sure that Googlebot can access a page that might otherwise be left to guesswork.
If you’re successful, the page will render, and you’ll be able to see if any resources are blocked to Googlebot.
If you want access to the code of your site, click View Tested Page to see the HTML, a screenshot, and any crawl errors. (Note: Crawl errors used to be its own report; now it’s located in URL inspection under Coverage.)
When you get to the debugging point of web development, you can’t beat this free tool.
Robots.txt Tester
If you’re using a robots.txt file to block Google’s crawlers from a specific resource, this tool allows you to double-check that everything is working.
So if you have an image you don’t want to appear in a Google Image Search, you can test your robots.txt here to make sure that your image isn’t popping up where you don’t want it.
When you test, you’ll either receive an Accepted or Blocked message, and you can edit accordingly.
URL Parameters
Google themselves recommend using this tool sparingly, as an incorrect URL parameter can negatively impact how your site is crawled.
When you do use them, this tool will help you keep tabs on their performance and make sure they’re not pointing Googlebot in the wrong direction.
FAQs
What is Google Search Console?
What is Google Search Console? The Google Search Console is a collection of tools that enables you to monitor the operation of your website, identify problems, and improve its Google ranking. It’s a free online tool Google offers with details about your website and the users who visit it.
How to Use Google Search Console
When learning how to use Google Search Console, first add your website to Google Search Console. Then, set up operations you want to look to consistently optimize. Next, submit a sitemap, and finally, learn metrics for refining and reporting purposes after putting the Google Search Console to work.
How to Set Up Google Search Console
Start by signing into your Google Account, open Google Search Console, and add your site. Finally, add in your domain or URL prefix to verify your account and begin taking advantage of the features.
What is Google Search Console? The Google Search Console is a collection of tools that enables you to monitor the operation of your website, identify problems, and improve its Google ranking. It’s a free online tool Google offers with details about your website and the users who visit it.
”
}
}
, {
“@type”: “Question”,
“name”: “How to Use Google Search Console”,
“acceptedAnswer”: {
“@type”: “Answer”,
“text”: ”
When learning how to use Google Search Console, first add your website to Google Search Console. Then, set up operations you want to look to consistently optimize. Next, submit a sitemap, and finally, learn metrics for refining and reporting purposes after putting the Google Search Console to work.
”
}
}
, {
“@type”: “Question”,
“name”: “How to Set Up Google Search Console “,
“acceptedAnswer”: {
“@type”: “Answer”,
“text”: ”
Start by signing into your Google Account, open Google Search Console, and add your site. Finally, add in your domain or URL prefix to verify your account and begin taking advantage of the features.
“Saturday Night Live”‘s Weekend Update co-anchor Colin Jost this weekend joked that “we’re now at the point where at every press conference [President Biden is] asked, ‘Will there be a nuclear war?'”
Confused about Google’s core web vitals update? Not sure what it means for your SEO? Join my free live webinar on June 29th at 8 a.m. PST to learn more. I’ll cover what core web vitals are, why they matter, and what changes you need to make to your website.
There’s a good chance you’re already doing most of this. However, the core web vitals gets a bit more complicated than just improving page speed. It also looks at things like the largest contentful paint, the first input, and cumulative layout shift.
These sound complex, but they aren’t.
These features look at how long it takes for your page to start displaying the most important elements, how quickly your site responds to user interactions, and how often layout shifts impact the user experience.
Essentially, Google wants to reward sites that are easy for users to use — which is nothing new. How Google decides which sites are easier to use has changed slightly, which is why marketers are paying attention.
What You’ll Learn in the Google’s Core Web Vitals and Core Update Webinar on June 29th
In this webinar, I’ll cover what you need to know about Google’s core web vitals and the core update, including:
What core web vitals are and how to prepare your site for the upcoming changes.
Why most users leave your website in just seconds, and what to do about it.
Methods that SEO agencies will never tell you because they’d rather sell their own solutions.
Three simple tweaks you can make to your site that can boost your sales by 300 percent or more.
Sign Up Now: Core Web Vitals Live Webinar
I’m really excited to talk about this topic and what it means for the future of SEO. I hope you’ll join me at 8 a.m. PST. Remember, it’s free!
Update time: March 12 – 8am Eastern Time To all our community members: As many of you know, there was a major fire at the data center of our service provider. This resulted in a …
Update time: March 12 – 8am Eastern Time To all our community members: As many of you know, there was a major fire at the data center of our service provider. This resulted in a … The post Paper.li Service – Status Update appeared first on Paper.li blog. The post Paper.li Service – Status Update … Continue reading Paper.li Service – Status Update
Let’s say a lot of people from your area are checking out your business online, and in-store sales are through the roof thanks to your local search rankings.
Then comes a problem: You decide to move to a new location.
In addition to the logistical factors associated with moving your business, you also need to think about the successful local SEO strategy you worked so hard to build. Can you imagine all your efforts going down the drain and having to start a campaign from scratch?
This is where local SEO comes in. The goal of local SEO is to have businesses to rank for queries with a geographic component.
Let’s go through the steps you’ll want to follow to maintain local SEO gains after you relocate your business.
Why Is It Important to Update Your Local SEO For a New Location?
There’s no magic potion to help you transfer your local SEO gains when you move to a new location.
It may be easy to update the location on your Google My Business listing and assume it’ll automatically change the whole strategy.
Unfortunately, it doesn’t work that way.
Google pulls information from infinite sources across the internet. If you only update your business name, address, and phone number (NAP) in one place, you’ll create inconsistencies in your local SEO, as other sources will feed Google the wrong information.
All the local citations about a business need to be consistent across the internet, as two different NAPs will give Google the impression of two separate businesses.
As a result, your local SEO efforts will be disjointed, potentially lowering your local rankings.
In addition, customers looking for your business rely on NAP information. If it’s inconsistent, you may lose them as they won’t know exactly where to find you.
To avoid all these issues when you relocate, be proactive, and take control of all your local listings.
Take Precautionary Measures For a New Location
If your local SEO campaign is still new when you’re relocating, you likely won’t need to change your information in many places. Keep an inventory of every site where your business has a listing to make sure the information matches across the board.
What if the campaign has been in place for a few years?
Hopefully, you already have that inventory to refer to. If not, you’ll need to find all the sites where your business is listed and build that inventory as you go. Then you’ll know where to update your NAP and other information after the move, and prevent inconsistent listings.
The good news is, you don’t have to perform hundreds of search queries to find all your business listings. Tools like Moz’s Check Your Online Presence can do the heavy lifting for you.
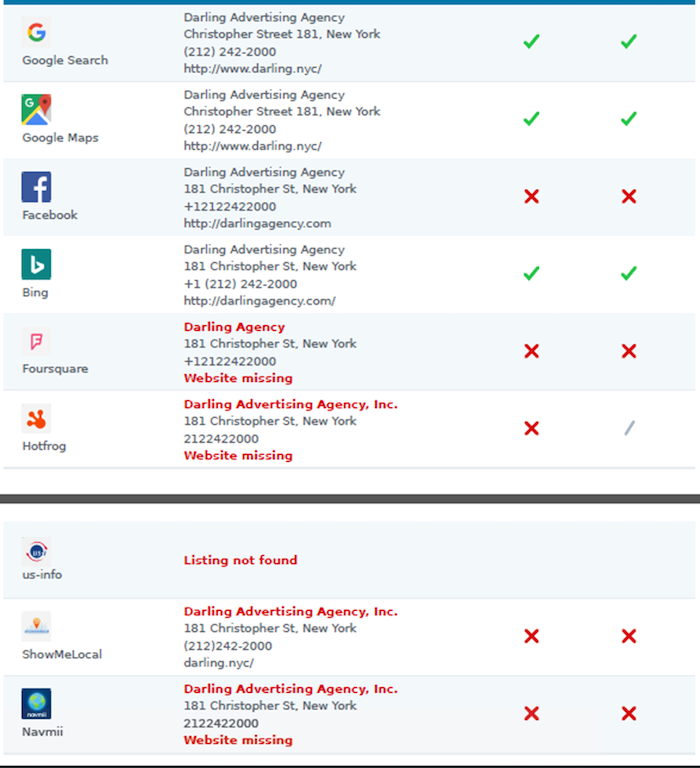
Check out these online presence results for the Darling Advertising Agency in New York:
Those stats break down as follows:
If your search returns a lot of those red X’s, you have some work to do.
How to Correct Your Local Business Listings
Moving your business can be hectic, but set aside some time to manage your Local SEO to preserve your rankings and help customers find you in your new location.
1. Update Your Website With New Location Information
Just as your new space will be your physical location, your website is your virtual real estate. Keeping it updated is crucial to maintaining your traffic, both online and in person.
You likely have your NAP listed on your contact page, but if it appears anywhere else on the site, make sure you update every instance. That information may also appear in your site’s footer. The good thing about that is, you can update it once, and it will be correct on every page of your site.
You can also add an image or two of the new location to your contact page to help your customers know what to look for on their first visit to the new spot.
Also, consider writing a brief blog post about the move. You can include more images here.
Don’t forget about the schema markup! Rather than sifting through your site’s code, you can check all your site’s structured data with Google’s Structured Data Testing Tool.
You may also want to include detailed directions to the new store. The best way to do this is to embed a map on your contact page. Roughly 86% of people look up business locations on Google Maps. Embedding it on your site will save your customers from having to look it up themselves. Plus, it can help make your contact page more attractive and useful, like Third Rail Coffee’s page:
The more information you can provide to your site visitors, and the easier you can make things for them, the more likely they’ll be to follow you to your new location.
2. Close the Previous Business Listing
Unless you’re moving to a brand-new location, there’s a chance another company previously occupied the spot.
Check for old listings. You may be surprised to find more than one listing already in existence. It’s pretty common since small businesses often move as they grow.
You’ll want to clear all these listings attached to your new location to prevent any confusion and to make sure your business is the only one showing up in searches attached to that location.
It’s especially important to clear out any old businesses because if you try to add a location already verified in Google My Business, it won’t appear because it will be flagged as a duplicate location in your account.
If this happens, you’ll see it listed as “Access needed,” which will tell you some other business verified this location previously.
Google has clear instructions on how to remedy the situation, but if all else fails, it might be easier to contact the other companies that occupied that location and ask them to remove their listing.
3. Change Your Google My Business Address to the New Location
Now that you’ve cleared any previous listings under your location, make sure your listing is updated.
Log into your Google My Business account, and check the pin marker to confirm it’s moved. In most cases, it’ll shift automatically. If it doesn’t, Google may send a postcard to verify the new location.
4. Update All Other Listings to the New Location
The older your business is, the more online listings it probably has, which means the more listings you need to update.
Some businesses have niche-specific directories such as Healthgrades for medical practitioners, HomeAdvisor for home improvement professionals, and Avvo for lawyers.
These listings carry a lot of weight so if they apply to your business, definitely make sure you keep them updated.
5. Review Your Listings For the New Location
Every few weeks, look for any duplicate listings that may have popped up. Mistakes happen all the time. Google may create a listing from old data so stay on top of things to keep such errors from affecting your rankings and confusing your customers.
What Next With Your Local SEO?
Once you’re settled in the new location, and your local listings are updated, you can start working on your local SEO again.
Solicit reviews from customers, keep your website updated, and use keywords consistent with the new place. This is critical if you’ve moved to a new town.
Connect with local people through your social media account to build rapport with your followers to help attract local customers. People want to visit businesses that are engaged with and care about their community.
Conclusion
Successful local SEO is all about attention to detail. Stay on top of your location information, wherever it appears online, and you’ll see less fluctuation in your rankings and foot traffic when your business moves.
You’ll also be better placed to compete with the businesses around you. More importantly, people will find your store, and you’ll hold onto those valuable customers.
Have you ever moved your business? Did it affect your local SEO?
This website uses cookies to improve your experience. We'll assume you're ok with this, but you can opt-out if you wish.AcceptRejectRead More
Privacy & Cookies Policy
Privacy Overview
This website uses cookies to improve your experience while you navigate through the website. Out of these, the cookies that are categorized as necessary are stored on your browser as they are essential for the working of basic functionalities of the website. We also use third-party cookies that help us analyze and understand how you use this website. These cookies will be stored in your browser only with your consent. You also have the option to opt-out of these cookies. But opting out of some of these cookies may affect your browsing experience.
Necessary cookies are absolutely essential for the website to function properly. This category only includes cookies that ensures basic functionalities and security features of the website. These cookies do not store any personal information.
Any cookies that may not be particularly necessary for the website to function and is used specifically to collect user personal data via analytics, ads, other embedded contents are termed as non-necessary cookies. It is mandatory to procure user consent prior to running these cookies on your website.